A video code is a piece of software that's used to both compress and decompress a digital video. Therefore, a codec can be used to convert an uncompressed video into a compressed one, or it can be used to convert a compressed video to an uncompressed one. The compressed video format usually follows a standard specification called video compression specification or video coding format. In this sense, OpenCV provides FOURCC, which is a 4-byte code that's used to specify the video codec. FOURCC stands for four character code. The list of all available codes can be seen at http://www.fourcc.org/codecs.php. It should be taken into account that the supported codecs are platform-dependent. This means that if you want to work with a specific codec, this codec should already be installed on your system. Typical codecs are DIVX, XVID, X264, and MJPG.
Additionally, a video file format is a type of file format that's used to store digital video data. Typical video file formats are AVI (*.avi), MP4 (*.mp4), QuickTime (*.mov), and Windows Media Video (*.wmv).
Finally, it should be taken into account that the right combination between video file formats (for example, *.avi) and FOURCC (for example, DIVX) is not straightforward. You will probably need to experiment and play with these values. Therefore, when creating a video file in OpenCV, you will have to take all of these factors into consideration.
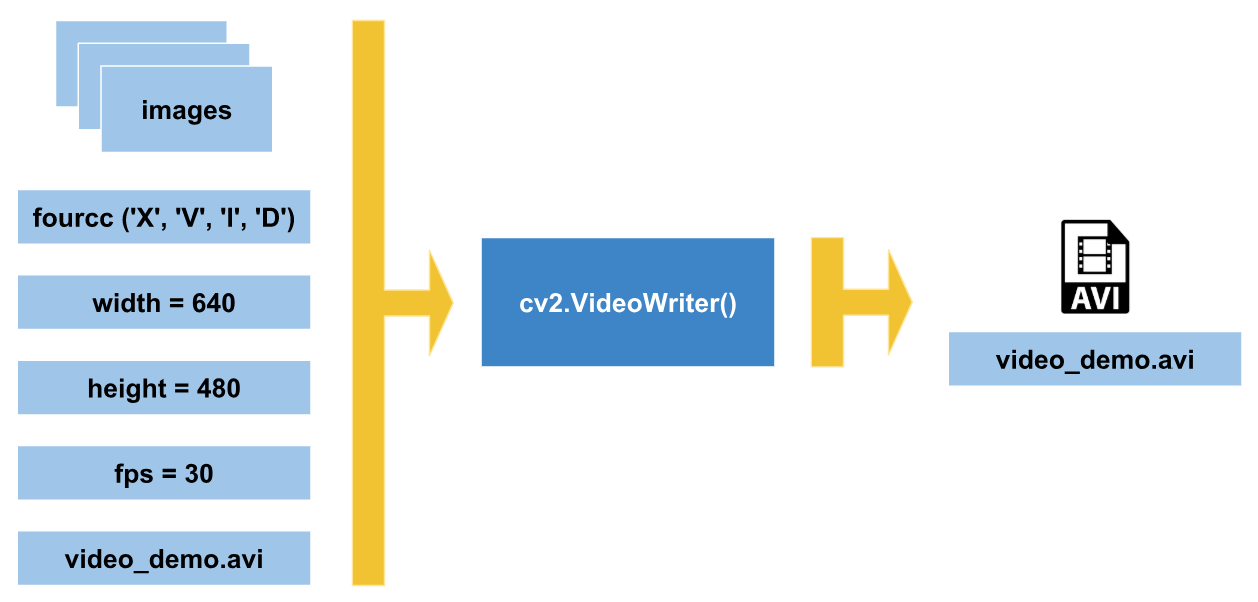
The following diagram tries to summarize them:

This diagram summarizes the main considerations you should take into account when creating a video file using cv2.VideoWriter() in OpenCV. In this diagram, the video_demo.avi video has been created. In this case, the FOURCC value is XVID and the video file format is AVI (*.avi). Finally, both the fps and the dimensions of every frame of the video should be established.
Additionally, the following example, write_video_file.py, writes a video file and it can also be helpful to play with these concepts. Some key points of this example are commented here. In this example, the required argument is the video file name (for example, video_demo.avi):
# We first create the ArgumentParser object
# The created object 'parser' will have the necessary information
# to parse the command-line arguments into data types.
parser = argparse.ArgumentParser()

# We add 'output_video_path' argument using add_argument() including a help.
parser.add_argument("output_video_path", help="path to the video file to write")
args = parser.parse_args()
We are going to take frames from the first camera that's connected to our computer. Therefore, we create the object accordingly:
# Create a VideoCapture object and pass 0 as argument to read from the camera
capture = cv2.VideoCapture(0)
Next, we will get some properties from the capture object (frame width, frame height, and fps). We are going to use them to create our video file:
# Get some properties of VideoCapture (frame width, frame height and frames per second (fps)):
frame_width = capture.get(cv2.CAP_PROP_FRAME_WIDTH)
frame_height = capture.get(cv2.CAP_PROP_FRAME_HEIGHT)
fps = capture.get(cv2.CAP_PROP_FPS)
Now, we specify the video codec using FOURCC, a four-byte code. Remember, it is platform-dependent. In this case, we define the codec as XVID:
# FourCC is a 4-byte code used to specify the video codec and it is platform dependent!
# In this case, define the codec XVID
fourcc = cv2.VideoWriter_fourcc('X', 'V', 'I', 'D')
The following line also works:
# FourCC is a 4-byte code used to specify the video codec and it is platform dependent!
# In this case, define the codec XVID
fourcc = cv2.VideoWriter_fourcc(*'XVID')
Then, we create the cv2.VideoWriter object, out_gray. We use the same properties as the input camera. The last argument is False so that we can write the video in grayscale. If we want to create the video in color, this last argument should be True:
# Create VideoWriter object. We use the same properties as the input camera.
# Last argument is False to write the video in grayscale. True otherwise (write the video in color)
out_gray = cv2.VideoWriter(args.output_video_path, fourcc, int(fps), (int(frame_width), int(frame_height)), False)
We get frame by frame output from the capture object by using capture.read(). Each frame is converted into grayscale and written to the video file. We can show the frame, but this is not necessary to write the video. If q is pressed, the program ends:
# Read until video is completed or 'q' is pressed
while capture.isOpened():
    # Read the frame from the camera
    ret, frame = capture.read()
    if ret is True:

        # Convert the frame to grayscale
        gray_frame = cv2.cvtColor(frame, cv2.COLOR_BGR2GRAY)

        # Write the grayscale frame to the video
        out_gray.write(gray_frame)

        # We show the frame (this is not necessary to write the video)
        # But we show it until 'q' is pressed
        cv2.imshow('gray', gray_frame)
        if cv2.waitKey(1) & 0xFF == ord('q'):
            break
    else:
        break
Finally, we release everything (the cv2.VideoCapture and cv2.VideWriter objects, and we destroy the created windows):
# Release everything:
capture.release()
out_gray.release()
cv2.destroyAllWindows()
The full code for this example can be seen in the write_video_file.py file.