In the snapchat_augmeted_reality_moustache.py script, we overlay a moustache on the detected face. Images are continuously captured from the webcam. We have also included the possibility to use a test image instead of the images captured from the webcam. This can be useful in order to debug the algorithm. Before explaining the key steps of this script, we are going to see the next screenshot, which is the output of the algorithm when the test image is used:

The first step is to detect all of the faces in the image. As you can see, the cyan rectangle indicates the position and size of the detected face in the image. The next step of the algorithm is to iterate over all detected faces in the image, searching for noses inside its region. The magenta rectangles indicate the detected noses in the image. Once we have detected the nose, the next step is to adjust the region where we want to overlay the moustache, which is calculated based on both the position and size of the nose previously calculated. In this case, the blue rectangle indicates the position where the moustache will be overlaid. You can also see there are two detected noses in the image, and there is only one moustache overlaid. This is because a basic check is performed in order to know whether the detected nose is valid. Once we have detected a valid nose, the moustache is overlaid, and we continue iterating over the detected faces if left, or another frame will be analyzed.
Therefore, in this script, both faces and noses are detected. To detect these objects, two classifiers are created, one for detecting faces, and the other one for detecting noses. To create these classifiers, the following code is necessary:
face_cascade = cv2.CascadeClassifier("haarcascade_frontalface_default.xml")
nose_cascade = cv2.CascadeClassifier("haarcascade_mcs_nose.xml")
Once the classifiers have been created, the next step is to detect these objects in the image. In this case, the cv2.detectMultiScale() function is used. This function detects objects of different sizes in the input grayscale image and returns the detected objects as a list of rectangles. For example, in order to detect faces, the following code can be used:
faces = face_cascade.detectMultiScale(gray, 1.3, 5)
At this point, we iterate over the detected faces, trying to detect noses:
# Iterate over each detected face:
for (x, y, w, h) in faces:
    # Draw a rectangle to see the detected face (debugging purposes):
    # cv2.rectangle(frame, (x, y), (x + w, y + h), (255, 255, 0), 2)

    # Create the ROIS based on the size of the detected face:
    roi_gray = gray[y:y + h, x:x + w]
    roi_color = frame[y:y + h, x:x + w]

    # Detects a nose inside the detected face:
    noses = nose_cascade.detectMultiScale(roi_gray)
Once the noses are detected, we iterate over all detected noses, and calculate the region where the moustache will be overlaid. A basic check is performed in order to filter out false nose positions. In case of success, the moustache will be overlaid over the image based on the previously calculated region:
for (nx, ny, nw, nh) in noses:
    # Draw a rectangle to see the detected nose (debugging purposes):
    # cv2.rectangle(roi_color, (nx, ny), (nx + nw, ny + nh), (255, 0, 255), 2)

    # Calculate the coordinates where the moustache will be placed:
    x1 = int(nx - nw / 2)
    x2 = int(nx + nw / 2 + nw)
    y1 = int(ny + nh / 2 + nh / 8)
    y2 = int(ny + nh + nh / 4 + nh / 6)

    if x1 < 0 or x2 < 0 or x2 > w or y2 > h:
        continue

    # Draw a rectangle to see where the moustache will be placed (debugging purposes):
    # cv2.rectangle(roi_color, (x1, y1), (x2, y2), (255, 0, 0), 2)

    # Calculate the width and height of the image with the moustache:
    img_moustache_res_width = int(x2 - x1)
    img_moustache_res_height = int(y2 - y1)

    # Resize the mask to be equal to the region were the glasses will be placed:
    mask = cv2.resize(img_moustache_mask, (img_moustache_res_width, img_moustache_res_height))
    mask_inv = cv2.bitwise_not(mask)
    img = cv2.resize(img_moustache, (img_moustache_res_width, img_moustache_res_height))

    # Take ROI from the BGR image:
    roi = roi_color[y1:y2, x1:x2]

    # Create ROI background and ROI foreground:
    roi_bakground = cv2.bitwise_and(roi, roi, mask=mask_inv)
    roi_foreground = cv2.bitwise_and(img, img, mask=mask)

    # Show both roi_bakground and roi_foreground (debugging purposes):
    # cv2.imshow('roi_bakground', roi_bakground)
    # cv2.imshow('roi_foreground', roi_foreground)

    # Add roi_bakground and roi_foreground to create the result:
    res = cv2.add(roi_bakground, roi_foreground)

    # Set res into the color ROI:
    roi_color[y1:y2, x1:x2] = res

    break
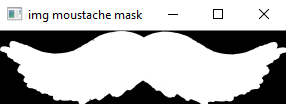
A key point is the img_moustache_mask image. This image is created using the alpha channel of the image to overlay.
This way, only the foreground of the overlaid image will be drawn in the image. In the following screenshot, you can see the created moustache mask based on the alpha channel of the overlay image:

To create this mask, we perform the following:
img_moustache = cv2.imread('moustache.png', -1)
img_moustache_mask = img_moustache[:, :, 3]
The output of the snapchat_augmeted_reality_moustache.py script can be seen in the next screenshot:

All the moustaches included in the following screenshot can be used in your augmented reality applications:

Indeed, we have also created the moustaches.svg file, where these six different moustaches have been included.