Chapter 16
Learning VBA for Data Analysis
Record a Macro
A macro is a sequence of instructions that perform one or more actions or return a result. You can save time and make the process of creating a macro easier by recording some or all of the actions you want your macro to perform. To build a macro that manipulates Excel in some way, you use the macro recorder. After you activate the recorder, you use Excel to perform the action or actions that you want in the macro, which Excel then translates into the equivalent VBA statements and stores as a macro for later use. You can store your recorded macros in any workbook, but Excel provides a special workbook for this purpose: the Personal Macro Workbook.
Record a Macro

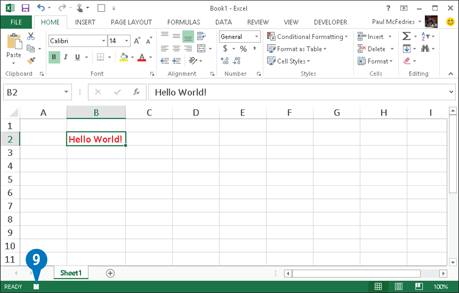
 Click the View tab.
 Click the Macros down arrow.
 Click Record Macro.
A You can also click the Macro Recording icon in the status bar.

The Record Macro dialog box appears.
 Type a name for the macro.
 Click the Store Macro In down arrow and then select the workbook you want to use to store the macro from the drop-down list.
Note: For most macros, it is best to store the code in the Personal Macro Workbook.
 (Optional) Type a description of the macro.
 Click OK.
Excel starts the macro recorder.

B The Recording icon appears in the status bar.
 Perform the Excel actions you want to record.
 Click the Recording icon.
Excel stops the macro recorder and saves the macro in the workbook that you selected in step 5.
EXTRA
When you specify the macro name in step 4, keep in mind that there are some restrictions you must observe: the name must not be longer than 255 characters; the name must begin with either a letter or an underscore (_); the name cannot contain a space or a period; and the name cannot be the same as an existing Excel function.
You can perform many macro-related actions faster and easier using the Developer tab. To display the Developer tab, right-click the Ribbon, click Customize the Ribbon, click the Developer check box ( changes to
  ), and then click OK. To start a macro recording, click the Developer tab and then click Record Macro.
Open the VBA Editor
If you want to add a macro to a workbook, or to create a macro from scratch, you can do this in the VBA Editor, a program that enables you to view, create, edit, and run VBA macros. After you finish recording your actions, Excel translates them into VBA statements and saves the macro in a module, a special window in which you can view, edit, and run macros; you access the module using the VBA Editor. If you make mistakes during the recording, or if you want to augment the recorded macro with other VBA statements, then you need to do this in the module. Similarly, you also require access to the module if you want to paste code from other sources or create new macros from scratch.
Open the VBA Editor
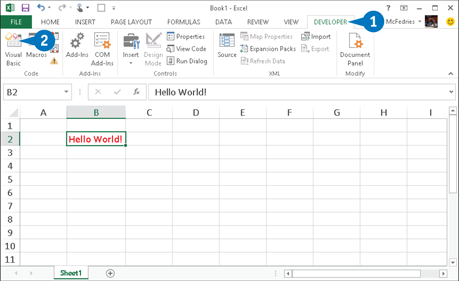
Click the Developer tab.
Note: See the section, Record a Macro, to learn how to display the Developer tab.
Click Visual Basic.
You can also press Alt+F11.
The Microsoft Visual Basic for Applications window appears.
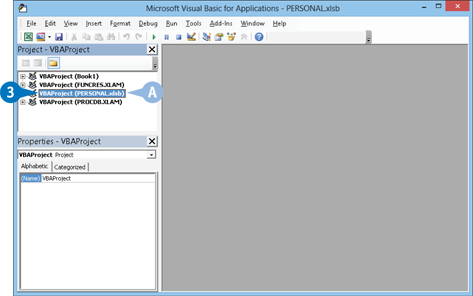
Double-click the workbook that contains the recorded macro.
A PERSONAL.xlsb is the Personal Macro Workbook.
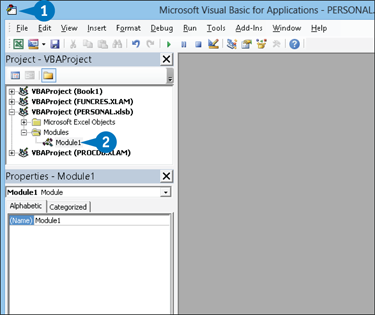
If you do not see the Project pane, you can click View and then click Project Explorer, or press Ctrl+R.

B Excel displays the workbook’s modules.
Double-click the module you want to open.

The module window opens.
C The VBA Editor opens the module in a new window.
D If you recorded a macro and are working with the workbook that you used to store that macro, the recorded code appears in the module window.
Explore the Excel Object Model
To program Excel with VBA, you need to understand the Excel object model. In the programming lexicon, an object model is a complete summary of the objects associated with a particular program or feature, the hierarchy used by those objects, and the properties and methods supported by each object. Here an object is a distinct, manipulable item such as a worksheet or range. A property is a programmable characteristic of an object, such as a worksheet’s name, or whether a range is formatted with bold text. A method is an action you can perform on an object, such as creating a new worksheet or clearing the formatting from a range. This section shows you a few properties and methods for the three main Excel objects: the workbook, worksheet, and range.
Workbook Object
You can use VBA to create new workbooks, open, save, and close workbooks, and more. You can reference a specific workbook either by using the ActiveWorkbook object, which represents the workbook that currently has the focus, or by using the Workbooks collection, which represents all the workbooks currently open in Excel. Here are some examples:
Workbooks(1)
Workbooks(“Budget.xlsx”)
Workbook Properties
|
Property |
Description |
|
Workbooks.Count |
Returns the number of open workbooks. |
|
Name |
Returns the filename of the workbook. |
|
Path |
Returns the location of the workbook. |
|
FileFormat |
Returns the Excel file format of the workbook. |
|
FullName |
Returns the location and filename of the workbook. |
|
PivotTables |
Returns the collection of PivotTables in the workbook. |
|
Saved |
Returns False if the workbook has unsaved changes. |
|
VBASigned |
Returns True if the workbook has been digitally signed. |
Workbook Methods
|
Method |
Description |
|
Activate |
Switches to a workbook. |
|
Workbooks.Add |
Creates a new workbook. |
|
Workbooks.Open |
Opens an existing workbook. |
|
Protect |
Protects a workbook. |
|
Save |
Saves a workbook. |
|
SaveAs |
Saves a workbook to a different file. |
|
PrintOut |
Prints a workbook. |
|
Close |
Closes a workbook. |
|
Unprotect |
Unprotects a workbook. |
Worksheet Object
You can use VBA to create new worksheets, copy, move, and delete worksheets, and more. You can reference a specific worksheet either by using the ActiveSheet object, which represents the worksheet that currently has the focus, or by using the Worksheets collection, which represents all the worksheets currently open in Excel. Here are some examples:
Worksheets(1)
Worksheets(“Sheet1”)
Worksheet Properties
|
Property |
Description |
|
Worksheets.Count |
Returns the number of worksheets in the workbook. |
|
Name |
Returns the name of the worksheet. |
|
StandardHeight |
Returns or sets the standard row height. |
|
StandardWidth |
Returns or sets the standard column width. |
|
Visible |
Hides or displays a worksheet. |
Worksheet Methods
|
Method |
Description |
|
Worksheets.Add |
Creates a new worksheet. |
|
Activate |
Switches to a worksheet. |
|
Calculate |
Calculates a workbook. |
|
Copy |
Copies a worksheet. |
|
Move |
Moves a worksheet. |
|
Delete |
Deletes a worksheet. |
Range Object
You can use VBA to select a range, add data to a range, format a range, and more. You can reference a specific cell by using the ActiveCell object, which represents the worksheet cell that currently has the focus. You can also use the WorkSheet object’s Range method to specify a range using a reference or a defined name. Here are some examples:
Worksheets(1).Range(“A1:B10”)
ActiveSheet.Range(“Expenses”)
Range Properties
|
Property |
Description |
|
Address |
Returns the address of the range. |
|
Count |
Returns the number of cells in the range. |
|
NumberFormat |
Returns the numeric format of the range. |
|
Value |
Returns or sets the data or formula for the range. |
Range Methods
|
Method |
Description |
|
Cut |
Cuts a range to the Clipboard. |
|
Copy |
Copies a range to the Clipboard. |
|
Clear |
Clears all data and formatting from a range. |
|
Select |
Select a range. |
Add a Macro to a Module
If you have a macro that you want to create or copy, you need to add the VBA code for the macro to a module in the VBA Editor. As you become familiar with manipulating Excel using VBA, you will likely come up with many ways to simplify complex tasks and automate routine and repetitive chores using macros. To implement these macros, you need to type your code into a module in the VBA Editor.
Similarly, you may run across a macro that you want to use for your own work, either as it is or by modifying the code to suit your needs. You can either transcribe this macro into a module on your system, or better yet, copy the macro and then paste it into a module.
Add a Macro to a Module
Start the VBA Editor.
Double-click the module into which you want to add the macro.
If you prefer to add your code to a new module, you can click Insert and then click Module, instead.

Excel opens the module window.
Position the cursor where you want to start the new macro.
Note: You must add the new macro either before or after an existing macro.

Type Sub, a space, the name of the new macro, and then press Enter.
Note: Make sure the name you use is not the same as any existing macro name in the module.
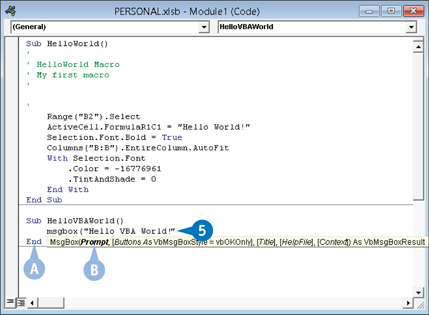
A The VBA Editor adds the line End Sub to denote the end of the macro.
If you copied the macro code from another source, click Edit and then click Paste, instead.
Type the macro statements between the Sub and End Sub lines.
B As you type a VBA function, object, property, or method, the VBA Editor displays the syntax in a pop-up box.
Run a Macro
You can run a macro from any open workbook. You have the option of running the macro from the VBA Editor or from Excel. Excel maintains a list of the macros that are stored in each open workbook. When you want to run a macro, you can either open the module that contains the macro or display the list of available Excel macros. Either way, to run a macro, you must first open the workbook in which the macro is stored.
It is best to use the VBA Editor if you are testing the macro, because although VBA switches to Excel to execute the code, it returns to the VBA Editor when it is done. Therefore, you can run the code, see whether it works properly, and then adjust the code as necessary.
Run a Macro
Run a Macro from the VBA Editor

Open the module that contains the macro.
Click any statement within the macro you want to run.
A The macro name appears in the list of macros.
Click Run.
Click Run Sub/UserForm.
You can also click the toolbar’s Run icon ( ) or press F5.
The VBA Editor runs the macro.
Run a Macro from Excel

Open the workbook that contains the macro.
You can skip step 1 if the macro is stored in the Personal Macro Workbook.
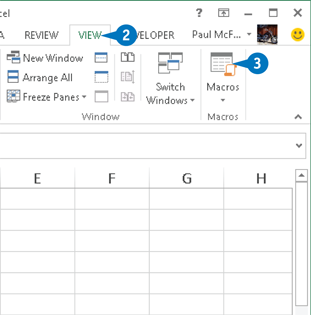
Click the View tab.
Click Macros.
If you have the Developer tab displayed, you can also click the Developer tab and then click Macros.
You can also press Alt+F8.

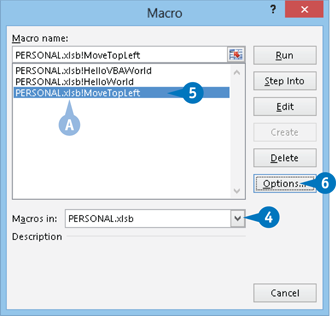
The Macro dialog box appears.
Click the Macros In down arrow and then select the workbook that contains the macro you want to run from the drop-down list.
If you are not sure which workbook contains the macro, select All Open Workbooks, instead.
B Excel displays a list of macros in the workbook.
Click the macro you want to run.
Click Run.
Excel runs the macro.
Include a Function Macro in a Formula

Type = and whatever formula operators and operands you need before the function.
Click Insert Function.
The Insert Function dialog box appears.
Select the User Defined category.
Click the function.
Click OK.
Specify the function’s argument, if any, and click OK (not shown).
Excel inserts the function macro into the formula.
Assign a Shortcut Key to a Macro
If you have a macro that you use often, you can quickly access the code by assigning a shortcut key to the macro. Macros are meant to be timesavers, so it is not unusual to have a macro that you run several times each day, or even several times in a row. In such situations, those mouse clicks can add up and you may wonder whether the macro is really saving you time. To work around this problem, you can assign a shortcut key to the macro. As long as the macro’s workbook is open, you can press the shortcut key within Excel to run the macro.
Assign a Shortcut Key to a Macro
Open the workbook that contains the macro.
You can skip step 1 if the macro is stored in the Personal Macro Workbook.
Click the View tab.
Click Macros.
If you have the Developer tab displayed, you can also click the Developer tab and then click Macros.
You can also press Alt+F8.
The Macro dialog box appears.
Click the Macros In down arrow and then select the workbook that contains the macro you want to work with from the drop-down list.
If you are not sure which workbook contains the macro, select All Open Workbooks, instead.
A Excel displays a list of macros in the workbook.
Click the macro.
Click Options.
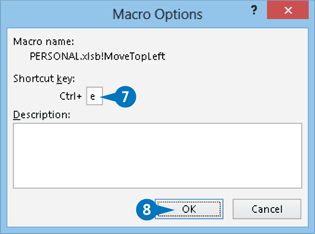
The Macro Options dialog box appears.
Type the character you want to use as part of the shortcut key.
Click OK.
Excel assigns the shortcut key to the macro.
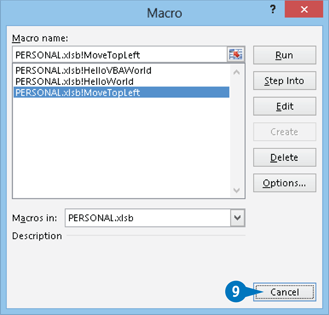
Click Cancel.
You can now run the macro by pressing the shortcut key.
Assign a Macro to the Quick Access Toolbar
If you have a VBA macro that you use frequently, you can create one-click access to the code by assigning that macro to a button on the Excel Quick Access Toolbar. The Quick Access Toolbar is the row of buttons that appears, by default, on the left side of the title bar.
As long as you leave open the workbook in which the macro is stored, you have one-click access to the macro. Because you must have the macro’s workbook open, it is a good idea to only create toolbar buttons for macros in your Personal Macro Workbook, which is always open.
Assign a Macro to the Quick Access Toolbar

Click the Customize Quick Access Toolbar button.
Click More Commands.
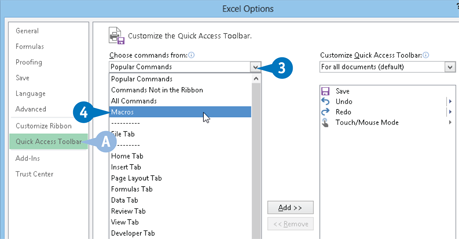
The Excel Options dialog box appears.
A Excel automatically displays the Quick Access Toolbar tab.
Click the Choose Commands From down arrow.
Click Macros.

Click the macro you want to add.
Click Add.
B Excel adds the command.
Click OK.
C Excel adds a button for the macro to the Quick Access Toolbar.
Assign a Macro to the Ribbon
You can improve your Excel productivity by customizing the Ribbon with buttons that run the macros you use frequently. It is often useful to organize your macros in some way. For example, you might have a set of macros related to formatting, another set related to file management, and so on. To organize these and other related macros, you can add them to the Excel Ribbon. To add a new command to the Ribbon, you must first create a new tab or a new group within an existing tab, and then add the command to the new tab or group.
Assign a Macro to the Ribbon
Display the Customize Ribbon Tab
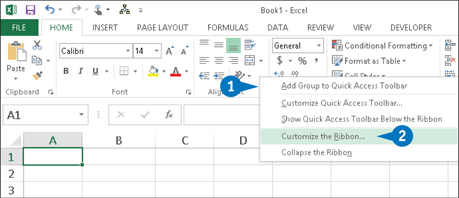
Right-click any part of the Ribbon.
Click Customize the Ribbon.
Add a New Tab or Group
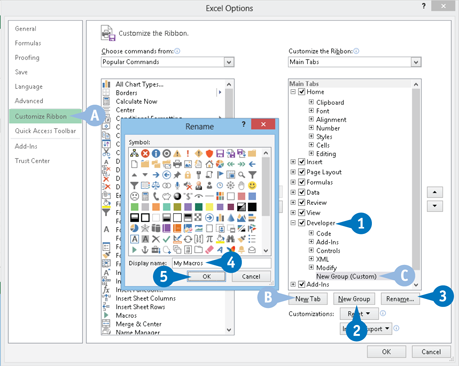
The Excel Options dialog box appears.
A Excel automatically displays the Customize Ribbon tab.
Click the tab you want to customize.
B You can also click New Tab to create a custom tab.
Click New Group.
C Excel adds the group.
Click Rename.
In the Rename dialog box, type a name for the group.
Click OK.
Assign a Macro
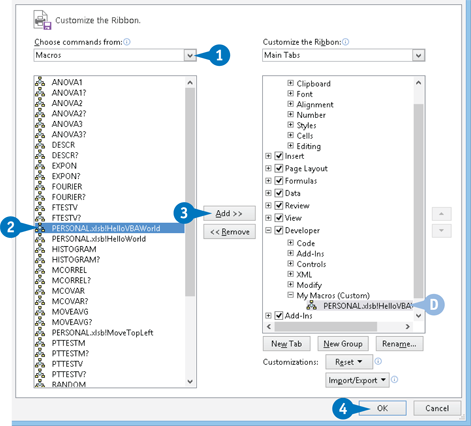
Click the Choose Commands From down arrow and then click Macros.
Click the macro you want to add to the Ribbon.
Click Add.
D Excel adds the macro to the tab.
Click OK.

E Excel adds the new group and command to the Ribbon.
Set the Macro Security Level
VBA is a powerful language that is all too often used for nefarious ends. Fortunately, you can adjust the macro security setting to one of four options to protect your system. The Disable All Macros without Notification option enables you to disable all macros, without a way to enable them. The Disable All Macros with Notification option notifies you that a document contains macros and disables the macros, but gives you the option of enabling them. The Disable All Macros Except Digitally Signed Macros option enables macros only if they come from a source that has digitally signed the VBA project. The Enable All Macros option runs all macros without prompting.
Set the Macro Security Level

Click File.

Click Options.

The Excel Options dialog box appears.
Click Trust Center.
Click Trust Center Settings.
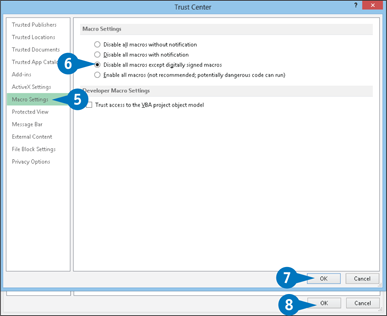
The Trust Center dialog box appears.
Click Macro Settings.
Click to select the security level you want to use ( changes to
  ).
).
Click OK.
Click OK.
Excel puts the new macro security level into effect.
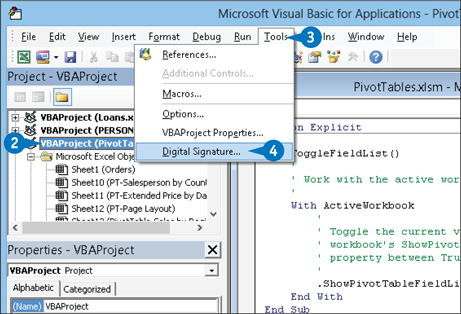
Digitally Sign Your Excel Macros
If you set macro security to Disable All Macros Without Notification, Excel does not allow you to run your own macros that reside outside the Personal Macro Workbook. Does this mean you must store all your macros in the Personal Macro Workbook? That would make it difficult to distribute your macros to other people. Fortunately, it is possible to “prove” that you are the author of your own macros. You can do that by self-certifying, which creates a trust certificate that applies only to your own work and to using that work on your own computer.
Digitally Sign Your Excel Macros
Note: Before proceeding, create your personal digital certificate by running the SelfCert.exe program, as described in the Apply It section.
Press Alt+F11.
Excel opens the Visual Basic for Applications Editor.
Click the project to which you want to assign the certificate.
Click Tools.
Click Digital Signature.

The Digital Signature dialog box appears.
Click Choose.
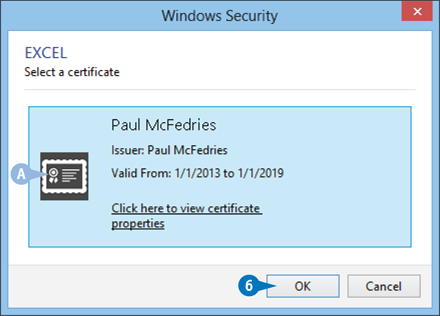
The Windows Security dialog box appears.
A Windows displays your digital certificate.
Note: Remember that you only see this digital certificate after you have run the SelfCert.exe program, as described in the Apply It section of this task.
Click OK.

B The certificate appears in the Digital Signature dialog box.
Click OK.
Excel applies the digital certificate to the project.