
LESSON 7: Modes and Other Diatonic Chords
This first topic may seem like we are taking a break from chords, but it will tie back into them shortly. First, let’s define what a mode of a scale is.
Specifically, we are going to look at the modes of the major scale. Because there are seven notes in the major scale, we will end up with seven different modes. Each mode is the result of treating each of the seven notes as the root note.
For example, treating the first note of the major scale as the root note is the same thing we’ve been doing. But, treating the second note as the root note reveals what seems like a different scale entirely.
The main thing to remember about modes is that the seven original notes never change. In any of the seven modes, you are always playing the exact same seven notes. The difference between them all is simply which note you are treating as the root note. Basically, the root note is always the starting point, or reference note, for the other six.
Take a look at figure 7.1 on the next page, which illustrates all seven modes using different colors.

Notice that the first mode, shown in green, is simply the major scale itself. This is because when we talk about the first mode, we mean that we are treating the first note of the scale as the root note, which is always true.
If we move on to the second mode, we see how things change. Now we treat the second note, D in this case, as the "root note." D is not the true root note of the C major scale of course, but in the second mode it acts as the root note.
Notice that the numbering system for the second mode is now based on this temporary root note replacement. You compare the new intervals (whole steps and half steps) back to what they normally would be in the first mode. Remember that the first mode is simply the same major scale formula we’ve already learned.
Again, keep in mind that the notes of the scale never change; we are still using the C major scale, but we simply begin and end from D instead of C.

While you can refer to each mode as 1st, 2nd, 3rd, and so on, they also have an “official musical name” as shown in figure 7.2. The first mode is called Ionian, the second is called Dorian, and so on.
The quality of each mode refers to the same quality that we think of when dealing with chord types. Some chord types are major, minor, etc. The qualities exhibited by the modes of the major scale match those exhibited by their corresponding chords. For example, recall that the 4th chord in any major key is a major chord type. Thus, the 4th mode of any major scale will exhibit that same major quality.
The formulas shown are the same as in figure 7.1. Before, we said that these formulas come from comparing the new intervals to what they normally would be in the first mode, or the Ionian mode. Let’s show exactly how that happens by walking through the Ionian and Dorian modes more closely using figure 7.3:

In Dorian mode, we begin by marking D with a 1. Then, we step through the scale formula one note at a time, just like we practiced back in lesson two. But, make sure you notice that because we are starting from the second note in the scale, we have start from the second note within the major scale formula too. The orange arrow helps show this.
The interval from first note of the mode, D, to the second note of the mode is a whole step (2 frets). This means the second note of the mode is E.
The interval from the second note, E, to the third note of the mode is a half step. We know that there is only a half step between E and F, so F must be the third note of the mode.
But, why did the 3 become a b3? In the first mode, the 3 is natural, but in the second mode, we ended up with a b3. This is because in the first mode, the interval is a whole step between notes 2 and 3, but in the second mode, that interval is now a half step. Thus, compared to the first mode, the second mode technically has a flat 3 and not a natural 3. Again, the actual note, F in this case, is the same no matter what mode you are in.
If this seems confusing at first, don’t worry at all. There’s really nothing special or tricky going on here. Modes are really just a different way of looking at the major scale; they are not entirely new scales on their own. Well, then why do we care about modes? We need them to help us with the main point of this lesson, which is how to tell whether or not any given chord is within a key, or outside of a key.
First though, let’s take a look at the sixth mode in particular, because it turns out that the sixth mode is the relative natural minor scale of the major scale!
***The Sixth Mode is the Relative Minor Scale***
This is going back a ways, but recall from lesson one that two keys are relative when they share the same notes but have different starting points, or root notes. Looking at figure 7.1, we see that the sixth mode is actually the exact same as the A natural minor scale. The intervals (whole steps and half steps) are aligned in such a way that they match the natural minor scale formula, and since the sixth note of the C major scale is A, the result is the A natural minor scale.
Therefore, the sixth mode is always a good one to remember. Also remember that this relationship is true for all keys. That is, the sixth mode of any major scale (meaning the major scale in any key) will always be the same as its relative natural minor scale. Of course, this also helps you remember the relative major/minor key relationships that were shown back in figure 1.11.
***Other Diatonic Chord Types***
Now, we will get into why learning those modes were helpful. The main point we want to learn is that there are many chord types available for use within any particular key other than just major and minor (recall that when we harmonized the major and natural minor scales, we ended up with 3 major chords, 3 minor chords, and 1 diminished chord per key). If there were actually only seven usable chords within any given key, we wouldn’t have nearly as many options when writing and playing music. Luckily, the modes allow us to see that there are several additional types of chords that can be used within any given key.
We defined the term diatonic back in lesson 5, but let’s reiterate it here since it is relevant:

It will be helpful to keep in mind that the mode number, the position of the corresponding note in the scale, and the position of the corresponding chord in the key are all the same. For example, the first mode of the C major scale corresponds to the first note of the scale, C, as well as the first chord in the key, C major. Likewise, the second mode corresponds to the second note of the scale, D, as well as the second chord in the key, D minor, etc.
Now let’s look at how we use the modes to identify what other types of chords we can use in a key. To do this, we go down the list of chord types and match their formulas to the numbering system of each mode.
First, let’s focus on only the first mode. Since the first mode is just the major scale itself, the numbering system is still 1 2 3 4 5 6 7. Take a look figure 7.4 below, which is the chart that shows us many common types of chords and their formulas. Starting with the first chord type (major), the formula is 1 3 5. Since 1 3 5 exists in the numbering system for the first mode, this tells us that if we build a major chord starting from the first note of the major scale, it will be diatonic, meaning within the key.
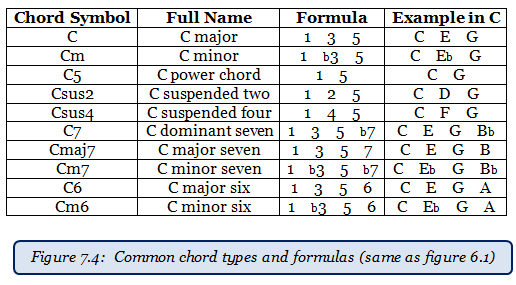
Looking at the next chord type in the list (minor), the formula is 1 b3 5. The 1 is a match, the 5 is a match, but the b3 is not. Since one of the required notes for a minor chord type does not match the first mode, building a minor chord starting from the first note in the major scale would not be diatonic (it would be an altered chord). This should make sense because basically we’re saying the first chord in a major key can’t be a minor chord.
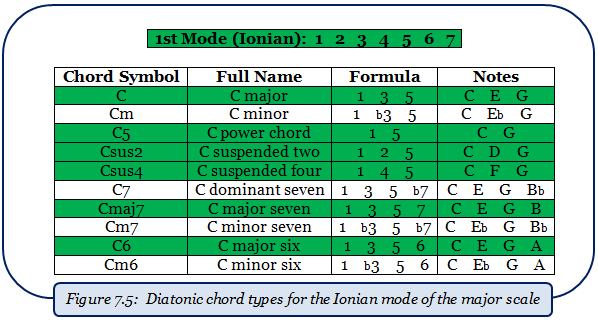
Now that we have the basic process down, let’s summarize the result of going through this process for each chord type and each mode in figure 7.5 below. The first mode is really the easiest to check, since any chord formula with even a single accidental will not be diatonic. The diatonic chord types are highlighted in green (to be consistent with the colors used in figure 7.1).
To explain what we can actually do with this information, consider this: In the key of C, the first chord that we typically use is C major. Think of this as the "default" first chord in the key of C major. There's nothing wrong with it of course, but now we know that we can replace it with C5, Csus2, Csus4, Cmaj7, or C6, and still be within the key of C major.
Why is it so important to stay within the key? Well, remember from lesson one when we said that all the notes/chords in a key are basically guaranteed to work well together. This is because they all come from simply different combinations of the same seven notes. Staying within a key is important because it is difficult to make something sound “bad” by doing so. The chords/notes/scales will all blend together quite well. Going outside of a key is not a bad thing at all, but one step at a time!
Essentially, this process boils down to a number-matching game. Again, the idea is that if we go down the list of chord types in figure 7.4 and compare each one to the numbering system of each of the seven modes, we will have a list of all the possible types of chords that we can use for each chord in the key.
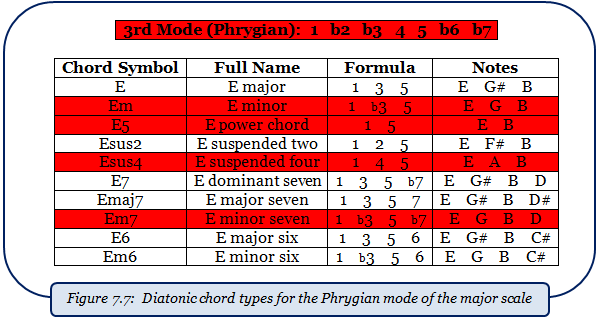
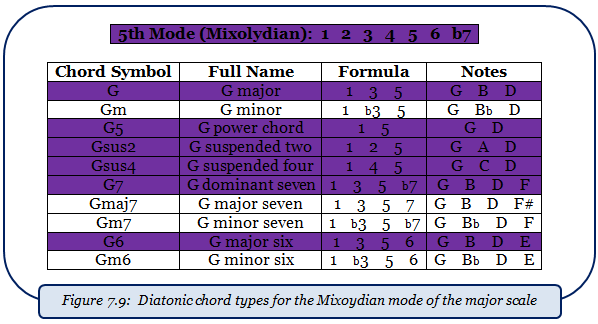
Figures 7.6 through 7.11 each show the results of the process for the remaining modes, similar to how figure 7.5 did for the Ionian mode. Each diatonic chord type in each mode is highlighted.


*Fmaj7 is sometimes called the “face” chord. Can you see why? ;)
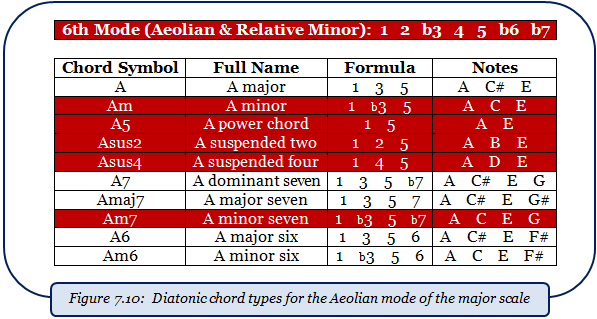
*The 6th mode of the major scale is the relative natural minor scale! For example, recall that A minor is the relative minor to C major. Look at the 6th mode’s formula – it is identical to the natural minor scale we learned back in Lesson 2 (check figure 2.8).

*Note that the diminished chord type was absent from all the other figures, since it is only diatonic when used by the 7th chord/mode due to the b5 note.
Review each of the above figures and you will see exactly which chord types you can use for each chord position in a major key. Figure 7.12 below summarizes everything into a single chart. Note that a much larger list of chord types was used when figure 7.12 was created, so there are some chord types that you won’t recognize from this lesson, but all chord types we did see in this lesson are included.

Note that although this figure uses the key of C major, you can carry over all the chord types to any other key and they are still valid. In other words, in the key of A major, you can still substitute the I chord with any of the chord types shown in that row above. You can substitute the ii chord, iii chord, IV, chord, etc. with any of the chord types in those rows above, regardless of the major key.
For example, in the key of C major, instead of using F major as the IV chord, we could substitute any of the other chord types from that list. This means we could use F5, Fsus2, Fmaj7, Fmaj6, etc. Again, the important fact is that all of those different F chords are within the key of C major.
To close the loop, once we’ve selected any of these other diatonic chord types that we want to use, we can go through the Chord Construction steps that we talked about last lesson and build the chord ourselves. Of course, there is no harm in simply looking up how to play any given chord on the internet (there are even dedicated handheld devices that are basically electronic chord dictionaries). That being said, I want to emphasize that building chords yourself will dramatically help you understand and familiarize yourself with the notes and chords on the guitar. If you do look up a chord, I suggest you at least study it so that you see how that chord was built.
The potential of what we have learned so far is that you now know all the diatonic chord types you can use, and you have a way to build those chords from scratch. In reality, once you practice these ideas enough, you will never have to look a chord up again! Of course, there are more complicated chord types out there that you may come across, in which case you can look them up when needed. Again, you can still analyze that chord and see how the chord was built in the first place.