Congratulations on making it to the final chapter! In this chapter, we will look at one more useful pattern when creating iPhone apps-making lists using the UITableViewController type. Lists are very popular in apps since they are an intuitive way of illustrating a list of items. These items can then be added, deleted, or perhaps you can select them to reveal more information about a specific item.
After looking at how you can create a list for your app, we will use that knowledge to build one last app-the Movie Night application. This application will use some of the knowledge we have gained throughout the book, while taking advantage of the pattern of creating lists. Toward the end of the chapter, we will quickly look at how we can install our application on our iPhone so that we are able to carry the application with us, making it easier to show it to our friends and family.
To sum up, this chapter will cover the following topics:
- An introduction to how one can create lists in iPhone applications using the
UITableViewControllertype - Guiding the reader on how to create the Movie Night application to handle one's favorite movies
- How to install the application on an iPhone device
Creating lists is very common in the real world, as well as in software applications. A list in a software application can be used for a variety of things, such as creating a to-do list, showing a list of the most recent news, or showing the items on the menu of your local pizza joint:

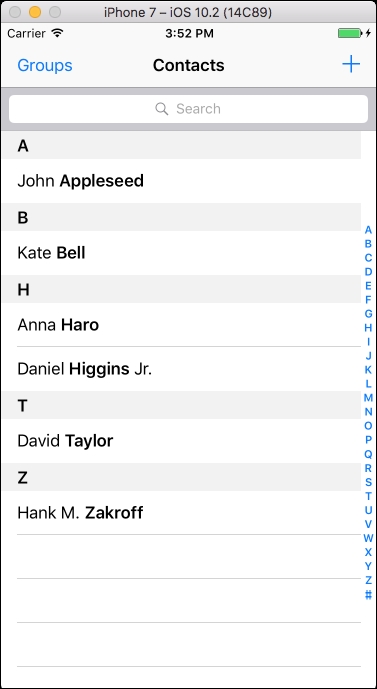
A list in an iOS application is most commonly implemented, and referred to, as a table view. A table view refers to the UITableView UI element, which is the view that gives us a list of horizontal items. Each item in the list is referred to as a cell due to its type being UITableViewCell. A cell comes with a set of predefined formats, but custom cells can also be created to fit the developer's needs. Further, a list can be divided into sections, for example, by the first letter of a contact's last name, as in the preinstalled Contacts app that ships with iOS:
Besides setting up the interface to include the UITableView, a set of methods needs to be implemented in the corresponding UIViewController. These methods will ensure that data is able to be displayed and will tell the application how it should handle user interaction with the table view. In fact, there are two protocols that are very relevant to conform to in order to set up a list. A protocol defines a set of variables and/or a set of functions a conforming object needs to implement in order to satisfy the protocol. In relation to setting up a list, conforming to two protocols is necessary to make it work correctly. These two protocols are named UITableViewDataSource and UITableViewDelegate.
The data source, or the UITableViewDataSource protocol to be more precise, has some required methods that you need to implement in order to conform to the protocol. The protocol also defines a set of optional methods that one can implement for more control of the table view. Let's go through some of the most popular methods.
The first method has the following signature:
func numberOfSections(in tableView: UITableView) -> Int
This method should return a value of the Int type, which should indicate how many sections there are in the table view. If we take a look at the screenshot from Apple’s Contacts app, we can see that this table view has five sections. This method will return 1 by default if you do not implement it.
The next method says something about how many rows exist in each section. The signature looks as follows:
func tableView(_ tableView: UITableView, numberOfRowsInSection section: Int) -> Int
As the method name indicates, this method will state how many rows should go into each section in the
UITableView
. For example, in the preceding screenshot from the Contacts app, there should be one row for the first section. The first section is A and the single row is John Appleseed.
Another central method from the UITableViewDataSource protocol has the following signature:
func tableView(_ tableView: UITableView, cellForRowAt indexPath: IndexPath) -> UITableViewCell
This method looks a little different than the others because it does not say anything about the number of sections, rows, or similar that is needed in order to set up the table. Instead, it prepares the actual view for the cell that has the UITableViewCell type, as explained earlier. This means that the view this method returns will be the actual cell for that specific row. Looking at the screenshot of the Contacts app, we can see that each cell is fairly simple and only contains one label that shows the name of the contact.
While the UITableViewDataSource protocol tries to encapsulate the required data in order to display the table view, the UITableViewDelegate protocol tries to encapsulate what should happen when a user interacts with the table view. The UITableViewDelegate protocol does not have any required methods, but a long list of optional methods. Let's take a look at one of the most used methods. It has the following signature:
func tableView(_ tableView: UITableView, didSelectRowAt indexPath: IndexPath)
As the name of the method indicates, this method will be called when a user taps on a row in the list. The developer will then be able to react based on that; for example, by displaying more information about the specific item.
Up until now, we have looked at how we can make our UIViewController show a list using the UITableView by conforming to the two protocols: UITableViewDataSource and UITableViewDelegate. However, there's a slightly different approach one can take to make a list, that is, to make a UITableViewController instead of a UIViewController. The difference is that the UITableViewController inherits from UIViewController, which means that it acts like a view controller, but it also gives you some list-related functionality out-of-the-box.
First of all, it comes with the UITableView already placed in the interface. It also implements all the required related methods with some default behavior. This means that all we need to do in order for it to work as we want, is to implement the relevant methods. Let's take a look at how to do this by developing one last application: Movie Night.