Now that you have a little background with jQuery and understand how to get it up and running in an HTML document, let's take a look at WordPress. Again, most of you are already WordPress users and developers. At the very least, you've probably worked with it in some way. You might even have a WordPress site that you own or maintain.
For those of you with minimal experience with WordPress, we'll quickly go over some background and essentials to getting started with it. Even you more experienced users may want to read on, as I'll cover setting up a "sandbox" or development installation of WordPress. This way, you can experiment, learn, and play with WordPress and jQuery without having to have any of it appear on your actual site until you're ready to deploy it.
WordPress, developed as a fork off the original b2/cafelog software, was co-developed by Matt Mullenweg and Mike Little. It first appeared in 2003. Originally a blog platform, it has grown over the years into a robust publishing platform that millions of people and organizations use in a myriad of ways for maintaining their site's content.
Like jQuery, WordPress is flexible and extensible. Matt and his fellow WordPress developers at Automattic have taken care to make sure WordPress conforms to current W3C web standards. A WordPress site's design and additional, custom functionality can be easily controlled and updated using the platform's APIs, which streamline theme and plugin development.
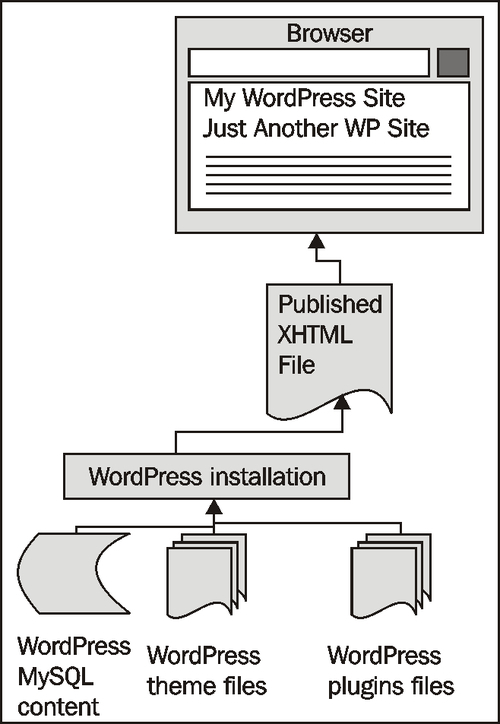
You should keep in mind, as someone who is looking to enhance your site with jQuery, just how dynamic a WordPress site is. WordPress uses a MySQL database and set of theme template pages as well as plugin pages, not-to-mention hundreds of core functionality pages to generate your site. This means a final displayed XHTML page's markup comes from many places; from the theme's template files, from post and page content stored in the MySQL database, and some of it may be defined in the code of a plugin or widget that the installation is using.
The more you know and understand about your WordPress installation and how its files come together, the more easily you'll be able to enhance the site with jQuery.
The next diagram illustrates how WordPress serves up a complete HTML page to the browser:
Tip
Completely new to WordPress?
Again, I highly recommend the book WordPress 2.7 Complete by April Hodge Silver and Hasin Hayder. This book is an excellent resource. It covers everything you need to know about WordPress and will also get you started on working with WordPress themes and plugins.
Interested in going deeper with WordPress?
If you're comfortable with using WordPress but would like to understand more about theme and plugin development, then you should definitely check out WordPress Plugin Development by Vladimir Prelovac, and, if you'll excuse the shameless plug for my own book, WordPress 2.8 Theme Design.
If you have a version of WordPress running that you can play with, great. If you don't, I highly recommend having a locally running installation. Installing and running a small web server on your local machine or laptop has become very easy with the release of WAMP (Windows, Apache, MySQL, and PHP) and MAMP (Mac, Apache, MySQL, and PHP). A local server offers you several conveniences compared to working with WordPress installed on a hosting provider.
I often find that when I travel, despite more and more Internet WiFi bubbles popping up, I am often somewhere that doesn't have one, or I'm in a Starbucks and I don't feel like shelling out cash to T-Mobile for the "privilege" of being connected. With a local installation of WordPress, I have no worries. I can develop and tinker to my heart's content regardless of Internet connectivity and most importantly, without worry that I'll break something on the live site that I'm developing or designing for.
If you're interested in a local sandbox installation of WordPress, I recommend you download WAMP for Windows or MAMP for Mac.
WAMP stands for Windows, Apache, MySQL, and PHP and it makes it very easy to have a local web server running on your computer in just a few clicks. If you're using a Windows operating system such as XP, Vista, or Windows 7, you can head over to http://www.wampserver.com and download WAMP 2.
Be sure to follow the directions in WAMP's installation wizard! If you already have a web server running as localhost and/or a previous version of WAMP installed, carefully read the wizard instructions for disabling or uninstalling that server, backing up your data, and installing the latest version of WAMP.
You can also agree to let WAMP install a start page for you. From this start page as well as from the WAMP icon in the taskbar, you'll be able to easily launch phpMyAdmin. phpMyAdmin will allow you to easily create a database and the database user account required for installing WordPress.
Similar to WAMP, MAMP stands for (you guessed it!) Mac, Apache, MySQL, and PHP. Mac users will head on over to http://mamp.info and download the free version of the server.
Once you download and unpack the ZIP and launch the .dmg file, it's a pretty straightforward process for copying the MAMP folder to your Applications folder and launching the app.
Again, like WAMP, MAMP from the start page offers you an easy way to launch phpMyAdmin. phpMyAdmin will allow you to easily create a database and database user account, which is required for installing WordPress.
Tip
Using Ubuntu?
If you're using Ubuntu and need a local server, you're in luck. Linux afterall is the OS most web servers use (I think you know what LAMP stands for at this point).
I'd recommend you do a little research through Google to find the best way to install your own local web server. I found the following resource to to be the most useful for me and what I used to install LAMP on my Ubuntu 10.04 installation: http://www.unixmen.com/linux-tutorials/570-install-lamp-with-1-command-in-ubuntu-910.
If you are using a school's or library's computer and can't (or otherwise just don't want to) locally install software, you'll need an account with a web hosting provider. The hosting provider you choose must be running Apache, MySQL, and PHP, in order to accommodate WordPress. It will greatly benefit you to choose a hosting provider that offers an easy-to-understand account panel, which allows you to easily access phpMyAdmin.
Tip
Easy, one click installs—Easy, yes. Just be careful!
Many web hosting providers offer super easy "one-click" installs of many of today's top CMS publishing platforms and other useful web applications including WordPress. Be sure to check out your hosting provider's services and options as this will let you fill out one easy form and will save you the hassle of dealing directly with phpMyAdmin or the WordPress install wizard.
Be careful with one-click installs! While many providers simply install a single installation of WordPress on to your account for you, which is perfect, some providers may have WordPressMU running. These providers will create an MU account, which will map to your domain name, but not give you access to any installation files. If that's the case, you will not have complete control over your WordPress site!
You'll must be able to FTP into your hosting account and see your WordPress installation's files, particularly the wp-content directory, which will contain your theme and plugin directories and files that you'll need to be able to edit in order to enhance your site with jQuery. Be sure to double-check with your hosting provider before choosing a one-click install.
WordPressMU is multi-user WordPress. It is what powers WordPress.com accounts. While it's super easy to set up a site on WordPress.com and have them host it, you cannot upload or customize your own themes and plugins. This is why this title doesn't even attempt to cover WordPress.com accounts as you need access to the wp-content folder in order to enhance your site with jQuery.
WordPress itself is very easy to install. Once you have a MySQL database set up with a username and password for that database, you'll unzip the latest WordPress version and place it into your local httpdoc or www root folder and then run the installation by navigating to http://localhost-or-domainname-url/my-wp-files/wp-admin/install.php.
Tip
WordPress in 5 minutes (or less!)
For a complete overview of installing WordPress, be sure to check out WordPress' 5-Minute Installation Guide from the Codex: http://codex.wordpress.org/Installing_WordPressAgain. The book WordPress 2.7 Complete will walk you through a WordPress installation, step-by-step.