By now you've gotten the point that the WordPress theme essentially contains the HTML and CSS that wrap and style your WordPress content. Thus, it's usually the first place you'll start when incorporating jQuery into a site. Most of the time, this is a good approach. Understanding a bit more about how themes work can only make your jQuery development go a little smoother. Let's take a look at how themes are structured and best practices for editing them.
Tip
Want to know more about WordPress theme design?
This title focuses on what you most need to know to work with jQuery in WordPress. If you're interested in WordPress theme development I highly recommend April Hodge Silver and Hasin Hayer's WordPress 2.7 Complete. Along with covering the complete core competencies for managing a WordPress site,Chapter 6, WordPress and jQuery's UI has an overview on editing and creating standard themes for WordPress.
If you want to really dig deep into theme design, my title WordPress 2.8 Theme Design will walk you through creating a working HTML and CSS design mockup and coding it up from scratch.
We've discussed that a WordPress theme comprises many file types including template pages. Template pages have a structure or hierarchy to them. That means, if one template type is not present, then the WordPress system will call up the next level template type. This allows developers to create themes that are fantastically detailed, which take full advantage of all of the hierarchy's available template page types, to make the setup unbelievably simple. It's possible to have a fully functioning WordPress theme that consists of no more than an index.php file!
To really leverage a theme for jQuery enhancement (not to mention help you with general WordPress troubleshooting), it's good to start with an understanding of the theme's hierarchy.
In addition to these template files, themes of course also include image files, stylesheets, and even custom template pages, and PHP code files. Essentially, you can have 14 different default page templates in your WordPress theme, not including your style.css sheet or includes such as header.php, sidebar.php, and searchform.php. You can have more template pages than that if you take advantage of WordPress' capability for individual custom page, category, and tag templates.
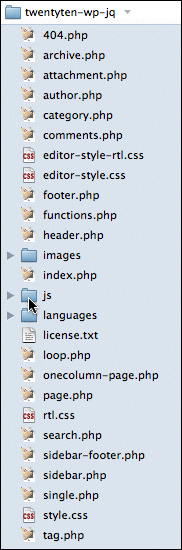
If you open up the default theme's directory that we've been working with, you'll see most of these template files as well as an image directory, style.css and the js directory with the custom-jquery.js file we started in Chapter 2, Working with jQuery in WordPress. The following screenshot shows you the main files in WordPress 3.0's new default theme, Twenty Ten:
The next list contains the general template hierarchy rules. The absolute simplest theme you can have must contain an index.php page. If no other specific template pages exist, then index.php is the default.
You can then begin expanding your theme by adding the following pages:
archive.phptrumpsindex.phpwhen a category, tag, date, or author page is viewed.home.phptrumpsindex.phpwhen the home page is viewed.single.phptrumpsindex.phpwhen an individual post is viewed.search.phptrumpsindex.phpwhen the results from a search are viewed.404.phptrumpsindex.phpwhen the URI address finds no existing content.page.phptrumpsindex.phpwhen looking at a static page.- A custom template page, such as:
page_about.php, when selected through the page's Administration panel, trumpspage.php, which trumpsindex.phpwhen that particular page is viewed.
- A custom template page, such as:
category.phptrumpsarchive.php, which then trumpsindex.phpwhen a category is viewed.- A custom category-ID page, such as:
category-12.phptrumpscategory.php. This then trumpsarchive.php, which trumpsindex.php.
- A custom category-ID page, such as:
tag.phptrumpsarchive.php. This in turn trumpsindex.phpwhen a tag page is viewed.- A custom tag-tagname page, such as:
tag-reviews.phptrumpstag.php. This trumpsarchive.php, which trumpsindex.php.
- A custom tag-tagname page, such as:
author.phptrumpsarchive.php. This in turn trumpsindex.php, when an author page is viewed.date.phptrumpsarchive.php. This trumpsindex.phpwhen a date page is viewed.
If you wanted to create a new theme, or as in the case of this book, if you'll be modifying a theme considerably, you'll want to create a directory with a file structure similar to the hierarchy explained previously. Again, because it's hierarchal, you don't have to create every single page suggested, higher up pages will assume the role unless you decide otherwise. As I've mentioned, it is possible to have a working theme with nothing but an index.php file.
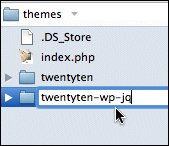
I'll be modifying the default theme, yet would like the original default theme available for reference. I'll make a copy of the default theme's directory and rename it to: twentyten-wp-jq. WordPress depends on the theme directories namespace. Meaning, each theme requires a uniquely named folder! Otherwise, you'll copy over another theme. The next screenshot shows this directory's creation:
I'll then open up the style.css file and modify the information at the beginning of the CSS file:
/*
Theme Name: Twenty Ten - edited for Chapter 3 of WordPress & jQuery
WordPress themenew theme, creatingTheme URI: http://wordpress.org/
Description: The 2010 default theme for WordPress.
Author: the WordPress team & Tessa Silver
Version: 1.0
Tags: black, blue, white, two-columns, fixed-width, custom-header, custom-background, threaded-comments, sticky-post, translation-ready, microformats, rtl-language-support, editor-style
*/
...
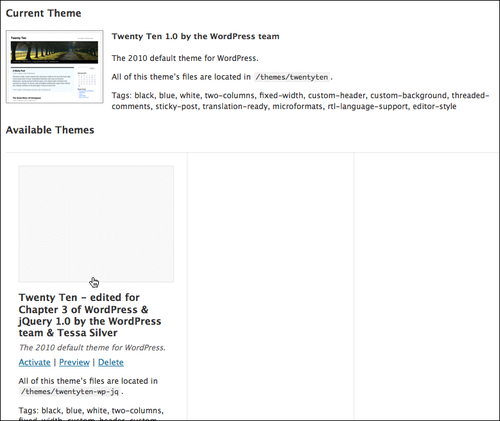
My "new" theme will then show up in the administration panel's Manage Themes page. You can take a new screenshot to update your new or modified theme. If there is no screenshot, the frame will display a grey box. As the look of the theme is going to change a little, I've removed the screenshot.png file from the directory for now, as you can see in the next screenshot:
In Chapter 1, Getting Started: WordPress and jQuery and Chapter 2, Working with jQuery in WordPress we learned how useful it was that jQuery "looped" through the selected elements in the wrapper for you. WordPress does a little looping of its own; in fact, it's important enough to be named "The Loop". The Loop is an essential part of your WordPress theme. It displays your posts in chronological order and lets you define custom display properties with various WordPress template tags wrapped in HTML markup.
The Loop in WordPress is a while loop and therefore starts with the PHP code: while (have_posts()): followed by the template tag the_post(). All the markup and additional template tags are then applied to each post that gets looped through for display. The Loop is then ended with the PHP endwhile statement.
Every template page view can have its own loop so that you can modify and change the look and layout of each type of post sort. Every template page is essentially, just sorting your posts in different ways. For example, different category or tag template pages sort and refine your posts down to meet specific criteria. Those sorted posts can appear different from posts on your main page, or in your archive lists, and so on. The next example is a very simple loop taken from WordPress 2.9.2's default Kubrick theme:
... <?php while (have_posts()) : the_post(); ?> <div <?php post_class() ?> id="post-<?php the_ID(); ?>"> <h2> <a href="<?php the_permalink() ?>" rel="bookmark" title="Permanent Link to <?php the_title_attribute(); ?>"> <?php the_title(); ?> </a> </h2> <small><?php the_time('F jS, Y') ?> <!-- by <?php the_author() ?> --> </small> <div class="entry"> <?php the_content('Read the rest of this entry »'); ?> </div> <p class="postmetadata"> <?php the_tags('Tags: ', ', ', '<br />'); ?> Posted in <?php the_category(', ') ?> | <?php edit_post_link('Edit', '', ' | '); ?> <?php comments_popup_link('No Comments »', '1 Comment »', '% Comments »'); ?> </p> </div> <?php endwhile; ?> ...
The loop is tucked into a large if/else statement that most importantly checks if there are posts to sort. If there are no matching posts to display, a "Sorry" message is displayed, and the searchform.php file is included with the get_search_form() include tag.
The new WordPress 3.0 Twenty Ten theme has its loop separated out into its own template page called loop.php, and it has quite a few more if/else statements within it so that the same loop code can handle many different situations, instead of writing individual loops for different template pages. On the whole, the same basic template tags as well as conditional and include tags are used in the new theme as they were before in the previous default theme. There are now just a few new template and include tags that help you streamline your theme.
Let's take a closer look at some of these template tags, include and conditional tags, and the API hooks available to us in a WordPress theme.
Within The Loop, you probably noticed some interesting bits of code wrapped in PHP tags. The code isn't pure PHP, most of them are WordPress-specific tags and functions such as template tags, which only work within a WordPress system. The most obviously important template tags in The Loop are the_title(), and the_content(). You'll notice that most tags and functions can have various parameters passed through them. You'll notice that in the previous code snippet, the_content tag has a parameter 'Read the rest of this entry »' passed to it. That string of text with a right angle quote, will appear if the <!--more--> tag is placed into a post.
Not all WordPress tags and functions go inside the loop. If you poked around the header.php file at all in Chapter 1, Getting Started: WordPress and jQuery and Chapter 2, Working with jQuery in WordPress, you probably noticed things such as blog_info() and body_class(), and of course the wp_enqueue_script() that we used to register jQuery in our installation.
When having to work with theme template files for development and enhancement, I've found that the following template tags and functions are useful to recognize and know:
bloginfo()—this tag can be passed parameters to retrieve all sorts of information about your blog. In theheader.phpfile, you'll note it's most commonly used to find your stylesheet directorybloginfo('stylesheet_directory')and stylesheet URLbloginfo('stylesheet_url'). It can also display your RSS URL, what version of WordPress your site is running, and quite a few other details. For more details, have a look at: http://codex.wordpress.org/Template_Tags/bloginfo.wp_title()—this tag can be outside the loop and it displays the title of a page or single post (not a sorted list of several posts). You can pass it a few options such as what text separator to use in the title, and if the separator text should show up on the left or the right. You can also pass this tag a Boolean true or false to display the title.wp_title("--",true,"right"). For more details, have a look at http://codex.wordpress.org/Template_Tags/wp_title.the_title()—this tag goes inside the loop. It displays the title of the current post and you can pass it any text characters you'd like the title to be wrapped in:the_title("<h2>", "</h2>"). For more details, have a look at http://codex.wordpress.org/Template_Tags/the_title.the_content()—this tag goes inside the loop and it displays the post's content. If you don't pass it anyparams, it will display a generic Read More link if the<!--more-->tag is used in the post. Otherwise, you can pass it what you'd like the 'read more' instructions to say (I've even found passing an existing tag works here.the_content("Continue Reading".the_title()). For more details, have a look at http://codex.wordpress.org/Template_Tags/the_content.the_category()—this tag also has to go into the loop and it displays a link or links to the categories assigned to the post. You can pass it the text separators of your choice if there's more than one category.the_category(", "). For more details, have a look at http://codex.wordpress.org/Template_Tags/the_category.the_author_meta()—this tag also has to go into the loop. It has a wealth of parameters that can be passed to it. You'll be most familiar withthe_author_meta("nickname"), orthe_author_meta("first_name"), orthe_author_meta("last_name"). You can also get the author's bio,the_author_meta("description"), as well as e-mail and website URLs. Your best bet is to review the codex for all that you can do with this tag: http://codex.wordpress.org/Template_Tags/the_author_meta.
The conditional tags can be used in your template files to change what content is displayed and how that content is displayed on a particular page depending on what conditions that page matches. For example, you might want to display a snippet of text above the series of posts, but only on the main page of your blog. With the is_home() conditional tag, that task is made easy.
There are conditional tags for just about everything; out of all of them, these are the few that I find I need most in my theme development:
is_page()is_home()oris_front_page()is_single()is_sticky()
All of those functions can take the following parameters: the post ID or page ID number, the post or page title, or the post or page slug. As great as themes are, I'm sure you've run into the conundrum that you or your client doesn't want the exact same sidebar on every single page or post.
I use these conditional tags to ensure specific pages can have particular styles or divs of content turned on and off and display or not display specific content. These tags really help give project sites a true, custom website feel.
In the index.php template page and other template pages like single.php or page.php and so on, you probably noticed these include tags. They let you include standard page includes into the other template pages:
get_header()get_footer()get_sidebar()comments_template()- custom include:
include(TEMPLATEPATH."/file-name.php")
A while back, WordPress 2.7 introduced the ability to create custom headers, footers, and sidebar templates for a theme. You simply create your custom header, footer, or sidebar and call it using the standard include template tag. Be sure to add a file prefix of header-, footer-, or sidebar-, and your own file name. You can then call your custom template file as follows:
get_header('customHeader')will includeheader-customHeader.phpget_footer('customFooter')will includefooter-customFooter.phpget_sidebar('customSidebar')will includesidebar-customSidebar.php
In general, unless you're a plugin developer, you probably don't have much need to pour over the plugin API. There are, however, a few hooks that should be placed into themes in order for plugins to work effectively with your theme. If you're editing a theme, be sure to not remove these hook tags, or if you're creating a custom theme, be sure to include them:
wp_head:Place within the<head>tags of aheader.phptemplate:<?php wp_head(); ?>
wp_footer:Place within thefooter.phptemplate:<?php wp_footer(); ?>
wp_meta:You'll most likely place this hook within thesidebar.phptemplate. However, it's best to add this hook wherever you intend plugins and widgets to appear:<?php wp_meta(); ?>
comment_form:Goes incomments.phpandcomments-popup.php, before the</form>closing tag:<?php do_action('comment_form'); ?>
Alright! That may seem like a lot to know about themes! As someone just looking to enhance a WordPress site with jQuery, you may be asking: "Is it really necessary to know all that?" Even if you have no interest in creating custom themes, from time to time, when working with jQuery, you'll find it very useful to be able to understand how WordPress themes work, what HTML markup the theme is outputting, and what most of the different tags and functions do.
Granted, in Chapter 2, Working with jQuery in WordPress, I strongly advocated that you learn how to handle jQuery's selectors, inside and out, specifically so that you would be able to enhance any WordPress site without having to edit its theme. While you should know your jQuery selectors and filters like the back of your hand, it's not always the quickest or easiest approach. Sometimes, while you can select and edit anything that you want on the page, the jQuery selection process and statement chain is bloated; it could be cleaned up and trimmed down if only some element just had a specific HTML tag, class or id attribute. There will be lots of situations where being able to edit the theme directly will allow you to create your jQuery enhancements faster and with less code. Not to mention, many themes are great, but can usually be made a little better and more customized to your site with just the simplest theme tweaks. Let's do that now and take what we've just learned about themes and put it to use.
Now, the new Twenty Ten default theme we're using is great, but it would be better if the date was a bit more prominent in the posts and if the Sidebar was cleaned up to look more like "official" links, instead of just lists of bullets.
Since we're touching up the theme, I want to change what the loop displays. We're going to assume this is a site for a client, and I know the client will eventually want to focus on the post's authors (there are many authors on this "hypothetical" site) and while the date is important, it shouldn't be on the same line as the author's name. I'm sure you've seen some blogs that have a little calendar or iCal-ish icons next to the post. I think that's a visually appealing way to display information like that, and not have the date take up a lot of room.
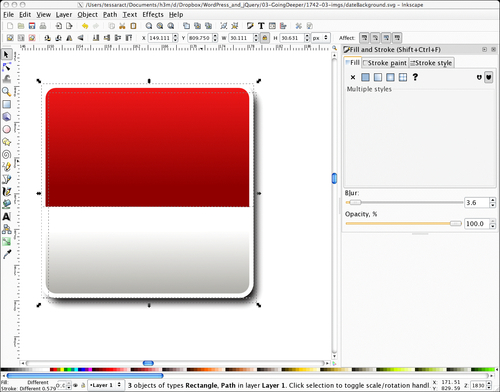
Using the free open source vector editor Inkscape (http://inkscape.org), I made a calendar background icon that can have the day's date up top in red and the three letter month below it. The icon is about 32 pixels square. You can use whichever graphic program you prefer, GIMP, Photoshop, Illustrator, and so on, to create a similar icon, or you can probably find a royalty-free image on the Web.
To get our calendar background behind our date and formatted properly, let's dig into the loop. The default theme's loop is located inside the template file called loop.php. This is a much longer loop than you may be used to if this is your first time working with the Twenty Ten default theme. Ultimately, we're interested in the "normal" or "everything else" view that is displayed on the site's "home" or default blog page. You'll find this code around line 127 starting with <div class="entry-meta">.
To start, comment out the custom PHP function twentyten_posted_on (it references a custom function in the theme's function.php file, getting into which is a bit beyond the scope of this title), and then add the following HTML markup and PHP template tags in bold:
...
<div class="entry-meta">
<?php //twentyten_posted_on();//comment this out ?>
<small class="date">
<?php the_time('d') ?><br/>
<span><?php the_time('M') ?></span>
</small>
</div><!-- .entry-meta -->
...
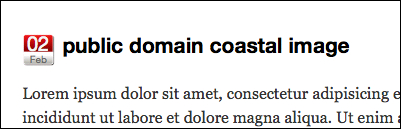
What we're focusing on is the date display. The date is displayed with a template tag called the_time which has parameters set to display the full month, the day "as said", and the year; for example; February 4, 2010.
I just want to display the date's number and the three-letter abbreviation of the month underneath that. the_time tag's parameters don't really let me add HTML break tags, so I'll separate my date into two separate the_time tag calls so that I can control the HTML a little better. I'll also want to ensure my style only applies to this loop and not the <small> date and content that's wrapped in other template page's loops, so I'll be sure to add a custom date class to the <small> tag. I'll also wrap the year date display inside some <span> tags so that I can have some additional style control over it. My date display and classes end up looking like this:
...
<small class="date">
<?php the_time('d') ?><br/>
<span><?php the_time('M') ?></span>
<!-- by <?php the_author() ?>-->
</small>
...
We'll then open up the CSS style.css stylesheet and add the rules for the special class name that we added to the date display, and modify the header display. I simply add my modifications to the very bottom of the style.css stylesheet. If on the odd chance, any of my style names are the same as anything already defined in the stylesheet, my rules will inherit from the previous rule and amend it (Either that, or make it blatantly clear that I need a more unique style name.)
First, I'll move the h2 headers on the home page itself that are inside the .post class over 40 pixels, in order to make room for my date. Next, I'll move my date inside the .post class up about 25 pixels to have it sit next to the header. Within this rule, I also assign the dateBackground.png that I created in Inkscape and tweak the date number's size, color, and a few other properties a bit. Lastly, I set my month display size and color inside the span tag as follows:
...
/*----------twentyten chapter 3 customizations------------*/
.home .post .entry-title{
padding-left: 40px;
}
.post small.date{
display:block;
background: url(images/dateBackground.png) no-repeat;
margin-top: -25px;
padding-top: 4px;
width: 32px;
height: 32px;
font-size: 20px;
line-height: 12px;
text-align: center;
color: #eee;
}
.post small.date span{
font-size: 10px;
color: #666;
}
...
And with that, the next screenshot shows what our post's headers and dates appear like now:
Not bad! Now, let's tackle the sidebar.
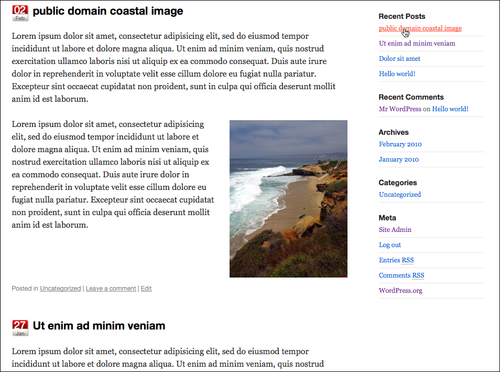
The sidebar will be easy. The whole thing in the Twenty Ten default theme is widgetized, so any reordering that we want to do can be done through the administration panel. However, we do want to adjust the CSS of the sidebar's bulleted lists a bit. When amending a theme you didn't create yourself from scratch, it's always best to add new classes to the markup and stylesheet, rather than change or edit any of the original styles that the author put in. This just makes it easier to revert for various reasons. As you must have noticed earlier, I always add my new custom styles to the bottom of the style.css stylesheet.
Let's start off by opening up sidebar.php in our editor and just adding in a new class name that we can use to style any widgets that get loaded up into any of the widget areas. Wherever I find a <ul class="xoxo"> tag, I'll just add an additional class called .currentsidebar after the .xoxo class. This appears twice in the sidebar.php file approximately around line 12, and again, approximately around line 51.
...
<ul class="xoxo currentsidebar">
...
<ul class="xoxo currentsidebar">
...
Next, we'll now simply open up our style.css stylesheet, and again at its bottom, let's write up our new .currentsidebar CSS rules to affect the list items:
...
.currentsidebar li{
padding: 0;
margin: 15px 0 20px 0;
}
.currentsidebar li ul li{
list-style: none;
padding: 5px 0; margin: 0 0 0 -15px; border-bottom: 1px solid #ddd;
font-size: 105%;
}
...
Tada! As you can see in the next screenshot, our page and sidebar navigation now look like this:
As you can see, touching up a WordPress theme is easy. Not only can you customize your theme to look and work the way you want, you can imagine how easy it is to tweak the theme's HTML markup so that your jQuery enhancements are easier to add in. Next, let's move on to WordPress plugins.