We're going to continue to build on our knowledge of jQuery and WordPress while delving deeper into animation using jQuery. Animation is one of jQuery's strong suites and while you may eschew animation as frivolous or a cheap trick, just for "eye candy", it can be very useful when properly implemented.
jQuery animation of CSS properties, colors, and interface elements can ensure that users clearly see alert, error, and conformation messages. Animation also enables interface objects to fade and slide in and out of view for a better user experience. Last but not least, a little "eye candy" certainly never hurt a site's interest and popularity level with users.
In this chapter we will be using animation to:
- Grab your user's attention and direct it to alerts
- Save space and animate through a series of rotating sticky posts
- Create some slick, animated mouse-over effects and easy animated graph charts
Let's get started applying useful, high-end animations to our WordPress site.
To start off, we already have a little experience with jQuery animation. Let's refresh: In Chapter 2, Working with jQuery in WordPress, in the Events and effects section, we learned about the following functions: show(), hide(), fadeIn(), fadeOut(), fadeTo(), slideUp(), slideDown(), and slideToggle(). I had also mentioned the animate() and stop() functions.
We've already worked with several of these functions in our previous projects in Chapter 2, Working with jQuery in WordPress; Chapter 3, Digging Deeper: Understanding jQuery and WordPress Together; and Chapter 4, Doing a Lot More with Less: Making Use of Plugins for Both jQuery and WordPress, particularly, show() and hide(), as well as fadeTo() and slideToggle(). As we've seen, a very large portion of your animation needs are easily met with these shortcut functions, though at the same time, limited by them. Let's now take a closer look at the animate() function and pick up some fine grain control over our jQuery animations.
The .animate() function allows you to animate any numerical CSS property. Pixels px are the understood norm for most numerical property values, but you can specify em and % (percentage) units. Pretty much anything you can place in the handy .css() function, can be used in the .animate() function.
Additionally, rather than numeric values, you can add the shortcut strings "show", "hide", and "toggle" to any property. They will essentially take the value from 0 to 100, or vice versa, or toggle from 0 or 100 to the opposite number for you.
Let's take a look at a quick example of this clever function. Remember, you'll want to place any jQuery scripts you write inside the document ready function: jQuery(function(){//code here}); also inside <script> tags, so that your jQuery will launch when the DOM has finished loading:
...
jQuery('.post p').animate({ fontSize: '140%',
border: '1px solid #ff6600',}, 3000);
...
This snippet will animate all .post p paragraph tags on the page, increasing the font size and adding a border.
You'll notice that I added a border property that does not have a single numeric value. You'll also notice that when you test this code on your site, the border does not animate in; instead, it just appears at the very end as the animation completes. Adding CSS properties that are not basic numeric values (like borders or background color, hex values) will not animate, but you can add all CSS properties using the .animate() function, which will act like the .css() function once it's completed running. This is probably not the best way to add regular CSS properties, but if you're animating something anyway, just know you can add other non-numeric CSS properties, they just won't animate.
Tip
Your property doesn't work?
You probably noticed this with the .css() function as early as Chapter 2, Working with jQuery in WordPress already, but just in case you didn't: property names must be camel cased in order to be used by the .animate() and .css() function. It's a bit confusing as you're probably just thinking of them as properties that you'd use in an actual CSS stylesheet but you'll need to specify paddingBottom instead of padding-bottom and marginRight not margin-right.
You probably agree that as cool as the .animate() function is, it's not that impressive without color (and a little jarring with color that just changes abruptly at the end of the animation). You long to cross fade in brilliant color. Who doesn't? Unfortunately, the core animate function isn't robust enough to calculate all the variances of numbers in a single hex web color, much less between two hex colors (let's just say, some serious math is involved). It's much more complicated than moving a value anywhere from 0 to 100, or down again.
The good news is, the animate function can be extended with the Color plugin. The even better news? Yes, this plugin comes bundled with WordPress!
Let's add this plugin to our theme with the wp_enqueue_script like so:
...
<?php wp_enqueue_script("jquery-color"); ?>
<?php wp_head(); ?>
...
Tip
Registering and including a script that only needs to load on a particular page?
You'll recall in Chapter 2, Working with jQuery in WordPress, that you can wrap your wp_enqueue_script() functions in if statements that use WordPress' conditional tags that check for what page the site is on: is_home(), or is_front_page(), or is_admin(), and so on. Be sure to use these to your advantage to help keep your site running as optimized as possible and not unnecessarily slowed down by loading scripts that aren't needed. To find out more about conditional tags, check out their use with the Script API in Chapter 2, Working with jQuery in WordPress, and the conditional tag quick reference in Chapter 9, jQuery and WordPress Reference. You can also check out WordPress' Codex at http://codex.wordpress.org/Conditional_Tags.
Again, this plugin extends the existing .animate() function, so there are no new properties to learn! Once you've included the Color plugin into your project you can animate in background colors to your heart's content.
...
jQuery('.post p').animate({'backgroundColor':'#99ccff'}, 2000);
...
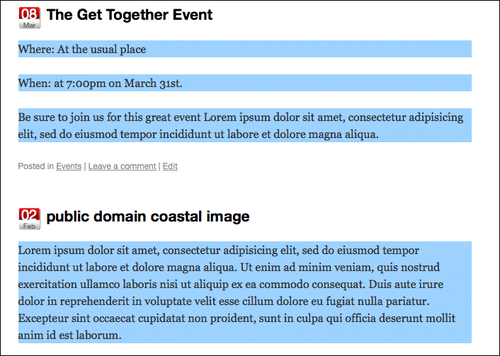
You should now see the .post paragraphs fade elegantly to a nice, light-blue color, as seen in the next screenshot:
If you're familiar with animation using various video editing tools or Adobe Flash, you've probably heard of easing. Easing is the control of acceleration and deceleration in an animation. It's most common use is to give animations a more natural feel, mimicking various properties of physics found in the real world, instead of calculated and rigid movement.
Almost as complicated as animating hex color values, easing applies virtual physics properties to the object being animated using various algorithms to control the speed of an animation as it starts off and ends. Serious math indeed. jQuery comes with a type of built-in easing, so we're saved from having to really think about any of it.
jQuery's default easing option is called "swing". Technically, there are two options—"linear" and "swing". Linear easing simply animates the object along its values from point A to point B, like a good programming script should. No acceleration or deceleration, so yeah, it is a tad "stiff".
Swing easing starts off more slowly, gains full speed, and then slows down again as the animation completes. jQuery chose swing as the default easing option as it looks best in most situations. That's probably because this is how most objects react in our real physical world; heading off a little slower while gaining speed, then decelerating and slowing down as they come to rest (provided the object didn't crash into anything while at the maximum speed).
As swing easing is the default, let's take a look at our previous script that animates in our post's paragraph blue background color and see if we can detect the difference:
...
jQuery('.post p').animate({'backgroundColor':'#99ccff'
}, 2000, 'linear');
...
It's subtle, but a definite difference is there. Linear easing is much more rigid.
Tip
Advanced easing: There's a plugin for that!
As you've probably guessed, plenty of "mathy" people have figured out all sorts of variations in the easing algorithm to mimic all sorts of different physics environments and yes, there's a jQuery plugin for that. While this plugin doesn't come bundled with WordPress, that shouldn't stop you from downloading and experimenting with it. You can download and test out all the available easing options here: http://gsgd.co.uk/sandbox/jquery/easing/.
The plugin, like the Color plugin, extends the .animate() function and provides you with over 25 easing options, which include some pretty cool options such as jswing bounce and elastic, as well as a host of vector easing paths such as circular and sine wave.
The majority of these options are a bit of overkill for most projects that I've been on but I do love the elastic and bounce easing options. By the way, if you're one of those "mathy" people I referred to a second ago, you'll enjoy checking out the magic behind the easing algorithms here: http://www.robertpenner.com/easing/.
Again, if you're familiar with animation, be it traditional animation, video, or multimedia work with Flash, you've probably learned—timing is everything. The more control you have over the timing and playback of your animations the better. Easing, for example, depends on how much time to give the object to animate and move. No matter how "smooth" you'd like an object to move, it's going to look fairly jerky if you only give it a second or less to get across the screen. Let's take a look at the three main ways to get a handle on your timing and playback.
We've discussed chaining functions in previous chapters, and you're most likely aware that any events you've chained together in a jQuery statement kick off in the order that they were appended to the chain. As far as I can tell, and based on what the experts say, you can chain to your heart's content as many functions as you'd like, infinitely (or until the browser crashes).
On the whole, I find laying out jQuery functions in separate lines, with their own selector sets, can take up some space, but keeps your jQuery scripts much more organized and manageable. Remember, you always start a jQuery statement with an initial selector for a wrapper set, but based on additional chained functions that can move you around the DOM and take their own selectors, you'll find that you can move around and affect the DOM a whole lot just from one statement! Along the way, possibly generating some quite magnificent "spaghetti code" that's hard to follow and will make any developer who has to work with you hate your guts.
However, for functions that need to be run on a single initial selector set, especially animation functions, I really like jQuery chains as they help keep my animation sequences in the order that I want them to kick off, and it's clear what wrapper set is going to be affected by the chain.
Here's an example:
...
jQuery('.post:first').hide().slideDown(5000, 'linear').fadeTo('slow', .5);
...
Now, even initially concise animation chains can get a little complicated. That's OK; unlike some scripting languages, JavaScript and jQuery rely on the semi colon ";" as a clear ending statement, not the actual end of the line. So you can organize your chains into separate lines so that it's a little easier to follow and edit like so:
...
jQuery('.post:first')
.hide()
.slideDown(5000, 'linear')
.fadeTo('slow', .5);
...
Because timing is everything, I often discover I want a function's animation to complete, and yet, depending on the easing option, especially those that are elastic or bounce, I don't necessarily want the very next function to kick off quite so fast! As of jQuery 1.4, it's easy to pause the chain with the .delay() function. Let's place a three second pause in our chain like so:
...
jQuery('.post:first')
.hide()
.slideDown(5000, 'linear')
.delay(3000)
.fadeTo('slow', .5);
...
Tip
Check your jQuery version! delay() requires 1.4+
As soon as this function became available, I've put it to use in all sorts of invaluable ways with my jQuery animations. However, if you find the delay function is not working for you, you're probably working with version 1.3.2 or older of jQuery. The delay function is only available with version 1.4+. You may want to go back to Chapter 2, Working with jQuery in WordPress and see about registering jQuery from the Google CDN or including it directly in your theme.
Queues—those irritating lines that ensure everyone or everything in them is processed fairly and in the order they arrived. jQuery's animation queue works similarly, only processing each object's animation request, in the order it was assigned to the object. Sometimes special needs and requirements arrive that shouldn't be forced to waste time in the queue.
So far, we've seen how the .animate() function, in addition to CSS properties, can be passed various optional parameters specifying the duration, (slow, fast, or numerical milliseconds) and the type of easing (swing, linear, or plugin extended easing).
The que parameter is a true or false Boolean that can be set if you don't want the animate function to have to wait its turn. For the instances that you'd like an object to have several animations to run in parallel with each other, like sliding and fading at the same time, disabling the queue in your animate function will do the trick.
In order to set the queue option in your code, instead of using the previous syntax we've been working with, you will have to wrap all the other options into a more advanced syntax which clearly labels each optional parameter like so:
...
jQuery animationqueue, jumpingjQuery('.post:first')
.hide()
.fadeTo(0, .1)
.css("height","5px")
.animate({
height: '+=500px',
},
{
duration: 4000,
easing: 'swing',
queue: false
}
)
.fadeTo(4000, 1);
...
The following screenshot shows the post is fading out while changing in height at the same time:
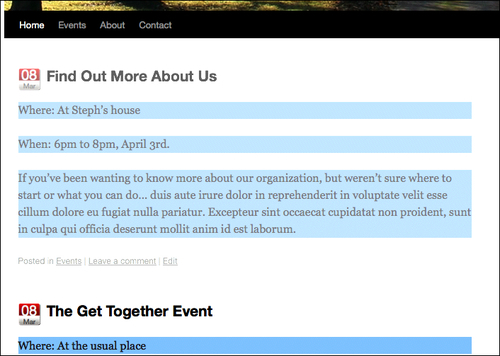
You can see by the previous screenshot that the code we just wrote fades the first .post div in while it's sliding down. If you change false to true, and reload the page, you'll discover that the first .post div slides all the way down to 500 pixels high and then fades in.
The final options that can be passed into the .animate() function are step and complete. The step parameter allows you to set up an additional function that can be called after each step of the animation is complete (sometimes useful if you have multiple CSS properties you're animating). The complete parameter allows you to specify a callback function when the entire animation function has been completed. Keep in mind, you can chain multiple animation functions together, and the steps with complete parameters are unique to each instance of the animation functions that they belong to.
If you have an animation that absolutely should not kick-off until the current animation function has completed, the .delay() function might not be the best way to go. You can use the step and complete parameters to kick off other functions and animations in the exact order you wish.
...
jQuery('.post:first')
.hide()
.fadeTo(0, .1)
.css("height","5px")
.animate({
height: '+=500px',
},
{
duration: 4000,
easing: 'swing',
queue: false,
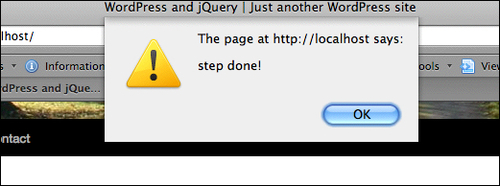
step: function() {alert('step done!');},
complete: function() {alert('completely done!');}
}
)
.fadeTo(4000, 1);
...
The previous code snippet will generate JavaScript alerts at the .animate() function's completed steps once it's completely finished.
I've personally never needed to hook into the step parameter for a WordPress project, but I can see how it could be very useful for hooking into and creating a chain of cascading type effects. I have found the complete parameter very useful for many of my animations.