The term AJAX has been bandied about the blogosphere since early 2005, though the technology behind the term is nothing new. It was coined by Mr. Jesse James Garrett of the software consulting firm AdaptivePath. AJAX, which is short for Asynchronous JavaScript and XML, describes a set of practices for building Web applications that result in highly responsive applications that feel more like a “rich client” application instead of a traditional Web application. It is now becoming the technology of choice for a new generation of rich client JSF components that offer the page author unsurpassed power without increasing development complexity. At the same time, it provides a superior, rich client experience for the end user. It is a technology that no JSF developer can afford to ignore.
AJAX is an acronym for Asynchronous JavaScript and XMLHttpRequest. The XMLHttpRequest object is a de facto standard object provided by browser-based JavaScript implementations, and when used in an asynchronous fashion it allows the page author to communicate with the Web server in the background of the page, without giving the user any visual cue that this communication is occurring. The Web browser’s “spinner” does not spin, the hourglass mouse pointer does not appear, and the browser does not “block” in any way. Using the XMLHttpRequest in concert with standard JavaScript and DOM APIs allows the page author to dynamically update the page with arbitrary server-supplied data.
The first implementation of an API for background-based asynchronous communication with the server came from Microsoft in the form of their XMLHTTP ActiveX object. This API was later emulated in a compatible fashion by Netscape and other browsers, enabling users to write Web applications that use XMLHttpRequest and still run on a variety of browsers while minimizing the amount of browser-dependent code required. It has taken a long time to arrive at the point where most users can be assumed to have a browser capable of AJAX, but as of this writing it’s a safe bet.
Even though these technologies had been around for several years their widespread use in Web applications didn’t catch on until Google showed the world how powerful a first-class application of AJAX practices can be. The introduction in 2004 of Google’s e-mail service, which makes heavy use of XMLHttpRequest techniques, inspired a renaissance of interest in JavaScript that ultimately led to what people now call AJAX. Google’s map service also leverages AJAX techniques to good effect. As of this writing, the field of innovation is still wide open and the best practices have yet to fully emerge.
The software industry has always grappled with the problem of maintenance costs, particularly in large enterprises where huge numbers of users need to have current software updates, bug fixes, and other changes. The problem wasn’t so bad in the mainframe days, but with the advent of the PC and the office LAN, things got much worse. Each computing node had its own user-configurable and updateable software stack. Rolling out upgrades to all users was a complex and risky problem. Solving this problem is the main reason for the popularity of Web-deployed applications. Web applications delivered on the promise of downloadable applications that effectively maintained no state information in the client. This enabled administrators to easily upgrade the software with much less risk of downtime for all users.
As shown in the history lesson in Chapter 1, Web applications have been developing in several dimensions. Pertinent to this discussion is the degree to which a Web application resembles a traditional, non-browser-based application in terms of responsiveness and richness of experience. Applets address this problem quite well, but have failed, for a number of technical and non-technical reasons, to achieve widespread adoption. JavaWebStart, a technology that enables distributing, upgrading, and versioning Java applications via the Web, also addresses this problem very well and its use has been steadily growing. However, a JavaWebStart application doesn’t run inside the confines of a browser, and many users and IT managers insist that their applications run in a browser. Thus, every Web application framework aspires to be as rich as possible. As Google and others have shown, AJAX makes it possible to bring the Web application experience a lot closer to the rich client experience.
As you will see later in this chapter, employing AJAX-only practices by hand is very tricky and error prone, and can be very frustrating for Web developers or page authors. It’s particularly difficult dealing with browser quirks to achieve a solution that will run for as many users as possible. For example, the very way in which you obtain a reference to an XMLHttpRequest object differs across different browsers, even though the API is the same once you have it. The powerful encapsulation mechanism offered by the Faces component and event model is ideally suited to allow a component developer to provide AJAX-enabled (or AJAXian) components that are no more difficult to use than any other normal Faces component.
The remainder of this chapter will cover the fundamentals of AJAX APIs, build on the earlier material of creating custom components by showing how to bring AJAX practices to your component development, review two AJAX JSF component examples, and close with some tips and tricks to ease the pain of developing an AJAXian Faces component. Through the course of covering this material, you will see a fair amount of JavaScript. A thorough treatment of JavaScript is beyond the scope of this book, but an excellent reference is JavaScript: The Complete Reference, Second Edition by Thomas Powell (McGraw-Hill, 2004).
Before building AJAX-enabled JSF components, it is important to fully understand the core AJAX architecture involved in an AJAX client-server transaction. In its simplest form, AJAX is possible when these two core technologies are present:
• A JavaScript-enabled browser that supports either XMLHTTP or XMLHttpRequest objects
• An HTTP server technology that can respond in XML or any markup
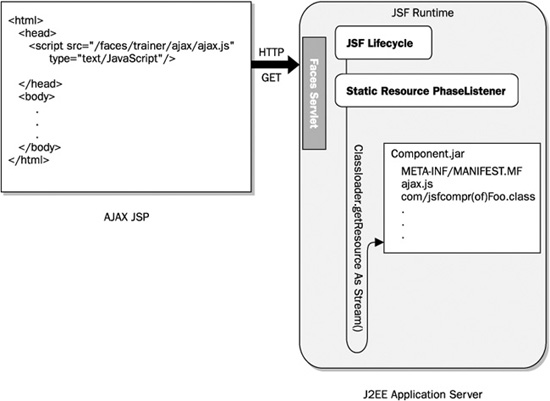
Since the popular browsers support JavaScript and the necessary XMLHTTP request objects and almost any Web server technology can generate XML (or any markup), the core AJAX technology is already widely available. The architecture for an AJAX-only (no JSF involved) application using these technologies is depicted in Figure 11-1.
As you can see in Figure 11-1, an AJAX application in its simplest form is essentially a standard HTML user interface with JavaScript functions to interact with an HTTP server that can generate XML dynamically. Any dynamic Web technology ranging from CGI or servlets to JavaServer Faces, as we’ll discuss later, can serve as a server-side AJAX technology. In the user interface, you’ll find an HTML page with elements such as an input field, a button, or anything else that can be linked to JavaScript that can communicate via AJAX to a Web server. For example, a button could fire a JavaScript function when pressed and it in turn issues an AJAX request for data. An even more subtle usage would eliminate the button altogether: simply typing in an input field could fire a JavaScript function. This is possible using the JavaScript onkeyup event. For example, the input field searchField could call a JavaScript function lookup( ) when an onkeyup event occurs (i.e., during typing), as shown here:
<input type="text" id="searchField" size="20"
       onkeyup="lookup('searchField');">
The lookup( ) function could then make an AJAX request for data related to the value in the input field. As you’ll see later in the chapter, both of the AJAX examples operate exactly in this fashion where text from an input field is sent to an AJAX-enabled server and a response is then provided to the client without the need for a complete page refresh.
FIGURE 11-1 The core AJAX architecture
In addition to responding to user interface interactions like typing or clicking a button, AJAX JavaScript functions can operate independently on their own by using timers—for example, if you want a Web form to have the ability to autosave itself after a certain amount of time has passed.
Now that you know how AJAX JavaScript code can be invoked, let’s examine the actual JavaScript code that can issue an XML HTTP request. The following code snippet allows both major browser families (Internet Explorer and Mozilla/Safari) to instantiate respective browser-compatible XMLHttpRequest objects, which can then be used to communicate with an AJAX server.
if (window.XMLHttpRequest) {
  req = new XMLHttpRequest();
}
else if (window.ActiveXObject) {
  req = new ActiveXObject("Microsoft.XMLHTTP");
}
Once the object is instantiated, it can be manipulated in exactly the same manner, regardless of browser type, since it has compatible methods. (A full list of the XMLHttpRequest methods and properties is provided in the “AJAX XMLHttpRequest Reference” section at the end of the chapter.)
To initialize a connection to a server, the open method is used:
req.open("GET", url, true);
The first argument is the HTTP method (GET or POST). The second argument is the URL of the server (or form action if using a POST), and the third argument, when true, denotes whether the call should be made asynchronously (the “A” in AJAX) or not. This means that the browser can continue doing other things while the request is being fulfilled. A false value in the open method denotes a non-asynchronous or serial processing. This is not recommended, since your browser will cease operations until the response has been returned.
For asynchronous calls, an onreadystatechange call can be made to register a callback function that will be invoked once the request is complete:
req.onreadystatechange = processXMLResponse;
In this example the callback function is declared as processXMLResponse( ). This function is invoked by the browser when the request is fulfilled and is responsible for taking action on the XML response. The callback function can also be declared inline in the onreadystatechange statement:
req.onreadystatechange = processXMLResponse() {
  // process request
};
Any HTTP request header content can be specified using req.setRequestHeader. For example:
req.setRequestHeader("Cookie", "someKey=true");
Once the XMLHttpRequest object (req) has been fully initialized, initiating a call to the server can be done using send( ):
req.send(null);
For GET requests, a null value or empty string ("") is used. POST requests contain a string argument with form data. They also require the Content-Type to be set in the header of the request. The following lines show how to perform an AJAX POST to an AJAX server (/ajaxserver), with form parameters specified in the send call.
req.open("POST", "/ajaxserver", true);
req.setRequestHeader("Content-Type", "application/x-www-form-urlencoded";
req.send("name=scott&email=stiger@foocorp.com");
The callback function processXMLResponse has some code to make sure the request has not errored out. This is accomplished by checking the readyState as well as the overall status of the HTTP request. (A readystate of 4 means the XMLHttpRequest is complete and a status of 200 means it was a success (as opposed to 404, etc.).)
function processXMLResponse() {
  if (xmlreq.readyState == 4) {
    if (xmlreq.status == 200) {
      // Process the XML response…
    }
  }
}
When no error conditions have been encountered, processing the XML response is done using standard JavaScript DOM methods. For example, to extract the employee name, “Joe”, from the incoming XML stream:
<employee>
  Joe
</employee>
one can use req.responseXML:
var name = req.responseXML.getElementsByTagName("employee")[0];
Parsing more complex XML involves iterating through the XML elements using code such as:
var elements = req.responseXML.getElementsByTagName("employee");
for (i=0;i<elements.length;i++) {
  for (j=0;j<elements[i].childNodes.length;j++) {
    var ElementData = elements[i].childNodes[j].firstChild.nodeValue;
  }
}
It should also be stated that the XML response obtained through the XMLHttpRequest object need not always be well-formed and valid. This means that the AJAX server can send over HTML content directly to the client. JavaScript code can then retrieve the HTML content by using the req.responseText method/property, which simply retrieves the content as a string. The HTML string text can then be used in whatever fashion to alter the page. For example, an HTML stream of:
<h3>Hello there!</h3>
<p> This is <cTypeface:Bold>HTML</b></p>
could be retrieved into a string using:
var HTMLcontent = req.responseText;
and then added to a specific DIV tag with id=“div1”.
document.getElementById("div1").innerHTML += HTMLcontent;
Having stepped through the basics of an AJAX transaction, let’s consider a first AJAX example: DirectorySearch. This example will first be presented as a pure AJAX-only example without Faces technology. Later you’ll see how to turn this and other AJAX examples into AJAX-enabled JSF components, making them much easier to use from a page author’s perspective.
Consider the following DirectorySearch example application where the user is presented with a single input text field. When the user begins typing characters into the field, a list of corresponding matches from a fictitious corporation’s employee directory appears, as shown in Figure 11-2.
As the user continues typing, the list decreases in size until a best match is found, as depicted in Figure 11-3. The user doesn’t even have to click on a Submit button because the page updates itself with the closest matches based on the input so far. This all occurs without requiring a traditional page submission and a complete refresh cycle.
The DirectorySearch AJAX example consists of the following elements:
• An HTML page, directory.html, that contains:
• An input text field
• JavaScript functions that react to the characters entered and invoke an AJAX request, then update the UI with data from the response
• A Java servlet that responds to the AJAX request by sending XML responses
Each is examined next.
As mentioned earlier in the chapter, the AJAX request is initiated when new text is entered into the input field. This occurs because the input field in the HTML page has an onkeyup attribute set with a reference to a JavaScript lookup( ) function.
<input type="text" id="searchField" size="20"
     onkeyup="lookup('searchField');">
Notice the ID of searchField is passed to the lookup( ) function, which then uses this to determine the current value of the field in the callback function.
FIGURE 11-2 Entering a character into the AJAX DirectorySearch
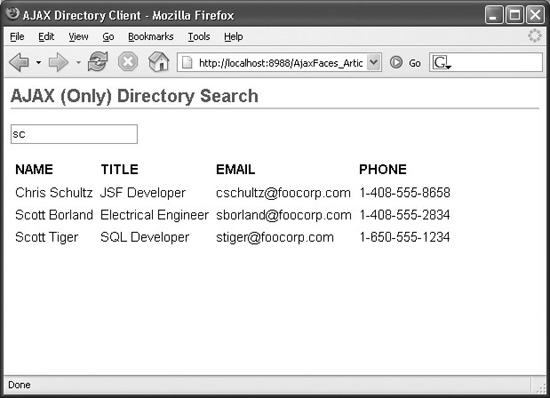
FIGURE 11-3 Typing more characters into the DirectorySearch input field
The JavaScript lookup( ) function along with the other functions are embedded inside of a pair of <script> tags in the header of the HTML page. In the lookup( ) function shown next, notice that its purpose is to initiate the AJAX call with a URL of ajaxdirectoryservice, which is the url-mapping of the AJAX servlet. It passes the value of the searchField input field to the AJAX servlet using the input parameter:
<script type="text/JavaScript">

// Note that using global variables to store such things as the
// XMLHttpRequest instance is not a good idea in a production
// environment. This is because multiple requests from the
// same browser window will overwrite the previously stored value.
// One production grade solution is to use JavaScript "closures",
// which are beyond the scope of this book.
var req;
var writeloc;

function lookup(field) {
  writeloc = field + ":table";
  var searchField = document.getElementById(field);
  var url = "ajaxdirectoryservice?input=" + searchField.value;
  if (window.XMLHttpRequest) {
    req = new XMLHttpRequest();
  }
  else if (window.ActiveXObject) {
    req = new ActiveXObject("Microsoft.XMLHTTP");
  }
  req.open("GET", url, true);
  req.onreadystatechange = processXMLResponse;
  req.send(null);
}
Once the request is initiated in asynchronous mode, the processXMLResponse( ) callback function, shown next, will be invoked when the request is complete. This function merely checks to see that the request from the servlet completed successfully and is sent to a data rendering function, renderTable( ).
function processXMLResponse() {
  if (req.readyState == 4) {
    if (req.status == 200) {
      renderTable();
    }
  }
}
The data retrieved from the servlet in this example is pure XML and is based on the input text that was supplied to it. For example, if a string of “sc” is sent to the servlet, it will respond with the following matching content in XML:
<?xml version = '1.0'?>
<directory>
   <employee>
      <NAME>Chris Schultz</NAME>
      <TITLE>JSF Developer</TITLE>
       <EMAIL>cschultz@foocorp.com</EMAIL>
       <PHONE>1-408-555-8658</PHONE>
    </employee>
   <employee>
      <NAME>Scott Borland</NAME>
      <TITLE>Electrical Engineer</TITLE>
       <EMAIL>sborland@foocorp.com</EMAIL>
       <PHONE>1-408-555-2834</PHONE>
    </employee>
</directory>
The renderTable( ) JavaScript function is as follows:
function renderTable()
  {
    xmlDoc = req.responseXML;
    var elements = xmlDoc.getElementsByTagName('employee');
    var table = document.createElement('table');
    table.setAttribute('cellPadding',3);
    table.setAttribute('border',0);
    var tbody = document.createElement('tbody');
    table.appendChild(tbody);
    var h_row = document.createElement('tr');

    for (i=0;i<elements[0].childNodes.length;i++) {
       if (elements[0].childNodes[i].nodeType != 1) continue;
       var t_header = document.createElement('th');
       var headerData =
document.createTextNode(elements[0].childNodes[i].nodeName);
       t_header.appendChild(headerData);
       h_row.appendChild(t_header);
      }
      tbody.appendChild(h_row);

     for (i=0;i<elements.length;i++) {
       var t_row = document.createElement('tr');
       for (j=0;j<elements[i].childNodes.length;j++) {
         if (elements[i].childNodes[j].nodeType != 1) continue;
         var td = document.createElement('td');
         var tdData =
document.createTextNode(elements[i].childNodes[j].firstChild.nodeValue);
         td.appendChild(tdData);
         t_row.appendChild(td);
      }
       tbody.appendChild(t_row);
     }

    // Clear previous table
    var element = document.getElementById(writeloc);
    while(element.hasChildNodes())
       element.removeChild(element.firstChild);

     // Append new table
    document.getElementById(writeloc).appendChild(table);
}
The code may seem a bit cryptic, but essentially it just loops through the XML data, constructs a new HTML table with the data in it, and appends it to a specified write location, writeloc, which is a DIV defined just below the input text field. The DIV that serves as the write location writeloc is defined as:
<div id="searchField:table"></div>
Also recall that writeloc was defined in the lookup( ) function as a concatenation of the field name provided and :table:
writeloc = field + ":table";
Before writing the new HTML table, however, the renderTable( ) function removes the old HTML results table just before it appends the new one. The DIV that serves as the write location writeloc is defined as:
<div id="searchField:table"></div>
The servlet that responds to the request and processes the incoming input parameter is fairly simple and is displayed next.
package com.jsfcompref.ajax.servlet;
public class AjaxDirectoryService extends HttpServlet {
  public void init(ServletConfig config) throws ServletException {
    super.init(config);
  }
  public void doGet(HttpServletRequest request,
                    HttpServletResponse response) throws ServletException,
                                   IOException {
    response.setContentType("text/xml");
    response.setHeader("Cache-Control", "no-cache");

    XmlGenerator myXmlGenerator =
      new XmlGenerator(request.getParameter("input"));

    String xmlout = myXmlGenerator.getXmlResponse();
    PrintWriter out = response.getWriter();
    out.write(xmlout);
    out.close();
  }
}
Aside from being a typical HTTPServlet, the key things to notice are that the content type is set to text/xml and a header parameter, Cache-Control, is set to no-cache. This prevents any of the XML data from being cached by the browser. Notice also the XMLGenerator class. This is a custom class that does the XML generation. It can use any technology as long as it can accept a string argument and return an XML data stream as a query result. XPath or XQuery could be used to process these queries. XML-enabled databases such as Oracle and its XML SQL utility can also be used to generate the query response. Since the code varies on how to generate an XML response based on a query string, you can decide how to best perform this task. You may also want to look into the XQuare open source project (formerly known as XQuark), which provides an XML query (XQuery) engine equally across the leading database technologies. (For more information on XQuare, see http://xquare.objectweb.org/.)
Although fully functional, there is a potential problem with the architecture of the pure AJAX-only DirectorySearch example application. It forces the page author to bear full responsibility for making the AJAX transaction work because the AJAX plumbing is manually constructed using JavaScript in the HTML client. Because of the complexities involved, this is a task that could overburden a typical page author or Web designer, especially if the overall user interface is considerably larger. Considering the inherent difficulties in debugging JavaScript code, this could prove to be a painful task for even the most technically experienced page author or Web designer. Another complexity that must be faced is the possibility of having multiple AJAX requests and responses going on in the page at the same time. It’s possible that multiple different servlets would be needed to handle all the different kinds of responses. Without careful planning, extremely cryptic conditions can arise that are very difficult to debug.
The ideal solution would be to offer an AJAX-enabled DirectorySearch custom JSF component that the page author can simply drop onto a page and it just works. In this manner, the page author would not have to code a single line of JavaScript as the JSF component assumes this responsibility entirely.
Most of the remainder of the chapter is devoted to describing how to build AJAX-enabled JSF components, which provide an extremely easy development experience for the page author. We will begin by describing the high-level AJAX elements needed when using JSF.
Figure 11-4 shows the elements of an AJAX system using JSF and how they work together during an AJAX transaction. The AJAX JavaScript code (Element 1) converts user interactions with the rendered UI of the AJAX UI component (Element 2) into parameters on the XMLHttpRequest and sends them to an AJAX processing server component (Element 3). The AJAX processing server component can be either independent of the JSF application, such as with a generic servlet, or integrated into the JSF application, but its job remains the same: return an AJAX response to the client’s AJAX request. The AJAX script, which made the request, is then responsible for interpreting the AJAX response and updating the browser page accordingly.
Similar to the non-JSF AJAX architecture, JavaScript client code is required for interaction with the AJAX server object. The key difference from the non-JSF AJAX approach is that the JSF component or application is now entirely responsible for rendering the script into the browser, thus drastically simplifying AJAX development for the page author. From the component developer’s perspective, however, the key challenge is implementing a way to render the JavaScript to the client. In HTML there are two ways the script can be loaded into the browser. The first is inline—that is within the body of <script> tags.
<script type="text/JavaScript">
  // This is an inline script.
  document.write("hello world");
</script>
FIGURE 11-4 The high-level elements of an AJAX system in JSF
The second way is by reference—using the <script> tag with a src attribute that allows the browser to download the script as a separate file:
<script type="text/JavaScript" src="ajaxScript.js"></script>
NOTE When using the src attribute and omitting the nested script content, the closing </script> tag is optional, but it’s a good practice to keep your markup well-formed to ease a possible future transition to XHTML or other XML formats.
There are pros and cons to both approaches. For example, the latter approach avoids the need to redeploy the application when any JavaScript changes are done since they reside in a .js file. Also, most commonly available JavaScript libraries, such as DOJO and Prototype, are distributed in JavaScript files. Loading these by reference allows the browser to store the script content in the browser cache. On the other hand, the former approach is best when custom JavaScript needs to be rendered dynamically with values only available at runtime (such as with the slider example in Chapter 10).
The AJAX JSF examples later in the chapter use both approaches. However, they both also completely hide the JavaScript code from the page author.
The UIComponent subclass plays a key role in an AJAX JSF system. During encoding, this component renders the UI elements for the component itself, such as buttons or input fields. These rendered UI elements provide a way for the end user to trigger any AJAX transactions. In addition to the visible elements initially rendered, the UI component may also render an empty placeholder location such as with a <DIV> tag, which can later be used as a writeable location for dynamic content that is generated as a result of the AJAX transactions. Finally, the UI component also renders the AJAX JavaScript, which can be either the full source inline or a <script> tag with the src attribute as a URL reference to the JavaScript file.
The last element of the AJAX JSF system is the AJAX Processing Server Component. This element receives AJAX requests from the browser and returns XML responses. An AJAX Faces server component can be implemented as either:
• A fully independent HTTP server object such as a generic servlet, or
• An AJAX server object integrated into the JSF application. This can either be integrated into the AJAX component’s decode( ) method or be component-independent but still reside in the JSF application, such as within a PhaseListener.
In the SpellCheckTextArea example later in the chapter, the decode( ) method in the component serves as the AJAX server component. The other AJAX JSF example, DirectorySearch, uses either the decode( ) method or a PhaseListener to serve as the AJAX server component.
JSF 1.2 TIP JSF 1.2 introduced a new feature to define alternate JSF lifecycles specifically for handling AJAX requests. Please see Chapter 12 for details on building a custom lifecycle. Once you have done so, you can simply use an <init-param> element in your web.xml to identify it as a JSF lifecycle instance to the FacesServlet.
<servlet>
  <servlet-name>ajax</servlet-name>
  <servlet-class>javax.faces.webapp.FacesServlet</servlet-class>
  <init-param>
    <param-name>javax.faces.LIFECYCLE_ID</param-name>
    <param-value>com.foo.lifecycle.AJAX_LIFECYCLE_ID</param-value>
  </init-param>
</servlet>
<servlet-mapping>
  <servlet-name>ajax</servlet-name>
  <url-pattern>/faces/*</url-pattern>
</servlet-mapping>
If you have properly configured your custom LifecycleFactory as described in Chapter 12, your custom lifecycle will be used instead of the default lifecycle. The details of an AJAX-aware JSF lifecycle are beyond the scope of this chapter, but such an approach is used in the JavaServer Faces Technology Extensions project on java.net: https://jsf-extensions.dev.java.net/.
Let’s now convert the original non-JSF AJAX DirectorySearch example shown earlier to a JSF UI component. The new JSF version of DirectorySearch eliminates the inherent JavaScript complexities that the page author had to deal with earlier. With this new version, the page author simply drops the <jcr:directorysearch> tag onto the JSP page to use the component, as shown here:
<jcr:directorysearch border="0" />
At runtime, the DirectorySearch UI component performs its job of providing a directory lookup just like the AJAX-only version. The DirectorySearch JSF component also provides attributes that are passed on to the underlying JavaScript. This affords the page author a high degree of control over the component’s behavior without having to edit any JavaScript code. For example, the same component can have a different background:
<jcr:directorysearch border="0" tablebgcolor="#99EEFF" />
This would generate a DirectorySearch component with a light blue background.
The architecture of the JSF-enabled DirectorySearch as depicted in Figure 11-5 is similar to the non-JSF AJAX example from before, except that the JSF component performs the task of rendering the JavaScript directly into the HTML (JSP) page. The JavaScript code then initiates an XMLHttpRequest either to the same AJAX servlet that was used before, or to an AJAX server component that essentially contains the same XML generation code that was used in the servlet, but instead integrated into the JSF application. Recall that the AJAX server object could be implemented as a JSF PhaseListener or in the decode( ) method of the JSF component itself. Using the existing non-JSF AJAX servlet would be the easiest architecture if your AJAX servlet does not need to interact much with your JSF application data; however, if you want to take advantage of JSF features such as the Expression Language and Managed Beans when building your AJAX server object, it is best to place the code inside the JSF application.
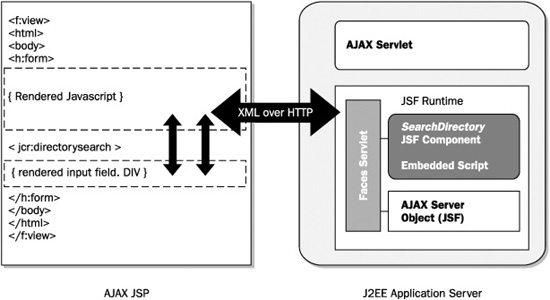
FIGURE 11-5 The AJAX-enabled JSF DirectorySearch architecture
For this example, embedding JavaScript inside a JSF component’s encode( ) method(s) using the ResponseWriter is sufficient. This approach was used previously in the Slider and BarChart examples of Chapter 10.
The code for rendering the AJAX script for DirectorySearch is invoked via the encodeAjaxJavaScript( ) method in the component’s encodeBegin( ) method, shown here:
  public void encodeBegin(FacesContext context) throws IOException  {
    String clientId = getClientId(context);
    encodeAjaxJavascript(context);
    encodeInputField(context, clientId);
  }
The content of encodeAjaxJavaScript( ) is
  private void encodeAjaxJavascript(FacesContext context)
throws IOException  {
    String border = (String)getAttributes().get("border");
    String tablebgcolor = (String)getAttributes().get("tablebgcolor");
    // render Ajax-enabled Javascript only once per page
     if (!jsRenderedFlag(context)) {
       // if not rendered yet, go ahead and do it
       ResponseWriter writer = context.getResponseWriter();
       writer.startElement("script", this);
       writer.writeAttribute("type", "text/javascript", null);
       renderLookupFunction(writer);
       render_processXML_function(writer);
       render_renderTable_function(writer, border, tablebgcolor);
       writer.endElement("script");
     }
   }
The code for renderLookupFunction( ), which actually generates the JavaScript function lookup( ) in the browser, is presented below in an abbreviated fashion:
private void renderLookupFunction(ResponseWriter writer)
  throws IOException  {
     writer.write("function lookup(field) {\n" +
       "writeloc = field + \":table\";\n" +
       "var searchField = document.getElementById(field);\n" +
       // Remainder of the ResponseWriter output omitted.
       "}\n" );
}
The sources for the remaining JavaScript render methods are omitted but are similar to the renderLookupFunction( ) and simply use the ResponseWriter to render JavaScript code.
In addition to rendering the AJAX script, the component also renders the core UI element(s) of the component. For the DirectorySearch example this is done by using the encodeInputField( ) method, which is also in the component’s encodeBegin( ) method.
encodeInputField(context, clientId);\
The UI for DirectorySearch is very basic because it is just an input field along with a <DIV>, which will serve as the write location for the results from the AJAX transaction.
public void encodeInputField(FacesContext context, String clientId)
throws IOException  {
  // render a standard HTML input field along with a DIV
  ResponseWriter writer = context.getResponseWriter();
  writer.startElement("p", this);
  writer.startElement("input", this);
  writer.writeAttribute("type", "text", null);
  writer.writeAttribute("id", clientId, "clientId");
  writer.writeAttribute("size", "20", null);
  writer.writeAttribute("onkeyup", "lookup('" + clientId + "');", null);
  writer.endElement("input");
  writer.endElement("p");
  writer.startElement("div", this);
  writer.writeAttribute("id", clientId + ":table", null);
  writer.endElement("div");
  }
Notice that the lookup( ) JavaScript function is included as an attribute of the input field.
As an alternative to using an external servlet to serve as the AJAX server component, the DirectorySearch example will embed this functionality inside the component’s decode( ) method, as shown here.
public void decode(FacesContext context) {
    Map requestMap = context.getExternalContext().getRequestMap();
  HttpServletResponse response = (HttpServletResponse)
    context.getExternalContext().getResponse();
  HttpServletRequest request = (HttpServletRequest)
    context.getExternalContext().getRequest();

  if (requestMap.containsKey("ajaxreq")) {
  // set the header information for the response
  response.setContentType("text/xml");
  response.setHeader("Cache-Control", "no-cache");
  response.setCharacterEncoding("UTF-8");

  try {

    XmlGenerator myXmlGenerator = new
      XmlGenerator(request.getParameter("input"));
    String xmlout = myXmlGenerator.getXmlResponse();
    response.getWriter().write(xmlout);
    response.getWriter().close();
  } catch (IOException e) {
      e.printStackTrace();
    }
  context.responseComplete();
  }
  // Place non-AJAX decode code here…
}
The first thing to notice about this decode( ) method is the code to check if a certain “ajaxreq” (AJAX Request) is one of the request parameters:
if (null != request.getParameter("ajaxreq")) {
This check allows the decode( ) method to distinguish between AJAX requests (XMLHttpRequest) and regular page requests. This approach requires that the JavaScript function making this request must supply this parameter. Another very important request parameter requirement is that the form name must also be passed as a parameter to the JSF application. If this value if not passed, the JSF application will interpret the request as a non-post-back request and the decode( ) method will not be entered. Therefore, the resulting response will be a non-AJAX, complete HTML page. The form name value can be obtained on the client by using window.document.forms[0].id.
NOTE This actually just retrieves the ID of the first form in the page, but this is sufficient to allow the JSF runtime to identify it as a non-post-back request.
Placing the formName along with the ajaxreq parameter can be combined with the following JavaScript client code:
var formdata = "formName=" + window.document.forms[0].id + "&ajaxreq=true";
The formdata data is then passed in the XmlHttpRequest’s send( ) call with req .send(formdata). Also, because submitting a form always issues a post-back, a different URL (such as ajaxdirectoryservice ) is not needed for the form’s action. Another important bit of information that is often passed as a set of parameters is the current status of the components in the page, or view state. This is only needed when the AJAX server component needs access to the UI components of the original view to which the user is now posting back. The next AJAX JSF example in the chapter does, however, show how to do this.
The other key thing to notice in the decode( ) method example is the usage of the HttpServletResponse.getWriter( ) method to write the XML directly to the response. Another approach would be to create a custom ResponseWriter that is suitable for writing XML.
The final thing to notice is that once the content for the request has been fulfilled, the JSF lifecycle can complete the response immediately so as not to render an entire page by using context.responseComplete( ).
The other task of the AJAX DirectorySearch JSF component is to render the same JavaScript code that was hard-coded directly into the HTML page in the original AJAX-only version. This is accomplished by using the ResponseWriter object in the component’s encode( ) method. Since this portion is trivial, it is not included in the text but is available on the web site.
In addition to the rendering code, the only remaining sub-component is the JSP tag handler that exposes the UI component to the JSP page. This is also a fairly straightforward step and its code is also available on the web site.
Our next AJAX JSF component example builds on the concepts shown in the DirectorySearch example but also shows alternative methods for rendering JavaScript on the client as well as how to process AJAX requests.
Similar to the previous AJAX example, this next example falls in line with the guiding philosophy in our usage of AJAX, which is to present to the page author the simplest possible usage model. It therefore also hides all of the complexity of asynchronous JavaScript code behind a Faces component. Our next AJAX example component, SpellCheckTextArea, extends HtmlInputTextArea and provides a simple AJAX-enabled spell-checking facility. The JSP usage for this is also very simple:
<jcr:spellCheckTextArea cols="30" rows="15" value="#{user.interests}" />
This component renders a spell-checking panel beneath an HTML textarea input field, and allows the user to check the spelling of their text before submitting. As before, the user is not required to put any <script> tags anywhere in the page to use this component. When the user presses the Next button (as shown in Figure 11-6), an asynchronous request is made to the server, which causes a MethodBinding to be called. This MethodBinding points to a method that takes a string and returns an array of suggested spellings. For the sake of simplicity, <jcr:spellCheckTextArea> doesn’t do anything fancy to highlight the incorrect word or dynamically replace it with the chosen suggestion. This feature has nothing to do with Faces and therefore is left as an exercise for the reader. Rather, the UI simply shows the current misspelled word and lists the suggestions in a simple table, as shown in Figure 11-6.
Similar to the DirectorySearch example, the SpellCheckTextArea example also shows the power of combining Faces with AJAX techniques while delivering the same ease of development to the page author. We’ll now examine the high-level AJAX JSF elements of the SpellCheckTextArea example in more detail.
In contrast to rendering AJAX script directly into the page from the component’s encode( ) methods, the SpellCheckTextArea example uses a PhaseListener to deliver the AJAX script instead. In this example, the delivered script is just a reference to an external JavaScript file. It is also conditionally rendered such that only the first usage of the SpellCheckTextArea component renders the script since the browser only needs one copy of the AJAX script in memory.

FIGURE 11-6 The AJAX SpellCheckTextArea component
FIGURE 11-7 Using a PhaseListener to render the AJAX JavaScript
Using a PhaseListener to Deliver the AJAX Script to the Client Since the AJAX script is just a file reference, in keeping with hiding the JavaScript from the page author, it would be nice to avoid requiring the page author to place the script file at some location on the server’s filesystem. Instead, the “file” will be referenced purely as a runtime resource such as “SpellCheckTextArea .ajaxScript”. At runtime this script resource will be resolved and the content will be delivered to the client leveraging the existing FacesServlet using a PhaseListener. This approach, shown in Figure 11-7, allows you to bundle the actual AJAX script file into the same jar file in which the component itself is packaged, preserving the all-important JSF value proposition of “drop the component jar into WEB-INF/lib of your application and you’re ready to go.”
Early in this book, there is an example of how to write a simple PhaseListener. This example defines a SpellCheckPhaseListener that handles several different processing tasks, one of them being to render the AJAX script. The SpellCheckPhaseListener needs to be notified only on the Restore View phase of the lifecycle, so its getPhaseId( ) method looks like this:
public PhaseId getPhaseId() {
  PhaseId.RESTORE_VIEW;
}
In the case of rendering the AJAX script, the afterPhase( ) event is acted upon during the Restore View phase:
public void afterPhase(PhaseEvent event) {
  // If this is restoreView phase and the viewId is the script view id…
  if (-1 != event.getFacesContext().getViewRoot().
      getViewId().indexOf(RENDER_SCRIPT_VIEW_ID)) {
    // render the script
    writeScript(event);
    event.getFacesContext().responseComplete();
  }
}

static final String RENDER_SCRIPT_VIEW_ID = "SpellCheckTextArea.ajaxScript";

private static final String SCRIPT_RESOURCE_NAME =
   "/com/jsfcompref/components/component/ajax.js";

private void writeScript(PhaseEvent event) {
  URL url = getClass().getResource(SCRIPT_RESOURCE_NAME);
  URLConnection conn = null;
  InputStream stream = null;
  BufferedReader bufReader = null;
  HttpServletResponse response = (HttpServletResponse)event.
  getFacesContext().getExternalContext().getResponse();
  OutputStreamWriter outWriter = null;
  String curLine = null;

  try {
     outWriter = new OutputStreamWriter(response.getOutputStream(),
         response.getCharacterEncoding());
    conn = url.openConnection();
    conn.setUseCaches(false);
    stream = conn.getInputStream();
    bufReader = new BufferedReader(new InputStreamReader(stream));
    response.setContentType("text/javascript");
    while (null != (curLine = bufReader.readLine())) {
      outWriter.write(curLine+"\n");
    }
    outWriter.close();

  } catch (Exception e) {
    String message = null;
    message = "Can't load script file:" +
        url.toExternalForm();
    response.sendError(HttpServletResponse.SC_BAD_REQUEST, message);
  }
}
The full code for the SpellcheckPhaseListener is included on the Web site for this book; however, the writeScript( ) method deserves special attention. This method uses the ClassLoader to load the ajax.js file and sends it out to the HttpServletResponse, making sure to set the contentType to text/javascript and the status to 200. The call to responseComplete( ) is needed because it tells the Faces lifecycle that the response for this request has been written and no further action need be taken to satisfy this request, thus causing the remaining lifecycle phases to be skipped.
The Content of the SpellCheck AJAX Script and How It Uses XMLHttpRequest As described above in the SpellCheckTextArea component example, all of the AJAX JavaScript code resides in a file called ajax.js that is bundled into the ajaxcomponents.jar and served up by the SpellCheckPhaseListener. The SpellCheckTextArea component also renders the HTML markup, which with the provided script starts the process of sending XML requests in response to the user clicking the buttons in the page. We’ll look at the component code in detail later. For now, here is the rendered output of the component.
<p>
<textarea id="form:textarea" name="form:textarea"
          cols="30" rows="5">
</textarea>
<script type="text/JavaScript"
        src="SpellCheckTextArea.ajaxScript">
</script>

<table border="1">
  <tr>
    <td>current word</td>
    <td>suggestions</td>
     <td rowspan="2">
      <input type="button" value="previous" onclick=
"getSuggestionsForPreviousWord('form:textarea');">
    </td>
     <td rowspan="2">
        <input type="button" value="next" onclick=
"getSuggestionsForNextWord('form:textarea');">
    </td>
     <td rowspan="2">
       <input type="button" value="reset" onclick=
"resetSpellCheck('form:textarea');">
    </td>
  </tr>
  <tr>
    <td id="form:textarea:currentWord"> </td>
    <td id="form:textarea:suggestions"> </td>
  </tr>
</table>
</p>
<p><input type="submit" name="form:_id0"
          value="reload" onclick=
    "clearFormHiddenParams_form(this.form.id);" />
</p>
All of the JavaScript functions referenced as the value of onclick handlers are defined in the ajax.js file. Let’s examine getSuggestionsForPreviousWord( ) to illustrate the necessary actions to send an AJAX request to the server.
var theRequest = null;
var isMozilla = false;
var isIE = false;
var gContexts = new Array();
function getSuggestionsForPreviousWord(clientId) {
  var previousWord = getPreviousWord(clientId);

  var req = prepareRequest(clientId, previousWord);
  req.request.onreadystatechange = processAjaxResponse;
  req.request.send(req.params);

  return false;
}
First, some global variables are declared. These variables will be used throughout the ajax.js file sent to the browser as requested in the tag:
<script type="text/JavaScript" src="SpellCheckTextArea.ajaxScript">
Next, note that getSuggestionsForPreviousWord( ) takes the clientId of the AJAX component itself. This is very important because without this piece of data it would be impossible to distinguish between multiple instances of the component in the same page. In general, it is a good practice to always pass around the clientId of the component to all the JavaScript functions relating to that component. The previous word (previousWord) is obtained from the text area. Then the request (shown below) is prepared. The return value from prepareRequest( ) is a JavaScript associative array with two entries. The req entry is a two-element JavaScript object. req.request is the actual XMLHttpRequest JavaScript object. req.params is the post data to be sent along with the request. The onreadystatechange property in the example is assigned to the callback function, processAjaxResponse( ).
The content of getPreviousWord( ) and getContext( ) is shown next.
function getPreviousWord(clientId) {
  var context = getContext(clientId);
  if (-1 == context.index) {
    context.index = context.words.length - 1;
  }
  return context.words[context.index--];
}

function getContext(clientId) {
  var context = null;

  if (null == (context = gContexts[clientId])) {
    var fieldValue = window.document.getElementsByName(clientId);
    fieldValue = fieldValue[0].value;

    context = new Object();
    context.index = 0;
    context.words = fieldValue.split(' ');
    gContexts[clientId] = context;
  }
  return context;
}
The getPreviousWord( ) function calls getContext( ), which returns another JavaScript associative array that encapsulates the words to be spell checked along with the index of the current word. getPreviousWord( ) simply manipulates the context appropriately.
Next, examine prepareRequest( ):
function prepareRequest(clientId, word) {
  // State submitting code omitted, described later
  var params = "";
  // A truly robust implementation would discern the form number in
  // which the element named by "clientId" exists, and use that as the
  // index into the forms[] array.
  var formName = window.document.forms[0].id;
  // build up the post data
  var ajaxId = clientId + "Ajax";
  var params = params + formName + "=" + formName + "&" + clientId + "=" +
      word + "&" + ajaxId + "=ajax";
  // Again, this is safe to use the 0th form's action because each
  // form in the page has the same action.
  var formAction = window.document.forms[0].action;
  var request = getXMLHttpRequest();

  request.open("POST", formAction, true);
  request.setRequestHeader("Content-Type",
           "application/x-www-form-urlencoded");
  var result = new Object();
  result.request = request;
  result.params = params;

  return result;
}
The prepareRequest( ) function takes as arguments the clientId of the AJAX component, and the word to be spell checked. These arguments are assembled into name/value pair POST data in the param local variable. Also included in the POST data are the view state (omitted here, but explained later), the form name, the client ID, the word to be spell checked, and a special parameter called ajaxId, which is expected by the AJAX component on the server to indicate that this request is an AJAX request and not a normal form submit. Once the param local variable is properly assembled, the action of the first form in the page is obtained. Note that this will work even if there are multiple JSF forms in the page because the form action is guaranteed by JSF to be the same for each one. As an enhancement from the DirectorySearch example, helper method getXMLHttpRequest( ) is used to get the actual XMLHttpRequest instance.
function getXMLHttpRequest() {
  if (!theRequest) {
    // If this is the mozilla browser
    if (window.XMLHttpRequest) {
      theRequest = new XMLHttpRequest();
      isMozilla = true;
     }
     else if (window.ActiveXObject) {
      theRequest = new ActiveXObject("Microsoft.XMLHTTP");
      isIE = true;
     }
  }
  return (theRequest);
}
Recall from before that the code to obtain an XMLHttpRequest object must detect the browser family (Mozilla or Internet Explorer) to obtain the correct version. Also note that there is only one actual XMLHttpRequest instance in this example. A production quality implementation would need to manage multiple instances using a clientId keyed context mechanism similar to what was done with the words in the text area.
Once the request object is attained, the open( ) function is called. Recall that this method takes three arguments: the HTTP method to use for this request, the action to which the request should be sent, and a Boolean parameter indicating if this request should be sent asynchronously or not. As before, this example also posts back to the FacesServlet, which always expects the method to be POST. The last argument to open( ) will be true again since the “A” in AJAX stands for “asynchronous,” after all. After the request has been open( )ed, the Content-Type header is added to ensure the server properly interprets it. The header is the same as before, “application/x-www-form-urlencoded”. Finally, a JavaScript Object is constructed to hold the initialized XMLHttpRequest instance and the parameters to be sent along with it. This Object is returned from the prepareRequest( ) method as used in getSuggestionsForPreviousWord( ) above.
The last portion of the AJAX script is the callback function, processAjaxResponse( ), whose job is to process the returned XML response. For example, when a word such as “ferther” is provided to the SpellCheckTextArea component, the XML response below will be returned:
<message>
  <suggestions>
    <word>farther</word>
    <word>further</word>
    <word>feather</word>
  </suggestions>
  <currentWord>ferther</currentWord>
  <clientId>form:textarea</currentWord>
<message>
Let’s examine how the processAjaxResponse( ) method, shown here, takes this message apart and deals with it.
function processAjaxResponse() {
  var request = getXMLHttpRequest();
  if (4 == request.readyState) {
    if (200 == request.status) {
      // extract the currentWord from the XML
      var currentWord =
        request.responseXML.getElementsByTagName("currentWord")[0];
      currentWord = currentWord.firstChild.nodeValue;
      // extract the suggested words from the XML
      var wordNodes =
        request.responseXML.getElementsByTagName("suggestions")[0];
      // if there are no suggested words, use an empty array
      if (null == wordNodes) {
        wordNodes = new Array();
      }
      else {
        wordNodes = wordNodes.childNodes;
      }
      // extract the clientId from the XML
      var clientId =
        request.responseXML.getElementsByTagName("clientId")[0];
      clientId = clientId.firstChild.nodeValue;

      // update the currentWord JavaScript with the value from XML
      var targetElement =
         window.document.getElementById(clientId + ":currentWord");
      targetElement.innerHTML = currentWord;

      // update the suggested words with the value from XML
      targetElement =
         window.document.getElementById(clientId + ":suggestions");
      var wordList = "";
      for (i = 0; i < wordNodes.length; i++) {
         wordList = wordList + wordNodes[i].firstChild.nodeValue +
        "<br />";
      }
      targetElement.innerHTML = wordList;
    }
  }
}
Similar to the DirectorySearch example, the callback function first checks the request .status value, which is the HTTP response code sent from the server. A value of 200 here means that everything is okay, and we can read the response from the server. Again, the XML message is accessed via the responseXML property of the XMLHttpRequest object. The callback function also uses standard JavaScript DOM processing techniques here to extract the important content from the message. Once we’ve parsed the message, we modify the DOM of the page in the browser by getting access to the innerHTML property for the currentWord and suggestions fields in the table. Recall from the rendered markup at the beginning of this section that these fields look like this:
<tr> <td id="form:textarea:currentWord"> </td> <td id="form:textarea:suggestions"> </td> </tr>
The suggestions field is populated with all the suggested words sent from the server.
Now that you have the ability to easily serve up the AJAX script in response to a request to the FacesServlet, and you have an idea of what is in the AJAX script itself, you need to generate the actual <script> element markup and the JavaScript attributes that cause the AJAX requests to be sent based on user interaction. This is no different from rendering any other HTML markup as you did earlier in the chapter. In the case of SpellCheckTextArea, we add this logic to the encodeEnd( ) method:
public void encodeEnd(FacesContext context) throws IOException {
  getStandardTextareaRenderer(context).encodeEnd(context, this);
  ExternalContext extContext = context.getExternalContext();
  ResponseWriter writer = context.getResponseWriter();
  // Render the main script, only once per page
  if (!extContext.getRequestMap().containsKey("ajaxflag.ajaxScript")) {
    extContext.getRequestMap().put("ajaxflag.ajaxScript", Boolean.TRUE);
    writer.startElement("script", this);
    writer.writeAttribute("type", "text/JavaScript", null);
    writer.writeAttribute("src", SpellcheckPhaseListener.RENDER_SCRIPT_VIEW_ID,
                           null);
    writer.endElement("script");
  }

  // Table rendering code omitted
  writer.startElement("input", this);
  writer.writeAttribute("type", "button", "type");
  writer.writeAttribute("value", "previous", "type");
  writer.writeAttribute("onclick", "getSuggestionsForPreviousWord('" +
                 clientId + "');", "onclick");
  writer.endElement("input");

  // More table rendering code omitted
  writer.startElement("input", this);
  writer.writeAttribute("type", "button", "type");
  writer.writeAttribute("value", "next", "type");
  writer.writeAttribute("onclick", "getSuggestionsForNextWord('" +
                 clientId + "');", "onclick");
  writer.endElement("input");

  // More table rendering code omitted
  writer.startElement("input", this);
  writer.writeAttribute("type", "button", "type");
  writer.writeAttribute("value", "reset", "type");
  writer.writeAttribute("onclick", "resetSpellCheck('" +
                 clientId + "');", "onclick");
  writer.endElement("input");

  // More table rendering code omitted
  writer.startElement("tr", this);
  writer.startElement("td", this);
  writer.writeAttribute("id", clientId + ":currentWord", "id");
  writer.write(" ");
  writer.endElement("td");
  writer.startElement("td", this);
  writer.writeAttribute("id", clientId + ":suggestions", "id");
  writer.write(" ");
  writer.endElement("td");
  writer.endElement("tr");
There are four points of interest in the above code. The first is the usage of a request scoped attribute to prevent the <script> element from being rendered more than once per page. This is desirable because once the script has been loaded into the browser, there is no need to re-load it while the browser is on the same page. The second interesting point is the usage of the RENDER_SCRIPT_VIEW_ID constant from the SpellcheckPhaseListener class. This is a tight coupling between SpellCheckTextarea and SpellcheckPhaseListener. The rendered script element looks like this:
<script type="text/JavaScript" src="SpellCheckTextArea.ajaxScript">
</script>
Because the URL from which the JSP page was loaded looks something like the relative URL in the <script> element causes the browser to fetch to the URL:
http://localhost:8080/spellcheck/faces/spellCheck.jsp\
http://localhost:8080/spellcheck/faces/SpellCheckTextArea.ajaxScript.
This runs through the Faces lifecycle, and thus causes our SpellcheckPhaseListener to be invoked, which in turn returns the AJAX script.
The third interesting point is the liberal sprinkling of clientId as a parameter to the JavaScript function getSuggestionsForPreviousWord( ). This is important because it enables multiple instances of the component to reside in a single page, thanks to the ID uniqueness guarantee provided by the JSF runtime.
Finally, note that we render empty <td> elements to hold the currentWord and suggestions values from the server, again making sure to use the clientId to distinguish between multiple instances of the spell-check component.
While the SpellCheckTextArea component generates the <script> tag that loads the AJAX browser script, and the standard FacesServlet serves up the script to the browser using the PhaseListener, the remaining portion of this example is the AJAX server component, which responds to the AJAX request issued from the script in the browser. Let’s now review this in more detail.
Similar to the DirectorySearch component where the AJAX server code is integrated into the JSF application, the SpellCheckTextArea component example leverages the FacesServlet to allow the JSF lifecycle to guide the processing of AJAX requests. As you’ve seen in the DirectorySearch example, this is slightly more complex to develop than an independent generic servlet solution, and there may be higher performance costs if the number of AJAX requests is large. However, the entire AJAX technology is packaged into a single JSF UI Component, thus ensuring easier access to application data (via EL, ManagedBeans, messages) as well as providing a simpler deployment process. The performance cost can also be mitigated by carefully designing your AJAX interactions, and by using a servlet container that can leverage the high-performance java.nio package for its network layer, such as the Sun Java System Application Server.
Using the FacesServlet and JSF Lifecycle to Host the High-Level AJAX Processing Server Element In order for a request from the browser to get into the JSF component lifecycle, the second URL argument of the open( ) call on the XMLHttpRequest instance must match the servlet-mapping url-pattern defined in the web.xml (for example,/faces). There are two ways the JSF request processing lifecycle can be used to orchestrate the AJAX request processing server component: executing within the scope of a view (page) or executing without reference to a specific view. The former involves having the AJAX browser script simulate a form submit with the entire view state, which includes adding the necessary request parameters to allow the JSF lifecycle to restore the entire view and perform processing on it. This approach has the benefit of allowing your components to have access to the entire view while performing the AJAX processing. The latter doesn’t ship the component state along with the AJAX request, and therefore the JSF lifecycle cannot access the component state. However, it still can access managed beans and other JSF resources. Let’s examine submitting the AJAX request with the component state first, because omitting the component state is simple once you understand how to include it in the first place.
Including the JSF Component View State in the AJAX Request In the ajax.js script, the prepareRequest( ) function is responsible for marshaling the parameters to be sent in the AJAX request, including any view state. The omitted code to pull in the view state is now included here.
function prepareRequest(clientId, word) {
  // The following is a dependency on Sun's JSF Implementation.
  // In Faces 1.2, this has been fixed by specifying a value of
  // javax.faces.ViewState as the name of the state field. A
  // production quality implementation would need to also consider
  // other implementations, such as MyFaces.

  var stateFieldName = "com.sun.faces.VIEW";
  var stateElements = window.document.getElementsByName(stateFieldName);
  var stateValue = null;
  var params = "";

  if (null != stateElements && 0 < stateElements.length) {
    // In the case of a page with multiple h:form tags, there will be
    // multiple instances of stateFieldName in the page. Even so, they
    // all have the same value, so it's safe to use the 0th value.
    stateValue = stateElements[0].value;
    // We must carefully encode the value of the state array to ensure
    // it is accurately transmitted to the server. The implementation
    // of encodeURI() in mozilla doesn't properly encode the plus
    // character as %2B so we have to do this as an extra step.
    var uriEncodedState = encodeURI(stateValue);
    var rexp = new RegExp("\\+", "g");
    var encodedState = uriEncodedState.replace(rexp, "\%2B");
    params = stateFieldName + "=" + encodedState + "&";
  }
The view state code above requires a bit of knowledge about the JSF state management system, but essentially provides the server with the current state of the JSF page (or view component tree). This is only needed when any manipulation of a view component tree is to be done by the AJAX server component.
NOTE The code provided is actually specific to Sun’s implementation of JSF 1.1 because the name of the hidden field for the page state was not standardized until JSF 1.2.
Generally, the idea is to find the name of the hidden field that contains the page state, if any, and bundle that into the parameters, making sure to encode it properly so the browser doesn’t mix things up.
With this approach, the SpellCheckTextArea component itself can handle the AJAX processing in its normal decode( ) method, as shown here:
public void decode(FacesContext context) {
  ExternalContext extContext = context.getExternalContext();
  String
    clientId = this.getClientId(context),
    ajaxId = clientId + "Ajax",
    ajaxIdVal = (String)
      extContext.getRequestParameterMap().get(ajaxId);
  String [] result = null;
  // Determine if this is an ajax request or a regular Faces request.
  if (null == ajaxIdVal || -1 == ajaxIdVal.indexOf("ajax")) {
    // Delegate to standard Textarea Renderer if this is a regular
    // Faces request.
    getStandardTextareaRenderer(context).decode(context, this);
    return;
  }

  // See if there are any words to check
  String value = (String) extContext.getRequestParameterMap().get(clientId);
  if (null == value) {
    // If not, return.
    return;
  }

  try {
    result = (String [])
      getWordServer().invoke(context, new Object [] { value });
  } catch (Exception e) {
    System.out.println("Exception: " + e.getMessage());
  }
  if (null == result) {
    return;
  }

  HttpServletResponse response = (HttpServletResponse)
  context.getExternalContext().getResponse();

  // set the header information for the response
  response.setContentType("text/xml");
  response.setHeader("Cache-Control", "no-cache");

  try {
    ResponseWriter writer = Util.getResponseWriter(context);
    writer.startElement("message", this);
    writer.startElement("suggestions", null);
    for (int i = 0; i < result.length; i++) {
      writer.startElement("word", this);
      writer.writeText(result[i], null);
      writer.endElement("word");
    }
    writer.endElement("suggestions");
    writer.startElement("currentWord", this);
    writer.writeText(value, null);
    writer.endElement("currentWord");
    writer.startElement("clientId", this);
    writer.writeText(clientId, null);
    writer.endElement("clientId");
    writer.endElement("message");
  } catch (IOException e) {
    // log message…
  }
  context.responseComplete();

}
Similar to the DirectorySearch component, the first thing decode( ) checks is the special request parameter, which indicates that it is an AJAX request. In this example it is ajaxId. The absence of this parameter causes the component to simply delegate to the standard Textarea renderer for the decoding and to return afterward. It then extracts the clientId parameter, which is assumed to be the list of words to check, and passes it on to the spell-checking engine. If the server returned any suggestions, the XML message is composed to conform to the syntax expected by the ajax.js script. Note that the content type is set to text/xml and Cache-Control header is set to no-cache. These two headers are vitally important. Leaving them out will break the component. Finally, note that responseComplete( ) is called on the context for the same reason it was called on it in SpellcheckPhaseListener: to prevent the rendering phase of the request processing lifecycle from happening. This is important because the ajax.js script is expecting to receive only the simple XML message, not a full rendered page.
JSF 1.2 TIP The ability to maintain the component state and context when submitting and processing the AJAX request is essential to using JSF and AJAX together. The previous sections detailed the need for submitting the JSF View State along with the AJAX request. However, there is a special case that must be addressed: iterating components. Consider a data-table with many rows and columns. Let’s say we want to update a single cell in that table over AJAX, using, for example, an “in-place editor” widget from a third-party JavaScript library. Recall that the data-table doesn’t actually instantiate new components for each row in the table; rather, it uses a “rubber stamp” approach for each row, substituting in the values for each row as the table is rendered.
<h:dataTable id="table" value="#{data.table}" var="row">
  <h:column>
    <h:outputText id="name" value="#{row.userName}" />
  <h:column>
    <h:outputText id="userid" value="#{row.userid}" />
  </h:column>
</h:dataTable>
Regardless of how many rows are in the table, there are only two outputText components created and used when the table is rendered. The rendered markup for this table will look something like:
<table>
  <tr>
    <td><div id="table:0:name">John Bigboote</div></td>
    <td><div id="table:0:userid">bigboote</div></td>
  </tr>
  <tr>
    <td><div id="table:1:name">John Small Berries</div></td>
    <td><div id="table:1:userid">jsmallb</div></td>
  </tr>
</table>
Note the funny-looking id attributes of the table cells: table:1:name, etc. These clientId values are created by the UIData component as the rows of the table are rendered.
Let’s say we want to replace each outputText component with a special AJAX-enabled in-place editor component (the details of this component are beyond the scope of this introductory chapter). Such components typically replace some static text with a text field and a button, submitting the AJAX request when the button is pressed. The JSP markup will look something like this:
<h:dataTable value="#{data.table}" var="row">
  <h:column>
     <ajax:inplaceEditor value="#{row.userName}" />
  <h:column>
     <ajax:inplaceEditor value="#{row.userid}" />
  </h:column>
</h:dataTable>
In order for the AJAX request to modify the correct value of the user name based on which cell in which row is edited, the clientId associated with that row must be properly interpreted. Let’s say the user clicks on the String “John Smallberries” and clicks OK on the in-place editor text field button. This will cause an AJAX request to be posted back to the FacesServlet including a name/value pair like this:
table:1:userid="John Ya Ya"
When posting back this request, the JSF runtime must be able to locate the individual component representing the userid element of the second row in the table. Passing the clientId to findComponent( ) will not work because the table does not correctly position itself to the desired row. JSF 1.2 introduces the invokeOnComponent( ) method for this purpose. This method is over-ridden on the UIData class to properly position the table before taking action on the component. The syntax for this method is
public boolean invokeOnComponent(FacesContext context, String clientId
                          ContextCallback callback) throws FacesException
The ContextCallback is an interface that you must implement with the following signature:
public interface ContextCallback{
  public void invokeContextCallback(FacesContext context,
                                    UIComponent target); }
The general usage pattern is to obtain the UIViewRoot from the FacesContext and call invokeOnComponent( ) on it, like this:
UIViewRoot root = FacesContext.getViewRoot( );
ContextCallback cb = new ContextCallback( ) {
  public void invokeContextCallback(FacesContext context,
                                    UIComponent target) {
    // Take some action on the component, perhaps setting its value.
  }
};
boolean found = root.invokeOnComponent(context, "table:1:userid", cb);
// found will be true if a matching component was found.
Omitting the JSF Component View State from the AJAX Request Leaving out the component view state when issuing AJAX requests to the FacesServlet is also a viable option when the server component does not need access to the page’s components at runtime. When this is the case, the AJAX request doesn’t need to include the view state information as a request parameter. Under this scenario the AJAX server component can be implemented as a PhaseListener as opposed to using a decode( ) method in a component. This approach uses basically the same AJAX server code that was used in the decode( ) method examples from before, but instead it is placed inside of a PhaseListener. A complementary example of how to do this is provided in the DirectorySearch example and is available on the Web site.
Debugging a JSF AJAX application may make debugging a regular JSF application look easy. One must directly confront browser incompatibilities. It is common for a component to work fine in one browser but not function at all in another. The Web site http://www.quirksmode.org/, named after one of the two modes in which a browser can read an HTML document (the other being strict mode), is a great resource for getting around these incompatibilities. Also, no survey of AJAX tips and tricks would be complete without a reference to Ben Galbraith and Dion Almaer’s http://www.ajaxian.com/.
For completeness, we also must mention three leading JavaScript libraries that provide advanced JavaScript features that are agnostic to the server side processing, and therefore can be used with JSF.
• Dojo: http://dojotoolkit.org/ This open source library is a well-documented and robust JavaScript library that includes AJAX processing, a packaging system, and a set of ready-to-use UI Widgets that supplement the ones provided by JSF.
• Prototype: http://prototype.conio.net/ A competitor to Dojo, this is a smaller library, also open source, with fewer features, but has a lot of buzz going around it due to its association with Ruby on Rails.
• Zimbra: http://www.zimbra.com/ Zimbra is actually much more than just a JavaScript library, and its other features are not generally germane to JSF; however, they do have a decent AJAX library. Unfortunately, they are not open source as of this writing but have announced plans to go that route.
There are also a number of debuggers and tools available to help in developing an AJAXian application. The most basic is the JavaScript console.
The Mozilla Firefox Web browser has an excellent JavaScript debugger called Venkman (http://www.mozilla.org/projects/venkman/). Another Firefox extension is called Greasemonkey (http://greasemonkey.mozdev.org/). This enables you to add DHTML to each page to highly customize its behavior in the browser, sometimes providing debugging insight. Internet Explorer users can use the JavaScript debugging functionality in Visual Studio and also make use of the Internet Explorer Developer Toolbar. This download can be obtained by searching the Microsoft Web site for the exact name “Internet Explorer Developer Toolbar” (without the quotes).
Finally, when considering deploying an AJAX application, one must consider accessibility concerns. Chapter 14 covers accessibility in detail, but one point deserves special attention here. One of the key guidelines for producing an accessible application is that it should perform well even when JavaScript is turned off. This validity of this guideline is subject to debate, but it is prudent to keep it in mind. As AJAX becomes more and more common, meeting this guideline will become increasingly unreasonable. On the other hand, government-mandated accessibility requirements are not likely to change just because it’s possible to build cooler looking applications by ignoring these requirements. Please keep this in mind when developing your AJAX-enabled application.
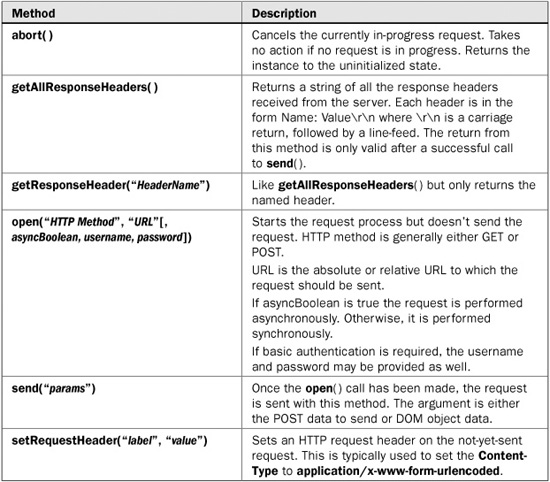
This section provides a brief reference to the functionality of the XMLHttpRequest object.
Table 11-1 lists the methods available on the XMLHttpRequest object.
Table 11-2 lists the properties on the XMLHttpRequest object.