Before understanding Spark, it is imperative to understand the reason behind this deluge of data that we are witnessing around us today. In the early days, data was generated or accumulated by workers, so only the employees of companies entered the data into systems and the data points were very limited, capturing only a few fields. Then came the internet, and information was made easily accessible to everyone using it. Now, users had the power to enter and generate their own data. This was a massive shift as the number of internet users grew exponentially, and the data created by these users grew at even a higher rate. For example: login/sign-up forms allow users to fill in their own details, uploading photos and videos on various social platforms. This resulted in huge data generation and the need for a fast and scalable framework to process this amount of data.
Data Generation

Data Evolution
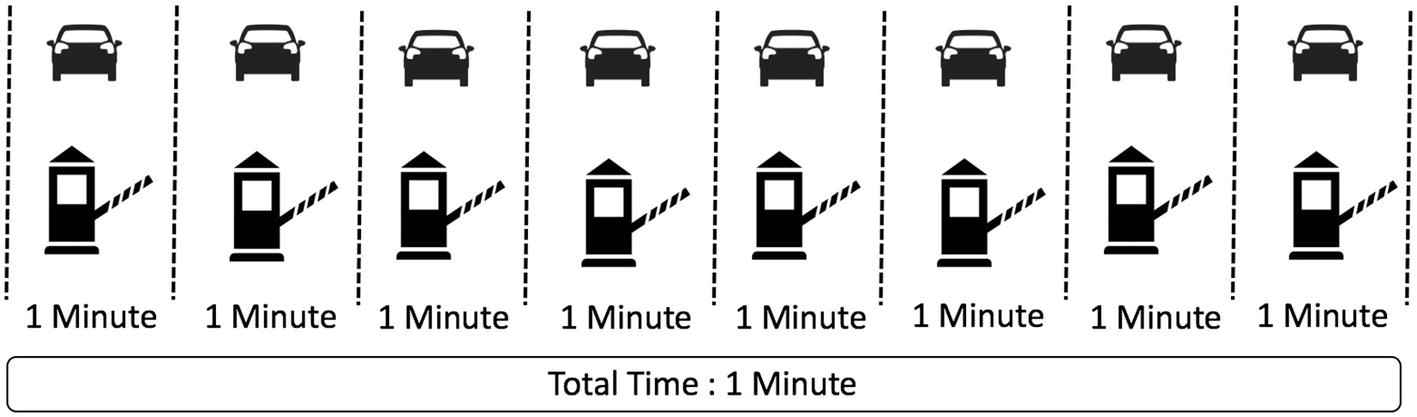
Earlier, when the data was still at enterprise level, a relational database was good enough to handle the needs of the system, but as the size of data increased exponentially over the past couple of decades, a tectonic shift happened to handle the big data and it was the birth of Spark. Traditionally, we used to take the data and bring it to the processer to process it, but now it’s so much data that it overwhelms the processor. Now we are bringing multiple processors to the data. This is known as parallel processing as data is being processed at a number of places at the same time.

Single Thread Processing
Parallel Processing
Parallel or Distributed computing works on a similar principle, as it parallelizes the tasks and accumulates the final results at the end. Spark is a framework to handle massive datasets with parallel processing at high speed and is a robust mechanism.
Spark
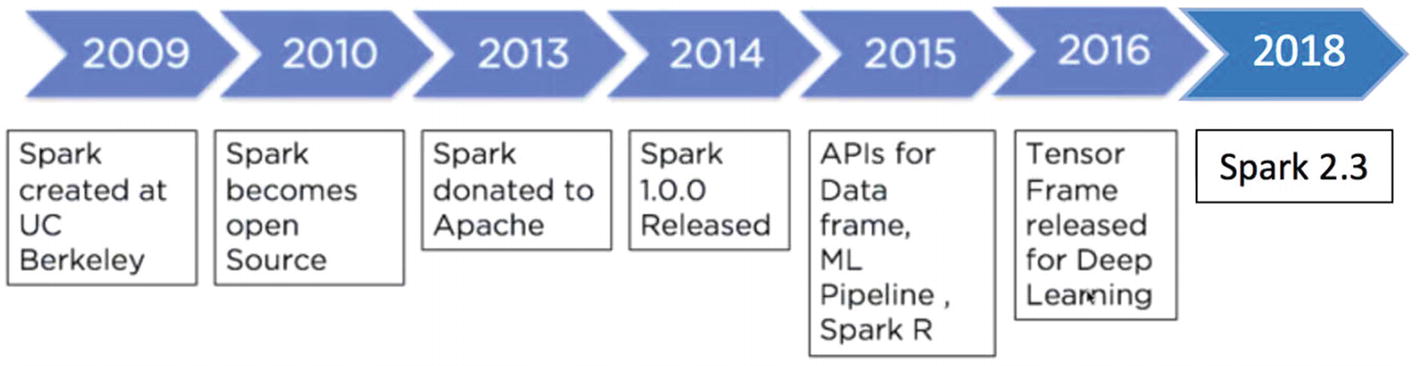
Spark Evolution
Spark Functioning
The prime reason that Spark is hugely popular is due to the fact that it’s very easy to use it for data processing, Machine Learning, and streaming data; and it’s comparatively very fast since it does all in-memory computations. Since Spark is a generic data processing engine, it can easily be used with various data sources such as HBase, Cassandra, Amazon S3, HDFS, etc. Spark provides the users four language options to use on it: Java, Python, Scala, and R.
Spark Core

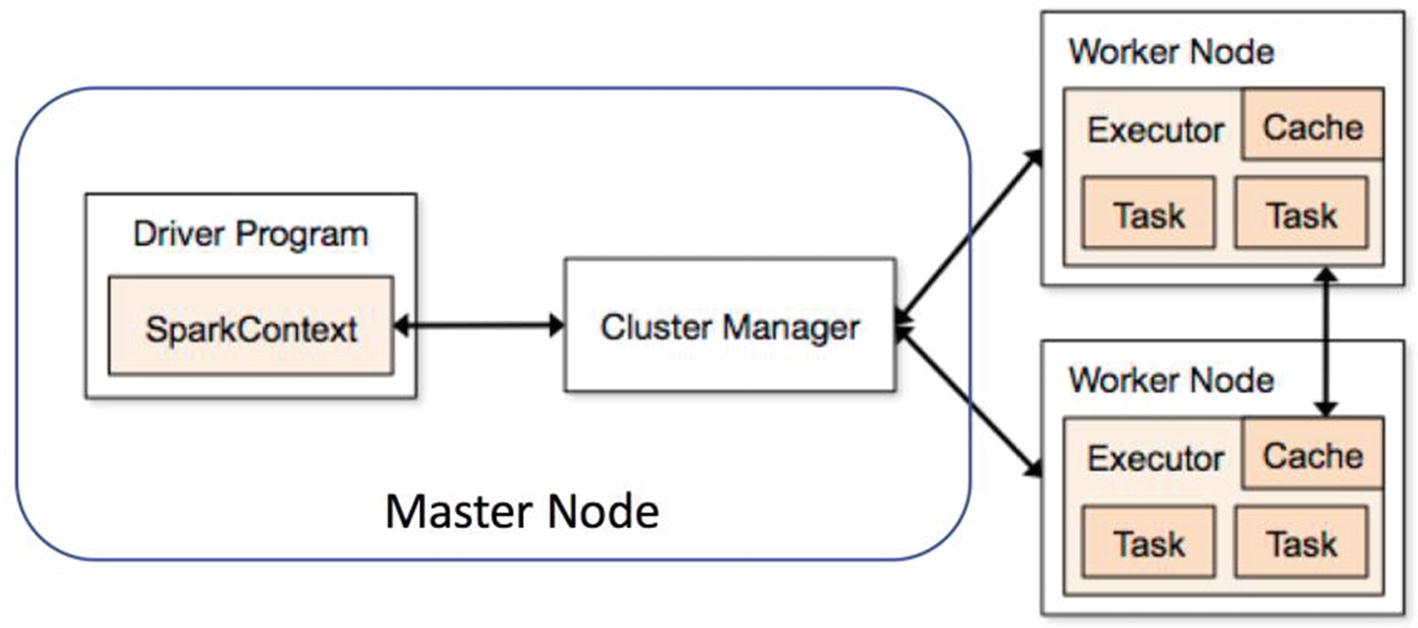
Spark Architecture
Spark Components
Let’s look at the components.
Spark SQL
This component mainly deals with structured data processing. The key idea is to fetch more information about the structure of the data to perform additional optimization. It can be considered a distributed SQL query engine.
Spark Streaming
This component deals with processing the real-time streaming data in a scalable and fault tolerant manner. It uses micro batching to read and process incoming streams of data. It creates micro batches of streaming data, executes batch processing, and passes it to some file storage or live dashboard. Spark Streaming can ingest the data from multiple sources like Kafka and Flume.
Spark MLlib
This component is used for building Machine Learning Models on Big Data in a distributed manner. The traditional technique of building ML models using Python’s scikit learn library faces lot of challenges when data size is huge whereas MLlib is designed in a way that offers feature engineering and machine learning at scale. MLlib has most of the algorithms implemented for classification, regression, clustering, recommendation system, and natural language processing.
Spark GraphX/Graphframe
This component excels in graph analytics and graph parallel execution. Graph frames can be used to understand the underlying relationships and visualize the insights from data.
Setting Up Environment
This section of the chapter covers setting up a Spark Environment on the system. Based on the operating system, we can choose the option to install Spark on the system.
Windows
- 1.
Anaconda (Python 3.x)
- 2.
Java (in case not installed)
- 3.
Apache Spark latest version
- 4.
Winutils.exe
Anaconda Installation
Download the Anaconda distribution from the link https://www.anaconda.com/download/#windows and install it on your system. One thing to be careful about while installing it is to enable the option of adding Anaconda to the path environment variable so that Windows can find relevant files while starting Python.
Java Installation
Visit the https://www.java.com/en/download/link and download Java (latest version) and install Java.
Spark Installation
Create a folder named spark at the location of your choice. Let’s say we decide to create a folder named spark in D:/ drive. Go to https://spark.apache.org/downloads.html and select the Spark release version that you want to install on your machine. Choose the package type option of “Pre-built for Apache Hadoop 2.7 and later.” Go ahead and download the .tgz file to the spark folder that we created earlier and extract all the files. You will also observe that there is a folder named bin in the unzipped files.
The next step is to download winutils.exe and for that you need to go to the link https://github.com/steveloughran/winutils/blob/master/hadoop-2.7.1/bin/winutils.exe and download the .exe file and save it to the bin folder of the unzipped spark folder (D:/spark/spark_unzipped/bin).
Now that we have downloaded all the required files, the next step is adding environment variables in order to use pyspark.
Go to the start button of Windows and search for “Edit environment variables for your account.” Let’s go ahead and create a new environment variable for winutils and assign the path for the same. Click on new and create a new variable with the name HADOOP_HOME and pass the path of the folder (D:/spark/spark_unzipped) in the variable value placeholder.
We repeat the same process for the spark variable and create a new variable with name SPARK_HOME and pass the path of spark folder (D:/spark/spark_unzipped) in the variable value placeholder.
Let’s add a couple of more variables to use Jupyter notebook. Create a new variable with the name PYSPARK_DRIVER_PYTHON and pass Jupyter in the variable value placeholder. Create another variable named PYSPARK_DRIVER_PYTHON_OPTS and pass the notebook in the value field.
In the same window, look for the Path or PATH variable, click edit, and add D:/spark/spark_unzipped/bin to it. In Windows 7 you need to separate the values in Path with a semicolon between the values.
We need to add Java as well to the environment variable. So, create another variable JAVA_HOME and pass the path of the folder where Java is installed.
IOS
Now try opening Jupyter notebook in a terminal and import Pyspark to use it.
Docker
We can directly use PySpark with Docker using an image from the repository of Jupyter but that requires Docker installed on your system.
Databricks
Databricks also offers a community edition account that is free of cost and provides 6 GB clusters with PySpark.
Conclusion
In this chapter, we looked at Spark Architecture, various components, and different ways to set up the local environment in order to use Spark. In upcoming chapters, we will go deep into various aspects of Spark and build a Machine Learning model using the same.