
Musculoskeletal Pain
Pain that is not due to anatomical abnormalities is usually musculoskeletal. It may go away by itself. It usually responds to gentle treatment like yoga. A wrench, a sprain, a strain, poor posture, or emotional stress may produce pain in the lower back. Overworked, tired muscles may go into spasm. To make matters worse, adaptation to that discomfort can cause pain to arise in the upper back and cervical regions.
Muscle spasm is an intense, prolonged, and involuntary contraction. The pain it causes is often grossly underestimated by otherwise excellent clinicians, partially because it does not show up on imaging studies and may occur without detectable medical abnormality. However, a good physician can usually treat spasm without any special equipment.
In a way, spasm stems from an engineering imperfection that occurs in all muscles. Capillaries, which supply fuel and the oxygen to burn it and carry away the waste products of this metabolism, are actually narrowed significantly during muscle contraction. This happens exactly when the muscles are working and these functions are needed most. As a consequence, one of the by-products of metabolism, lactic acid, builds up in the immediate vicinity of the muscle fibers. The lactic acid and other irritants cause further contraction of the muscle fibers, making the condition even worse, and even less under direct voluntary control.
Yoga poses for musculoskeletal pain concentrate on relieving this vicious cycle by stretching to elongate muscle fibers mechanically and by means of reflexes. Just the act of increasing the distance the muscle spans will stretch it and thereby open the capillaries and ameliorate the condition and its causes. Reflexes initiated by the stretch itself and by the activation of antagonist muscles will substantially reduce the tendency for spasm to recur. I have discussed this in the first chapter.
There is a reason I recommend starting by holding yoga poses for ten to fifteen seconds, gradually increasing to thirty seconds, and then to one to two minutes or longer, and that is related to relieving pain. Stretched for that period of time, muscles will relax and tend to stay that way. If you stretch too quickly, too violently, or for too short a time, the muscles will snap back like rubber bands, and the pain will remain or recur. The first pose in this chapter works differently; holding it for much longer periods of time is desirable.
Inverted Lake
BENEFITS: Bridges the gap between forward bends and inverted (upside-down) poses, and has some of the advantages of both: Stretches hamstrings, drains blood from lower extremities. Good for headache; produces calm. Good for back pain during pregnancy.
WARNING: Take care to do this pose with minimal elevation if you have glaucoma, congestive heart failure, or pulmonary congestion.
Three modified variations for beginners:
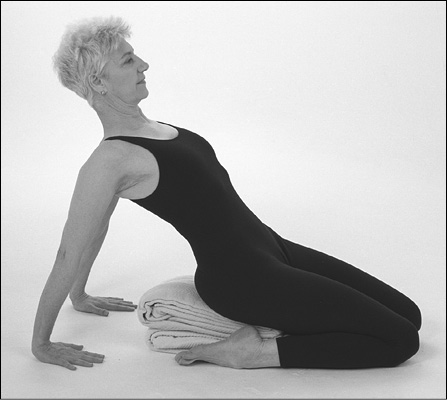
VIPARITA KARANI MODIFIED (VERSION 1) Lie on the floor with the backs of the calves and ankles resting on a chair or couch or close to a wall. Straighten knees, extend arms overhead, palms upward. Shoulder blades should be flat and close together. Relax your neck and face. Palms face upward. Stay in this pose for one to three minutes.
After that time, bend one knee, bringing that leg to the floor. Then repeat with the other leg.
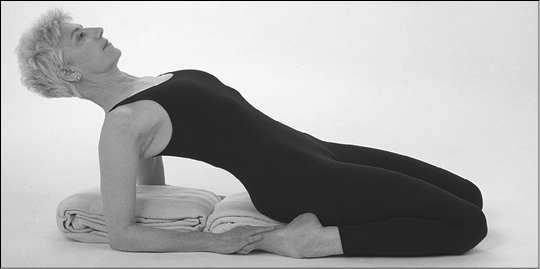
VIPARITA KARANI MODIFIED (VERSION 2) Sit on a cushion. Bring the left leg up onto pillows placed on a chair or couch or against the wall. Lie down as you bring the other leg up into a parallel position. Now straighten your knees and let gravity push your shoulder blades down toward your lower back. Bring the shoulder blades together, opening the chest. Relax your abdominal, chest, and neck muscles. Try to relax all the muscles of the head and face. Put hands on your abdomen, at your sides pointing toward your feet, or overhead and pointing backward. Breathe evenly for ten to fifteen minutes.
You will be very relaxed when you come out of the pose and there is little danger, but do it carefully. Raise one leg up so that the calf is no longer on the seat of the chair or couch. Pressing down with your hands slightly, bring one foot to the floor. Ease yourself over to the side so you can bring your other leg down. Alternatively, if it’s a small chair, bring the one leg down to the left and then bring the right leg down to the right.

VIPARITA KARANI MODIFIED (VERSION 3) Use more cushions and pillows. Position yourself as you did in the previous pose, but higher, so the feet are extended and parallel. Arms rest on pillows. Close your eyes. Breathe slowly and smoothly for ten to fifteen minutes, going from head to toe, trying to relax each muscle in your body. Skip over nothing.
To get out of this pose, carefully take your left leg off of the chair or couch and place as much of the sole of the left foot as possible on the floor. “Walk” the leg farther away from the pillows until there is room to bring down the right leg. Wait a short time, then roll from your back to your side.
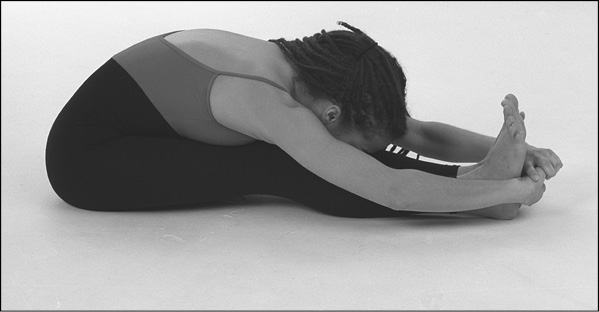
Head to the Knee (forward bend)
BENEFITS: Increases flexibility, reduces spasm in hamstrings and adductors.
WARNING: Bending too intensely may strain or even sprain hamstrings.
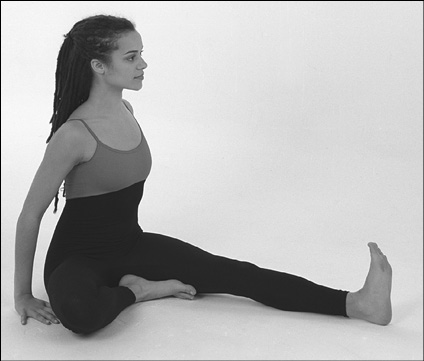
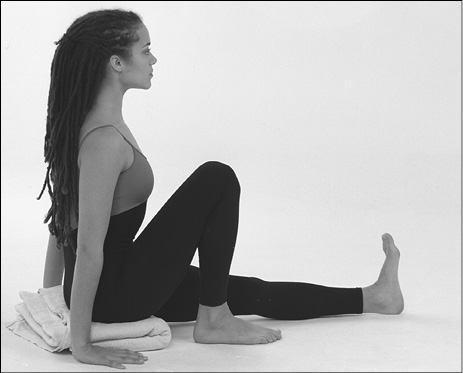
JANUSIRSASANA MODIFIED Sit squarely on the floor, extending the left leg so that the foot is firmly vertical and the toes point toward the ceiling. Bend the right knee, placing the sole of the right foot high up against the inner left thigh so that it and the right shin form a ninety-degree angle. Place palms on the floor, fingers pointing forward. Keep the back and the left knee straight. Press down and backward on the floor with your hands and fingers, inclining your torso toward the left foot. The most important things are to keep the extended knee fully extended and to keep the back straight. Like all yoga poses, holding a moderate stretch for a longer time is preferable to a more intense, shorter version. Breathe slowly for ten to fifteen seconds, then release the pressure from your hands, come up to vertical, and reverse the pose, stretching the other leg.
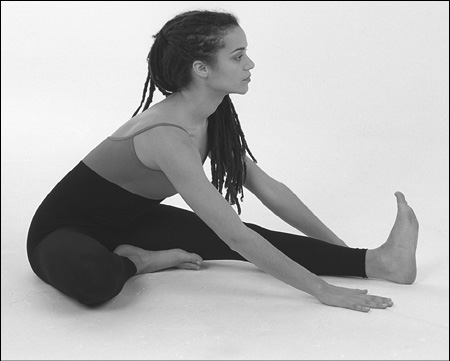
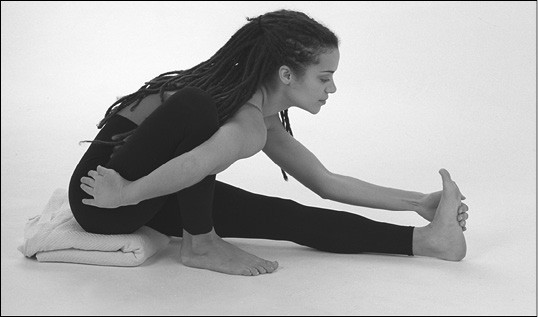
JANUSIRSASANA REGULAR Sit squarely on the floor, extending the left leg so that the foot is firmly vertical and the toes point toward the ceiling. Bend the right knee, placing the sole of the right foot high up against the inner left thigh so that it and the right shin form a ninety-degree angle. Keeping your back straight, inhale and bend evenly from the hips—not from the lumbar or thoracic spine—toward the foot. Do not bend your neck, but keep facing straight forward, not down. Exhale as you descend. As you come forward, align your sternum with the inside of the extended leg. Since you are doing this pose with the left leg extended, grasp your right wrist with your left hand, beyond the left foot. Relax the muscles of your back and chest and arms. Then work to relax the back thigh muscles of your extended leg. One way to do this is to contract the quadriceps muscle, which extends the left knee. This activates a reflex that relaxes the hamstrings. Stay in the position for fifteen seconds at first, but gradually work up to one minute on each side. Unless otherwise noted, this goes for all the following poses.
To come out of this pose, release your hands. Keeping your back straight, slowly draw your entire spine back until you’re sitting with your back in a vertical position.
West Posture
(Yoga is traditionally done facing east; since this pose stretches the back of the body, it’s named for the west.)
BENEFITS: Increases hamstring, gluteal, and lumbar flexibility; reduces spasm; calms the practitioner; isometrically balances upper and lower extremity muscle tone; lowers blood pressure; and relieves constipation.
CAUTION: May cause gastric problems or discomfort if done on a full stomach.
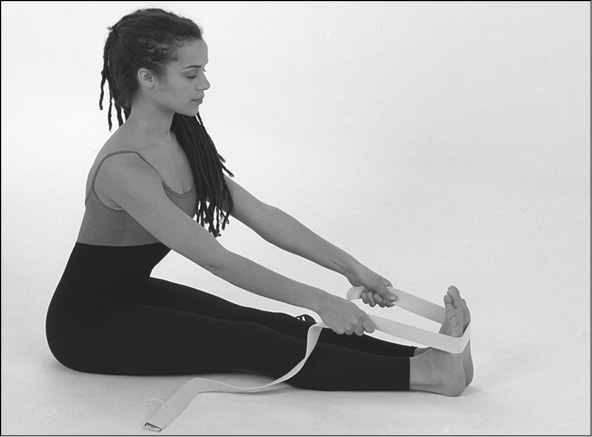
PROP: Yoga strap.
PASCHIMOTTANASANA MODIFIED Sit squarely and evenly on the floor. Legs are parallel and extended, ankles touching, feet vertical. Slowly move your hands down your legs. Use your hands for balance and support. Keep your back straight and gradually move your torso forward toward your extended feet. Continue to keep your back straight as you walk your hands forward as close to your feet as possible. You can loop a strap around your feet to bring yourself forward rather than down. Resist letting your legs turn outward or bending your knees, even if it means a less intense forward bend. Keeping your back straight, grasp your calves, ankles, or feet at the lowest point you can reach. Relax everything but the hands. Breathe evenly. Start by holding the pose for fifteen seconds, then half a minute, and continue until you are holding it for as long as five minutes. There should be some discomfort from the stretch, but it should not be extreme.
Leave this pose by releasing your hands. Come up slowly, keeping your back straight. Use your hands on your legs for support as your torso rises to vertical.
PASCHIMOTTANASANA REGULAR Sit squarely on the floor with both legs extended, knees straight, feet vertical, ankles touching. Inhale, open chest, pull in stomach. Keeping back straight, exhale while bending forward from the waist or hips as far as possible. Reach as far forward as possible, until you can grasp your right wrist with your left hand, beyond the foot, and the backs of both hands face the soles of your feet. Bring head forward, not down. Bring navel toward thighs. Breathe slowly, pausing between breaths. Start at ten to fifteen seconds, continue extending the pose gradually to as long as half an hour.
To exit this pose, release your hands. Inhale as you slowly come up to a sitting position.
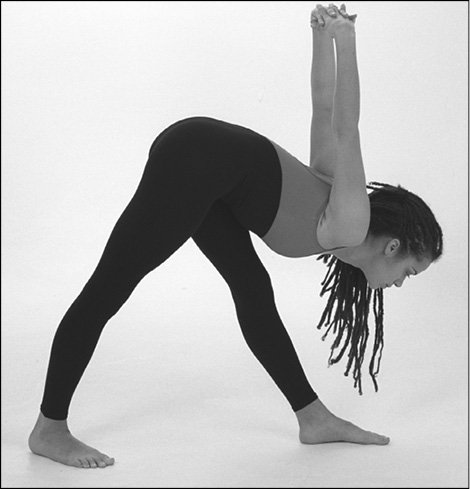
Stretching of the Flank
BENEFITS: Improves posture, reducing pain between shoulder blades. Stretching the entire back of the body and legs, one side at a time, it relieves muscle spasm and improves flexibility.
CAUTION: Do not do this pose if you are pregnant. You need to digest for four to five hours after eating before doing this pose.
PARSVOTTANASANA MODIFIED Stand with legs three feet apart. Turn the left foot out ninety degrees, and the right foot in thirty degrees. With arms behind the back, interlace fingers with upward-facing palms. Take a half turn to the left (ninety degrees) so that your navel is pointing in the same direction as the left foot. Push hands down toward the floor, straightening the elbows and bringing the shoulders back, down, and together. Keeping knees and spine straight, gently throw your head back and inhale. Then exhale and bring the entire torso forward toward the left leg and thigh. Bend only at the hips. Feel the stretch in the left hamstring and the back of the left calf. Shoulder blades should continue to move toward each other and down. Keep fingers interlaced. Bring your hands farther down toward your buttocks again. Stay in the pose for fifteen seconds on each side, breathing slowly through the nostrils. Gradually increase the time to one minute. To change sides, first bring the torso to vertical, then turn it and feet back to the initial forward position. Then turn the right foot out ninety degrees and the left foot in thirty degrees. Turn your torso so that your navel is facing in the same direction as the right foot. Then exhale. Continue on the right as you did on the left.
To exit this pose, bring your torso up to vertical and release your hands to relax your arms. If you choose, you can place your hands on your thigh for support as you raise your torso to vertical. Bring your hands to your sides. Turn your hips and feet to straight-ahead position. As you inhale, bring your feet together.
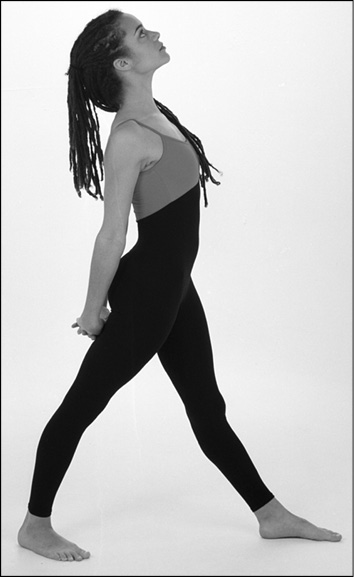
PARSVOTTANASANA REGULAR Proceed as above, until you exhale and bring the entire torso forward toward the right leg and thigh. Keeping the head elevated and neck extended (curved back), bring the navel close to the right thigh. Now raise your straightened arms up and away from your back, toward the top of the extended head. Pull the shoulder blades back and down toward the buttocks again. Proceed to completion as in the modified version just above. At first hold this pose for ten to fifteen seconds. Gradually increase to one minute on each side.
To leave the pose, lower your arms as you raise your torso to vertical. When your hands rest against the lumbar spine, release them. Turn feet and torso forward.
Lying-Down Hero
BENEFITS: Relaxation; relieves stiffness by stretching hip joint flexors and abdominal muscles; helps correct sacroiliac joint derangement, alleviating pain.
WARNING: If you are pregnant, do this pose cautiously, possibly using a cushion for back support. Beginners must sit on a cushion to avoid knee injury.
PROP: Two blankets.
SUPTA VIRASANA MODIFIED Sit on haunches with pillow or blanket between shins, and knees as close together as possible. Feet are parallel behind you, soles facing upward and heels far enough apart so buttocks fit between them. Straighten back from lumbar spine to the nape of the neck. Place the backs of your hands on the tops of the knees for a few moments. Then lean back until you can place your hands, one at a time, on the floor behind you. Fingers point toward the toes. Breathe evenly and quietly with your mouth closed for ten to fifteen seconds.
To leave the pose, straighten up to the kneeling position. Then lean forward on all fours.
SUPTA VIRASANA REGULAR Sit on your haunches with your knees together. Your shins are spread enough so your buttocks can fit beneath the heels. Sit squarely on your “sit” (ischial) bones. Balance for a moment with backs of hands on knees. Then lean back until you can place your hands, one at a time, on the floor behind you. Fingers point toward the toes. Then bend the elbows until your entire forearms are resting on the floor. Slide the arms forward until your shoulders, upper, and finally midback are all resting on the floor. At last, bring your arms straight over your head, so that the backs of the arms and hands are resting on the floor, fingers pointing in the same direction as the toes. Hold this pose for ten to fifteen seconds, stretching out the back and the backs of the hands and arms.
To exit, bring your arms back to your sides, palms up. Put weight on your elbows as you bend them, pressing symmetrically and hard enough, to raise your torso to the seated position. Gradually straighten your elbows as you rise. Breathe in as you come out of the pose.

Sage Marishi—Grandfather of the Sun God
BENEFITS: Good for back pain due to muscle spasm because it provides a stretch for the back of the body from the heels to the nape of the neck. Improves hip extensor, abductor, and adductor range, as well as therapeutically opening the sacroiliac joint and thoracic spine. All this helps one adapt to lower back problems and avoid future lower back pain. Excellent for upper-lower extremity coordination and weight control.
WARNING: Do not do this pose if you are pregnant. If you have problems with knee joints, you should flex the knees less. Don’t do this pose for four to five hours after eating.
PROP: Small pillow or blanket.
MARICHYASANA I MODIFIED Sit on the floor, left leg extended. Bend the right knee until the knee is directly over the foot: i.e., the shin is vertical. The right foot is parallel to the left thigh, and flush with it. Keeping your torso vertical, place both hands on the floor, fingers facing forward. Gently but firmly press your hands and fingers downward and backward, using your abdominal muscles to move the torso directly forward as much as possible. Keep your back straight; the idea is to bend at the hips and the lowest part of your back, nowhere else. Breathe evenly, attempting to inflate both lungs equally. Stay in the pose for fifteen to thirty seconds.
To get out of this pose, gently release your palms and relax your abdominal muscles. Straighten the right knee. Change legs.
MARICHYASANA I REGULAR Sit on the floor, left leg extended, left foot firm and vertical. Bend the right knee until the knee is directly over the foot and the shin is vertical. The foot of the bent leg is parallel to the left thigh and flush with it. Lean forward without bending to the right or left. Curl the right arm around the right shin just below the knee. Grasp the left foot with the left hand. Maintaining a straight back, push backward with the right upper arm and pull forward with the left hand. Lower your navel to the inner left thigh. Don’t worry about how low your head is going. Keep both shoulders level in the forward and vertical directions. Flex your left quadriceps to relax the left hamstring. Tighten your abdominal muscles to relax your lower back muscles. When you have stretched your hamstrings and lower back sufficiently, remain in the pose for ten to fifteen seconds, breathing evenly and calmly.
To exit the pose, release the left hand and bring the right arm forward, allowing your torso to rise again to vertical. Then repeat the pose by straightening the right leg and bringing the left shin to vertical.
There are some poses that are described and pictured elsewhere in the book for other diagnoses that may also be helpful for musculoskeletal complaints. These poses are in order from acute to chronic pain:
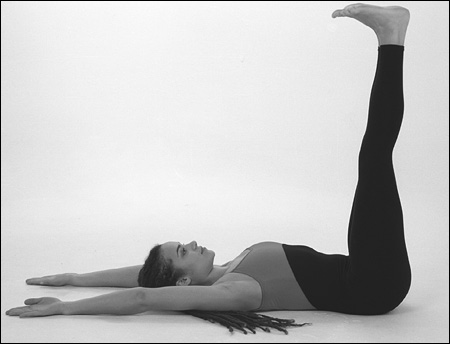
SUPTA PADANAGUSTHASANA—Holding Big Toe While Supine
UPAVISTHA KONASANA—Seated Angle
UTTHITA PARSVAKONASANA—Side at an Angle Pose
HALASANA—Plow