Ideally, we wouldn’t have to do anything special to a class to start working with it. In an ideal system, we’d be able to create objects of any class in a test harness and start working. We’d be able to create objects, write tests for them, and then move on to other things. If it were that easy, there wouldn’t be a need to write about any of this, but unfortunately, it is often hard. Dependencies among classes can make it very difficult to get particular clusters of objects under test. We might want to create an object of one class and ask it questions, but to create it, we need objects of another class, and those objects need objects of another class, and so on. Eventually, you end up with nearly the whole system in a harness. In some languages, this isn’t a very big deal. In others, most notably C++, link time alone can make rapid turnaround nearly impossible if you don’t break dependencies.
In systems that weren’t developed concurrently with unit tests, we often have to break dependencies to get classes into a test harness, but that isn’t the only reason to break dependencies. Sometimes the class we want to test has effects on other classes, and our tests need to know about them. Sometimes we can sense those effects through the interface of the other class. At other times, we can’t. The only choice we have is to impersonate the other class so that we can sense the effects directly.
Generally, when we want to get tests in place, there are two reasons to break dependencies: sensing and separation.
1. Sensing—We break dependencies to sense when we can’t access values our code computes.
2. Separation—We break dependencies to separate when we can’t even get a piece of code into a test harness to run.
Here is an example. We have a class named NetworkBridge in a network-management application:
public class NetworkBridge
{
public NetworkBridge(EndPoint [] endpoints) {
...
}
public void formRouting(String sourceID, String destID) {
...
}
...
}
NetworkBridge accepts an array of EndPoints and manages their configuration using some local hardware. Users of NetworkBridge can use its methods to route traffic from one endpoint to another. NetworkBridge does this work by changing settings on the EndPoint class. Each instance of the EndPoint class opens a socket and communicates across the network to a particular device.
That was just a short description of what NetworkBridge does. We could go into more detail, but from a testing perspective, there are already some evident problems. If we want to write tests for NetworkBridge, how do we do it? The class could very well make some calls to real hardware when it is constructed. Do we need to have the hardware available to create an instance of the class? Worse than that, how in the world do we know what the bridge is doing to that hardware or the endpoints? From our point of view, the class is a closed box.
It might not be too bad. Maybe we can write some code to sniff packets across the network. Maybe we can get some hardware for NetworkBridge to talk to so that at the very least it doesn’t freeze when we try to make an instance of it. Maybe we can set up the wiring so that we can have a local cluster of endpoints and use them under test. Those solutions could work, but they are an awful lot of work. The logic that we want to change in NetworkBridge might not need any of those things; it’s just that we can’t get a hold of it. We can’t run an object of that class and try it directly to see how it works.
This example illustrates both the sensing and separation problems. We can’t sense the effect of our calls to methods on this class, and we can’t run it separately from the rest of the application.
Which problem is tougher? Sensing or separation? There is no clear answer. Typically, we need them both, and they are both reasons why we break dependencies. One thing is clear, though: There are many ways to separate software. In fact, there is an entire catalog of those techniques in the back of this book on that topic, but there is one dominant technique for sensing.
One of the big problems that we confront in legacy code work is dependency. If we want to execute a piece of code by itself and see what it does, often we have to break dependencies on other code. But it’s hardly ever that simple. Often that other code is the only place we can easily sense the effects of our actions. If we can put some other code in its place and test through it, we can write our tests. In object orientation, these other pieces of code are often called fake objects.
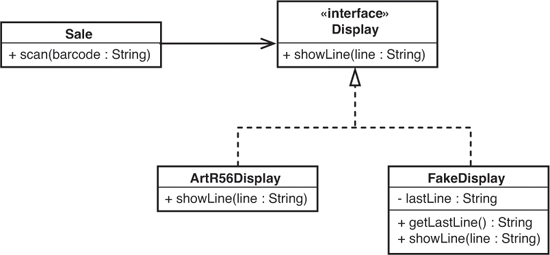
A fake object is an object that impersonates some collaborator of your class when it is being tested. Here is an example. In a point-of-sale system, we have a class called Sale (see Figure 3.1). It has a method called scan() that accepts a bar code for some item that a customer wants to buy. Whenever scan() is called, the Sale object needs to display the name of the item that was scanned, along with its price on a cash register display.

How can we test this to see if the right text shows up on the display? Well, if the calls to the cash register’s display API are buried deep in the Sale class, it’s going to be hard. It might not be easy to sense the effect on the display. But if we can find the place in the code where the display is updated, we can move to the design shown in Figure 3.2.
Figure 3.2 Sale communicating with a display class.

Here we’ve introduced a new class, ArtR56Display. That class contains all of the code needed to talk to the particular display device we’re using. All we have to do is supply it with a line of text that contains what we want to display. We can move all of the display code in Sale over to ArtR56Display and have a system that does exactly the same thing that it did before. Does that get us anything? Well, once we’ve done that, we can move the a design shown in Figure 3.3.
Figure 3.3 Sale with the display hierarchy.

The Sale class can now hold on to either an ArtR56Display or something else, a FakeDisplay. The nice thing about having a fake display is that we can write tests against it to find out what the Sale does.
How does this work? Well, Sale accepts a display, and a display is an object of any class that implements the Display interface.
public interface Display
{
void showLine(String line);
}
Both ArtR56Display and FakeDisplay implement Display.
A Sale object can accept a display through the constructor and hold on to it internally:
public class Sale
{
private Display display;
public Sale(Display display) {
this.display = display;
}
public void scan(String barcode) {
...
String itemLine = item.name()
+ " " + item.price().asDisplayText();
display.showLine(itemLine);
...
}
}
In the scan method, the code calls the showLine method on the display variable. But what happens depends upon what kind of a display we gave the Sale object when we created it. If we gave it an ArtR56Display, it attempts to display on the real cash register hardware. If we gave it a FakeDisplay, it won’t, but we will be able to see what would’ve been displayed. Here is a test we can use to see that:
import junit.framework.*;
public class SaleTest extends TestCase
{
public void testDisplayAnItem() {
FakeDisplay display = new FakeDisplay();
Sale sale = new Sale(display);
sale.scan("1");
assertEquals("Milk $3.99", display.getLastLine());
}
}
The FakeDisplay class is a little peculiar. Let’s look at it:
public class FakeDisplay implements Display
{
private String lastLine = "";
public void showLine(String line) {
lastLine = line;
}
public String getLastLine() {
return lastLine;
}
}
The showLine method accepts a line of text and assigns it to the lastLine variable. The getLastLine method returns that line of text whenever it is called. This is pretty slim behavior, but it helps us a lot. With the test we’ve written, we can find out whether the right text will be sent to the display when the Sale class is used.
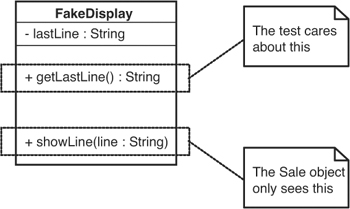
Fake objects can be confusing when you first see them. One of the oddest things about them is that they have two “sides,” in a way. Let’s take a look at the FakeDisplay class again, in Figure 3.4.
Figure 3.4 Two sides to a fake object.

The showLine method is needed on FakeDisplay because FakeDisplay implements Display. It is the only method on Display and the only one that Sale will see. The other method, getLastLine, is for the use of the test. That is why we declare display as a FakeDisplay, not a Display:
import junit.framework.*;
public class SaleTest extends TestCase
{
public void testDisplayAnItem() {
FakeDisplay display = new FakeDisplay();
Sale sale = new Sale(display);
sale.scan("1");
assertEquals("Milk $3.99", display.getLastLine());
}
}
The Sale class will see the fake display as Display, but in the test, we need to hold on to the object as FakeDisplay. If we don’t, we won’t be able to call getLastLine() to find out what the sale displays.
The example I’ve shown in this section is very simple, but it shows the central idea behind fakes. They can be implemented in a wide variety of ways. In OO languages, they are often implemented as simple classes like the FakeDisplay class in the previous example. In non-OO languages, we can implement a fake by defining an alternative function, one which records values in some global data structure that we can access in tests. See Chapter 19, My Project is Not Object-Oriented. How Do I Make Safe Changes?, for details.
Fakes are easy to write and are a very valuable tool for sensing. If you have to write a lot of them, you might want to consider a more advanced type of fake called a mock object. Mock objects are fakes that perform assertions internally. Here is an example of a test using a mock object:
import junit.framework.*;
public class SaleTest extends TestCase
{
public void testDisplayAnItem() {
MockDisplay display = new MockDisplay();
display.setExpectation("showLine", "Milk $3.99");
Sale sale = new Sale(display);
sale.scan("1");
display.verify();
}
}
In this test, we create a mock display object. The nice thing about mocks is that we can tell them what calls to expect, and then we tell them to check and see if they received those calls. That is precisely what happens in this test case. We tell the display to expect its showLine method to be called with an argument of “Milk $3.99”. After the expectation has been set, we just go ahead and use the object inside the test. In this case, we call the method scan(). Afterward, we call the verify() method, which checks to see if all of the expectations have been met. If they haven’t, it makes the test fail.
Mocks are a powerful tool, and a wide variety of mock object frameworks are available. However, mock object frameworks are not available in all languages, and simple fake objects suffice in most situations.