Chapter 3
Pressed, Gunkan and Nigiri Sushi
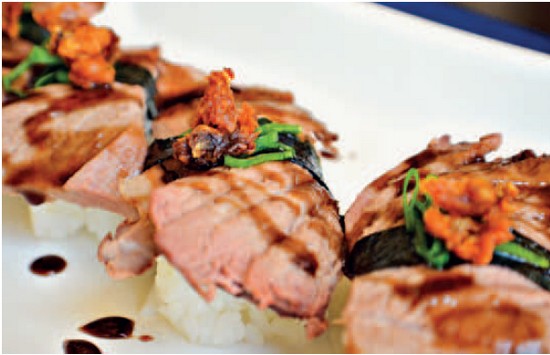
It’s easy to understand why nigiri zushi is the crown jewel of sushi types. Imagine colorful cuts of pristine fish draped carefully over hand formed beds of rice or cooked seafood toppings held in place with a nori “seatbelt.” Even meats and vegetables can be used to create delicious one-bite wonders.
There are several methods when it comes to preparing nigiri zushi. The most important things to remember are that the beds of rice should all be a consistent size and that they should not be packed together too tightly. A variety of different sizes will affect the aesthetic of your presentation. If your hand-formed rice beds are wonky, try using a mold. This will ensure a uniform size for all the pieces. But don’t pack it firmly. When beds of rice are packed too tightly, they will not be as enjoyable to eat. Like sushi rolls, nigiri-zushi should hold together long enough so that they can make it from the plate to the mouth without falling apart. To aid in this journey, dip in soy sauce with the topping side down rather than using the rice side. In this chapter you’ll discover many creative sushi toppings. With fresh seafood, you can of course make classic, unadorned nigiri zushi of your choice. Vegetable lovers will delight in options such as Avocado and Pomegranate Nigiri (page 65) while meat lovers would enjoy Beef Tataki Sushi (page 61). If you want try something truly unique, try the Smoked Duck Nigiri (page 71).
Making Nigiri Sushi and Gunkan Maki
PREPARING NIGIRI SUSHI
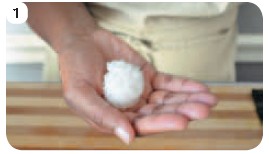
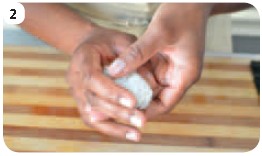
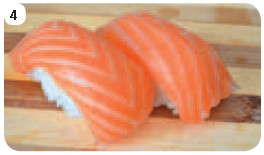
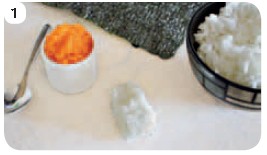
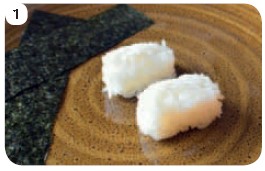
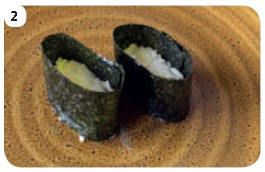
Dip your fingertips lightly in water and splash the water across your palms. Grab a walnut-sized ball of prepared Sushi Rice or about 2 tablespoons (figure 1). Lightly squeeze the Sushi Rice into a rectangle that is flat on the bottom. It is helpful to use your thumb and forefinger to shape the sides (figure 2). To prepare a piece of nigiri sushi that is topped with slices of fish place the bed of rice flat in your left palm and drape the slice of fish over the rice (figure 3). Grasp the side of the rice with your right thumb and forefinger. Rub your left thumb over the top of the fish to shape (figure 4).
PREPARING GUNKAN MAKI
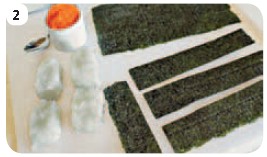
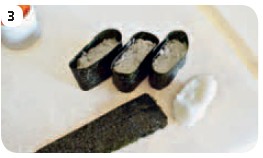
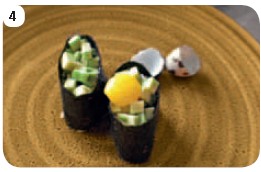
Place the prepared bed of rice on a flat surface (figure 1). Cut a 4 x 7 inch (10 x 18 cm) sheet of nori into 1½ x 5 inch (4 x 13 cm) strips (figure 2). Wrap one strip of nori, rough side facing in, around the bed of rice to form a wall (figure 3). It may be necessary to use a single grain of rice as “glue” for the edges. Place the desired fillings inside the wall (figure 4).
Making Nigiri Sushi
Making Gunkan Maki
Beef Tataki Sushi
You’ll experience a little sweet, spicy, salty, and hot all at once with every bite of this variation of Beef Tataki. If you prefer something a little more tame, omit the serrano pepper and fresh ginger root. Instead, substitute sesame seeds and minced green onions (scallions). Or, go for something rich by brushing each piece of beef with Ponzu Sauce (page 27) and melted unsalted butter.
RICE PREP: UP TO 1½ HOURS
SUSHI PREP: 15 MINUTES
MAKES ABOUT 12 PIECES
1½ cups (300 g) prepared Traditional Sushi rice (page 23) or Quick and easy Microwave Sushi rice (page 24)
½ recipe beef Tataki Platter (page 49), cut into 12 slices
2 tablespoons Sweetened Soy Syrup (page 28)
1 serrano chili pepper, cut into 12 thin slices
½ teaspoon finely grated fresh ginger root
1 Prepare the Sushi Rice, the recipe from Beef Tataki Platter, and the Sweetened Soy Syrup.
2 Dip your fingertips in water and splash some across your palms. Squeeze a walnutsized ball of prepared Sushi Rice, about 2 tablespoons, in your hand to form a neat rectangular bed of rice. Repeat to make 11 more beds of rice.
3 Place one bed of rice flat in your left palm and drape one slice of Beef Tataki over it. Grasp the side of the rice with your right thumb and forefinger. Rub your left thumb over the beef tataki to shape it. Repeat the steps with the remaining Beef Tataki and rice.
4 To serve, arrange the pieces on a serving tray. Brush some of the Sweetened Soy Syrup over the tops of each piece. Place 1 serrano pepper slice in the center of each piece and top it with a tiny amount of the grated fresh ginger root.
Glazed Eggplant Sushi
Locating the boxes used to prepare pressed sushi can sometimes be difficult. Here’s a way to use plastic wrap to make an eggplant-topped sushi.
RICE PREP: UP TO 1½ HOURS
SUSHI PREP: 20 MINUTES
MAKES ABOUT 8 PIECES
1½ cups (300 g) prepared Traditional Sushi rice (page 23) or Quick and easy Microwave Sushi rice (page24)
1 small Japanese eggplant
Oil for cooking
1 tablespoon soy sauce
½ teaspoon dark sesame oil
½ teaspoon miso paste
1 teaspoon rice vinegar
1 teaspoon toasted sesame seeds
1 teaspoon minced green onions (scallions), green parts only
1 Prepare the Sushi Rice.
2 Heat an oven to 350°F (175°C). Line a baking sheet with parchment paper. Cut the eggplant into ½ inch (1.25 cm) slices. Mix the soy sauce, dark sesame oil, miso paste, and rice vinegar together in a small bowl. Smear both sides of the eggplant slices with the mixture. Lay the pieces flat on the parchment lined baking sheet. Bake for 7 minutes. Cool the eggplant slices completely.
3 Lay a piece of plastic wrap on top of a bamboo rolling mat. Make a horizontal row across the plastic wrap with the eggplant slices. Wet your fingertips and spread the Sushi Rice over the eggplant. Fold the plastic wrap up around the Sushi Rice. Flip the plastic wrap parcel over so that the rice is on the bottom. Use the bamboo rolling mat to shape the sushi into a rectangle.
4 Dip the blade of a very sharp knife in water. Using a sawing motion, cut through the plastic wrap to cut the sushi into 8 pieces. Carefully remove the plastic wrap.
5 To serve, place the pieces on a serving dish. Sprinkle the sesame seeds and green onions over the pieces.
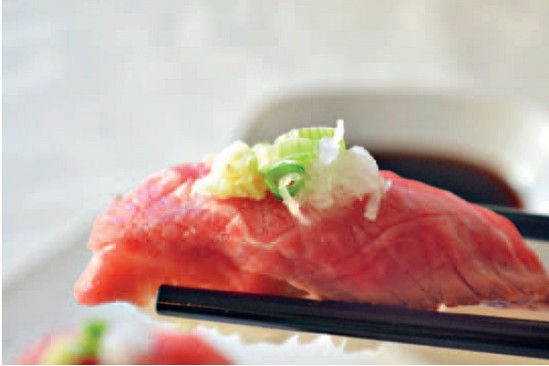
Tuna Tataki Nigiri
When very lightly seared, tuna becomes magical. In one bite, you can discover the silky rare interior as well as the crunchy sesame coated exterior that possesses an almost smoky quality.
RICE PREP: UP TO 1½ HOURS
SUSHI PREP: 20 MINUTES
MAKES ABOUT 8 PIECES
1 cup (200 g) prepared Traditional Sushi rice (page 23) or Quick and easy Microwave Sushi rice (page 24)
6 oz (175 g) fresh tuna, cut into a 1 in (2.5 cm) thick block
3 tablespoons toasted sesame seeds
Oil for cooking
One 4 x 7 in (10 x 18 cm) sheet of nori
1 Prepare the Sushi Rice.
2 Pour the sesame seeds on a plate and lay the tuna block over them. Turn the tuna to coat evenly.
3 Heat enough oil in the bottom of large skillet to completely coat it. Let the oil get hot. (At some point the skillet may start smoking. Some smoke is okay.) Add the coated tuna to the skillet and sear it for about 15-20 seconds per side. Be sure to sear the ends, too. Remove the tuna and allow it to cool for at least 5 minutes.
4 Dip your fingertips in water and splash some across your palms. Squeeze a walnut-sized ball of prepared Sushi Rice, about 2 tablespoons, in your hand to form a neat rectangular bed of rice. Repeat to make 7 more beds of rice.
5 Cut the sheet of nori crosswise into 8 strips. Slice the sesame-crusted tuna crosswise into ¼ inch (6 mm) thick slices. Lay one piece of sesame tuna over each bed of rice. Use the strips of nori to adhere the sesame tuna slices to the rice.
6 To serve, arrange the pieces on a serving dish. Serve immediately with Ponzu Sauce (page 27).
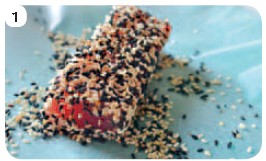
Coat each side of the tuna, including the edges, with sesame seeds.

Briefly sear each side of the tuna for about 15 seconds.
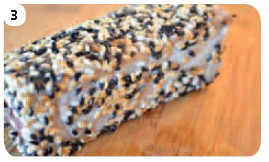
Allow the tuna to cool slightly before slicing.
Arctic Char Nigiri
When cut into paper-thin slices, citrus fruit can be enjoyable as a sushi topping. The juice from the fruit forms a lightly flavored instant “ponzu” in your mouth when combined with a light dip of soy. When opting to use this method, you’ll want to be sure that you can see through the slices. If you can’t, they are too thick and you’ll experience an unpleasant rush of pith. To avoid this, slice cold citrus fruit with a mandoline.
RICE PREP: UP TO 1½ HOURS
SUSHI PREP: 15 MINUTES
MAKES ABOUT 10-12 PIECES
1½ cups (300 g) prepared Traditional Sushi rice (page 23) or Quick and easy Microwave Sushi rice (page 24)
6 oz (175 g) block arctic char, skin removed
1 tablespoon sake, optional
½ lemon wedge, cut into 10-12 paper-thin slices
1 sprig fresh dill weed
1 Prepare the Sushi Rice.
2 Cut the arctic char using the block cut method (page 18) into 10-12 slices. Wet your fingertips in water and splash some across your palms. Squeeze a walnut-sized ball of prepared Sushi Rice, about 2 tablespoons, in your hand to form a neat rectangular bed of rice. Repeat to make 9-11 more beds of rice.
3 Dip your fingertip in the sake, if using, and brush it across the arctic char. Repeat as necessary to lightly flavor each slice of arctic char. Place one bed of rice flat in your left palm and drape one slice of arctic char over it. Grasp the side of the rice with your right thumb and forefinger. Rub your left thumb over the arctic char to shape. Repeat the steps with the remaining arctic char and rice.
4 To serve, arrange the pieces of sushi on a serving dish. Top each piece with a paper-thin slice of lemon. Tear the dill sprig into pieces to garnish each piece of sushi. Serve with soy sauce if desired.
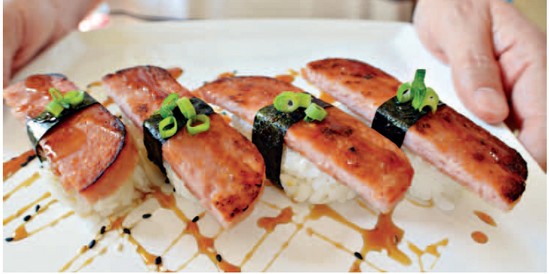
Spam Musubi
Getting a really good sear on the Spam is essential. When prepared properly, the browned surface offers a crunch that can’t be beat. The simplicity of the Sweetened Soy Syrup and sesame seed topping is quite flavorful, but the Spam is wonderfully complemented by a sprinkle or two of furikake (page 13) or thinly sliced green onions (scallions.)
RICE PREP: UP TO 1½ HOURS
SUSHI PREP: 20 MINUTES
MAKES 12 PIECES
1½ cups (300 g) prepared Traditional Sushi rice (page 23) or Quick and easy Microwave Sushi rice (page 24)
One 12 oz (340 g) can of Spam
Oil for cooking one 4 x 7 in (10 x 18 cm) sheet of nori
4 tablespoons Sweetened Soy Syrup, or more to taste (page 28)
2 teaspoons toasted sesame seeds
1 Prepare the Sushi Rice and the Sweetened Soy Syrup.
2 Cut the Spam lengthwise into 6 even slices. Heat enough oil in the bottom of large skillet to completely coat it. Fry the Spam slices until each side is golden brown, about 2-3 minutes per side. Drain the fried slices on paper towels.
3 Wet your fingertips in water and splash some across your palms. Squeeze a walnut sized ball of prepared Sushi Rice, about 2 tablespoons, in your hand to form a neat rectangular bed rice. Repeat to make 11 more beds of rice.
4 Cut the sheet of nori crosswise into 12 strips. Cut each piece of fried Spam in half lengthwise. Lay one piece of Spam lengthwise over each bed of rice. Use the strips of nori to adhere the Spam slices to the rice.
5 To serve, arrange the Spam pieces on a serving dish. Drizzle the Sweetened Soy Syrup over the pieces. Sprinkle sesame seeds over the serving tray. Serve with additional Sweetened Soy Syrup, if desired.
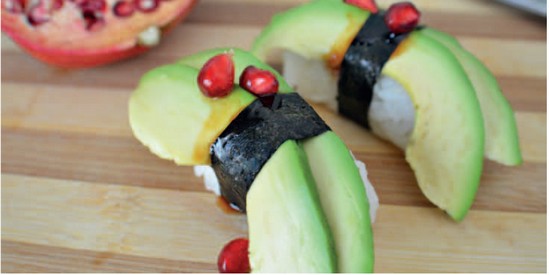
Avocado and Pomegranate Nigiri
One of the things I enjoy about pomegranate molasses is that it has a similar flavor to pickled plum paste, umeboshi. It works just as well with seasoned Sushi Rice. Most notably, it has many applications outside of sushi. Pomegranate molasses can be used to flavor dips, meat marinades, salad dressings, and dessert sauces. Find it at Mediterranean markets or specialty grocery stores.
RICE PREP: UP TO 1½ HOURS
SUSHI PREP: 10 MINUTES
MAKES 8 PIECES
1½ cups (300 g) Traditional Sushi rice (page 23) or Quick and easy Microwave Sushi rice (page 24)
1 tablespoon pomegranate molasses
1 teaspoon Ponzu Sauce (page 27)
½ avocado, cut into 16 thin slices
One 4 x 7 in (10 x 18 cm) sheet of nori
2 teaspoons pomegranate seeds
1 Prepare the Sushi Rice.
2 Stir together the pomegranate molasses and the Ponzu Sauce in a small bowl.
3 Dip your fingertips in water and splash some across your palms. Squeeze a walnutsized ball of prepared Sushi Rice, about 2 tablespoons, in your hand to form a neat rectangular bed of rice. Repeat to make 7 more beds of rice.
4 Cut 8 strips of desired width crosswise from the sheet of nori. Reserve the remaining nori for another use. Top each bed of rice with 2 avocado slices. Secure them in place with a nori strip “seatbelt.”
5 To serve, arrange the pieces on a serving dish. Spoon some of the pomegranate mixture over each piece and top with a couple of pomegranate seeds.
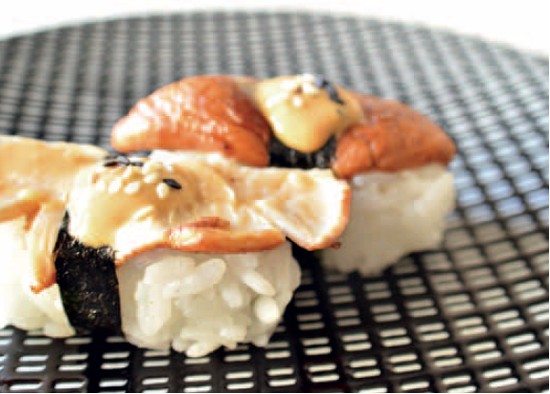
Shiitake Nigiri
Shiitake mushrooms are suggested for this recipe because of their delicate fragrance when lightly seared and because they are my favorite variety of mushroom. You can experiment with other mushrooms as sushi toppings, such as enoki or sliced portabella mushrooms. No matter which variety you use, be sure to only lightly cook each one. You want the flavor of the mushroom to shine through without sacrificing the texture.
RICE PREP: UP TO 1½ HOURS
SUSHI PREP: 15 MINUTES
MAKES 8 PIECES
1½ cups (300 g) prepared Traditional Sushi rice (page 23) or Quick and easy Microwave Sushi rice (page 24)
8 small shiitake mushrooms, wiped and stems removed
Oil for cooking
One 4 x 7 in (10 x 18 cm) sheet of nori
2 tablespoons Sesame noodle Dressing (page 28)
1 teaspoon toasted sesame seeds
1 Prepare the Sushi Rice and Sesame Noodle Dressing.
2 Score the top of each mushroom with a knife. Heat enough oil in the bottom of large skillet to completely coat it. Add the mushrooms and gently cook them to release the fragrance. This should take only a couple of minutes. Remove from the skillet and allow to cool.
3 Dip your fingertips in water and splash some across your palms. Squeeze a walnutsized ball of prepared Sushi Rice, about 2 tablespoons, in your hand to form a neat rectangular bed of rice. Repeat to make 7 more beds of rice.
4 Cut 8 strips of desired width crosswise from the sheet of nori. Reserve the remaining nori for another use. Top each bed of rice with 1 mushroom. For variety, place half of the mushrooms on beds of rice with the undersides facing up. Secure the mushrooms in place with a nori strip “seatbelt.”
5 To serve, arrange the mushroom sushi pieces on a serving dish. Spoon some of the Sesame Noodle Dressing over each piece and sprinkle with sesame seeds.
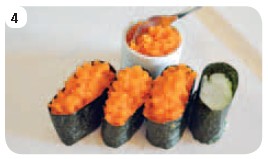
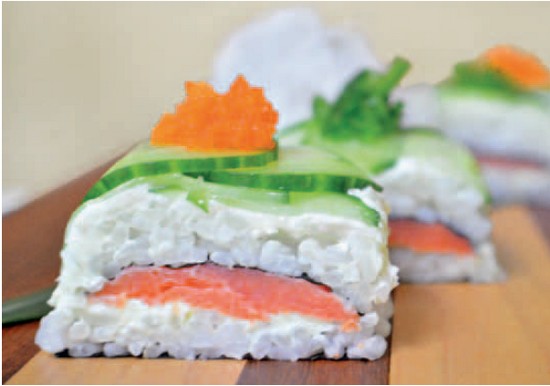
Smoked Salmon, Cream Cheese and Cucumber Stacks
If you’re looking for a way to introduce sushi-shy friends to the cuisine with out scaring them away, try these simple stacks. Since nothing is rolled, all of the ingredients can be easily inspected. The familiar cream cheese, cucumber, and salmon should be enough to balance the perhaps less familiar salmon roe. Because of the flavored cream cheese and salty salmon, no dipping sauce is needed for these quaint bites.
RICE PREP: UP TO 1½ HOURS
SUSHI PREP: 15 MINUTES
MAKES ABOUT 12 PIECES
1 cup (200 g) prepared Traditional Sushi rice (page 23) or Quick and easy Microwave Sushi rice (page 24)
4 tablespoons cream cheese, softened
1 teaspoon wasabi paste
¼ teaspoon lime zest
Two 4 x 7 in (10 x 18 cm) sheets nori
4 oz (125 g) smoked salmon or lox, thinly sliced
¼ English cucumber or Japanese cucumber, cut into paper thin slices
1 tablespoon salmon roe
1 Prepare the Sushi Rice.
2 Mix the cream cheese, wasabi paste, and lime zest together in a small bowl. Cut the nori sheets in half lengthwise. Place two of the pieces on your work surface, rough side facing up, and set the other two aside. Wet your fingertips and spread 4 tablespoons of Sushi Rice across the surface of a nori half. Repeat this for the other nori half. Smear 1 tablespoon of the cream cheese mixture across the rice.
3 Divide the smoked salmon in half. Spread it sandwich-style over the surface of the cream cheese covered nori halves. Push them to the side and retrieve the remaining 2 nori halves. Place them rough side up on your work surface. Wet your fingertips and spread 4 tablespoons of Sushi Rice over each one. Layer the halves, rice side up, over the smoked salmon.
4 Spread 1 tablespoon of the cream cheese mixture over the surface of each rice covered stack. Top each stack with cucumber slices in a slight overlapping pattern. Place a piece of plastic wrap over each stack. Use a bamboo rolling mat to gently press the stacks. Keep the plastic wrap in place and use a sharp knife to cut each stack into slices. Again, use the bamboo rolling mat to gently press the stacks. Remove the plastic wrap.
5 To serve, transfer the piece to a serving dish. Top each piece with some of the salmon roe.
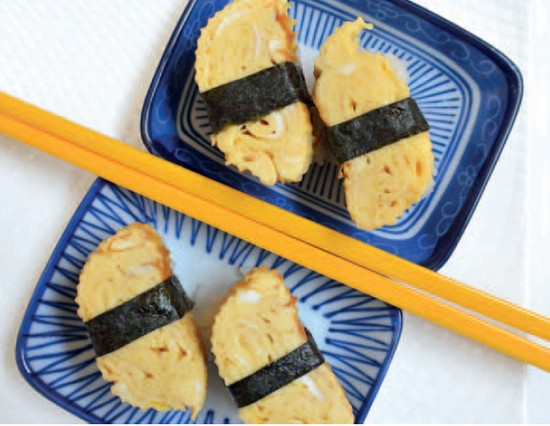
Japanese Omelet Sushi Tamago Nigiri
During my sushi training an incredible amount of eggs were sacrificed for student practice. For each tamagoyaki, or Japanese omelet, we used 10 eggs. I can still picture those heavy rectangular pans, small bowls with oil saturated paper towels, long cooking chopsticks and the hope that the next flip would land once again inside the pan, rather than over the side of it! Thanks to Zoren-san and Bobby-san, who cleverly recommended that we bring bacon and ketchup (for katsuramuki hashbrowns) to class, most of those misshapen omelets fueled hours of sushi practice. Using this method, you can prepare a nice rolled omelet in a regular skillet. After it cooks, simply trim the edges to maintain the desired rectangular form.
RICE PREP: UP TO 1½ HOURS
SUSHI PREP: 25 MINUTES
MAKES ABOUT 12 PIECES
1½ cups (300 g) prepared Traditional Sushi rice (page 23) or Quick and easy Microwave Sushi rice (page 24)
5 large eggs
4 tablespoons Dashi Stock (page 29), cooled
1 tablespoon sugar
2 tablespoons light colored soy sauce
½ teaspoon salt
Oil for frying
One 4 x 7 in (10 x 18 cm) sheet nori

Whisk together the egg mixture.
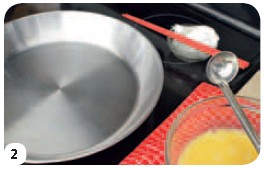
Grease the skillet by dipping a paper towel in oil, and lightly coating the surface
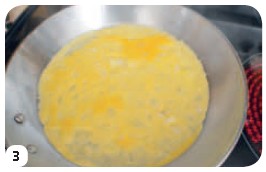
Add the first layer of egg mixture.
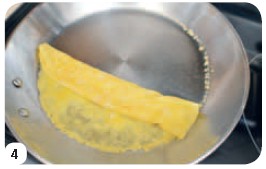
Use chopsticks to gently fold the omelet.
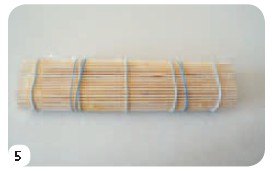
Allow the completed omelet to cool in a bamboo rolling mat
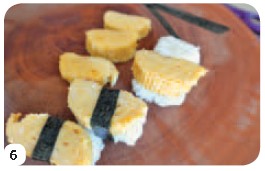
Cut the cooled tamago into slices and use to make nigiri.
VARIATION
Japanese Omelet Sheets
Add ½ cup (125 ml) of the egg mixture to the oiled skillet. Tilt the skillet to coat it. When the egg firms, loosen the sides with a pair of chopsticks. Flip the omelet onto a plate. Repeat the steps with the remaining egg mixture. Allow 1 plate per omelet sheet for cooling purposes. After the sheets are cooled, cut them into thin strips.
1 Prepare the Sushi Rice and Dashi Stock.
2 Whisk the eggs, dashi, sugar, light colored soy sauce, and salt together in a medium bowl. Strain the mixture through a fine strainer to separate any bits of egg that won’t mix. Heat a skillet over medium heat. Wad a large paper towel into a ball and dip it in some cooking oil. Use chopsticks or tongs to rub the paper towel around the skillet. This should add a thin coat of oil to the skillet.
3 Pour about 4 tablespoons of the egg mixture in the skillet. Quickly tilt the skillet so that the egg mixture coats the skillet. When the egg begins to firm, use chopsticks to loosen the edges. Fold the top of the egg down towards the bottom of the skillet. Push the cooked egg back to the top of the skillet. Rub the paper towel in the skillet again. Lift the cooked egg up and pour another 4 tablespoons of mixture in the skillet. Allow the new egg mixture to bond with the cooked egg. When the new mixture firms, fold the egg down and continue repeating the process until all of the mixture has been used.
4 Remove the omelet from the skillet and place it on a bamboo rolling mat. Roll the mat around the omelet to shape it into a rectangle. Use rubber bands to hold the mat in place. Let the omelet cool inside the mat. Remove the omelet and cut it into ¼ inch (6 mm) thick slices.
5 Wet your fingertips in water and splash some across your palms. Squeeze a walnutsized ball of prepared Sushi Rice, about 2 tablespoons, in your hand to form a neat, rectangular bed of rice. Repeat to make 11 more beds of rice.
6 Cut the sheet of nori crosswise into 12 strips. Top each bed of rice with one of the omelet slices. Use a nori “seatbelt” strip to secure the omelet in place.
7 To serve, arrange the tamago pieces on a serving dish. Serve with soy sauce for dipping, if desired.
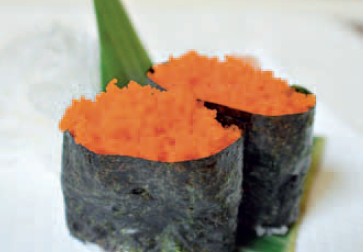
Masago Gunkan
Gunkan maki are one of the best ways to enjoy capelin roe or masago. However, capelin roe isn’t the only type of roe that can be used. Fill them with your favorite variety of roe such as flying fish roe, salmon roe, or sea urchin. Or, showcase all of the roes by making your own little roe “boat” sampler.
RICE PREP: UP TO 1½ HOURS
SUSHI PREP: 5 MINUTES
MAKES 4 PIECES
½ cup (100 g) prepared Traditional Sushi rice (page 23) or Quick and easy Microwave Sushi rice (page 24)
Two 4 x 7 in (10 x 18 cm) sheets nori
4 tablespoons capelin roe (masago)
1 Prepare the Sushi Rice and quarter it to make 4 beds of rice. Cut the nori into four 1 ½ x 5 inch (4 x 13 cm) strips. (Any remaining nori can be saved and cut into “seatbelts” for other nigiri.) Wrap one strip of nori, rough side facing in, around 1 bed of rice to form a wall. It may be necessary to use a single grain of rice as “glue” for the edges. Repeat for the remaining 3 beds of rice and nori.
2 To serve, spoon 1 tablespoon of masago over each bed of Sushi Rice.
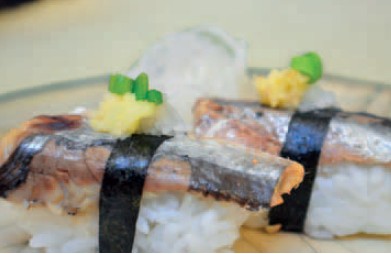
Sardine Nigiri
You won’t need a dipping sauce for these pieces of sushi. Canned sardines already have plenty of salt content. They also pack a lot of flavor. Instead, look forward to the fresh contrast the aromatics offer.
RICE PREP: UP TO 1½ HOURS
SUSHI PREP: 10 MINUTES
MAKES ABOUT 6-8 PIECES
1½ cups (300 g) prepared Traditional Sushi rice (page 23) or Quick and easy Microwave Sushi rice (page 24)
4 oz (120 g) can sardines
One 4 x 7 in (10 x 18 cm) sheet of nori
1 sprig fresh coriander leaves (cilantro)
½ teaspoon finely grated fresh ginger root
¼ teaspoon finely grated garlic
1 Prepare the Sushi Rice.
2 Remove the sardines from the canning liquid and pat them dry. Dip your fingertips in water and splash some across your palms. Squeeze a walnutsized ball of Sushi Rice, about 2 tablespoons, in your hand forming a neat rectangle. Repeat to make 6-7 more beds of rice.
3 Cut 8 strips of desired width crosswise from the sheet of nori. Reserve the remaining nori for another use. Top each bed of rice with 1 sardine. Secure the sardines in place with a nori strip “seatbelt.”
4 To serve, place the sardines on a serving dish. Remove the stems from the fresh coriander (cilantro) sprig. Top each sardine with 1 fresh coriander (cilantro) leaf. Divide the grated fresh ginger root between the sardines. Add a tiny dab of the grated garlic on top of each sardine.
Smoked Duck Nigiri
When my Southern-style sushi was profiled in a Japanese magazine many years ago, one of the headlines described this sushi as “bizarre sushi with duck cracklings.” Perhaps it is a bit untraditional and unusual, but if you enjoy duck as much as I do, you’ll find nothing bizarre about this tasty combination.
RICE PREP: UP TO 1½ HOURS
SUSHI PREP: 20 MINUTES
MAKES ABOUT 10-12 PIECES
1½ cups (300 g) prepared Traditional Sushi rice (page 23) or Quick and easy Microwave Sushi rice (page 24)
12 oz (340 g) smoked duck breast, skin intact
Oil for cooking
One 4 x 7 in (10 x 18 cm) sheet of nori
2 tablespoons Sweetened Soy Syrup (page 28)
1 teaspoon minced green onion (scallions), green parts only
1 Prepare the Sushi Rice and the Sweetened Soy Syrup.
2 Remove the skin from the duck breast and slice it into thin pieces. Heat enough oil in the bottom of large skillet to completely coat it. Add the duck skin slices and cook them until crispy and golden brown, about 3 minutes. Drain the duck cracklings on paper towels or a clean kitchen towel.
3 Slice the duck breast on a bias into 10-12 thin slices. Dip your fingertips in water and splash some across your palms. Squeeze a walnut-sized ball of prepared Sushi Rice, about 2 tablespoons, in your hand to form a neat rectangular bed of rice. Repeat to make enough beds of rice to accommodate the slices of smoked duck.
4 Cut the sheet of nori crosswise into enough strips to match the number of smoked duck slices. Lay one slice of duck over each bed or rice and secure them in place with a nori strip “seatbelt.”
5 Arrange the sushi on a serving dish. Drizzle the Sweetened Soy Syrup over the pieces. Spread the duck cracklings over the top and then the green onions.
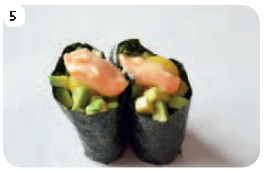
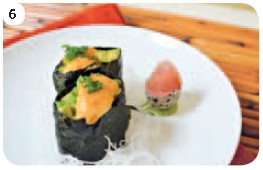
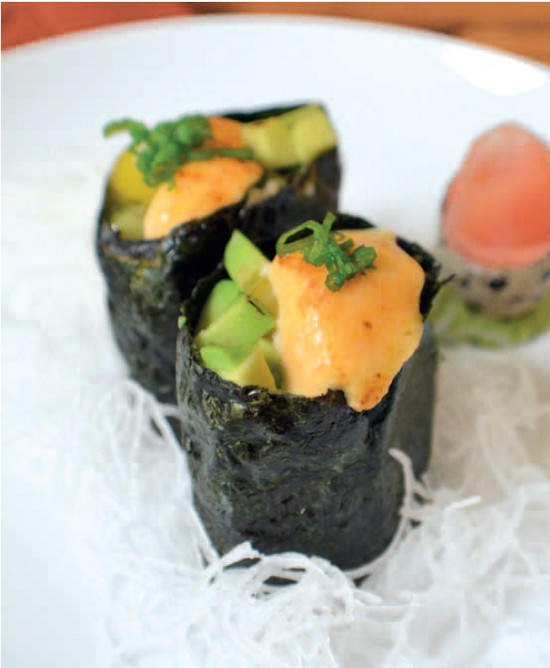
Deviled Egg and Avocado Gunkan
I like to think of these as sushi “bling.” In small amounts, they will satisfy any cravings you might have for something rich and decadent. And of course, the use of a cooking torch to create them makes a grand statement.
RICE PREP: UP TO 1½ HOURS
SUSHI PREP: 10 MINUTES
MAKES 4 PIECES
½ cup (100 g) prepared Traditional Sushi rice (page 23) or Quick and easy Microwave Sushi rice (page 24)
Two 4 x 7 in (10 x 18 cm) sheets nori
4 tablespoons chopped avocado
Pinch of salt
Juice of ¼ lime
4 quail egg yolks
4 teaspoons Spicy Mayonnaise (page 29)
1 teaspoon minced green onion (scallions), green parts only
1 Prepare the Sushi Rice and the Spicy Mayonnaise.
2 Divide the Sushi Rice into 4 parts and make 4 beds of rice. Cut the nori into four 1 ½ x 5 inch (4 x 13 cm) strips. (Any remaining nori can be saved and cut into “seatbelts” for other nigiri.) Wrap one strip of nori, rough side facing in, around 1 bed of rice to form a wall. It may be necessary to use a single grain of rice as “glue” for the edges. Repeat for the remaining 3 beds of rice and nori.
3 Mix the chopped avocado, pinch of salt, and lime juice together in a small bowl. Spoon 1 tablespoon of the mixture on each rice bed. Nestle 1 quail egg yolk in the center of each avocado topped sushi bed. Spoon 1 teaspoon of Spicy Mayonnaise over the top of each quail egg. Use a cooking torch to lightly sear the Spicy Mayonnaise until it becomes toasted, about 7-8 seconds.
4 To serve, sprinkle the green onions (scallions) over the tops of the sushi pieces and serve immediately.
Cut the nori into strips and prepare the beds of rice.
Wrap each bed of rice with the nori strips.

Spoon the chopped avocado onto the rice beds.
Center one quail egg yolk in the center of each piece.
Place Spicy Mayonniase on top of the quail egg.
Briefly sear the Spicy Mayonnaise before adding the final garnish.
White Tuna Nigiri
When it comes to handling onions and garlic, sushi chefs can take on diva-like attitudes. Many refuse to touch either type of produce with their bare hands. The oils from both can linger past many hand washes and leave a strong odor on the hands. This odor can be passed along to delicate flavored Sushi Rice. For this reason, pointed metal tipped chopsticks are used to place aromatic toppings over nigiri, like those for white tuna.
RICE PREP: UP TO 1½ HOURS
SUSHI PREP: 20 MINUTES
MAKES ABOUT 10 PIECES
1¼ cups (250 g) prepared Traditional Sushi rice (page 23) or Quick and easy Microwave Sushi rice (page 24)
6 oz (150 g) fresh white tuna, cut into a 1 in (2.5 cm) thick block
2 tablespoons Ponzu Sauce (page 27), plus more for dipping
¼ teaspoon finely grated yellow onion
¼ teaspoon finely grated garlic
½ teaspoon finely grated carrot
1 Prepare the Sushi Rice.
2 Use a cooking torch to lightly sear the outside of the white tuna. Alternately, skewer the white tuna with metal skewers and sear the outside of the fish over the flame of a gas cook top. Allow the fish to cool to the touch.
3 Cut the white tuna using the block cut method (page 18) into 10-12 slices. Wet your fingertips in water and splash some across your palms. Squeeze a walnut-sized ball of prepared Sushi Rice, about 2 tablespoons, in your hand to form a neat rectangular bed of rice. Repeat to make 8 more beds of rice.
4 Place one bed of rice flat in your left palm and drape one slice of white tuna over it. Grasp the side of the rice with your right thumb and forefinger. Rub your left thumb over the white tuna to shape. Repeat the steps with the remaining white tuna and rice.
5 To serve, arrange the pieces of white tuna sushi on a serving dish. Brush some of the Ponzu Sauce over each piece. Top each piece with a tiny amount of grated yellow onion, grated garlic, and grated carrot. Serve with additional Ponzu Sauce, if desired.
Smoked Tofu Nigiri
When I was in seventh grade, I decided to become a vegetarian. That lifestyle choice extended well into my twenties. Never once during that time did I even attempt to try tofu. Oddly enough, it wasn’t until I began eating meat again that I also began eating tofu. Now, I find myself trying to make up for all of those years I missed out by incorporating tofu into everything I can, including sushi.
RICE PREP: UP TO 1½ HOURS
SUSHI PREP: 50 MINUTES
MAKES ABOUT 10 PIECES
1½ cups (300 g) prepared Traditional Sushi rice (page 23) or Quick and easy Microwave Sushi rice (page 24)
16 oz (500 g) package tofu, drained of package liquid
½ cup (125 ml) Tempura Sauce (page 27)
One 4 x 7 in (10 x 18 cm) sheet nori
4 tablespoons Sushi rice Dressing (page 22)
½ teaspoon dark sesame oil
½ teaspoon garlic chili sauce
1 Prepare the Sushi Rice and Tempura Sauce.
2 Place the tofu between several layers of paper towels on a flat surface. Place a bowl and a heavy canned item on top of it. Allow the tofu to drain for at least 15 minutes. While waiting for tofu, place a handful of smoking chips in water to soak.
3 Place the tofu in a small bowl and add the Tempura Sauce. Turn it a few times to coat. Let the tofu marinate for about 10 minutes.
4 Heat your outdoor grill. Wrap the soaked wood chips in aluminum foil. Puncture the aluminum foil several times with a pair of chopsticks. Add the foil packet to the grill. When it starts smoking, place the marinated tofu on the grill racks and close the grill lid. Smoke the tofu for 20 minutes. Remove from the grill and allow it to cool completely.
5 Dip your fingertips in water and splash some across your palms. Squeeze a walnut-sized ball of prepared Sushi Rice, about 2 tablespoons, in your hand to form a neat rectangular bed of rice. Repeat to make 9 more beds of rice.
6 Slice the smoked tofu crosswise into ¼ inch (6 mm) thick slices. Cut 8 strips of desired width crosswise from the sheet of nori. Reserve the remaining nori for another use. Top each bed of rice with 1 slice of smoked tofu. Secure the slices in place with a nori strip “seatbelt.”
7 To serve, arrange the smoked sushi pieces on a serving dish. Mix together the Sushi Rice Dressing, dark sesame oil, and the garlic chili sauce in a small dish. Brush some of the mixture over each piece of smoked tofu.
Garlic Seared Scallop Nigiri
It doesn’t take much scallop to make a big impact. Each sea scallop is cut in half, then butterflied before draping over the bed of Sushi Rice. If your scallops tend to slide off the rice, pat the undersides dry, or use nori “seatbelt” strips to keep them in place.
RICE PREP: UP TO 1½ HOURS
SUSHI PREP: 10 MINUTES
MAKES 4
½ cup (100 g) prepared Traditional Sushi rice (page 23) or Quick and easy Microwave Sushi rice (page 24)
2 fresh sea scallops, shucked
½ teaspoon minced garlic
Pinch of salt
½ teaspoon dark sesame oil
1 Prepare the Sushi Rice.
2 Wet your fingertips and splash water into your palms. Divide the Sushi Rice into 4 beds of rice.
3 Cut each scallop in half crosswise. Cut each scallop half in the center to butterfly. Do not cut all the way through. Drape each butterflied scallop over the top of each bed of rice.
4 Mix together the garlic, pinch of salt, and dark sesame oil in a small dish. Spread the mixture generously over the surface of each scallop with the back of a spoon. Sear each scallop with a cooking torch to lightly brown the surface. Serve with soy sauce.