Chapter 3: Setting Up the Nikon D3200
The Nikon D3200 has quite a few menus, each with many settings. Whether you are deciding what information you want to appear during image playback or setting the Function button ( ), this chapter helps you navigate the menus and choose the best options. Because there are so many menu choices, it can be frustrating. This chapter looks at each menu available on the D3200 and explains what it does. It also covers which settings are important and which can be set once and ignored.
The menu system is accessed by pressing the Menu button ( ) on the back of the camera. The multi-selector is used to navigate through the choices and the OK button (
 ) is used to select the highlighted option. To exit the camera menu system, just press the Menu button () again, press the Information Edit button (
 ), or lightly press the shutter-release button.

Knowing which settings to use and where they are allowed me to capture this action shot.
The Playback Menu
The Playback menu ( ) is where you manage the images stored on the memory card in the camera, and how those images are displayed during playback. There are seven choices, but many of these can be set just once and left alone. When the Playback menu () is selected, the name of the menu appears at the top of the screen and the Playback menu icon () is highlighted in blue, as shown in Figure 3.1.
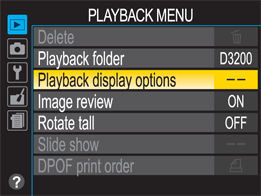
3.1 The selected Playback menu option is highlighted in yellow.
Delete
This menu allows you to delete images from the memory card in your camera in the following three ways: Delete selected images, delete images selected by date, or select and delete all images.
You can always delete an image when viewing it on the LCD screen by pressing the Delete button ( ), which is usually easier and faster than using the Playback menu.
Follow these steps to delete selected images from the Playback menu:
1. Press the multi-selector up ( ) or down (
 ) to highlight Delete, and then press the multi-selector right (
 ). The three delete options appear.
2. Highlight Selected and press the multi-selector right ().
3. Use the multi-selector to navigate through the images and press the Thumbnail/zoom out button ( ) to mark those you want to delete. A small trash can icon () appears in the top corner of the thumbnail. Press the Thumbnail/zoom out button () a second time to remove an image from those to be deleted and the trash can icon () disappears.
4. Once all of the images you want to delete are marked, press the OK button ().
5. A confirmation screen appears asking if you really want to delete the selected images. The default choice is No, so press the multi-selector up () to highlight Yes, and then press the OK button (). The images are deleted.
Follow these steps to delete all images taken on a certain date from within the Playback menu:
1. Press the multi-selector up () or down () to highlight Delete, and then press the multi-selector right ().
2. Highlight Select date, and then press the multi-selector right ().
3. Scroll through the list of dates using the multi-selector up () and down () buttons. When you find the date you want to delete, press the multi-selector right (). All images from that date are selected for deletion. If you want to select other dates, repeat steps 2 and 3 until all of those you want to delete are selected.
If you aren’t sure you have the correct date or images, press the Thumbnail/zoom out button () to see the images from that date and confirm that you want to delete them. Return to date selection by pressing the Thumbnail/zoom out button () again.
4. Press the OK button () to delete the images.
5. A confirmation screen appears asking if you really want to delete the selected images. The default choice is No, so you need to press the multi-selector up () to select Yes. Press the OK button () to delete the images.
Follow these steps to delete all images from a memory card in the Playback menu:
1. Press the multi-selector up () or down () to highlight Delete, and then press the multi-selector right ().
2. Highlight All, and then press the multi-selector right ().
3. A confirmation screen appears asking if you really want to delete the selected images. The default choice is No, so press the multi-selector up () to select Yes, and then press the OK button (). All images are deleted from the memory card.
Images that have been protected with the Protect button ( ), which is covered in Chapter 1, are not deleted when using the Delete all option.
Playback folder
The Nikon D3200 creates folders for your images on the memory card. The main or root folder is always called DCIM (Digital Camera Images). Subfolders are created named 101D3200, 102D3200, 103D3200, and so on. Once a folder contains 999 images, the next folder is created automatically. The Playback folder menu option allows you to choose which folders are included in the playback. There are two options: Current and All. The default is Current, but I prefer to set it to All so that it shows all of the images on the memory card.
If you have used the memory card in another camera and have not formatted it (how to do so is covered later in this chapter), then the images taken with the other camera could appear during playback.
Playback display options
The Playback display options determine what information is visible when reviewing your images on the camera, and what transitions (if any) are used between images during the review. I firmly believe that the more information you have when reviewing your images, the better off you are in making decisions. The two choices that you have are Additional photo info and Transition effects.
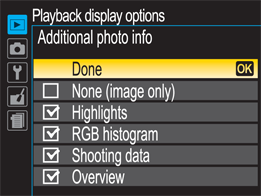
3.2 The Additional photo info options.
The default setting when viewing your images shows the folder name, filename, the date and time the image was taken, and its size and resolution. This menu allows you to see much more information about each file. When reviewing your images on the LCD screen, you can scroll them by pressing the multi-selector left ( ) and right (). You can see the extra information picked here for each image by pressing the multi-selector up () and down ().
The following options are available under the Additional photo info menu:
▶ Done. Obviously, this isn’t actually an option. However, when you have selected the options that you want, you must select Done for the changes to take effect.
▶ None (image only). The images are displayed without any of the photo data.
▶ Highlights. Areas that are pure white (overexposed) blink on and off. I keep this turned on because it is the quickest way to see any areas that are overexposed.
▶ RGB histogram. This displays the histograms for the portion of the image visible on the LCD screen. There is a histogram for each of the three color channels (Red, Green, and Blue). I keep this turned on because it is a more accurate way to see if an image was exposed correctly.
▶ Shooting data. This option displays the camera settings at the time the photo was taken, including the metering mode, shutter speed, aperture, and focal length. Knowing what settings were used allows you to see what worked and what didn’t.
▶ Overview. This gives you a quick overview of the image shooting data and the overall histogram. This is the screen that I most often use to preview my images because it gives me the most information in the least amount of time.

3.3 After you select other Additional photo info options, you see a lot more data about each photo.
To change the default Playback display options, press the multi-selector up () or down () to highlight the option of your choice, and then press the multi-selector right (). A check mark appears in the box next to the option. Press the multi-selector up () or down () to highlight Done, and then press the OK button () to return to the Playback menu. If you forget to highlight and select Done before returning to the Playback menu, the default option is not changed.
The Transition effects menu allows you to pick from Slide in (the default), Zoom/fade, or None. This is a personal preference, but unless you want to wait for a transition effect when reviewing your images on the LCD screen, I suggest setting this to None.
Image review
This setting controls if the camera shows the last image you took on the LCD screen right after you take it. It is convenient to be able to quickly check and see if everything—composition, focus, and exposure—looks the way that you want. However, there are times when this should be turned off, mainly because the LCD screen is the biggest drain on your battery. Reviewing each image can cause the battery to run down rather quickly. The Image review options are On or Off. I prefer to have it set to Off to save the battery life and use the Playback button to review my images.
Rotate tall
The camera has a built-in sensor that tells it what orientation the camera was in when the photo was taken. This menu choice allows the images to be shown in the correct orientation on the LCD screen. For example, if you shoot in portrait orientation, the image is rotated so that when you hold the camera in landscape orientation, the portrait is shown correctly on the LCD screen. Keep in mind that when turned, the image uses only part of the screen and appears rather small. I recommend setting this option to Off so that you can take advantage of the entire 3-inch LCD screen. You can simply rotate your camera to view images in portrait orientation.
Slide show
You can use the camera to play a slide show of the images stored in the current playback folder on the memory card. I love using this to automatically go through all of the images from a shoot without having to use the multi-selector to change between images.
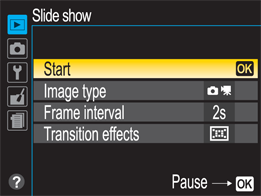
3.4 The Slide show menu options.
When you select the Slide show from the Playback menu you are presented with the following four choices:
▶ Start. This choice starts playing the slide show when you press the OK button ().
▶ Image type. Here, you select the type of files to display in the slide show. Press the multi-selector right () and the choices appear. You can pick Still images and movies, Still images only, or Movies only. Press the OK button () when your choice is highlighted to go back to the Slide show menu.
▶ Frame interval. This determines how long (in seconds) each image is displayed. Press the multi-selector right () and the choices appear. You can pick 2s (the default), 3s, 5s, or 10s. I find that 2 seconds is plenty of time to review images. Press the OK button () when your choice is highlighted to go back to the Slide show menu.
▶ Transition effects. This is one of those clever little touches that I love because it takes something plain and adds a little wow factor. You can choose the Zoom/fade or Cube transition options. If you don’t want a transition, choose None. Press the multi-selector right () and the choices appear. Press the OK button () when your choice is highlighted to go back to the Slide show menu.
The Slide show also works when the camera is connected to a television using the supplied A/V cable. The transitions really look amazing on a big screen.
DPOF print order
You can print images directly from your camera to compatible printers or print kiosks using the DPOF (Digital Print Order Format). This menu choice allows you to create a set of images that can be printed when you connect the camera to a printer or load the memory card into a print kiosk. This is useful for making a quick set of prints without having to download the images to a computer first.
Follow these steps to create a set of images for printing:
1. In the Playback menu, select DPOF print order and press the multi-selector right ().
2. Highlight Select/set and press the multi-selector right (). You can now navigate through the images using the multi-selector.
3. When you find an image that you want to add to the print set, press and hold the Thumbnail/zoom out button (), and then press the multi-selector up ().
4. With the Thumbnail/zoom out button () still depressed, press the multi-selector up () to add to the total number of the selected images to print. Press the multi-selector down () to decrease the number of prints. Each additional time you press the multi-selector up () or down (), it increases or decreases the number of prints that are created from that image.
5. Press the OK button () when you finish selecting images to see the following additional choices:
• Done. Select this option and press OK button () to save the set.
• Print shooting data. Press the OK button () or the multi-selector right () to select this option. It prints the shutter speed and aperture on the print. You still have to navigate to the Done option to save the set once this is selected.
• Print date. Press the OK button () or the multi-selector right () to select this option, which prints the date on the print. You still have to navigate to the Done option to save the set once this is selected.
The Shooting Menu
The Shooting menu ( ) is where the image size and quality, white balance, and ISO are all located. All of these, of course, affect the outcome of your images. Many of these settings are accessed from the information display that is covered in Chapter 1. When the Shooting menu () is selected, the name of the menu appears at the top of the screen and the Shooting menu icon () is highlighted in green, as shown in Figure 3.5.

3.5 The selected menu option in the Shooting menu is highlighted in yellow; here, Image quality is selected.
Reset Shooting menu
This resets the Shooting menu to the factory specifications. If you have changed several settings and aren’t sure of the defaults, or if you just want to start over with the settings, select Yes from this menu.
If you reset the Shooting menu settings, be aware that this also resets the Picture Control System settings to their defaults.
Set Picture Control
This menu is where you set the Picture Control System settings. Begin by selecting one of the following six options: Standard, Neutral, Vivid, Monochrome, Portrait, or Landscape. If you want to, you can then customize your selected Picture Control setting to get it exactly the way that you want. Follow these steps to do so:
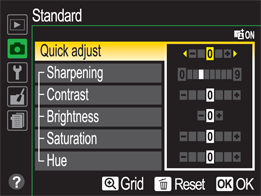
3.6 You can adjust the settings for each of the Picture Controls.
1. From the Shooting menu (), press the multi-selector up () or down () to highlight Set Picture Control, and then press the multi-selector right (). The six Picture Control options appear.
2. Press the multi-selector up () or down () to highlight the Picture Control you want to modify, and then press the multi-selector right (). The settings available for adjustment appear.
3. Press the multi-selector up () or down () to highlight a setting for adjustment.
4. Press the multi-selector right () or left () to change the value. You can adjust all of the following settings:
• Quick adjust. This menu is available in the Standard, Vivid, Portrait, and Landscape modes. You can increase or decrease the overall effect of the selected Picture Control by 2 steps (-2 to +2).
• Sharpening. You can set the sharpening from 0 to 9 (9 being the most and 0 being the least). You can also set the sharpening to Auto by pressing the multi-selector left ()—go all the way to the left, past the 0, until the A is highlighted green.
• Contrast. The contrast can be increased or decreased up to three steps or set on Auto mode. You can also set the contrast to Auto by pressing the multi-selector left ()—go all the way to the left, past the minus sign (–), until the A is highlighted green.
• Brightness. You can increase or decrease the brightness by one step in either direction.
• Saturation. The saturation can be increased or decreased up to three steps or set on Auto mode. You can also set the saturation to Auto by pressing the multi-selector left ()—go all the way to the left, past the minus sign (–), until the A is highlighted green.
• Hue. This is one control that I don’t touch. It controls how the color in your images is rendered and changing it can cause large color shifts, making your images look unnatural. You can adjust the hue by three steps, both positive and negative. When adding to the hue, the reds get more orange, the blues trend toward purple, and the green start to look more blue. When you reduce the hue, the reds start to look more purple, blues start to look more green, and the greens tend to look more yellow.
5. Press the OK button () to make the adjustments active. You can also press the Delete button () which opens a dialog box asking if you want to reset the menu to the factory default. Use the multi-selector up () to choose yes, and then press OK button (), which returns you to the adjustment menu. You must press the OK button () one more time to get to the Shooting menu ().
Any Picture Control setting that has been changed appears with an asterisk next to it in the Shooting menu ().
You can adjust the Sharpening, Contrast, and Brightness the same as the other Picture Controls, but you can also adjust the following settings:
▶ Filter effects. These effects are based on using different color filters, as if you were shooting black-and-white film. The Yellow filter makes anything yellow appear lighter, the sky appear darker, and skin tones to look slightly brighter. The Orange filter makes skies darker, and is used to give cloudy skies a little more punch. The Red filter makes skies much darker, but clouds still appear white. Red objects appear to be lighter. The Green filter is best for portraits as it can soften skin tones.
When you use the Picture Control settings, Nikon image editing software, like View NX2 and Capture NX2, shows the changes made by these settings in both RAW and JPEG files. The software also allows you to apply a different Picture Control setting to RAW files. However, other image editing software (like Adobe Photoshop and Lightroom, or Apple Aperture) apply Picture Control settings only to JPEGs.
▶ Toning. There are ten toning effects that can be applied when using the Monochrome Picture Control. These add a color tint to images and the strength can be adjusted from 1 (which applies the effect lightly) all the way to 7 (which applies the effect more strongly). The default is 4, which is a great starting point. The choices are B&W, Sepia, Cyanotype, Red, Yellow, Green, Blue Green, Blue, Purple Blue, and Red Purple.
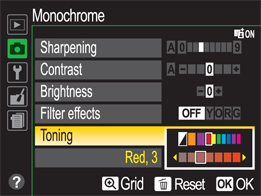
3.7 The Monochrome Picture Control settings are unique to its color effect.
Image quality
There are five Image quality settings on the D3200 that you can set. There are three JPEG-only modes, a single RAW-only mode, and one that combines JPEG and RAW.
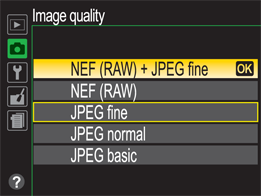
3.8 The Image quality menu allows you to pick the file format for your images.
The following are the Image quality settings that you can adjust on the D3200:
▶ NEF (RAW) + JPEG fine. This option saves two copies of the same photo, one in RAW format and the other as a JPEG with minimal compression. This is great if you are unsure of shooting in RAW and want a JPEG version of the file, as well. However, it takes longer to write the information to the memory card and uses more space because there are two files created each time a photo is taken.
▶ NEF (RAW). This saves the photo in the Nikon RAW file format. Images taken in this mode need to be processed before they can be used.
▶ JPEG fine. This saves a JPEG file with minimal compression. This setting creates the largest JPEG file.
▶ JPEG normal. This saves the image with normal compression, a balance between quality and file size.
▶ JPEG basic. This saves the image file as a highly-compressed JPEG, creating a smaller file with less quality.
If you pick one of the three JPEG-only modes here, you can also set the image size in the Image size Shooting menu ().
Image size
The image size menu choice allows you to select the size of the JPEG files when you have picked one of the three JPEG-only modes in the Image quality menu. The following sizes are available:
▶ Large. The large size gives you a huge, full resolution 6016-pixel × 4000-pixel 24.1-megapixel image file.
▶ Medium. The medium size setting gives you a large, 4512-pixel × 3000-pixel 13.5-megapixel image file.
▶ Small. The small size setting gives you a 3008-pixel × 2000-pixel 6.0 megapixel image file.
Because of the size of the sensor, the D3200 creates extremely large files—even shooting in the medium or small sizes produces large files. When you choose the RAW or RAW + JPEG setting in the Image quality menu, you can’t choose the image size.
White balance
This is where you can pick the white balance from one of the presets or set a custom value.
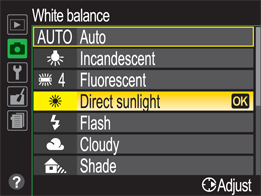
3.9 You can select the best white balance for your current shooting conditions.
The white balance setting is discussed at length in Chapter 2.
The choices for white balance are as follows:
▶ Auto ( ). This setting allows the camera to pick the white balance, and it usually does a great job.
▶ Incandescent ( ). This is for shooting under normal household-type bulbs.
▶ Fluorescent ( ). There are seven types of fluorescent lights for which the D3200 has a setting: Sodium-vapor lamps, Warm-white fluorescent, White fluorescent, Cool-white fluorescent, Day white fluorescent, Daylight fluorescent, and High temp. mercury-vapor. Each of these settings adjusts for a different type of fluorescent bulb. If you are not sure which type you are shooting under, check the color on the LCD screen or go with the Preset manual option instead.
▶ Direct sunlight ( ). This setting is used when shooting outdoors under direct sunlight.
▶ Flash ( ). This white balance setting produces a light that is close to direct sunlight, but may be slightly cooler.
▶ Cloudy ( ). Use this setting when the light is a little cooler because it is diffused by clouds.
▶ Shade ( ). This is used when shooting in shadows, where the light is usually much cooler (more blue) than when in direct sunlight or under a cloudy sky.
▶ Preset Manual ( ). You can create a custom white balance setting to deal with mixed light sources or those that don’t quite fall into any of the other presets.
Setting the Preset Manual white balance is covered in Chapter 2.
Each white balance setting can be fine-tuned using a color grid. The grid allows you to map a new point for the white balance by adjusting the color from warmer (A) to cooler (B), and by making the color point either more green (G) or more magenta (M).
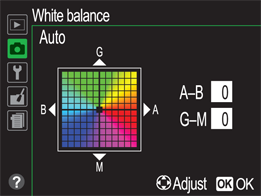
3.10 You can fine-tune the white balance with the color grid.
To fine-tune the white balance, follow these steps:
1. Open the Shooting menu () and highlight White balance. Press the multi-selector right ().
2. Press the multi-selector up () or down () to highlight the option you want to fine-tune. Press the multi-selector right (). The fine-tuning options appear.
3. Use the multi-selector to adjust the color. Up () adds green, down () adds magenta, right () adds amber, and left () adds blue. You can see the values change in the A-B window and the G-M window.
4. Once you have a new value that you like, press the OK button ().
ISO sensitivity settings
This menu allows you to set the ISO value. It is also where you set the values for Auto ISO mode ( ) and turn it on or off. You can select an ISO sensitivity setting from 100 to Hi 1, or the Auto mode. When you pick the Auto ISO mode (), the menu then allows the Auto ISO sensitivity control to bet set to On or Off. If you set it to On, you can change the Maximum sensitivity and the Minimum shutter speed.
I set the Maximum sensitivity to 3200 because, for my photography, I think that ISO 6400 has too much digital noise. The Minimum shutter speed is the lowest that the camera can go before having to increase the ISO. This setting depends on the subjects you are shooting. For example, if you are shooting a concert and need to freeze the subject, I suggest setting this to 1/125 second.
Active D-Lighting
This is where you can turn Active D-Lighting on or off. Active D-Lighting is a Nikon technology used to keep the highlights in your image from being overexposed, especially when shooting high-contrast scenes. The problem with photographing high-contrast scenes is that they can have very dark shadows and bright highlights—a range of tones wider than what the camera sensor can handle. To help with these scenes, Active D-Lighting actually underexposes the highlights of the image, which keeps detail in the bright parts as well as in the shadows.
Auto distortion control
Every camera lens has some sort of distortion. Basically, there are two types of distortion: Pincushion distortion, which is when image edges bow inward, and barrel distortion, which is when the edges bow outward. The Nikon D3200 Auto distortion control is a built-in capability you can adjust for these types of distortion. If you want the camera to do this for you, turn this option on; otherwise, leave it off. I usually have this turned off and use the lens-correction algorithms available in the Adobe image-editing software instead, but if you plan on using the images straight from the camera, go ahead and turn this on.
Color space
The color space of a device describes the range of colors that it can accurately display. The color space that you select can affect the look of your images based on how they are used. You have the following two choices on the D3200:
▶ sRGB. This is the color space used on most computer monitors. If your images are going to mainly be viewed on computer monitors (such as on Facebook, photo-sharing websites, e-mails, or your own website or blog), then this is the color space to pick. It has more saturated color than the Adobe RGB color space.
▶ Adobe RGB. This color space is meant for images that are going to be printed. It can accurately render a wider array of colors. Images rendered in the Adobe RGB color space might look a little flat when viewed on-screen.
I recommend the sRGB color space for most of images because they look better right out of the camera. If you shoot in the RAW mode, then you can easily change the color space in postproduction.
Noise reduction
Digital noise is introduced to your image when shooting at high ISO settings or when the sensor heats up during long exposures. The Nikon D3200 has a built-in noise-reduction feature that tries to minimize noise and, at the same time, keep the image sharp. You can turn Noise reduction on or off here.
There is one serious drawback to turning on Noise reduction when shooting long exposures—the noise-reduction process needs the same length of time as the exposure to complete the image. For example, if you take a 10-second exposure, the camera needs another 10 seconds to apply the noise reduction; if you take a 30-second exposure the camera needs another 30 seconds to process the image. This ties up your camera, preventing you from shooting additional images. When I shoot long exposures, I usually turn this off and apply the noise reduction in postproduction.
AF-area modes
There are eight autofocus modes—four when using the viewfinder and another four when using Live View mode ( ), including when recording movies.
The available autofocus modes are:
▶ Viewfinder. The following are the autofocus area modes that can be used when you use the viewfinder to compose your images:
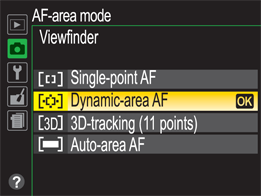
3.11 The AF-area modes for the viewfinder.
• Single-point AF ( ). This mode uses one of the 11 autofocus points, and allows you to control which one is active.
• Dynamic-area AF ( ). This mode uses a single selected autofocus point. The camera then uses the surrounding points to help when the subject moves.
• 3D-tracking (11 points) (![]() ). In this mode, the camera uses the distance information and the focus points to work out where the subject you are focusing on will be when it stops moving, or when you take a photo.
). In this mode, the camera uses the distance information and the focus points to work out where the subject you are focusing on will be when it stops moving, or when you take a photo.
• Auto-area AF ( ). In this mode, the camera picks a focus point from the 11 autofocus points.
▶ Live view/movie (). The choices that you make here determine which of the focus modes are used in the Live view mode () and when shooting movies. The choices available are:
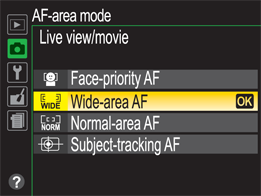
3.12 The AF-area modes for Live View/movie.
• Face-priority AF ( ). The camera finds and focuses on faces (it will focus on those closest to it).
• Wide-area AF ( ). This uses the main section of the frame and automatically tries to focus on the subject. You can move the focus point around using the multi-selector.
• Normal-area AF ( ). This is the same focusing concept as the Wide-area autofocus (), but it uses a smaller autofocus area.
• Subject-tracking AF (![]() ). In this mode, the camera tries to autofocus on the subject as it moves through the frame.
). In this mode, the camera tries to autofocus on the subject as it moves through the frame.
The focus and autofocus (AF) area modes are covered in more detail in Chapter 2.
The built-in AF-assist Illuminator
The front of the camera has a light that automatically comes on in low light to help the autofocus system work. This can be really useful; however, at times this lamp can be more of a hindrance. When the subject is too far away for the light to reach or if the light might disturb the subject, you can turn it off here.
Metering modes
The metering mode determines how the built-in light meter reads scenes. There are the following three choices:
▶ Matrix metering mode ( ). This mode looks at the light in the entire scene.
▶ Center-weighted metering mode ( ). In this mode, the built-in light meter looks at most of the scene, but pays the most attention to the area right in the middle.
▶ Spot metering mode ( ). This mode looks at just a small part of the scene and ignores the rest.
The metering modes are covered in greater detail in Chapter 5.
Movie settings
The Nikon D3200 takes great video, and the following list includes all of the settings for it:
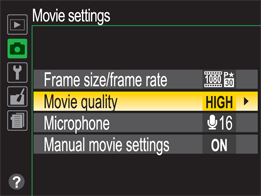
3.13 The movie settings are all accessible from this menu.
▶ Frame size/frame rate. This is where you pick the frame size of the movie and the frame rate at which it is recorded. There are four choices: 1920 × 1080 at 30 frames per second, 1920 × 1080 at 24 frames per second, 1280 × 720 at 60 frames per second, and 640 × 424 at 30 frames per second.
▶ Movie quality. You have two choices here: High or Normal. This controls the maximum bit rate, with high quality being 24 and normal quality being 12 for all modes (except the 640 × 424, which is 5 for high quality and 3 for normal).
▶ Microphone. Sound is really important in movies and the Nikon D3200 has some great microphone controls that allow you to set the sensitivity of the built-in microphone or an external one. You can set the microphone to have auto sensitivity, or you can manually set the input between 1 and 20. There is a visual audio monitor that shows you the current level of the sound so that you can adjust it exactly the way you want it. Ideally, you want the sound bars to be right around the 12 mark.
▶ Manual movie settings. When you turn on the manual movie settings, you can adjust the shutter speed and ISO when in the Manual exposure mode ( ). The shutter speed can be set as high as 1/4000 second all the way down to the lowest available, depending on the frame rate. That means the lowest shutter speed for frame rates of 24, 25, and 30 is 1/30 second. For a frame rate of 50, the lowest shutter speed is 1/50 second and for a frame rate of 60, the lowest shutter speed is 1/60 second. The ISO sensitivity can be set between 200 and Hi 1.
Check out Chapter 7 for more about the video capabilities of the Nikon D3200.
Flash control for built-in flash
This menu controls how the flash acts when the camera is in the Programmed auto mode ( ), Shutter-priority auto mode (
 ), Aperture-priority auto mode (
 ), and Manual mode (). In the Through-the-Lens (TTL) mode, the amount of light output from the flash is adjusted by the camera, depending on the scene and the information it receives through the lens. When set to Manual mode (), the power of the flash can be set to any of the following: Full, 1/2, 1/4, 1/8, 1/16, or 1/32. This allows you to have complete control over the power of the flash no matter what the lighting situation.
The Setup Menu
It’s important to be aware of the menu choices in the Setup menu ( ), but they are settings that can be set once, and then left alone (with the exception of the Format memory card option). When the Setup menu () is selected, the icon is orange, as shown in Figure 3.14.
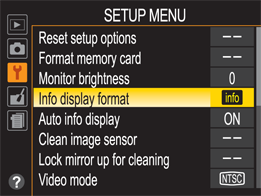
3.14 The Setup menu with the Info display format selected.
Reset setup options
This option resets the Setup menu () to the factory defaults. It does not, however, reset the Language, Time zone and date, Video mode, or Storage folder.
Format memory card
Formatting the memory card gets it ready to accept data from the camera. Selecting this menu choice erases all of the data on the card—even images marked as protected. It is a good idea to format the memory card from time to time because it helps avoid problems with the file structure. When I insert a memory card into the camera for the first time, the first thing I do is format it. This means that the card is empty and ready to use.
To format a memory card, do the following:
1. Press the Menu () button. Select the setup menu from the choices on the left, and then press the OK button ().
2. Press the multi-selector up () or down () to highlight Format memory card, and then press the multi-selector right (). A warning message appears.
3. Press the multi-selector up () to highlight Yes, and then press the OK button ().
When you format a memory card, all images on it are deleted.
Monitor brightness
You can adjust the brightness of the display here. You can make it three steps darker or brighter, and there is a graph with a ten-bar display that goes from black to white making the adjustment easier to gauge. If you can’t see all ten bars as separate colors, then you should probably adjust the display until you do. My personal preference is to have the display brightness set at -1. Press the multi-selector up () or down () to adjust the brightness.
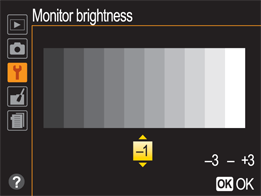
3.15 You can easily adjust the Monitor brightness.
Auto info display
Here, you can set what the information display looks like. There are two main options: Classic and Graphic. Each of those options has three color choices that allow you to customize the look of the information display to your liking. The two looks are shown in Figures 3.16 (Classic view) and 3.17 (Graphic view).
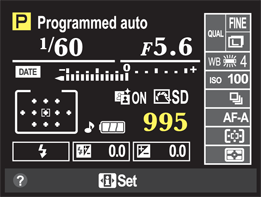
3.16 The Classic info display shown in black.
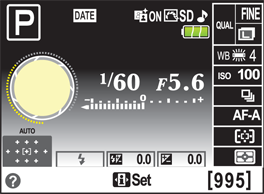
3.17 The Graphic info display shown in black.
The information displayed is the same in both views, but the Graphic choice is a graphical representation of the shutter speed and the aperture. The Classic view is better for people who want a bigger view of the selected shutter speed and aperture. The Classic info display is available in blue, black, or orange, while the Graphic view is available in white, black, and brown.
Clean image sensor
Tiny specks of dust on the camera sensor can cause unwanted blemishes in your images. This menu selection cleans the sensor immediately, and then sets when the camera should automatically clean the sensor. You can set it to Clean at startup or Clean at shutdown. You can also set it for my favorite—Clean at startup & shutdown—or you can turn it off. It’s a good idea to keep the sensor as clean as possible at all times.
Lock mirror up for cleaning
There are times when dirt on the sensor isn’t removed during the automatic sensor cleanings. That’s when you have to manually clean the camera sensor, but the mirror is in the way. This menu option moves the mirror up and locks it out of the way so that you can get to the sensor when the shutter is opened. When this is activated, a message appears on the LCD screen stating that the mirror will move out of the way when you press the shutter-release button, and go back down when you turn the power off. In this mode, there is no electrical current going to the sensor, which prevents a static charge. A static charge attracts more dust to the sensor and makes any that is already there more difficult to remove.
It is easy to damage the camera sensor, so be very careful if you try to clean it yourself.
Once the mirror is up and out of the way, you can access the sensor and clean it. To remove any dirt or dust, use a manual air blower and gently blow air across the sensor. If the sensor is really dirty, send the camera back to Nikon for cleaning.
Do not use compressed air to clean the camera sensor.
Video mode
This is where you can set the video mode to either NTSC or PAL. Choose the video mode for the region that you are in. The default is set for the region that the camera was purchased in, so no changes should be necessary unless you have moved, or the camera was purchased while on vacation or while living in a different country.
NTSC is the video standard used in North America and most of South America. In NTSC, 30 frames are transmitted each second and each frame is made up of 525 individual scan lines. PAL is the predominant video standard used in the rest of the world. In PAL, 25 frames are transmitted each second and each frame is made up of 625 individual scan lines.
HDMI
When the camera is connected to a television or monitor using the high-definition multimedia interface (HDMI), you can control the output resolution and the device control.
The settings that you can adjust are as follows:
▶ Output resolution. You can set the output resolution to one of the following settings: Auto, 480p (progressive), 576p (progressive), 720p (progressive), or 1080i (interlaced). The resolution setting here needs to match the device to which the camera is being connected; if you are unsure, set it to Auto and let the camera figure it out.
▶ Device control. Some higher-end HD devices allow you to control attached devices using the remote control. The Nikon D3200 can be controlled if you turn this setting on.
Flicker reduction
Fluorescent light is produced by passing an electrical charge through a gas that excites the phosphors that coat the inside of a sealed tube. This creates light, but because the current cycles, it can cause flickering in video. This setting works on reducing that flicker, depending on the cycle of the current. You can just leave this set on auto and the camera will try to deal with it. In North America, set the flicker reduction to 60Hz; set it to 50Hz in Europe.
Time zone and date
This is where you can set the time and date on your camera. The menu allows you to use the multi-selector to pick the Time zone, the Date and time, the date format, and lets you turn on daylight saving time. Select your menu choice with the multi-selector up () or down (), and then press the OK button (). Use the multi-selector to choose your current time zone or the year, month, date, hour, minute, and second, and then press the OK button (). You can choose to display the date in the following formats: Year/Month/Day, Month/Day/Year, or Day/Month/Year.
Language
This is where you set the language for the camera menu system and dialog boxes. The default is English, but there are 28 options, so if you are more comfortable with another language, chances are it’s here. Just select the language you want using the multi-selector, and then press the OK button ().
Image comment
The D3200 makes it possible to attach a 36-character-long comment to your images. You can then view the comments in the ViewNX 2 software (which is supplied with the camera) or CaptureNX 2 (available separately).
The three menu choices here are:
▶ Done. This option saves the comment created and returns to the Setup menu ().
▶ Input comment. This is where you enter the comment you want to attach to your images. To enter a comment, use the multi-selector to highlight the character you want, and then press the OK button (). To delete a character, press the Delete button (). Press the Playback/zoom in button ( ) to save the changes to the comment. You can also press the Menu button () to go back without making any changes.
▶ Attach comment. Select this if you want the comment to be attached to all of the photos you take (after this point). You can turn this on and off by pressing the multi-selector right ().
Any information that you enter here is only visible when using the Nikon ViewNX 2 and/or Capture NX 2 software.
Auto image rotation
The auto image rotation function records the orientation of the camera when taking photos. The images are then automatically rotated when viewed on a computer. This does not change the way that the images are shown on the LCD screen on the camera; that is controlled by the Rotate Tall menu option in the Playback menu. My recommendation is that you keep this turned on because it makes it much easier when editing photos on the computer later.
Image Dust Off ref photo
There are times when dust gets on the camera sensor and can cause spots in your images. If you use the optional Nikon Capture NX 2 software, you can use a dust off reference photo to map the dust spots and remove them. There are two ways to start the dust off reference photo function: You can start it immediately or you can clean the sensor first, and then start. If you have already taken photos that you want to use the dust off reference photo with, use the start option; if you haven’t taken any photos yet, there is a Clean sensor first option.
Once you have started the process, the next step is to take a photograph of a well-lit, white object about 4 inches away from the front of the lens. After the photo is taken, the camera lets you know if the exposure settings are appropriate, or if you have to take the photo again.
Image Dust Off ref photo only works if you have the Nikon Capture NX 2 software.
Auto off timers
This setting controls the amount of time the LCD screen remains on when no button is pressed. The longer the LCD screen stays on, the bigger the drain on the battery. If you want to conserve the battery power, choose the short delay.
You have the following four options:
▶ Short. When this is selected, the menus and image playback last for 20 seconds. The image review lasts for 4 seconds, Live View () is active for 5 minutes, and the standby timer is 4 seconds.
▶ Normal. When this is selected, the menus and image playback last for 1 minute. The image review lasts for 4 seconds, Live View () is active for 10 minutes, and the standby timer is 8 seconds.
▶ Long. When this is selected, the menus and image playback last for 1 minute. The image review lasts for 20 seconds, Live View () is active for 20 minutes, and the standby timer is 1 minute.
▶ Custom. Here, you can choose separate delays for the following elements: Playback/menus, Image review, Live view (), and Standby timer.

3.18 The Custom Settings menu allows you to adjust the Auto off timers.
Self-timer
When the Self-timer release mode is set to the self-timer ( ), you can set the length of the delay and the number of shots that the camera takes when the shutter-release button is pressed.
The available choices are as follows:
▶ Self-timer delay. The delay can be set to 2, 5, 10, or 20 seconds.
▶ Number of shots. You can set this so that the camera takes 1 to 9 images in a row.
For more on the Self-timer option, see Chapter 2.
Remote on duration
When you pick one of the remote Release modes that use an optional Nikon remote, this setting determines how long the camera stays in that mode before reverting to the previous Release mode. You can choose 1, 5, 10, or 15 minutes. Every time you use the remote to trigger the camera’s shutter, the timer starts over. I find that setting this to 10 minutes works well.
Beep
The Nikon D3200 beeps when the camera achieves focus. The beep icon ( ) changes to a no-beep icon (
 ) on the information display. You can turn the beep off, or change the pitch between high and low. I keep the beep turned off most of the time, as it can be distracting when shooting in quiet environments.
Rangefinder
The Rangefinder function in the camera uses the exposure indicator to show if the camera is properly focused when using Manual focus ( ). The display changes depending on whether the camera believes the current focus point is in front of or behind the proper focus point. The exposure indicator uses the six displays shown in Figure 3.19. This is useful if you are using a lens that does not have a built-in autofocus motor and doesn’t autofocus on the D3200.
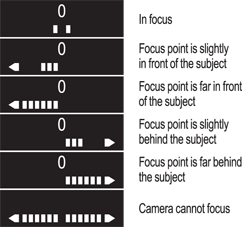
3.19 In the Rangefinder mode, the exposure indicators can be used to see if the subject is in focus.
File number sequence
Every time you take a photo, the camera gives it a unique filename by adding 1 to the previous photo’s filename. This option determines what happens when you insert a new memory card or when you format the card currently in the camera. The two options are for the camera to continue from the last number or for the camera to start over. This is a very important setting that needs to be set right from the beginning. When this option is on, the camera continues with new file numbers from where it left off on the previous card. When the image count reaches 9999, the camera creates a new folder and starts the image sequence from 0001 again. It doesn’t matter how many images are in the folder, when the filename 9999 occurs, a new folder is created. Each folder can have 999 images before a new one is created, but that folder will continue to number consecutively until it reaches 9999.
If this option is off, then the numbering starts at 0001 every time a newly formatted memory card is inserted into the camera. I always have this turned on because I want to minimize the possibility of two images having the same name. When working on the computer, a file can be overwritten when a new one with the same name is copied or moved into the same folder. Keep this option on to minimize the chances of overwriting an image later. There is also the option to reset the count to 0001 by selecting the Reset option, which makes a new folder and resets the count when the next photo is taken.
Buttons
This is where you can assign custom settings to a few buttons on the camera. You can assign the Function button, or reassign the ISO, AE-L/AF-L, or shutter-release buttons.
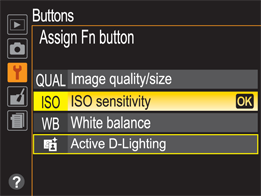
3.20 The Assign Fn button menu allows you to pick what the Function button does when pressed.
The functions you can assign each button are as follows:
▶ Assign the Function button (). This button can be assigned the following functions:
• Image quality/size. When this is set, press the Function button () and rotate the Command dial to change the image quality and size.
• ISO sensitivity. With the Function button set to ISO, pressing it and rotating the Command dial to the right increases the ISO; rotating it to the left decreases the ISO. This is the default setting and the one I prefer.
• White balance. This allows the Function button and Main Command dial to control the white balance settings. Press the Function button () and rotate the Command dial to cycle through the white balance settings. This works in the Programmed auto (), Shutter-priority auto (), Aperture-priority auto (), and Manual () modes.
• Active D-Lighting. This allows the Function button () and the Command dial to turn the Active D-Lighting on or off. This works in the Programmed auto (), Shutter-priority auto (), Aperture-priority auto (), and Manual () modes.
▶ Assign the AE-L/AF-L button ( ). This button can be set to any of the following:
• AE/AF lock. When this is set, the AE-L/AF-L button () locks both the exposure and the focus when pressed.
• AE lock only. When this is set, the AE-L/AF-L button () locks only the exposure when pressed.
• AF lock only. When this is set, the AE-L/AF-L button () locks only the focus when pressed.
• AE lock (hold). When set, this locks the exposure when the AE-L/AF-L button () is pressed. The exposure does not change until the AE-L/AF-L button () is pressed a second time.
• AF-ON. With this set, the AE-L/AF-L button () activates the autofocus instead of the shutter-release button.
▶ Shutter-release button AE-L. When you turn this on, the exposure is locked when the shutter-release button is pressed. In the default mode, the exposure is only locked when the AE-L/AF-L button () is pressed.
Slot empty release
This is an important setting because setting it to Enable release means the camera’s shutter-release button works even when there is no memory card in the camera. Without a memory card, no photos are saved even if it seems like they are being taken. The default is for the release to be locked, which does not allow the shutter-release button to work without a memory card in the camera. This is the setting I leave it on and suggest you do the same.
Print date
This option imprints the date information on the photo as it is taken. This setting does not apply when using the RAW or RAW + JPEG settings. There are four options here: Off, Date, Date and time, and Date counter. The date counter allows you to pick a base date and the newest photos are imprinted with the number of days that have passed between the base date and the date the photo was taken.
Storage folder
This menu allows you to pick the folder that stores your images. It also allows you to create a new folder, rename existing ones, or delete empty ones.
The options available in this menu are:
▶ Select folder. This option allows you to pick the folder on the memory card where the next images taken will be stored.
▶ New. You can create new folders here. Each folder name is preceded by a three-digit number created automatically by the camera. The folder name can then be an additional five characters. Each of the folders can store 999 photographs at which point the camera creates a new folder automatically. To enter the new folder name, use the multi-selector to highlight the character you want, and then press the OK button (). To delete a character press the Delete button (). Press the Playback/zoom in button () to save the changes to the folder you chose. You can also press the Menu button () to go back without making any changes.
▶ Rename. You can rename any of the current folders. The controls are the same as naming a folder the first time.
▶ Delete. You can delete any empty folders on the camera.
I tend not to create or rename any of the folders on any of my cameras as the images are usually transferred to a computer on a regular basis.
GPS
The Nikon D3200 can use the optional GP-1 GPS unit. When attached to the camera via the accessory terminal, it records the location data from the GPS when each photo is taken.
The following menu options are available here:
▶ Standby timer. It takes time for the GPS unit to get the data and write it to the camera. Because the exposure meters turn off automatically after a set time (controlled via the Auto off timers menu), when no operations are performed, the GPS might not have enough time to write the location data. When the GPS is attached, that time is extended by up to 1 minute. You can also disable the standby timer, which keeps the exposure meters turned on when the GPS is attached.
▶ Position. This menu option is only available when the GPS unit is attached to the computer. It displays the current latitude, longitude, and the Coordinated Universal Time (reported by the GPS, not the camera).
▶ Use GPS to set camera clock. You can use this option to set the camera time with the GPS.
Firmware version
This menu choice shows the firmware of the camera. The firmware is the built-in software that runs the camera. It can be updated by Nikon to fix any problems, add features, or to increase the functionality of the camera.
There are two other menus on the Nikon D3200: The Retouch ( ) and Recent settings (
 ) menus. The Retouch menu () is covered in great detail in Chapter 9. The Recent settings menu () gives you access to the last menu items accessed. This makes it easy to go back and reset recent changes.
