Chapter 5: All About Lighting
It is impossible to discuss photography without discussing light. Photo, the root word in photography, comes from the Greek and essentially means light. This chapter covers the quality of light, how to tell whether light is hard or soft, and how the direction of light affects the look and feel of an image. The different types of light sources that you encounter, from natural to contiguous, are also covered, as well as flash basics and the light metering modes on the D3200. This chapter also takes a brief look at measuring light and the camera’s built-in light meter.

Sometimes, light is actually the subject of the image. Using a black board behind the candles, I adjusted the exposure controls until I had something a little moody.
The Importance of Light
There is nothing more important in photography than light—I cannot stress this enough. To take great photographs, you need to study the light and understand how it interacts with the scene. This means not only understanding how to place your subject, but also how to work with existing lighting conditions to make the best photograph possible. Many of the great photographers seem to do this intuitively, but with practice, you can learn how to see the light and work with it to produce stunning images.
For example, I was watching Amlak Tafari (the bass player for Steel Pulse) adjust his gear and noticed how the glow from his amplifier illuminated his face. By adjusting my shooting location slightly and waiting until his expression was perfect, I was able to capture the photo in Figure 5.1

5.1 The proximity of the light source to the subject’s face made it soft, and the direction of the light helped the composition. Exposure: ISO 1600, f/2.8, 1/125 second.
The Quality of Light
The quality of light is a term that you hear photographers and filmmakers talk about when describing how the light interacts with the subject. I am talking about hard light and soft light. Many times, hard light is considered bad and soft light is considered good. It is important to understand that the quality of light, either hard or soft, is not good or bad, but depends on the situation in which the light is being used, and how you want to represent the subject.
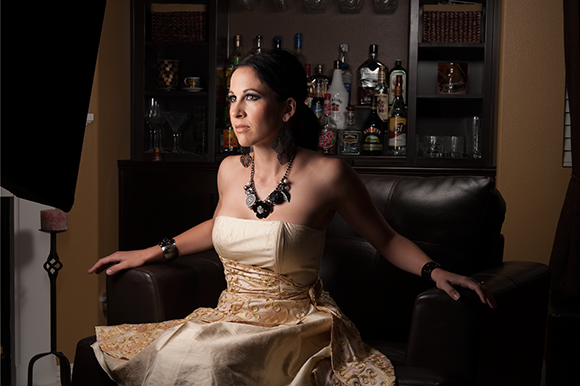
5.2 I placed the softbox as close to the model’s face as I could, as you can see in this production photo. The light was then angled across the subject to produce a softer, more flattering light. Exposure: ISO 100, f/5.6, 1/250 second.
Hard light comes from a small, bright light source and can easily be seen by the sharp shadows. The easiest way to see hard light is to go outside on a cloudless day and hold your hand out in the direct sun. Now look down at the shadow of your hand on the ground. It will be sharp edged and the change between the bright and the dark will be extreme. It’s best to avoid hard light when shooting portraits. It creates deep shadows, makes small wrinkles look deeper, and emphasizes skin imperfections. This is the main reason it isn’t suggested that you use the built-in flash for portraits.

5.3 You can see the hard-edged shadows in this photo taken in the morning sun. Exposure: ISO 400, f/5.6, 1/320 second.
Soft light wraps around the subject. The transition between the light and dark areas is a smooth and gradual one. This light is created by using a large light source very close to the subject. Soft light is usually very desirable, especially when shooting portraits, because it seems to wrap around the face, creating very soft shadows. It also seems to de-emphasize wrinkles or lines in the skin.

5.4 The soft light from the large light source close to the model’s face created a look with no harsh shadows. This was taken with a studio strobe triggered by a wireless transmitter. Exposure: ISO 100, f/7.1, 1/200 second.
The Direction of Light
The direction that the light comes from determines where the shadows fall. Shadows help define the subject, and create depth in your images. The direction that the light comes from can also reveal or hide parts of your subject. Consider how the direction of the sunlight changes during the day, and how that changes how the landscape looks. Early in the day, there are long, deep shadows that slowly shorten and, finally, disappear as the sun reaches midday. Then the shadows start to grow in the other direction as the sun drops and finally sets.
Sometimes, it is easy to see the direction of the light, either by seeing the actual light or looking at the shadows. For example, when photographing concerts, it’s clear where the light is coming from, as it is when shooting in the early morning or late evening when the sun is low on the horizon, as shown in Figure 5.5.
5.5 For this shot, the built-in light meter gave settings that seemed too bright, so I dialed in -2 exposure compensation to darken the image by 2 stops. Exposure: ISO 200, f/8.0, 1/800 second.
The following are the different directions of light:
▶ Frontlighting. Chances are, at some point, you were told that in order to take photos you needed to place the subject in direct sunlight or have the sun at your back. This was acceptable advice when you gave the control of your images to the camera, but it likely resulted in photographs with the subjects squinting into the light. In most frontlighting situations, the camera may render the image properly exposed, but it results in a dull image because the direction of this light causes no shadows and flat features.
There is nothing wrong with lighting the subject directly from the front, but remember that this is the how those great passport and driver’s license photos are usually taken. Try to move the light off to the side. If it can’t be moved, you should move or change the subject’s position.

5.6 The model was lit with a single light right in front of her. Notice that her face looks plain and the lack of shadows makes it seem flat. Exposure: ISO 200, f/4.5, 1/200 second.
▶ Sidelighting. This type of light can create very dramatic shadows and bring out textures and depth in a scene that frontlighting loses. However, when photographing people using sidelighting, be aware that it can emphasize flaws in skin, and features that other lighting is able to disguise or, at least, not emphasize as much. Also, because of the contrast in the dark and light areas when using sidelight, you must pay closer attention to your exposure.
5.7 A single light was placed to the right of the subject to create this very moody portrait. Exposure: ISO 100, f/5.6, 1/250 second.
▶ Backlighting. Lighting from this direction can create striking images or it can just look as if your image is badly exposed. It creates halos around portrait subjects, adds depth to the image, and can even create a warm glow through translucent items. Challenges you face when working with backlighting are mainly exposure related. When the light source is behind the subject, it is more difficult to measure it accurately and the camera is likely to underexpose the image. When the light is directly behind the subject, you have to add light to the front of the image or you create a silhouette (your subject ends up black). The easiest way to see if there is more light coming from the back or front of a subject is to look at the shadows. If the shadows are coming toward you, then there is more light coming from behind the subject. One method to expose correctly in this situation is to use the Spot metering mode ( ), which is covered later in this chapter.

5.8 The light was behind and to the right of this young softball player, as you can see from the direction of the shadow. The light created a halo around her hair. Exposure: ISO 400, f/2.8, 1/2000 second.
Lens Flare
Lens flare is caused by stray light that enters your lens, and it is often an issue when you try to shoot into the sun. It appears in your images as washed-out streaks, almost like foggy patches. If you find that you are shooting outdoors in this kind of situation often, you may want to consider purchasing a lens hood. It attaches to the end of your lens and acts as a shade, reducing the amount of stray light that can enter from the sides. A lens hood is a very low-cost way to eliminate lens flare.
▶ Uplighting. This type of light comes from below the subject. It is sometimes described as horror movie lighting because it is mostly used on old horror movie posters. This type of lighting creates harsh shadows that can’t exist in reality as natural light comes from above or, at the extremes, from the side. Uplighting by itself is not flattering but a little uplighting used in combination with other types of light can create interesting portraits.
For more on portraits, see Chapter 8.
The Intensity of Light
The intensity of the light is simply how bright it is and how much it illuminates your subject. This illumination decreases over distance as the light grows weaker. This holds true for all light sources, and it is the reason that the little pop up flash on the camera can’t light up something far away.
There is a rule in photography that you can calculate how much the light decreases in illumination as the distance between the light and the subject changes. This Inverse Square Law states that the illumination on a subject is inversely proportional to the square of the distance from the light source. Now, I am not a huge math fan, so let me break that down into something that can be easily understood. If you double the distance of the light from the subject—say, instead of four feet, it is 8 feet—the amount of light reaching the subject is a quarter of its original strength, not half. That means that to get the same exposure, you need four times the amount of light to reach the sensor. This can be achieved by using a longer shutter speed, a wider aperture, or by adding more light.
As shown in Figure 5.9, the intensity of the light can be changed by simply moving it closer to, or farther away from, the subject. Little changes can make a big difference, especially when you use smaller lights that are not quite as bright as others.

5.9 Here’s a set-up shot with a Speedlight off to the side of the model. It was fired through the umbrella to soften the light. I could control how much light reached the model by moving it closer or farther away, as needed. Exposure: ISO 200, f/5.6, 1/250 second.
The amount of light that illuminates the girl in front in Figure 5.10 is enough to expose her properly. However, even though the second girl is close behind her, the intensity of the light has dropped, leaving her underexposed. This rule also holds true for sunlight, as well. However, because the distance between the sun and the earth is so great, the changes are measured over an entire year, and don’t change all that much from moment to moment. The same is not true for window light, though, because the light source is no longer the sun, but the window. The light drops off as the subject moves closer to, or farther away from, the window.
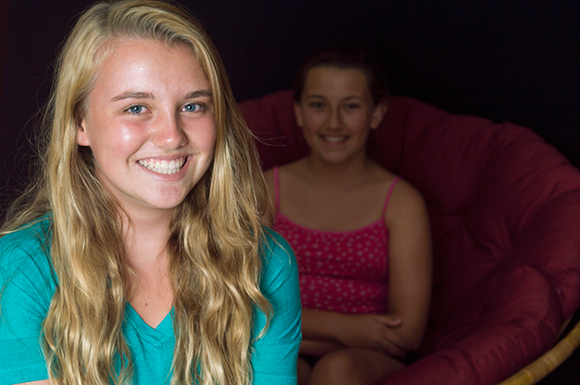
5.10 With two subjects at different distances from the light, the amount of light reaching the second subject is 1/4 as strong as the light reaching the subject in front. Exposure: ISO 100, f/5.6, 1/200 second.
Types of Light
There are three main categories of light: Natural, continuous, and flash. Natural light is light that is already present in the scene, such as sunlight. Light that is added to the scene is either continuous lighting or flash. The different types of light can be mixed to create a better image. For example, you can use a flash to add light to a scene predominantly lit by natural light. When creating photographs, it is essential to understand what light is present, and what light needs to be added or modified to yield the best results.
Natural light
Natural light is all around us all day long. Even on the cloudiest day, there is still natural light present. Natural light can be extremely flattering or it can be overly harsh—it all depends on the time of the day, the current weather, and the location where you are photographing. A key fact to remember when using natural light as your main light source is that it changes constantly as the sun moves across the sky. The light present at 8 a.m. is very different from the light present at 2 p.m.
Some examples of natural light are:
▶ Window light. Window light is, essentially, natural light that comes in through a window (or a door). It is often used for portraits, and it really does produce great results. The concept is simple: place your subject next to a window and use the light streaming in from outside to illuminate it. The reason this light works so well is that it takes a small, hard light source—the sun—and turns it into a bigger, closer, softer light source. You can further enhance this soft light by diffusing it—just cover the window with a translucent material, such as a thin white sheet.
▶ Shade. Areas of open shade make great spots to photograph people because the sunlight is diffused, creating a more even light. The object that creates the shade, such as a tree, blocks the direct sun but there is still a great deal of ambient light available to illuminate the subject.
▶ Diffused light. One of the best times to photograph outdoors is when there is a cloud layer between the sun and the subject. The clouds act as a diffuser that takes the very small, bright sun and turns the sky into a giant diffused light source. If you are shooting outdoors on a sunny day, you can diffuse the sunlight yourself with a diffuser panel. The panel allows the light to come through, but softens it, which takes away the hard shadows. Both of the images shown in Figure 5.11 were taken in direct sunlight. The only difference was the addition of a diffuser held to block the sun in the second image. The diffused light is also not quite as bright and needed a wider aperture and slower shutter speed for the correct exposure. The set up for the second image is shown in Figure 5.12.

5.11 The hard light from the sun creates hard shadows and extreme bright and dark areas in the first photo, taken without diffused light (Exposure: ISO 200, f/9.0, 1/320 second). The second image, shot in diffused sunlight, features a nice, soft light that creates a very smooth and even portrait (Exposure: ISO 200, f/7.1, 1/200 second).

5.12 Here, you can see the setup for the second image in Figure 5.11. The diffuser was held between the subject and the sun to soften the light.
▶ Reflected light. Light bounces off of nearby surfaces. You can use this to your advantage if you need extra light when taking a photograph. It can be used to fill in areas that need more illumination. Keep in mind that when bouncing light, it picks up the color of the object off of which it bounces. Many photographic reflectors come in different colors to help match the present light.
Continuous light
Continuous lights are those that produce constant illumination. This type of light has been a staple in videography and photography for years. It is one of the easiest types of light to use because it is always on. Additionally, you can see the effect it has on the subject as it is adjusted.
Continuous lighting has four real advantages: It is usually less expensive than strobe lighting; it is more predictable than natural lighting because it doesn’t move or change in intensity (unless you move it); you can use it for video, as well as still images; and you can use the camera’s built-in light meter to get an accurate reading of the light in the scene, which is something that can’t be done when using strobes.
There are many types of continuous lighting available. Some lighting kits offer the flexibility of using different types of light. Here are a few of the most common types:
▶ Fluorescent. In the fluorescent bulbs, the electrical charge causes the release of photons. These photons cause the phosphor coating inside the bulb to glow. These bulbs are usually cooler than incandescents, which is great for video because the subject might be under the lights for long periods of time. This type of bulb also requires less energy than incandescents, which makes them cheaper to use. In the past, they were not considered good for photography due to the green colorcast they produced; however, the newer, daylight-balanced bulbs create an even light without the green cast, which is perfect for video and photography. The only real downside is that they are less powerful than incandescent bulbs.
▶ Tungsten halogen. These bulbs are a form of incandescents, in which a tungsten filament is used along with halogen gas to create a brighter light. In incandescent bulbs, an electrical current is passed through a filament, causing it to heat up and produce light. Regular incandescent bulbs produce a lot of heat—they are known as hot lights—so it is uncomfortable when a subject has to be under them for long.
It’s easy to practice with continuous light. Try it with a lamp that uses a compact fluorescent bulb. Place it off to the side of your subject and move it around. Watch how the light starts to reveal and hide parts of your subject as it moves.
Flash basics
The D3200 comes with a built-in flash that pops up on top of the camera. The best advice about using this flash is not to. That might not be totally fair, but the placement and size of the flash creates a small, hard light that falls onto the subject from the front. This creates very unflattering light and, often, harsh shadows. On the plus side, the built-in flash means that you always have a flash with you and, in an emergency, it works. The better option is to use one of the compatible external flashes from Nikon. These flashes, called Speedlights, attach to the D3200 hot shoe and are fired when the shutter-release button is pressed.

5.13 A large softbox attached to a Nikon Speedlight was set off-camera to the left of the model. The flash was triggered wirelessly from the camera using a remote control. The soft light was created by getting the flash close and diffusing it. Exposure: ISO 200, f/7.1, 1/15 second.
Speedlights offer the following advantages over the built-in flash:
▶ More powerful. Speedlights have their own power supply, and larger flash heads and capacitors, which means they are more powerful and produce a brighter flash.
▶ Less battery drain. Because the Speedlight has its own power supply, it does not use the camera battery. So, not only does it not drain the camera battery, it also enables the flash to recycle faster. The faster the flash can recycle, the quicker it is ready to be used again.
▶ Adjustable flash heads. The SB-910 and SB-700 Speedlights both have fully adjustable flash heads that allow for the direction of the light to be adjusted both up and down, and side to side. This allows the light to be bounced off of a wall or ceiling.
▶ Off-camera capability. Using the Nikon Creative Lighting System, Speedlights can be fired when they are off the camera, and more than one can be triggered at a time.
For more information about the Nikon Creative Lighting System, see Chapter 4.
▶ Light modifiers. There are a great many light modifiers available for photographers. These change the quality of the light produced from the flash. There are softboxes and reflectors available from companies like HonlPhoto and LumiQuest that work great with Nikon Speedlights.
The best use of the built-in flash is to add some light to a scene to balance out the existing light. This is called fill light or fill flash, and it can go a long way in making better images. To successfully balance the flash with the existing light, you have to control the flash output. This can be done by dialing in a negative Flash Exposure Compensation. Hold down the Flash Exposure Compensation ( ) and Exposure Compensation (
 ) buttons at the same time, and then rotate the Command dial to the left. This reduces the amount of the flash output. You can then use it to add some fill light to your scene, without washing out or overexposing it.
Measuring Light
A photograph records the light reflected off of the subject on the sensor in the camera. To get a properly exposed photograph, the camera needs to record enough of the light so that there is detail in the dark and light areas, without being too dark or too light. The first step is to know how much light is actually present in the scene. To do this, you need to measure it.
Exposure settings are covered in detail in Chapter 6.
Light meters
A light meter is used to measure the brightness of the light present in a scene. All light meters work in the same general way. They convert the amount of light in a scene into a measurable form, and then convert that information into a form that the camera and photographer can use. There are two types of light meters: Direct (or Incident) light meters measure the light falling on the subject, and Reflected light meters measure the light that is bounced from the subject. The Nikon D3200 has a built-in light meter that reads the light reflected off of the subject and coming in through the lens, so it can accurately determine the amount of light reaching the sensor. As the light in front of the lens changes, the built-in light meter updates.
In the past, photographers used a separate, handheld light meter, took the settings, and then entered them into the camera. There are times when this is still a good idea, especially when working in a studio. The light meters shown in Figure 5.14 can be used to trigger studio strobes and measure the light output during the flash—something the built-in light meter can’t do.
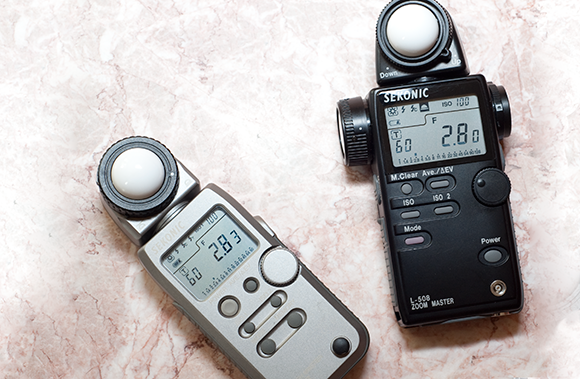
5.14 Handheld light meters read the light in a scene and give you the settings necessary to create an ideal exposure.
Metering modes
The Nikon D3200 has a built-in light meter that reads the light reflected off of the subject and coming through the lens. The downside of this is that the camera doesn’t know how much light is actually illuminating the subject. To compensate for this, the camera’s metering is based on a subject that has a medium-gray reflection. If the subject doesn’t have the same mid-gray reflectiveness, the metering can be off. For example, if you take a photo of a black cat in a coal mine, the camera’s metering system tends to overexpose the scene, and render the cat and the coal mine as gray. If you take a photo of a white cat in a snowstorm, the camera’s metering system tends to underexpose the scene, and render it also as gray.
There are three modes that control the way the built-in light meter looks at the scene through the lens. The Nikon D3200 uses Through-the-Lens (TTL) exposure-metering and has a 420-pixel RGB sensor.
There are two ways to easily change the metering mode:
▶ Use the Shooting menu ( ) and the multi-selector to choose the metering mode.
▶ Press the Info button ( ) twice and use the multi-selector to highlight the metering mode. Press the OK button (
 ) and select the mode you want. Press the OK button () again to accept the new mode.
The following are the metering modes available on the D3200:
▶ Matrix metering mode ( ). This type of metering evaluates the whole scene by breaking it down into 420 small parts, and then checking those parts individually. This mode does more than just read the brightness of the light reflected back at the sensor; it also takes into account the distance the subject is from the camera when using D- or G-type lenses. This metering system also uses customized algorithms to detect highlight areas. Once the camera has all of this information, it compares the data to a database of over 30,000 images looking for a match. It then uses this information to determine the correct exposure.

5.15 This image was shot in Matrix metering mode because I needed the light meter to take the water, the waves, and the surfer into consideration. Exposure: ISO 100, f/5.6, 1/1000 second.
▶ Center-weighted metering mode ( ). This mode considers 75 percent of a scene to an 8mm circle in the center of the frame. This means that the camera pays more attention to the area in the middle than it does to the edges (it doesn’t ignore the edges, however). This is the best mode to use when the subject doesn’t quite fill the frame, but still takes up a good portion of it, like a portrait. As the Matrix metering mode () improves, this mode doesn’t seem to be as useful as it once was. I find that in situations where previously I would have used Center-weighted metering (), I now use Matrix metering (). Figure 5.16 was taken in the Center-weighted metering mode (), while Figure 5.17 was taken with Matrix metering mode (). There is little difference in exposure between the two. The shutter speed used for Figure 5.17 was slightly faster.
5.16 For this image, the Center-weighted metering mode was used. Exposure: ISO 200, f/5.6, 1/200 second.
▶ The Spot metering mode (). This mode only uses about 2.5 percent of the frame centered on the current focus point. Because the Spot metering mode () only considers a tiny part of the scene, the camera has to decide the exposure settings based on very little information. This mode works best when there are large areas of very dark or light tones that can throw off the metering. Spot metering mode () does the same calculation (but working with less of the scene) as the Center-weighted metering mode () does. That is, it takes the light and dark values in the metered area and creates exposure settings that produce an average gray. This means that you shouldn’t focus on an area that is too dark or light. I use Spot metering mode () when shooting concerts because the changes of the background lights can change the exposure settings in the other modes. It works really well, especially when the focus point is on the subject’s face.
5.17 I used Matrix metering mode here. The difference from Figure 5.16 is negligible. Exposure: ISO 200, f/5.6, 1/200 second.

5.18 I used the Spot metering mode on the arm of the guitar player to get a more accurate meter reading. Exposure: ISO 1600, f/2.8, 1/320 second.
