Chapter 6: Exposure and Composition
Regardless of the camera you are using, the basic rules of photography are the same. There are two general categories of rules: Exposure, which is the recording of the image so that it isn’t too bright or too dark; and composition, which is how objects are placed in the image. This chapter covers both of these topics. It is important to understand the rules of photography so that you know when it is best to implement (or break) them.
For exposure, managing how shutter speed, aperture, and ISO work together is essential. With composition, you must consider the Rule of Thirds and leading lines, among others. Additionally, because the Nikon D3200 has such a great video feature, understanding the differences between shooting still images and video can help you get the most from your camera. Consider this chapter a foundation on which to build your photography knowledge.
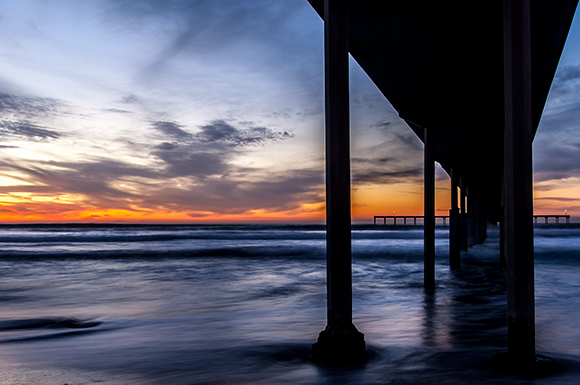
This photograph has enough detail in both the highlights and shadows to be properly exposed, while the placement of the elements creates a pleasing composition.
Exposure Basics
When the shutter-release button is pressed, light is allowed to reach the sensor and a photograph is produced. Three things control how much light reaches the sensor: The amount of time the shutter is open (shutter speed); how much light is allowed to pass through the lens (aperture); and how sensitive the camera sensor is to light (ISO).
Using these three ways to control the amount of light that reaches the sensor can produce the look you want in your images. If too much light reaches the sensor, the image is too bright, and the details in the bright parts are lost. This is called an overexposed image. When too little light reaches the sensor, the image is too dark and the details do not appear in the dark areas. This is called an underexposed image. The goal is to allow enough light to reach the sensor so that there is detail in both the bright and dark areas.
It’s important to understand standard terminology about exposure. The shutter speed is described using a measure of time—most often in fractions of a second. For example, for Figure 6.1, the shutter speed was 1/250 second. Aperture is described using the term f-stop. For Figure 6.1, the f-stop was f/8.0, which describes the size of the camera’s aperture during the 1/250 second the shutter was open. The ISO has a standard numerical value that is the same across all cameras.

6.1 This photo has detail in both the bright (the white stripes in the flags) and dark (the back of the blue shirt) areas. There are no areas of pure white or pure black. Exposure: ISO 200, f/8.0, 1/250.
A stop is the term used to describe the change in the amount of light allowed to reach the sensor. Adjustments to the shutter speed, aperture, or ISO are described in terms of a stop. When talking about shutter speeds, a 1-stop change is when exactly double or half of the amount of light is allowed to reach the sensor. For example, if you start with a shutter speed of 1 second, changing it to 2 seconds allows in twice as much light and would be a 1-stop change. Setting the shutter speed to 1/2 second allows in half as much light as the 1-second shutter speed and is a change of 1 stop.
The same concept applies to the aperture and ISO. When you double the size of the opening in the lens, the change is 1 stop. If you halve the size of the opening, the change in the amount of light entering the lens is 1 stop. The ISO is adjusted in the same way. Each time you double or halve the ISO you make the sensor twice or half as sensitive to light.
The D3200 has a built-in light meter that reads the amount of light in the scene and indicates what it believes to be the correct exposure in the viewfinder. The camera does this by using a number called exposure value (EV) to describe the exposure. The EV is measured in stops with a properly exposed image being 0. Negative values mean that the image is underexposed and needs more light. Positive values mean that the image is overexposed and needs less light. When you use the Programmed auto ( ), Automatic (
 ), Auto Flash Off (
 ), Shutter-priority auto (
 ), Aperture-priority auto (
 ), or any of the six scene modes, the camera uses settings that result in an EV of 0.
The Exposure Value (EV) scale on the D3200 is broken into 1/3 stop increments. When the camera is in Manual mode ( ), it lists the current EV on the display, allowing you to easily identify and correct potential problems. Because the EV is based on stops, the display shows the current value as a relationship to EV 0. For example, if you set the exposure settings on the camera and the light meter believes the scene is underexposed by 1 stop, it displays an EV of -1. You can correct this by changing the settings to allow in a full stop of light, which brings the EV to 0.
Shutter speed
Photography is all about capturing a moment in time, and the length of that moment is controlled by the shutter speed. The shutter speed controls how long the shutter is open, allowing the light that goes through the lens to reach the sensor in the camera. The longer the shutter is open, the more light is allowed in. The shutter speed is also used to show motion in photographs. Short shutter speeds freeze action in an image, while longer ones can show action.
The right shutter speed depends not only on your subject, but the speed and direction that it is moving in the frame. When you consider the subject’s movement, you should also consider its speed. For example, a person walking is moving relatively slowly, while a dog running in the park or kids playing ball are moving much faster. The faster the subject is moving, the faster your shutter speed needs to be to freeze the action.
The fastest shutter speed on the Nikon D3200 is 1/4000 second.
When photographing the fighter jets shown in Figure 6.2, a very fast shutter speed was needed to capture them as they flew across the frame.
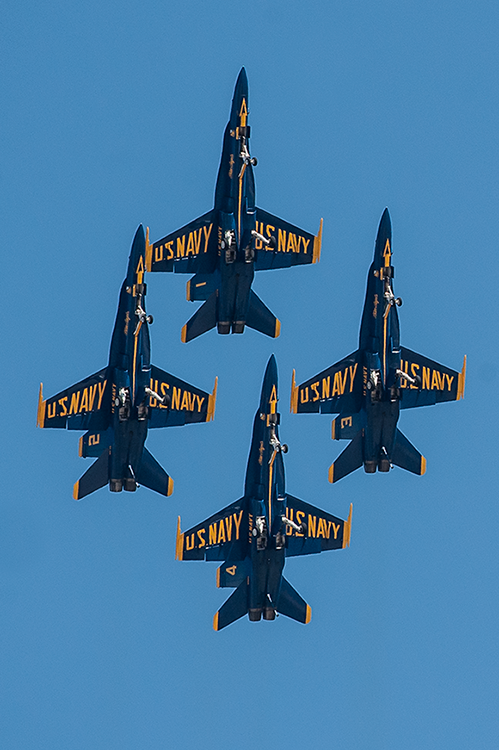
6.2 To freeze the jets in flight, a shutter speed of 1/4000 second was used. Exposure: ISO 800, f/5.6, 1/4000 second.
You must also consider the direction the subject is moving in the frame. Subjects moving away from or toward the camera need a slower shutter speed than those moving across the frame because they cover more distance. Finally, consider the distance the subject is from the camera and the amount of the frame it fills. The bigger a subject is in the frame, the quicker it moves across it, requiring a faster shutter speed to freeze it.
A slower shutter speed allows your subject to move in the frame, which can cause it to blur. This might not seem like a good thing at first glance, but it is a creative opportunity. Using long shutter speeds allows for the compression of time. That is, a single photograph can capture a long period of time because the sensor records everything in front of the camera while the shutter is out of the way. Long exposures can result in stunning images that can’t be seen with the naked eye. For example, the image of the star trails in Figure 6.3 was created using a 10-minute exposure with the camera on a tripod to allow the movement of the stars to be captured.

6.3 A long exposure of 10 minutes was used to capture these star trails in the Anzo Borrego desert. The Earth is always moving, so the stars are rendered as lines instead of points. Exposure: ISO 400, f/5.6, 10 minutes.
There is a technique that allows the capture of motion in an image using a longer shutter speed, but instead of allowing the camera to stay stationary while the shutter is open, you follow the action. This technique is called panning, and it allows you to show motion in still images. This works best if the subject is moving across the frame from left to right or right to left. The shutter needs to stay open long enough for there to be some blurring of the background. The idea is to track the subject with your camera and press the shutter-release button when it is in the frame. Then, while the shutter is still open, you keep moving the camera so that the subject stays in the same place and in acceptable focus while the background blurs. In Figure 6.4, a shutter speed of 1/2 second was used to allow the cab to move far enough to blur the background.

6.4 Panning as a yellow cab drove by allowed me to capture the motion of it. Exposure: ISO 200, f/2.8, 1/15 second.
Aperture
The aperture is the size of the opening in the lens that allows light to reach the sensor. By controlling the size of the opening, you control the amount of light allowed through the lens. The aperture is referred to as the f-stop, which is created by dividing the focal length by the actual opening in the lens. The f-stop is usually written as f/number, which represents the focal length ÷ the aperture size. Examples of f-stops are f/5.6 or f/2.8. Because they are fractions, the smaller the number is, the bigger the opening. Therefore, f/2.8 is bigger than f/5.6 and f/8.0 is smaller than f/5.6. You can see the relative size of the openings in Figure 6.5.
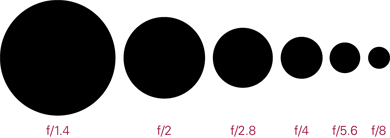
6.5 The relative size of the apertures shown here are all either half or twice as big as the one next to it.
The aperture range depends on the lens that is attached to the camera.
The aperture does more than just control the amount of light allowed through the lens; it also controls the depth of field, which is the area of the image that is in acceptable focus. The larger the opening is (and the smaller the f-stop), the shallower the depth of field. The smaller the opening is (and the larger the f-stop), the deeper the depth of field.
You can use the depth of field to control what someone looks at when viewing your photographs. When you look at an image, your eyes are naturally drawn first to the area that is in focus. In Figures 6.6 and 6.7, the use of a shallow depth of field directs the viewer to focus on the subject of the image.
Depth of field is discussed in more detail in Chapter 4.

6.6 Using an aperture of f/2.8 blurred the background enough for the tiger to stand out and left nothing else for the viewer to focus on. Exposure: ISO 800, f/2.8, 1/640 second.

6.7 Using a shallow aperture of f/2.8 makes the softball catcher stand out against the blurred fencing in the background. The focus is kept on the player, not the background. Exposure: ISO 400, f/2.8, 1/1600 second.
ISO
The ISO is a standard developed for film that is now also used to describe how the camera’s sensor reacts to the light. When you change the ISO, the sensor adjusts how much light is amplified. The more it is amplified, the less light is needed, so a lower ISO, such as 200, is less amplified than a higher ISO, like 800. Because the ISO is standard and predictable, you can adjust it in a controlled way. The ISO range on the D3200 is 100 to 6400. However, it can be pushed even higher to 12800 in the ISO menu. Each time the ISO is doubled, you need 1 stop less of light to get the same exposure. There is a cost for raising the ISO, however. The higher you push the ISO setting, the more the electronics in the camera must amplify the signal, which creates digital noise. Digital noise is a byproduct of the amplification process and it appears in digital photographs as unwanted spots of color, especially in darker areas and places with smooth tones.
One of the biggest advances in camera manufacturing in recent years is the low-noise, high-ISO capability of newer cameras, like the D3200. When shooting at a high ISO setting, you can reduce the amount of digital noise by using the built-in Noise reduction feature (which is covered in Chapter 3), or by applying noise reduction in postproduction (which is covered in Appendix A). Using high ISO settings allows you to shoot in low light. To do this in the past, it was absolutely necessary to have lenses that opened up really wide to allow in as much light as possible. Now, you can use other lenses if you increase the ISO. As shown in Figure 6.8, you can photograph in low light without a flash or a super-fast lens by pushing the ISO.

6.8 This photo of my dog, taken indoors in low light with the kit lens at f/5.6, was made possible by pushing the ISO to 6400. Exposure: ISO 6400, f/5.6, 1/40 second.
Equivalent exposures
Equivalent exposures allow for the creative side of photography. Because each of the exposure controls is adjusted in terms of stops, you can easily get equivalent exposures with vastly different exposure settings. The relationship between the shutter speed, aperture, and ISO is inverse. For example, if you use a faster shutter speed that allows less light to reach the sensor, you need to either use a wider aperture that allows more light in through the lens, or a higher ISO that increases the sensitivity of the sensor.
The key is that if you adjust one of the exposure settings, you need to adjust the others in the other direction by the same amount. Suppose that you use a shutter speed of 1 second, an ISO of 400, and an f-stop of f/5.6, but would rather use a faster shutter speed of 1/4 second. That is a change of 2 stops, which allows in 2 stops less of light. In order to get the same exposure (equivalent), you need to increase the other settings to allow the 2 stops of light back into the exposure. You can increase the ISO from 400 to 800, which is 1 stop of light. You can then change the aperture from f/5.6 to f/4.0, which lets in exactly twice as much light (1 stop). These two changes allow 2 stops more of light to reach the sensor, which counteracts the 2 stops less of light that the change in shutter speed created. You can see in Figures 6.9 and 6.10 that while the exposure is technically the same, the settings used were different, creating two very different views of the same scene.

6.9 A shallow depth of field and a fast shutter speed makes the subject stand out by blurring the tree in the background and the other flag in the foreground. Exposure: ISO 200, f/2.8, 1/4000 second.

6.10 This exposure is the same as Figure 6.9, but the deeper depth of field now has much more of the scene in acceptable focus. As the aperture was made smaller, the shutter speed was increased to keep the exposure the same. Exposure: ISO 200, f/11, 1/250.
When you begin to experiment with equivalent exposures, you will find that there are photographic side effects depending on the settings that are used. You have to make sure your adjustment of one setting doesn’t push another outside of a useful range. For example, don’t set your ISO to 6400 if you want a clean image without noise and don’t choose a shutter speed that you can’t handhold with if you don’t have a tripod.
Exposure compensation
Exposure compensation allows you to adjust the exposure from what the camera believes is correct. The key to exposure compensation is understanding that there are times when the settings the camera uses produce images that are either too bright or too dark. For example, when taking photos where there are a lot of lighter colors on a light or bright background (called a high key image), you may want to dial down the exposure compensation. For a darker subject on a dark background (a low key image), you should dial up the exposure. When in doubt, review the image on the camera’s LCD screen. If it looks too dark or too light, adjust the exposure compensation in either direction, from -5 to +5 stops in 1/3 steps.
You can adjust the exposure in postproduction, but doing so while shooting with the exposure compensation setting allows you to capture a better image from the start.

6.11 An overcast day at the beach exposed correctly seemed to lack the punch I wanted. Exposure: ISO 100, f/11, 1/320.
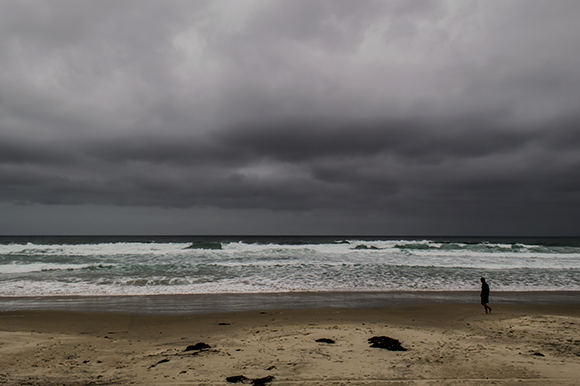
6.12 To create a more dramatic image, I dialed down the exposure compensation by 1-1/3 to darken the skies and the beach. Exposure: ISO 100, f/18, 1/320.
To adjust the exposure, press the Exposure Compensation button ( ) and rotate the Command dial either left or right. When using the Exposure Compensation button, keep in mind that positive (+) numbers make the image brighter and negative (-) numbers make the image darker. Manually adjusting exposure compensation is available in the Programmed auto (), Shutter-priority auto (), and Aperture-priority auto () modes.
You can also apply the exposure compensation by doing the following:
1. Press the Information edit button ( ). The Information display appears on the LCD screen. Press the Information edit button () again. You can now edit the current settings including the exposure compensation.
2. Use the multi-selector to navigate to the exposure compensation setting, and then press the OK button ( ). The Exposure compensation menu opens.
3. Use the multi-selector up ( ) or down (
 ) to adjust the exposure compensation. A sample image on the screen shows the effect of each selection.
4. Press the OK button () to use the selected exposure compensation.
Exposure for video
When it comes to picking the settings for shooting video, you have the same choices as when photographing stills. You can set the shutter speed, the aperture, and the ISO. The main concern when choosing exposure settings for video is whether the lighting conditions will change over time. If lighting conditions change and your exposure settings do not, the video is likely to have either bright or dark places as more or less light reaches the sensor. The best way to deal with changing light conditions is to set the shutter speed and aperture so they don’t change, but allow the camera to pick the best ISO for the scene using the Auto ISO function. The camera then adjusts the ISO as the light changes, which means that the exposure can stay reasonably consistent.
If you allow the camera to adjust the aperture, you also allow it to change the depth of field as it captures video. Imagine that you are watching a movie and, suddenly, more (or less) of the scene is in focus— this is very distracting.
When shooting video, you must consider the frame rate, which is the number of individual frames that make up a 1-second piece of video. This is also known as the FPS (frames per second) rate. Because the shutter speed determines how long the shutter is open when capturing an individual frame, the shutter speed and the frame rate are linked and have quite an impact on the way your video looks. For example, when you use a fast shutter speed, you end up with a series of frames that are very sharp, but look choppy when played back as video. If you use a very slow shutter speed, the video can look too blurry. The best shutter speeds for video are roughly two times the frame rate. So, if you are shooting at a frame rate of 30 FPS, an optimal shutter speed is 1/60 second.
Given these parameters, it’s best to use Auto ISO and not allow the camera to control the aperture or shutter speed when shooting video. To set the camera to Auto ISO, you have to turn it on in the Shooting menu. To do so, follow these steps:
1. Turn the camera on.
2. Press the Menu button ( ).
).
3. Press the multi-selector up () or down () to select the Shooting menu ( ), and then press the multi-selector right (
 ).
).
4. Press the multi-selector up () or down () to highlight ISO sensitivity settings.
5. Press the OK button ().
6. Press the multi-selector up () or down () to highlight Auto ISO sensitivity control, and then press the multi-selector right ().
7. Press the multi-selector up () or down () to highlight On, and then press OK ().
Auto ISO does not work in Manual mode (), so set the exposure mode to Shutter-priority auto () and the shutter speed to 1/60 second. The camera then sets the aperture and the ISO. It adjusts the ISO before the aperture, giving you better quality video.
Another option is to try is to shoot completely in Manual mode (). You can set the exposure for the most critical part of the scene, and then let the rest of the scene fluctuate in exposure. In this scenario, use Manual mode () and set the shutter speed (I use 1/60 second, which works great for 30 FPS) and the aperture for the desired depth of field. Next, set the ISO to get the proper exposure. Experiment and play around with these settings to see what works best for you.
Composition
If you want to actually start creating images instead of just taking snapshots, it’s important to think about the composition of the photograph before you even raise the camera to your eye. The Nikon D3200 has great exposure metering and an impressive autofocus, which makes taking good photos easy. To take great photos, however, you need to understand composition. In the simplest terms, composition is the arrangement of the elements in your photo. However, to really understand how to get the most visual impact from what you include in an image, you need to have a solid foundation in the basics of composition.
If you want more in-depth information about composition, check out the Composition Digital Field Guide, also available from Wiley.
Many new photographers start out by placing the subject right in the middle of the frame, simply because that is the easiest thing to do. There are times when this works, but most of the time, placing your subject dead center results in a rather average photo. The good news is that there are some guidelines you can follow to help add interest to your photos. These guidelines are often referred to as the rules of composition. However, they’re not really rules as much as tools to help you improve your composition. To see if they work for you, take a photograph the way you normally would, and then take the same photograph following the rules of composition to see if it improves your image.
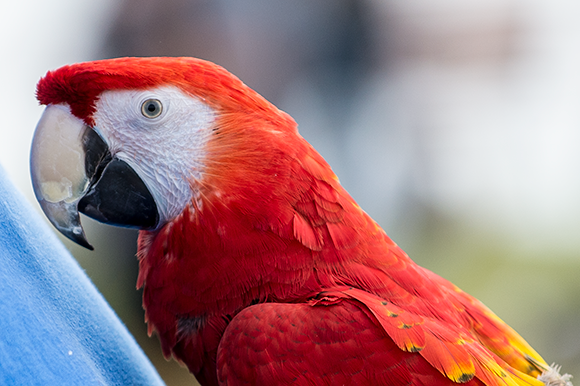
6.13 When taking this photo, I framed the parrot off-center and created a tight composition, filling the frame with the bird, and making sure the eye was in focus. Exposure: ISO 400, f/3.2, 1/4000 second.
The human eye is drawn to the brightest, most in-focus area of a photo. Make sure that when composing your images, you don’t include elements that draw attention away from your subject.
Rule of Thirds
The Rule of Thirds is probably the most well-known rule of composition. Its popularity comes from its simplicity—and the fact that it just plain works. To use this rule, imagine lines that divide your image into thirds, both vertically and horizontally, like a tic-tac-toe grid, as shown in Figure 6.14. Then, place the main subject at a point where the lines intersect, as shown in Figure 6.15.

6.14 Imagine this grid when taking a photograph and place the main point of the image at the intersection of any two lines.
6.15 Here, you can see the intersecting lines corresponding to the main action in the photo.
The Rule of Thirds is versatile—it can be applied to just about any subject or situation, whether you are shooting in landscape or portrait orientation, or photographing people, animals, or landscapes. If you want to improve your photography, the best place to start is by using the Rule of Thirds for every shot that you take. To see for yourself, take a shot using the Rule of Thirds, and then compare it to one you took without it.
Along with the Rule of Thirds, the placement of the horizon line in your image is really important. Using the Rule of Thirds can help you keep the horizon line straight across the frame and placed where it does the most good. As a general guideline, place the horizon line in your image either 1/3 up from the bottom or 1/3 down from the top of the frame, depending on the subject. For example, when shooting landscapes, if the sky is the subject, include more sky and less ground; if the subject is the ground, include more ground and less sky.
When using the Rule of Thirds, you may struggle to keep your off-center subject in focus. You can recompose the scene, which allows you to place the subject exactly where you want it in the frame without being constrained by the camera’s focus points. Simply focus on the main subject, and then, while continuing to partially hold down the shutter-release button, move the camera to reposition the main subject. Then, press the shutter-release button all the way down to take the photo.
Remember, there are times when the Rule of Thirds should not be used. Like all rules of composition, it doesn’t work for every situation. Sometimes, the most interesting composition is when the subject is in the center or off to the side of the frame (see Figure 6.16). For example, when using a fisheye lens, you usually want to place the subject in the middle of the frame to avoid the extreme curving at the edges. It’s up to you to decide when to use or break composition rules.
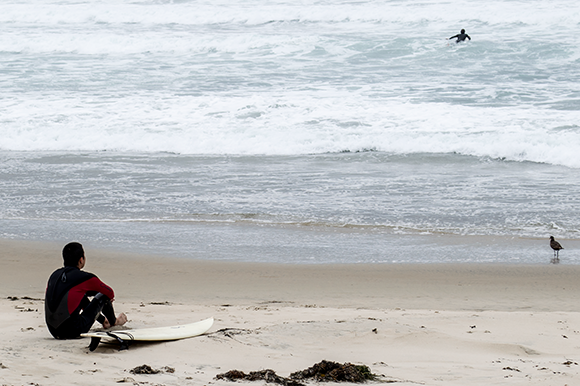
6.16 I recomposed this image to place the surfer in the bottom corner of the frame where there are no focus points. Exposure: ISO 100, f/8.0, 1/320 second.
Leading lines
One of the most powerful compositional techniques is using leading lines to direct the viewer’s eyes into the photo and to the main subject. You can find lines everywhere—and some are more obvious than others. The following are the three types of leading lines that you can use in your photos:
▶ Diagonals. These lines come in from the corners of your image and point the viewer toward the main subject in the frame. For example, in Figure 6.17, the blacksmith’s arms start in the top-right corner and lead the viewer down to the action taking place on the anvil. There is also a more subtle leading line created by the mortar line in the bricks below the arms. All of these lines work together to lead the eye into the frame and down toward the glowing metal.

6.17 When composing this photo, I wanted the eye to travel to the metal, which I achieved by using leading lines. Exposure: ISO 800, f/2.8, 1/125 second.
▶ Straight. These can run either vertically or horizontally, and they create a feeling of strength and power that can be enhanced by photographing from an angle. For example, if you are photographing a tree or power pole, accentuate the line by shooting upward from a low angle. Even people have straight lines—arms and legs can be used to draw the viewer’s attention to the subject. However, the poses must look natural for this to work.
▶ Curved. These curve into, out of, or sometimes, through your image. They may be gentle or S curves, but generally any type works well and keeps the viewer’s eye in the image as it follows the line. A street, stream, or path that winds through an image are all good examples of curved lines that can work in photography.
As with the Rule of Thirds, using leading lines in your images helps create stronger compositions. The more you look for lines, the more you start to see them everywhere. The key is to make sure that the lines in the image actually point to the subject and are not drawing the viewer’s eye to some other element or distracting from the subject.
Keeping it simple
When in doubt, keep it simple. This compositional rule really helps when you’re not sure how to compose an image. Keeping it simple means that you make it very clear what the subject is, and don’t clutter the frame with unneeded elements. Many times, just moving and changing the angle from which you are shooting changes the relationship between the subject and the background. Unwanted elements that are on the edge of the frame can also be cropped out later with the camera’s built-in editing feature or on a computer in photo-editing software.
Keeping it simple can mean photographing your subject in front of a plain background that you set up, as shown in Figure 6.18. For this shot, a simple black cloth background was set up and one light was triggered to the right of the camera. The shutter speed was set at 1/200 second to reduce the amount of ambient light, and the flash was fired using a Pocket Wizard remote that allows wireless triggering.
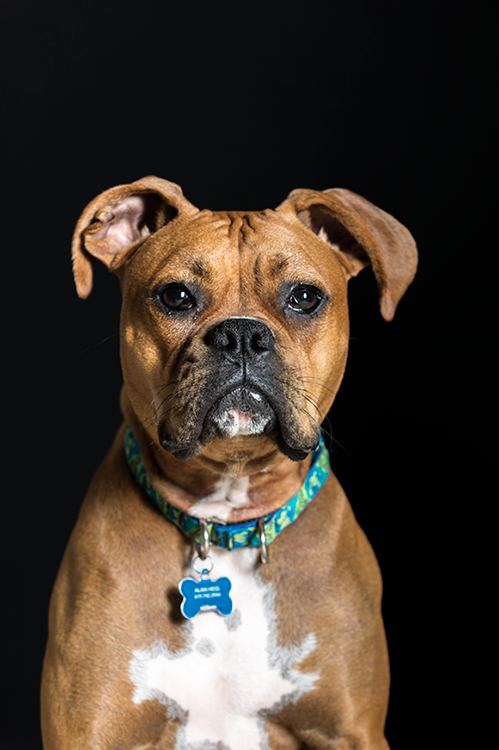
6.18 A simple black backdrop was used in the living room for this photo of my dog. Exposure: ISO 400, f/5.6, 1/200.
Tips
The previous rules are designed to help you create stronger images, but there are many more tips that can help you. Not every tip works for every image, but this list offers some good starting points:
▶ Avoid cropping through the joints. It’s best to avoid placing the edge of the frame through people’s ankles, knees, wrist, elbows, shoulders, or right through the waist when composing a photo.
▶ Fill the frame. Make sure that the subject is the most important element in your photograph by making it the biggest element in your photograph. This doesn’t work for everything, but it’s generally a good rule when photographing people and animals.
▶ Leave some space to move. This is more important when shooting sports or any moving object. Give the subject some space to move so that it’s not crowded up against the edge of the frame. For example, in Figure 6.19, there is some open space to the left of the polar bear, so the frame isn’t crowded.
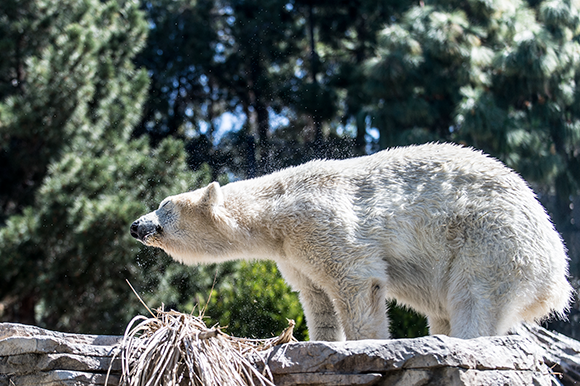
6.19 The polar bear needs a little space in front of him so that he doesn’t look crowded in the frame. Exposure: ISO 400, f/2.8, 1/2500 second.
▶ Odd numbers are better. When you photograph groups of objects, odd numbers work better than evens. That is, groups with 3, 5, and 9 elements work better than groups of 4, 6, or 8.
▶ Frame your subject. Look for elements in the scene that can be used to frame the subject. This could be as simple as placing your subject in a doorway or arch. These frames within your frame help lead the viewer to the subject of the image.
▶ Pick the right focal length. The focal length determines how much of the scene in front of the camera is recorded, but it also determines the relationship between the fore- and background. Small focal lengths (wide-angle lenses) tend to make things in the background seem farther away, while large focal lengths (telephoto lenses) compress the scene, making items in the background seem closer to the foreground.
▶ Watch the edges of the frame. The very last thing to do before pressing the shutter-release button is to let your eye travel around the edge of the frame to see if there are any elements that can distract from the final image. Really bright areas or spots at the edge of the frame should be avoided. You want to keep the viewer looking at the subject in the photo, not at the edge of the frame.
▶ Watch the background. When you look through the viewfinder and focus on the subject, the natural inclination is to ignore the background. Take a moment and make sure that nothing behind the subject is going to be distracting to the viewer. It is especially important to look for items in the background that merge with items in the foreground. This is how you avoid having the clichéd tree growing out of your subject’s head. One very easy tip is to use a shallow depth of field so that the background is out of focus compared to the subject.
Using these tips can improve your images and, after a while, you’ll discover what works best for you. The most important thing, however, is to always take photos that you like.
Composition and video
The basics rules of composition, such as the Rule of Thirds, also apply for video. However, when you create videos, you are using multiple video clips to tell a story. The following three basic types of shots can be used together to help tell your story:
▶ The wide shot. Wide shots show the whole subject in the frame, and can be used to establish the location or the action. When shooting people, the wide shot includes the whole person, from the feet to the top of the head.
▶ The medium shot. In the medium shot, about half of the subject is shown in the frame. This allows you to concentrate on a specific action. When shooting people, a medium shot shows them from approximately the waist up.
▶ The close-up. This is when the subject fills the frame, and it is useful for capturing small details or actions. When shooting people, the close-up means just shooting the face (or head) of the subject.
While filming video, you change the composition by moving the camera, having the subjects move, or by changing the focal length. This can be fun and creates more excitement in your video clips. Just keep in mind that a little motion goes a long way. There is nothing quite as nauseating as watching video footage that constantly zooms in and out, or moves from side to side or up and down. Try to plan the moves ahead of time, and make them as smooth and natural as possible.
There are two other terms with which you should be familiar when composing video. The first is headroom, which is the amount of space over the head of the subject in the frame. You want to leave just a little bit of space here. If you’re shooting a close-up, make sure that the bottom of the subject’s face is not out of the frame.
The second term is nose room. When setting up a video shoot, make sure there is enough space from the tip of the subject’s nose to the edge of the frame. In other words, when the subject is looking to the right, she needs to be placed on the left side of the image, creating open space between the subject and the right edge of the frame. Otherwise, the subject appears crowded to viewers. For the most successful video shoot, plan out the whole story ahead of time so you know exactly what types of shots you need.