Chapter 9: Viewing and Editing In-camera
The Nikon D3200 takes great photos and stunning video, but it can do a whole lot more. Not only can you view your images on the LCD screen on the back of the camera, but it also comes with the necessary cables to attach the camera to a television. You can also use an HDMI cable to connect it to an HD television for high-definition playback. The supplied USB cable allows the D3200 to be connected directly to a computer so that you can download your photos. And if you don’t have a computer handy, you can edit your images using the Retouch menu ( ), or connect it to a PictBridge-enabled printer to produce stunning prints.
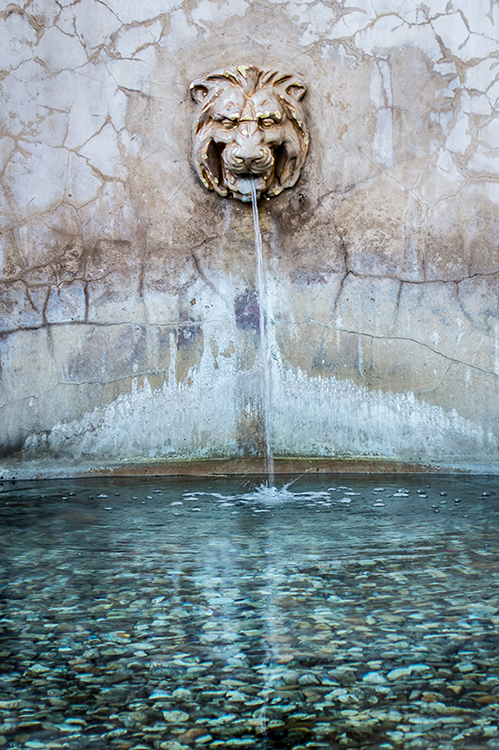
Using the LCD screen on the back of the camera allows you to check and make sure that the critical parts of an image, like the details on the lion’s head in this photo, are in sharp focus.
Viewing Your Images
After you take your photographs, you want to look at them, and show them off to friends and family. The Nikon D3200 allows you to view your images on the back of the camera, and if the LCD screen is too small, the camera can be connected to regular and HD televisions. The images can also be presented on an Android device using the optional wireless adapter.
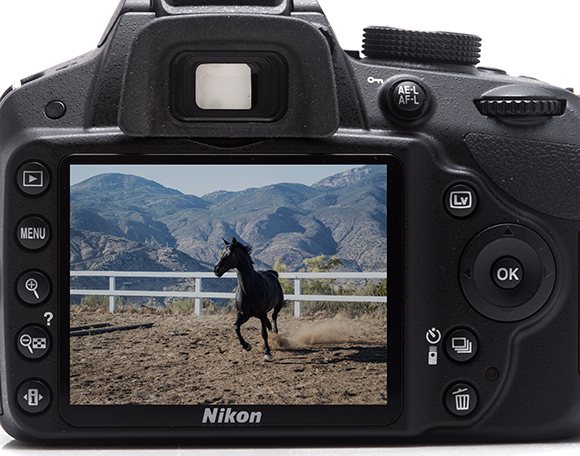
9.1 The D3200 has an LCD screen for viewing your images.
On the camera
The easiest and most convenient place to view your images is on the camera. The 3-inch LCD screen has a very high resolution and a 160-degree viewing angle. To view the images on the camera, turn it on, and then press the Playback button ( ) at the top left on the back. The last image taken is shown on the screen, and by pressing the multi-selector left (
 ) and right (
 ), you can scroll through the rest of the images on the memory card.
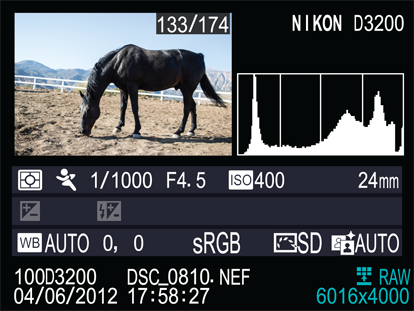
9.2 When viewing your images on the back of the camera, you can see a lot of data about them.
Once an image is displayed on the screen, you have the following options:
▶ Playback/Zoom in. Pressing the Playback/Zoom in button ( ) allows you to enlarge the image on the screen for a closer look. You can then check the detail, focus, and noise. Once you zoom in, you can move the viewable area by using the multi-selector.
▶ Thumbnails/Playback/Zoom out. If you are zoomed in, pressing the Thumbnails/Playback/Zoom out button ( ) zooms out. It also displays a thumbnail view allowing you to search through your images much faster than when scrolling through the full-size images.
▶ Protect. If you want to ensure that an image cannot be inadvertently deleted, you can protect it. Just press the Protect button ( ) once. Press it again and the protection is removed. Protected images have the protect icon () on the top-left side of the image.
▶ Delete. Pressing the Delete button ( ) opens the Delete menu. Press it again to erase the image. Press the Playback button () to cancel and exit the Delete menu.
▶ View shooting data. Pressing the multi-selector up ( ) and down (
 ) scrolls through the shooting data for the image on the screen. The information shown here is controlled by the Playback display options in the Playback menu.
▶ Open the Retouch menu (). Pressing the OK button ( ) opens the Retouch menu (), which gives you one-button access to the in-camera editing options.
Connecting to a standard TV
The Nikon D3200 can be connected to a television using the included A/V cable. This cable has a USB plug on one end, and a yellow RCA video plug and white RCA audio plug on the other. The USB end plugs into the camera and the RCA plugs go into the television. There is only one audio out plug, so there is no stereo output from the camera when using the RCA connections. If you use the optional HDMI connection, then the output is in stereo.
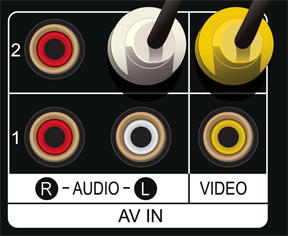
9.3 The RCA plugs from the supplied A/V cable plug into the back of the television.
You cannot use the USB data cable and the A/V cable at the same time because they both plug into the same USB port on the camera.
Once the camera is connected to the television, it mirrors the LCD screen, including when the camera is in Live View mode ( ). To best show off your images, I suggest that you run the slide show available in the Playback menu (), which is covered in Chapter 3. Any movies that you record on the D3200 can also be played back on a television using the multi-selector to control the playback.
The HDMI HDTV connection
The Nikon D3200 can also be attached to a high-definition (HD) television using an optional (it doesn’t ship with the D3200) HDMI cable. It needs to be a Type C mini-pin HDMI cable to fit into the camera. The HDMI cable plugs in to the camera right below the USB plug. When the camera is connected to an HD television with an HDMI cable, there is stereo sound (when applicable). Because the D3200 can record HD movies, and record in stereo when using the optional ME-1 Stereo microphone, movies look and sound much better when played back over the HDMI connection on an HD television.
Viewing images on a smart device
You can use the optional WU-1a wireless mobile adaptor to transfer images to a smart device using a wireless connection. At this writing, this is only available for Android devices, but the iOS version is expected in late 2012. You can use this adapter to view your photos on your smart device, or post them to your blog or favorite social networking site.
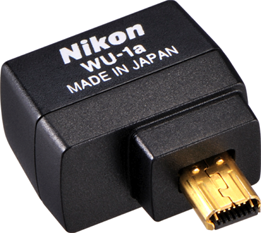
Image courtesy of Nikon.
9.4 The WU-1a Wireless Mobile Adapter attached to the D3200.
Additionally, the Live View display appears on the smart device’s screen and enables you to use it as a remote control for shooting. Some basic camera information appears on the smart device display, such as number of exposures remaining, shooting information, the active focus point, and the camera’s battery indicator. You must download and install the corresponding app for your smart device, called Wireless Mobile Adapter Utility, in order for the WU-1a to work with the D3200.
As of this writing, support for this is limited to phones running Android OS version 2.3 or newer, and tablets running Android OS version 3.x.
The Wu-1a Wireless Mobile Adapter is very simple to use. First, download the Wireless Mobile Adapter Utility from the Google Play service on your Android smart phone or tablet. Once the app is installed on your device, follow these steps:
1. Attach the Wireless Mobile Adapter to the D3200. The device plugs directly into the USB and A/V port on the left side of the camera.
2. On the smart device, open the Wi-Fi settings and select WPS button connection.
3. Press and hold the button on the side of the device for about 5 seconds, until the LED flashes red and green.
4. Start the Wireless Mobile Adapter Utility app on the smart device.
5. When a connection has been made between the camera and the smart device, the LED turns green and the main dialog for the app is displayed.
You can now browse through the images on your camera on your smart phone or tablet. Tap the Download pictures from the camera button to wirelessly transfer the images from the camera to your device.
To see which devices are supported by the Wireless Mobile Adapter, visit http://nikonimglib.com/ManDL/WMAU/.
To download existing photos, tap the Download pictures from camera menu choice. The images on the memory card in the camera are shown as thumbnails on the device screen. If you see a folder icon instead, tap it to see the images stored there. To select images for download to the device, just tap on the image thumbnail, and then tap Select. You can navigate backward and forward through the images by swinging across the screen. Tap download, and then tap Yes in the confirmation box to start downloading the selected images from the camera to the smart device.
Downloading Your Images
There are two ways to download your images from the camera to a computer. The first method is to connect the camera using the included USB cable. This method doesn’t require any extra equipment, but it does use the camera battery, which depletes it faster. The second method is to use a dedicated memory card reader to transfer the images to the computer. This method requires an extra piece of equipment (the memory card reader), but it doesn’t use the camera battery. Some computers, such as the MacBook Pro, have a built-in SD card reader so you can transfer files without any extra equipment. To download images directly from the camera to the computer, do the following:
1. Turn off the camera.
2. Plug the supplied USB cable into the computer.
3. Plug the other end of the USB cable into the USB plug on the left side of the camera under the microphone jack.
4. Turn the camera on. The computer recognizes the camera as an external storage device, allowing the files to be copied to the computer.
5. Launch the supplied Nikon Transfer software.
6. Select the Nikon D3200 folder in the Source window.
7. Click the Primary Destination window.
8. Select the destination folder. Create a subfolder and new name for the images on import, if you prefer.
9. Select Backup Destination to create a second copy of the images if preferred.
10. Click Start transfer on the bottom right to copy the files from the camera to the computer.
If you would rather use a different software application to transfer the files, that is also possible. However, the camera needs to have enough battery power to stay on during the entire process. If it runs out of power and turns off during the file transfer, the images could be damaged.
Transferring images using a dedicated card reader follows the same steps, but instead of plugging the camera in to the computer with the included USB cable, you need to remove the SD memory card from the camera and insert it into a card reader that is connected to the computer. There are two advantages to this method: The camera batteries are not depleted, and you can also continue to use the camera with another memory card while the images are being downloaded.
Editing in the Retouch Menu
The Nikon D3200 doesn’t need a computer to edit its images; it has a built-in Retouch menu that allows you to do some pretty cool image editing right in the camera. You can access the Retouch menu by pressing the Menu button ( ) on the back of the camera and navigating to the Retouch menu () with the multi-selector. Once the Retouch menu () is selected, its icon is highlighted in purple.
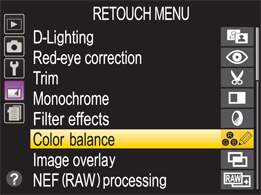
9.5 The Retouch menu on the D3200.
D-Lighting
The D-Lighting setting brightens the shadow areas of a photo, but leaves the midtones and highlights alone. This brings out details that would otherwise be lost in the dark areas, without causing a loss of detail in the bright areas.
Each image can have three levels of D-Lighting applied. The first step is to select the image that you want to adjust. When you select D-Lighting from the menu, a thumbnail view of your images appears on the LCD screen. Use the multi-selector to scroll through your images until the one you want to edit is selected. It appears with a yellow border around it. Press the OK button () to open the edit window where you see both the original image and a copy with D-Lighting applied. You can then adjust the strength of the effect by pressing the multi-selector up () or down (). The choices are: High, Normal, and Low. You can press and hold the Playback/Zoom in button () to see the photo full screen and check the changes that were made. Press the OK button () to save the edited file.
Red-Eye Reduction
The Red-Eye Reduction option only works on images on which the built-in flash or a Speedlight was used. Image files that are taken without the flash are not selectable; they appear with a yellow X in the middle of the thumbnail. For images that are taken with a flash but don’t have clear areas with red-eye, the camera displays the following message: Unable to detect red eye in selected image.
Trim
The Trim option allows you to crop the image right in the camera. The first step is to select the image that you want to edit. When you select Trim ( ) from the Retouch menu (), thumbnails of the images on the memory card are displayed on the LCD screen. Scroll through the images using the multi-selector and pick the one you want to edit by pressing the OK button (). The selected image appears on the LCD screen with a yellow border showing the area to be trimmed, and you can now edit it.
9.6 The yellow box shows the current crop; in this case, the full frame before any trimming.
The following options are used to trim your images:
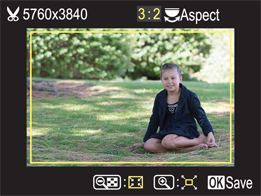
▶ Change the aspect ratio. You can easily change the aspect ratio by rotating the Command dial. As the aspect ratio changes, so does the size of the yellow box, giving you an immediate visual of the changes being made. Your choices are: 3:2, 4:3, 5:4, 1:1, and 16:9.
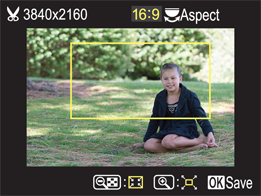
9.7 Changing the aspect ratio and cropping can create an entirely different look for an image. In this case, the aspect ratio has been changed to 16:9, which is for a widescreen television. The yellow border indicates that it will be cropped in tight.
▶ Reduce the trim area. To trim larger areas of your image, use the Thumbnail/Playback/Zoom out button (). Each time you press it, more of the image is cropped and the yellow trim box gets smaller.
▶ Increase the trim area. You can use the Playback/Zoom in button () to make the trim area larger, meaning that less of the image will be cropped.
▶ Move the trim area. You can move the yellow outlined trim area with the multi-selector.
Once the trimmed area of the image looks the way you want it, press the OK button () to save the file. This actually creates a new file and doesn’t harm the original in any way. The new file is saved as a JPEG image even if the original was a RAW file. You cannot trim a photo that has already been trimmed.
Monochrome
You can convert your color images into monochrome images. There are three types of monochrome effects: Black-and-white (grayscale), Sepia (brown tones), and Cyanotype (blue and white tones).
The first step is to pick which of the three monochrome effects you want to use. Use the multi-selector to choose the effect, and then press the OK button () or the multi-selector right (). A thumbnail view of your images appears on the LCD screen, allowing you to select the image you want to convert using the multi-selector. Once the image you want to convert is selected (the yellow border appears around it), press the OK button (). The image is converted immediately to the monochrome effect.
The Sepia and Cyanotype effects can be made lighter or darker by pressing the multi-selector up () or down (). Once the image looks the way you want, press the OK button () to save it. A new file is created and saved as a JPEG. The new JPEG file cannot be converted to monochrome again.
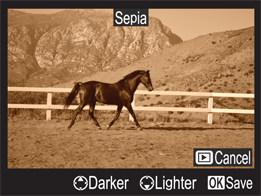
9.8 The monochrome effect can do more than just standard black and white, as this sepia-toned image shows.
Filter effects
The following effects available in this menu are based on the types of filters used in film photography:
▶ Skylight. This subtle effect reduces the amount of blue in the image.
▶ Warming. As the name implies, this subtle effect increases the warmer tones in an image.
▶ Red intensifier. This filter boosts the saturation of reds in your image. Pressing the multi-selector up () or down () allows you to increase or decrease the amount of the effect that is applied.
▶ Green intensifier. This filter boosts the saturation of greens in your image. Pressing the multi-selector up () and down () allows you to increase or decrease the amount of the effect that is applied.
▶ Blue intensifier. This filter boosts the saturation of blues in your image. Pressing the multi-selector up () and down () allows you to increase or decrease the amount of the effect that is applied.
▶ Cross screen. This effect is based on a star filter, which has a grid etched into the glass. When photographing scenes that have a light source or bright highlight in them, the grid makes it look like a star. This filter has four controls that can be adjusted: Number of points (4, 6, or 8), Filter amount (affects the brightness), Filter angle (angle of light points), and Length of points. Because the camera doesn’t automatically update the image with the selected edits, you must confirm your choices and view a preview of the image on the LCD screen. To accept the edit, select Save, and then press the OK button () to create the retouched image.
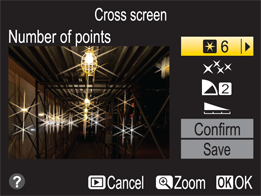
9.9 The Cross screen filter effect can turn any light source in your image into a star.
▶ Soft. This effect gives images a soft look. It is usually used with portraits. You can adjust the strength of this effect by using the multi-selector to choose low, medium, or high.
Color balance
This option creates a copy of your photo, which allows you to adjust the overall color. The first step is to choose the image you want to edit. When the Color balance option is selected, a thumbnail view of your images appears. Use the multi-selector to locate the image for editing, and then press the OK button (). The selected image opens with histograms for the composite RGB (Red, Green, and Blue) on the right. On the bottom of the screen is a color space map with the cursor set in the middle.
You can now adjust the color by using the multi-selector controls. Press the multi-selector up () to increase the amount of green in the image or press it down () to increase the amount of magenta. Pressing the multi-selector left () increases the amount of blue and pressing right () increases the amber. The image, the histograms, and the color space map all update automatically as the multi-selector is used. When the image looks correct, press the OK button () to save the new file or, if you need to start over, press the Playback button ().
Image overlay
The image overlay process overlays two RAW images and saves the resulting image as a new RAW file. This does not affect the original RAW files. When you select this Retouch option, you choose two of the RAW files stored on the memory card in your camera. When you select each image, you can also adjust the gain level of each from 0.1 to 2.0. This allows you to control which image is seen more in the final overlay.
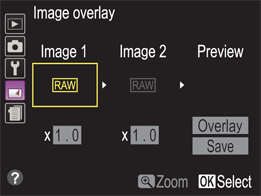
9.10 The Image overlay menu allows you to combine two images into one.
Here are the step-by-step directions:
1. Select Image overlay from the Retouch menu (), and then press the multi-selector right (). The Image overlay menu opens with Image 1 highlighted.
2. Press the OK button () to open a thumbnail view of the RAW files on the memory card.
3. Use the multi-selector to highlight the first image you want to use, and then press the OK button () to select the image and return to the Image overlay preview area. If you need to see the image larger before selecting it, press and hold the Playback/Zoom in button ().
4. Adjust the gain of Image 1 by pressing the multi-selector up () or down (). The changes can be seen immediately in the preview area.
5. Press the multi-selector right () to highlight the Image 2 window, then press the OK button () to open the thumbnails of the RAW files on the memory card.
6. Use the multi-selector to highlight the second image you want to use, and then press the OK button ().
7. Adjust the gain of Image 2 by pressing the multi-selector up () or down (). The changes can be seen immediately in the preview area.
8. Press the multi-selector right () or left () to move the cursor to the preview area.
9. Press the multi-selector up () or down () to highlight your choice—Overlay or Save—and then press the OK button (). If you choose Overlay, a preview of the overlay image appears. If you choose Save, no preview appears and the overlay image is saved.
10. If you chose to preview the image, press the OK button () from the preview to save the image. The completed overlay image appears in the monitor.
The newly created file is saved using the image quality and size that are set in the camera. The white balance, sharpening, color mode, and the rest of the image settings are copied from Image 1.
NEF processing
The RAW files on the Nikon D3200 are called NEF files (Nikon Electronic Format). The NEF (RAW) processing option allows the RAW files to be turned into JPEGs right in the camera. You can also pick the size of the image, adjust the white balance, apply exposure compensation, and set the Picture Control System.
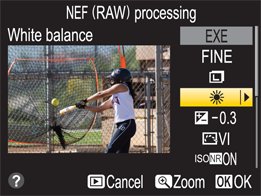
9.11 Processing a RAW image in the camera is possible using the NEF (RAW) processing option from the Retouch menu.
As demonstrated by the following steps, the process is actually quite simple:
1. Use the multi-selector to locate the RAW file that you want to edit and press the OK button () to open it for editing.
2. There are eight edit options on the right that can be accessed by pressing the multi-selector up () or down (). The screen only shows the first six, so you need to press the multi-selector down () to access the last two on the second page. These options can be accessed in any order you want and the changes do not take affect until you select EXE and press the OK button (). The options are:
• Image Quality. This is where you can choose the size of the resulting edited image. The choices are: JPEG Fine, JPEG Normal, or JPEG Basic.
• Image size. The size of the resulting image is set to Large, Medium, or Small.
• White balance. You can set the white balance to any of the presets, or adjust those by pressing the multi-selector right () to fine-tune the color.
• Exposure compensation. The exposure can be adjusted by plus or minus 2 stops. The more this is adjusted, the more the image quality suffers.
• Picture Control System. You can select any of the Picture Control System settings to apply to the image, no matter what was set when the original image was taken.
• High ISO noise reduction. The high ISO noise reduction can be applied or turned off.
• Color space. The color space of the edited image can be set to either AdobeRGB or sRGB.
• D-Lighting. The D-Lighting option can either be applied or turned off.
3. Once you have selected the menu item to adjust, press the multi-selector right () to open it.
4. Press the multi-selector up () or down () to go back to the first item in the list (EXE), and then press the OK button (). A JPEG copy of the selected photograph is created and appears on the LCD screen.
This is the only method of converting a RAW file to a JPEG file in the camera. If you need to do it, this works, but it is much easier to do in postproduction using the included Capture NX 2 software on your computer.
Resize
You can select any image on the memory card and create a copy of a different size using the Resize option. The first step is to pick the new size you want the image to be from the following list:
▶ 2.5m 1920 × 1280. This creates a 2.5-megapixel file with the dimensions: 1920 pixels × 1280 pixels.
▶ 1.1m 1280 × 856. This creates a 1.1-megapixel file with the dimensions: 1280 pixels × 856 pixels.
▶ 0.6m 960 × 640. This creates a 0.6-megapixel file with the dimensions: 960 pixels × 640 pixels.
▶ 0.3m 640 × 424. This creates a 0.3-megapixel file with the dimensions: 640 pixels × 424 pixels.
▶ 0.1m 320 × 216. This creates a 0.1-megapixel file with the dimensions: 320 pixels × 216 pixels.
Once the selection is highlighted, press the OK button (). Next, choose the image(s) that you want to resize. Select the Select image menu choice, and then press the multi-selector right (). You see the current images on the camera. Use the multi-selector to navigate to the one you want to reduce and press the Thumbnail/zoom out button () to select it. You can then select more images to resize, but remember that they will all be resized to the same dimensions you chose earlier. Once you are done selecting the images, press the OK button () and you are presented with the choice to create a resized copy or cancel.
Quick retouch
This option makes a copy with automatically applied adjustments to the contrast and color saturation of the image. The adjustments can be applied in three levels: Low, medium, or high. There is a side-by-side comparison as you switch among the three options. Then, just press the OK button () and the new image is saved with the adjustments embedded. This might be the easiest way to adjust an image, but it gives you very little control over the final product. I have found that if I need to use the high setting, then I would rather edit the image using software in postproduction.
Straighten
This is one of the most useful editing features for me. For some reason I tend to slightly skew images with the horizon line not quite straight. This editing feature allows the images to be straightened right in the camera. Once the photo you want to adjust is selected, a grid appears overlaid on the image. Press the multi-selector right () and left () to straighten the image. As you press the multi-selector right (), the right side of the image does down, and when you press the multi-selector left (), the left side goes down. The grid is there to help line up elements in your image.
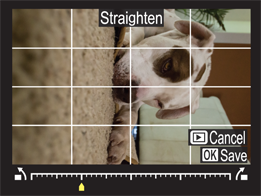
9.12 Straightening images is much easier with the grid overlay.
Distortion control
Distortion control is used to counteract any lens distortion (both pin-cushion and barrel), and while it does a fine job, the lens correction tools available in Adobe Lightroom and Adobe Photoshop offer far more control. There are two types of distortion controls in the D3200: Auto and Manual. The Auto setting is for use with the Nikon G and D lenses, while the Manual setting can be used for all lenses.
Both the Auto and Manual distortion controls work in the same way, with the same controls. First, choose which type of distortion control you want to apply, and then choose the photo. Once the photo is on the screen, press the multi-selector left () and right () to apply the distortion control. Pressing the multi-selector to the right reduces the wide-angle barrel distortion; pressing the multi-selector to the left reduces the telephoto lens pincushion distortion. Press the OK button () to save the new image.
Fisheye
This effect creates the look associated with the use of a fisheye lens, which is an ultra-wide angle lenses that creates severe distortion, especially at the edges of the frame. You can take a normal-looking image and adjust the look by pressing the multi-selector left () and right (). The effect creates extreme barrel distortion (fisheye effect) in the image. The problem is that this effect looks like it was created with software. If you want the fisheye look in your images, the best solution is to buy a fisheye lens, such as the Nikon 10.5mm fisheye.
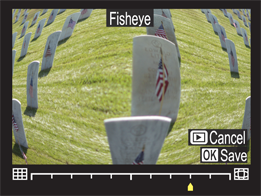
9.13 The fisheye effect can take a regular image and distort it, so that it looks like it was taken with a fisheye lens.
Color outline
The color outline effect creates a copy of the selected image with just the outlines of the subject visible. According to Nikon, this effect is meant to be used as a basis for drawing or painting using the outline of your photo as a base. This effect can actually look cool as is, but it really needs a photo with high contrast and not much fine detail. With the right image, it can make your photo look like a drawing.
Color sketch
This effect creates a copy of the image made to look as if it was done with colored pencils. Select the image that you want to convert, and then press the multi-selector up () and down () to switch between Vividness and Outline. Then, press the multi-selector left () and right () to adjust the image. Press the OK button () to create a copy of the image with the effect added.
Perspective control
There is an effect that occurs when shooting buildings from a low angle that causes the sides to seem closer together at the top than the bottom. This Retouch menu option allows you to adjust the perspective so that it looks as if the camera was parallel to the building. It is easy to edit the selected image by pressing the multi-selector to adjust the perspective. When the image looks correct, press the OK button () to save it.
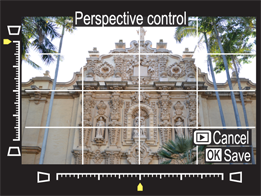
9.14 Using the built-in Perspective control to adjust a photo can help eliminate any perspective distortion by trying to make the vertical lines in the image parallel to each other and the edges of the frame.
Miniature effect
This effect is based on the look achieved when using a tilt-shift lens. It works best if the image is taken from a high vantage point looking down, and from a distance. This effect uses a very shallow depth of field and can trick viewers into thinking that what they are seeing is really a miniature and not the actual scene. Once you have selected a photo, you see a yellow outline on it. This is the area that stays in focus, while the area outside of the yellow box is blurred.
You can control the placement of the in-focus area by pressing the multi-selector up () and down (). You can control the size by pressing the multi-selector right () and left (). You can also change the direction of the focus area by pressing the Thumbnail/Playback/Zoom out button (). This switches the area of focus between the horizontal and vertical views. Pressing the Playback/zoom in button () allows you to look closer at the effect and pressing the OK button () saves the new image as a JPEG.
Selective color
Selective color is an effect where only certain colors in the image are preserved and the rest is rendered in gray. This effect used to only be possible with photo-editing software. You can select up to three colors to preserve in each image. The key to making this look good is to pick an image in which the main subject features only a few colors that are all different from the background.
Once you have selected the image that you want to retouch, pick the three colors that you want to save. At the top of the LCD screen are three boxes, all with the number 3 next to them, while in the middle there is a small yellow box. You can move the small yellow box around the screen using the multi-selector to select the colors you want to save. Once the yellow box is over the color you want to save, press the AE-L/AF-L button ( ) and the color under the yellow box is saved to the first box at the top of the screen.
The next step is to adjust the color range of the selected color. Rotate the Command dial until the number next to the box with the selected color is highlighted. Then, the multi-selector can be used to change the number from 7 to 1—the lower the number is, the more exact the color will match. The higher the number is, the bigger the range of colors that will be saved. Once the first color is selected, you can use the Command dial to select the second and third color boxes. Once you have all of the colors selected, press the OK button () to save the image with the selective colors.
Edit movie
The Nikon D3200 shoots video that can be edited right in the camera. This menu option allows you to set a new start and endpoint, or save a single frame from any of the movies on the memory card.
To save a frame as an image, select Save selected frame from the menu. To access the movies on your camera, press the multi-selector right (), and then use the multi-selector again to select the movie from which you want to get a still image. Press the OK button () to select the movie. Once the movie is open on the LCD screen, you can use the multi-selector and Command dial to get to the exact moment you want to save as a still image. The Command dial moves the video forward and backward in 10-second increments. The OK button () acts as a Play button, while pressing the multi-selector down () pauses the movie.
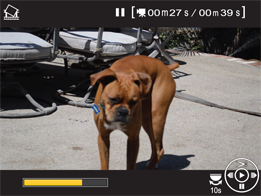
9.15 You can easily grab a single frame from a video.
Press the multi-selector left () and right () to go back and forth, frame-by-frame through the movie. Press and hold the multi-selector left () or right () buttons to watch the preview. When you have the scene that you want to save as a still image, press the multi-selector up (), use the multi-selector again to highlight Yes, and then press the OK button (). The scene is now saved as a JPEG with the dimensions of the original movie file.
Setting a new beginning and endpoint for your movie clip allows you to get rid of unwanted dead space at the beginning or end of your clips. This is not always the best idea, especially if you want to put a series of clips together to make a movie on the computer. That extra few seconds of footage before the action starts or after the action is over makes it a lot easier to edit and combine with other clips.
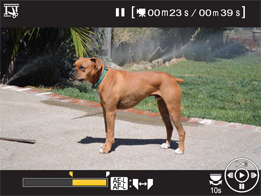
9.16 You can adjust the start and end-points of your movies.
When adding the transitions between clips in movie-editing software you need a second or two of unimportant footage so that the transition has time to work. I strongly suggest that you do not trim your video clips in the camera; however, if you decide you must, follow these steps:
1. From the Retouch menu (), press the multi-selector right (), and then press the multi-selector up () and down () until Edit movie menu is highlighted. Press the OK button ().
2. Select Choose start/end point, and then press the multi-selector right (). A thumbnail view of the movie clips available on the memory card opens.
3. Select the clip that you want to edit using the multi-selector, and then press the OK button (). The selected movie clip opens and can now be edited using the following controls:
• The AE-L/AF-L button () changes which point is active, either the start point or endpoint. The active point appears in yellow and is shown on a bar across the bottom of the screen.
• Use the Command dial to move forward or backward in 10-second increments.
• The multi-selector right () and left () moves the play head in forward and reverse.
• The OK button () plays the movie.
• The multi-selector down () pauses the playback.
• The multi-selector up button () is used to make the edits to the start and endpoints. When pressed, it opens the Save menu.
4. The Save menu allows you to Save as a new file, Overwrite existing file, Cancel, or Preview. I suggest that you choose Save as a new file because you might want to edit the original movie in a different way later.
Printing from the camera
You can print selected JPEG images directly from your camera when connected to a printer that is PictBridge enabled. The PictBridge standard was introduced in 2003 by CIPA (Camera & Imaging Products Association) and allows for direct printing from a camera without having to use a computer. For this to work, the printer needs to have a USB Type A slot so that the supplied USB cable can connect the camera to it.
Connect the camera to the printer with the supplied USB cord. Make sure that the camera is turned off and that the connection is straight to the printer and doesn’t use any USB hubs. Once the camera is connected and the printer is turned on, turn the camera on. The LCD screen on the back of the camera shows the PictBridge logo for a few moments, and then displays the PictBridge playback display.
Only JPEG images can be printed. If you want to print a RAW file, you must first create a JPEG version of it using the NEF processing option in the Retouch menu.
Once the camera is connected to a printer, the JPEG images on the memory cards can be printed. Press the multi-selector left () and right () to scroll through the images available for printing. Press the Playback/Zoom in button () to get a closer look before printing. Press the Playback button () to exit the Zoom view. Once the image that you want to print is selected, press the OK button () to open the PictBridge menu. You can now adjust the following settings:
▶ Paper size. This lists the paper sizes supported on the connected printer. Highlight the paper size you want, press the OK button () to select it, and then exit back to the menu.
▶ No. of copies. Press the multi-selector up () and down () to select the number of copies that will be printed, from 1 to 99. Press the OK button () to return to the previous screen.
▶ Border. If the printer supports it, you can print with a white border. Press the OK button () to return to the previous screen.
▶ Time stamp. You can print the time and date on the front of your images if the printer supports it.
▶ Cropping. If the printer allows it, you can crop the images before printing. Selecting crop from this menu allows you to use the Playback/Zoom in () and Thumbnail/Playback/Zoom out () buttons to change the crop size. Press the OK button () to return to the previous screen.
Select Start printing, and then press the OK button () to send the image files to the printer. If you want to stop printing, press the OK button () again. It is also possible to set the camera and printer to print multiple photos. This is done by creating a set of images, and then printing the entire set with the same settings. After the camera is connected to the printer, press the Menu button () to open a PictBridge menu with the following options:
▶ Print select. This allows you to select the images that you want to print.
▶ Select date. This lets you print one copy of each photo taken on a certain day.
▶ Print (DPOF). This prints an existing print set that was created using the Playback menu.
For more details about selecting a set of images for printing, see Chapter 3.
▶ Index print. This prints an index print of up to 256 JPEG images on a card.
Once all of the images you want to print are selected, you can display the print options, and then start printing right from the PictBridge menu. Make sure that you have a full battery in the camera and that the printer is loaded with the correct paper size and type.