Appendix A: Postproduction
Gone are the days of developing your photographs using enlargers and trays of chemicals. Now, image postproduction is done in the digital darkroom, more commonly known as your home computer. There are a great many choices of free image and video editing applications (including those from Nikon that came with your camera), as well as free applications, like iPhoto, that come on many computers.
There are also scaled-back editions of the industry leading applications from Adobe, including Photoshop Elements and Premier Elements. The really good part about all of this is that you don’t need to spend a lot of money to get started, and you can always upgrade in the future if you outgrow the free or more inexpensive options.
Still-photo Editing
Computer image-editing applications can help with your images after they are taken. It is possible to adjust the exposure, composition, color, and a whole lot more. The one thing that software cannot do is make an out-of-focus subject in focus, but I’m sure that is just a matter of time. The reality is that every image taken by a digital camera needs some form of image editing. It might just be a little adjustment to the exposure or a slight crop to improve the composition. There are a great many books available on the individual image-editing software applications—this section is only a few pages, so it can’t cover them all. Consider it an overview as to what can be done.
Nikon software
Packed along with your camera, lens, battery, and strap are a couple of CDs: One contains the camera manual, and the other includes a copy of Nikon ViewNX 2. This software is made for both Windows and Mac computers. The CD also includes Nikon Movie Editor (covered later in this chapter) and Nikon Transfer 2.
Nikon ViewNX 2 is media-browsing software that allows some limited editing capabilities. The best thing about this software is that it is free and comes with the camera. It processes RAW (NEF) files from the D3200 and can create JPEG versions that can be printed, e-mailed, and generally used anywhere. The first step is to launch the Nikon ViewNX 2 application and select the folder where the images that you want to look at are located. The layout of ViewNX 2 is straightforward, with a list of folders on the left, image previews in the middle, and any metadata and editing over on the right, as shown in Figure AA.1.
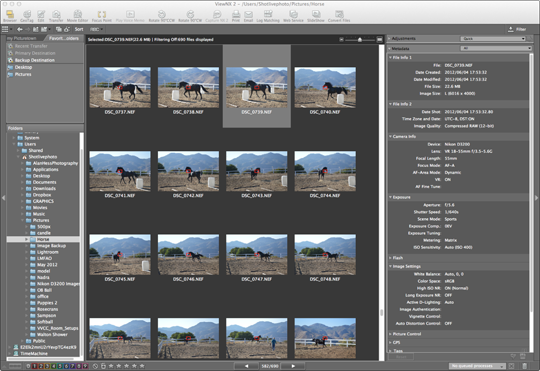
AA.1 The main interface of Nikon ViewNX 2, showing the folder of photos on the left and the file info on the right.
When you use Nikon ViewNX 2, you can see the focus point used to take each image. This is great when trying to figure out what went right and, at times, what went wrong.
Across the top the screen you can set the following:
▶ Browser. This opens the browser window where you can view and sort your images.
▶ GeoTag. Your images can have GPS information embedded in them if you use the optional GPS device. This is where you can see the location of your images using Google Maps.
▶ Edit. This opens the adjustment pallet on the right side of the window, where you can adjust the exposure, white balance, Picture Control settings, sharpness, contrast, brightness, Highlight protection, Shadow protection, D-Lighting, Color booster, crop, straighten, and auto red-eye.
▶ Transfer. This launches the included Nikon Transfer 2, which can be used to copy photos and videos from your camera or memory card to the computer.
▶ Movie Editor. This opens the free Nikon Movie Editor software that is installed at the same time as ViewNX 2 and can be used to edit videos created with the D3200.
▶ Focus Point. When this option is selected, it shows the focus point used when the image was taken. I always select this as it shows me exactly on what the camera was focused during the exposure.
▶ Play voice memo. This is for playing back voice memos from cameras that support them.
▶ Rotate 90° CCW. This rotates the selected image(s) 90 degrees counterclockwise.
▶ Rotate 90° CW. This rotates the selected image(s) 90 degrees clockwise.
▶ Capture NX2. If you have the Nikon Capture NX2 photo-editing software installed, you can launch it from here. The selection is grayed out if the software is not available.
▶ Print. This allows you to print the selected images. It also allows you to create index prints of multiple images.
▶ Email. You can pick any of the images and send them directly to your e-mail application. This is really great when shooting RAW images because you don’t have to do any editing or converting.
▶ Log Matching. This is used when a third-party GPS system is used. The GPS log file can be used to embed GPS information right into the image file.
▶ Web Service. This allows you to upload images, share images to Nikon PictureTown, or upload videos to YouTube.
▶ SlideShow. This allows you to play back the selected images as a slide show.
▶ Convert Files. This allows you to convert the current image to either a TIFF or JPEG. You can also change the image size and name easily using this option.

AA.2 The Convert Files menu of the Nikon ViewNX 2 software allows you to convert files to TIFFs or JPEGs.
When you are in the Browser window, the browser icon is yellow. There are a few options here that can make your life easier. The first is the way the images are displayed on your computer screen. You can switch among a thumbnail grid, a thumbnail list, an image viewer, and full-screen mode. You can also set a second monitor to show full screen. Next to the view options are controls that allow you to go back, forward, or up one level. They also allow you to mark a folder as a favorite. Next up are the controls that allow you to view JPEGs and RAW files of the same image as a single file. The last control is the Sort menu, which gives you control over the order the displayed images. If you look over to the right, you see a Filter button. Click this and the filters open above the photos.
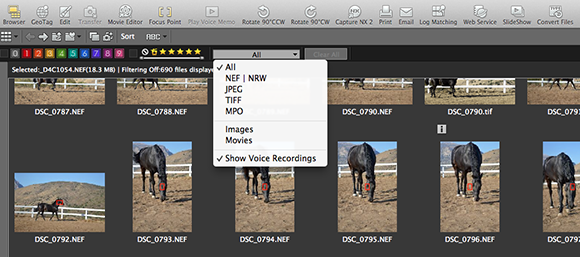
AA.3 The Filters menu allows you to quickly filter your images by file type, rating, or label.
With ViewNX 2 up and running, the following are some things you can do with your images:
▶ Locate your images. The folder structure view of ViewNX 2 should look familiar to anyone who has used a computer. The application allows you to navigate the computer’s existing file structure.
▶ Label your images. You can apply a color label to your images. You can see the different colors across the bottom of the screen. When an image (or multiple images) is selected, all you have to do is tap the corresponding number on your keyboard or the corresponding color box on the screen.
▶ Sort your images. The filter menu allows you to quickly go through your images and sort using any of the color labels you applied. Click on the color you want to view to display those images.
▶ Adjustments to your image. When you shoot RAW image files, the white balance settings can be changed in postproduction, and you can apply exposure compensation from -2 to +2 stops. You can also apply a Picture Control setting. Look over to the right of the display and click the Adjustments tab. When it opens, you see sliders for Exposure Compensation, White Balance, Picture Control, Sharpness, Contrast, and Brightness.
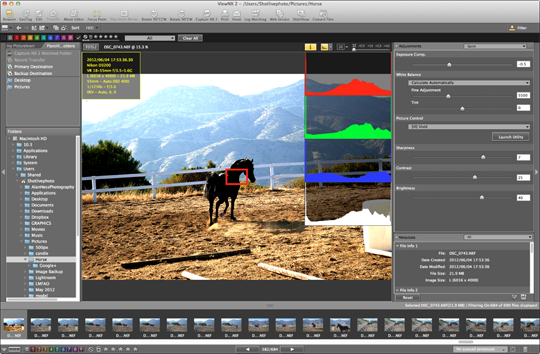
AA.4 With the screen set to the Image viewer, click the Edit button to open the Adjustment tab. You can also open the histograms and file info buttons here. The edits you make are shown in the preview window.
If you make any changes to an image, you are asked to save the file when exiting. None of the changes made to RAW files are permanent—they can always be removed. Capture NX 2 (Nikon’s advanced editing software) has many more controls and image-editing capabilities, including noise reduction and lens correction.
To check out Capture NX2, visit: www.nikonusa.com/Nikon-Products/Product/Imaging-Software/25385/Capture-NX-2.html.
iPhoto
When you buy a Mac lap- or desktop, it comes loaded with iPhoto (it’s not available for Windows computers). The iPhoto application is quite robust when it comes to dealing with RAW images. The application uses the same RAW converter that Apple uses system-wide, and it supports the Nikon D3200. The iPhoto interface is very intuitive, but unlike ViewNX 2, which just looks at the files on your computer, you first have to import your images into iPhoto. It then stores them in the iPhoto library.
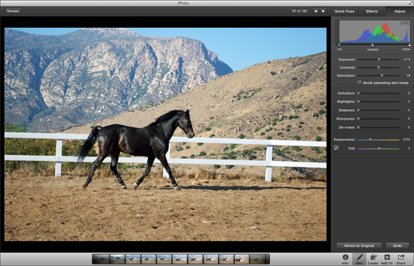
You can click File→Import to Library and pick the source from which you want to import your images into iPhoto. Once they are in the application, you can edit them, even if they are in the RAW format. Double-click an image to open it in full screen, and then click the Edit button at the bottom-right of the screen. This opens the Edit commands on the right, as shown in Figure AA.5.

AA.5 The iPhoto editing controls appear on the right when you click the Edit button.
There are three tabs in the Edit menu. The first is the Quick Fixes tab, which includes the following:
▶ Rotate. Click the Rotate button to rotate the image 90 degrees counterclockwise. Each time you click the button, the image rotates another 90 degrees.
▶ Enhance. This is a one-click enhancement button. There are no options, but for an auto-enhance function, it does a really great job. You can always revert to the original if you don’t like the enhancement. Just click Revert to Original on the bottom of the screen.
▶ Fix Red-Eye. If you need to fix red-eye you can do it here with some simple controls. Just click on the pupil in the image that has red-eye and adjust the size of the effect with the slider.
▶ Straighten. This tool was created for photographers who, like me, tend to never get their images exactly level. When this button is clicked, a yellow grid appears, along with a slider that controls the angle of the image. Move the slider left or right to straighten the image.
▶ Crop. Clicking the Crop button displays crop handles at the edge of the image that allow you to move the edges in to where you want them. You can also control the aspect ratio of the crop using the drop-down Constrain choices and clicking the Constrain box.
▶ Retouch. This allows you to remove small blemishes, like dust spots, or even pimples, from your photo. Just paint over the area and iPhoto does its best to remove them. This works best if the blemish is not at the edge of the frame.
The second tab is the Effects tab, where you can change the colors and tone of the selected image. The Adjust tab is where the real adjustments can be made. The interface has controls to adjust: Levels, Exposure, Contrast, Saturation, Definition, Highlights, Shadows, Sharpness, De-noise, Temperature, and Tint, as shown in Figure AA.6.
AA.6 The Adjust tab in iPhoto allows you to fine-tune an image.
Photoshop Elements
Adobe Photoshop is the standard to which all other image-editing software is compared. It really is an amazing piece of software that professional photographers and image retouchers need to know and use. The problem is that it is a very complicated and expensive application. There is a viable alternative created by Adobe called Photoshop Elements. Photoshop Elements is now in version 10, and while it doesn’t have the full abilities of Photoshop, it can do plenty. Because Photoshop Elements is such a full-featured application I am going to cover only a few of the basics here. There are plenty of great books on how to edit images using Elements. Here are just a few of the things that Adobe Photoshop Elements can do:
▶ Enhance the image. When an image is open in Elements, you can easily enhance it. Click the Enhance menu, which opens a huge list of options that you can apply to your image. These include a set of auto adjustments that range from Auto levels to Auto sharpen. Then, there are the controls used to adjust lighting, color, and even convert an image to black and white.
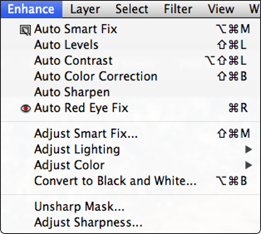
AA.7 The Enhance menu in Photoshop Elements.
▶ Guided edits. Another way to adjust the image is to use the Guided Edit mode. This is accessed by clicking the Edit tab on the top right, and then the Guided tab below it. The feature walks you through the steps for just about anything you can think of, from basic edits to photography effects, and even photo-merging functions. Spend some time in the tab and you will be able to do a ton of edits quickly.
▶ Crop an image. Cropping images in Elements is easy. Once the image is open, just click the Crop tool from the Tools palette on the left. Then, click and drag over the area you want to keep. You can select the overlay that helps you compose the image in the crop. Just click the Overlay button and select one of the guides, as shown in Figure AA.8.
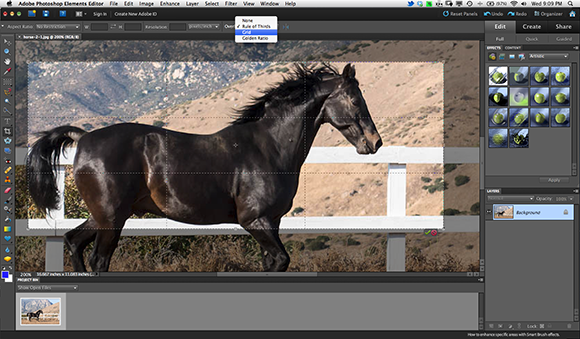
AA.8 The crop overlay in Photoshop Elements.
▶ Change the output size. Many times you need to reduce the size of an image so that it can be used on the Internet or sent via e-mail. To change the size of an image in Elements, just open it, click the Image menu, and then click Resize, as shown in Figure AA.9. This opens the Image Size dialog box, as shown in Figure AA.10. You can change the width and height of your image. For e-mail, you want to keep the image at about 1000 pixels on the longest edge. This creates a small file that can easily be sent over the Internet.
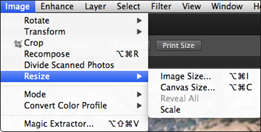
AA.9 The Image menu in Photoshop Elements with the Resize option selected.
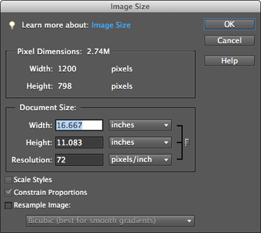
AA.10 The Image Size dialog box in Photoshop Elements.
Do not save the small file with the same name as the original file, as it could overwrite your original.
Photoshop Elements can be downloaded from www.adobe.com, and the good news is there is a free trial, so you can see if you like it before you buy.
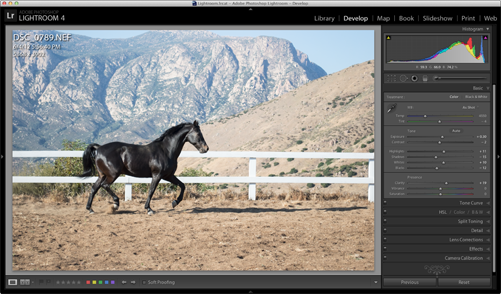
Adobe Photoshop Lightroom
Adobe Photoshop Lightroom was designed for professional photographers or advanced amateurs who take a lot of photos. It is my photography sorting and editing application of choice. Every image in this book was first sorted in Lightroom. Lightroom 4 has seven modules: Library, Develop, Map, Book, Slideshow, Print, and Web. The Library module is where all of the sorting is done. Once the images you like are selected, you can take them into the Develop module and change the exposure or color space, apply noise reduction, crop, or apply a variety of adjustments. The Map module can use GPS data to sort your images by location, and then you can create printed books, slide shows, print packages, and even websites right from the application.
Video Editing
Editing video is a lot tougher than editing images. It takes longer as well because a lot of the edits have to be done in real time. This means that for every minute of video footage, you have to actually spend a minute looking at it. Having a plan before you start shooting video makes it easier to put it all together in postproduction. If you have never edited video, it can be quite daunting.
The general idea is to take a series of video clips and combine them into a full movie. The clips need to be strung together so that, when watched from beginning to end, they create a coherent story. Each of the video clips usually needs to be trimmed, so that the video starts and ends in the right spot. The space between the clips can then have a transition applied so that the movie flows evenly. Many video-editing applications can color-correct movies or add special effects, titles, and edit sound.
Video-editing software used to be very expensive and running it required a high-end computer system. Now, video-editing software comes free with cameras and most computers. It is even possible to use video-editing apps on an iPad. Video is everywhere and it’s not going away. My advice is to use the free Nikon software to get an understanding of the basics, and then move on to an application like Premiere Elements from Adobe, which is a cut-down version of its professional Premiere video-editing application. You can also use Final Cut X from Apple, which is a professional-level video-editing app.
Nikon software
The Nikon video-editing application that comes free with your camera is a very simple, rudimentary application called Nikon Movie Editor. The simple interface allows you to combine clips in a timeline, add transitions, a background soundtrack, and not much else.
When you launch the Nikon Movie Editor, the screen looks very clean and simple. You now just need to add clips, drag them to the timeline, and add transitions. The Nikon Movie Editor doesn’t have a lot of transitions, and the only way to adjust them is to double-click a transition once it is in the timeline, and then change the duration.
Once your movie is created, you can click the Create Movie button to save it, and then pick the size of the movie and the frame rate. For movies that you want to send over e-mail, I suggest the setting of 640 × 424. For a simple, free movie editor, this app works great. If you want to start creating more advanced movies with audio editing, you will want to use iMovie or Adobe Premiere Elements.
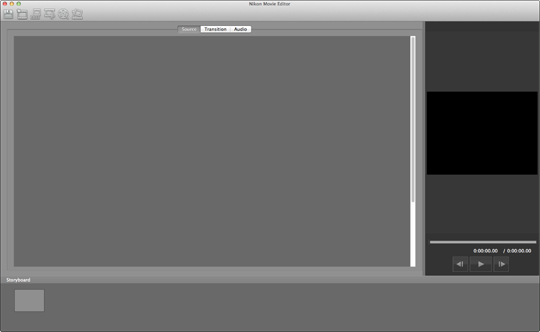
AA.11 The interface of the Nikon Movie Editor is really simple.
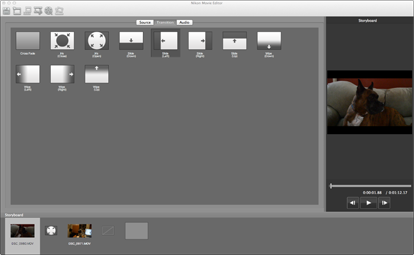
AA.12 The transitions screen in the Nikon Movie Editor. There are only 11 transitions (not a lot compared to other applications).
iMovie
iMovie is one of the parts that make up the Apple iLife suite of applications, and it is loaded on every Mac computer. The iMovie interface, shown in Figure AA.13, looks a lot more complicated than the Nikon Movie Editor interface, but the basics are the same.
AA.13 The interface for iMovie is similar to the Nikon Movie Editor application.
Once you actually load a clip into iMovie, you see how it far outshines the free Nikon Movie Editor software. Select a clip and click the Inspector button. You will not only see the qualities of the clip, but you can edit the video and the audio, as shown in Figures AA.14 and AA.15.
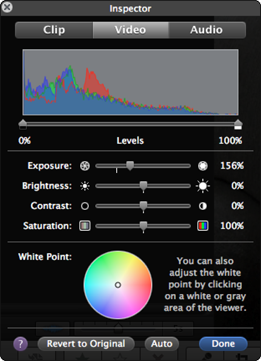
AA.14 The iMovie Inspector video options.
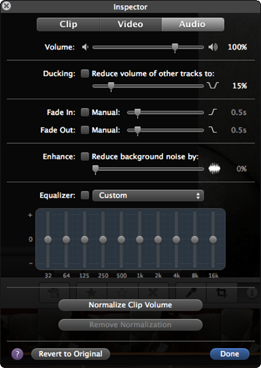
AA.15 The iMovie Inspector audio options.
Once you add your clips to the timeline, you can add transitions and determine exactly where you want them to start and stop. This makes creating a professional-looking movie a lot easier because you don’t have to guess where the start and stop points are. The bad news is that iMovie is only available for Mac computers. If you are a Windows user then I suggest giving Premiere Elements a try.
Premiere Elements
Adobe makes a high-end, professional video-editing application called Premiere, but it also has a lower-end consumer version called Premiere Elements. This might not have all the bells and whistles of the pro software, but it has enough features to keep any beginner (and many pros) really happy. The opening screen is very similar to the iMovie layout with the timeline at the bottom, a preview window, and the clip library above.
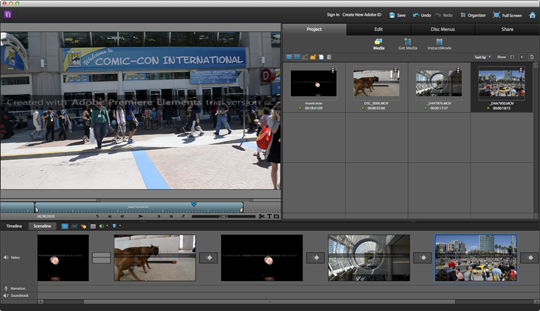
AA.16 The opening screen layout of Premiere Elements.
Once you load clips into the timeline, you can add effects, titles, and transitions. This application has a great number of transitions and, while it might seem like fun to use them all, the more professional method is to stick to a few subtle ones for most of the movie, and use the more flamboyant ones more sparingly, if at all.
