
Planes and boats, trains and buses, bikes and cars: the vehicles that get travel photographers from place to place also provide a vital link in the tale that’s to be told
Reaching your destination, and travelling between destinations, is a major part of the journey, but in photographic terms it is often neglected in favout of the eventual sites. But here is a great opportunity for a picture story, to stand alone or be a part of your journey project.
Journey photographs can be broken down into four kinds: the boarding scene, the vehicle, life on board, and views the transport offers.
Boarding scenes may start from home, and can be bus stations, railway stations, the quayside. Once abroad, they are often an occasion for great activity, from Indian porters carrying luggage on their heads to Burmese stevedores stripped to the waist ready to load fifty-kilo sacks of rice onto an Irrawaddy ferry. They can also be the occasion for theft and black market trading. This is the time also to consider having a picture or two taken with you in the frame.
Second, your transport itself may be worthy of attention, and you don’t have to be a trainspotter to appreciate the sleek aerodynamics of a high-speed shinkansen pulling into a Tokyo station, while local buses in some countries, especially in Africa, South America and the Indian sub-continent, may have idiosyncratic paint-jobs and decoration.
Life on board is the third genre of journey photograph, with the greatest freedom of choice going to boats with freedom to move around. Trains and buses often offer adventure and interest among the passengers and stops allow vendors to offer their wares.
Finally, consider the passing scenes to photograph from your vehicle; one advantage is that you have an elevated view, on a lofty ship or bus, or on a train travelling through countryside and along coasts that are often hidden from the roads.
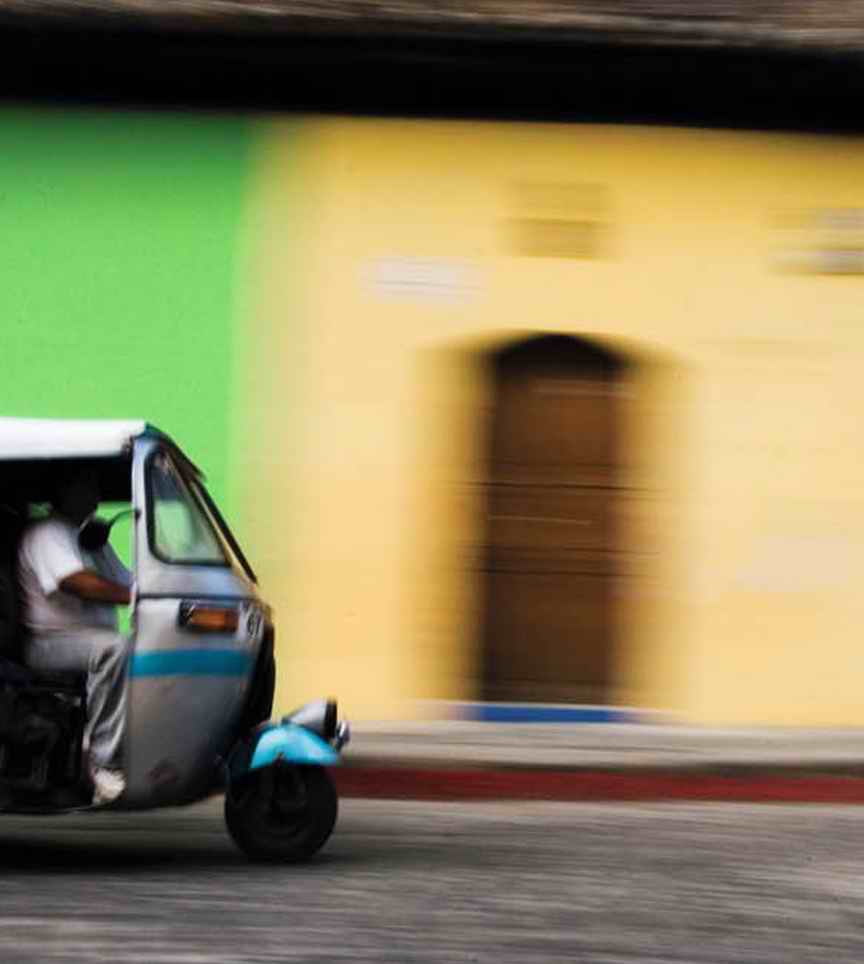
Corrie Wingate/APA
While for sheer photographic convenience there is nothing to beat the admittedly expensive option of hiring your own vehicle (with driver is always recommended), public road transport offers a dual choice: pictures from and pictures of.
Worldwide, buses are most frequently the traveller’s friend, and while the slick variety with reclining seats and video may not be conducive to photography, local buses in many parts of the world can be eventful and full of atmosphere. When your bus starts to fill up with locals, the compensation for not being able to spread your legs is that you have acquired a crowd of companions to photograph. Overcome awkwardness at photographing strangers in confined surroundings by first striking up a conversation.
If at first you feel less than enthusiastic about taking that rickety-but-colourful beaten-up Colombian bus heading out of a market town up a dodgy mountain road, especially as it is creaking beneath the weight of passengers and lugagge, reflect that it can make a great shot being loaded up, with a wide-angle lens, or from a distance up the road with a telephoto.
Trains
Railways inspire more enthusiasm than most other kinds of transport, and they can certainly be photogenic. With space and time to walk through the carriages, look for slices of life, particularly on local trains in out-of-the-way places.
Each country has its own particular style, from a Bolivian train carrying Quechua women to the weekly market, or the slow train from Bangkok to Hua Hin, and good-natured photography is usually tolerated provided that you don’t poke the camera too obtrusively into people’s faces.
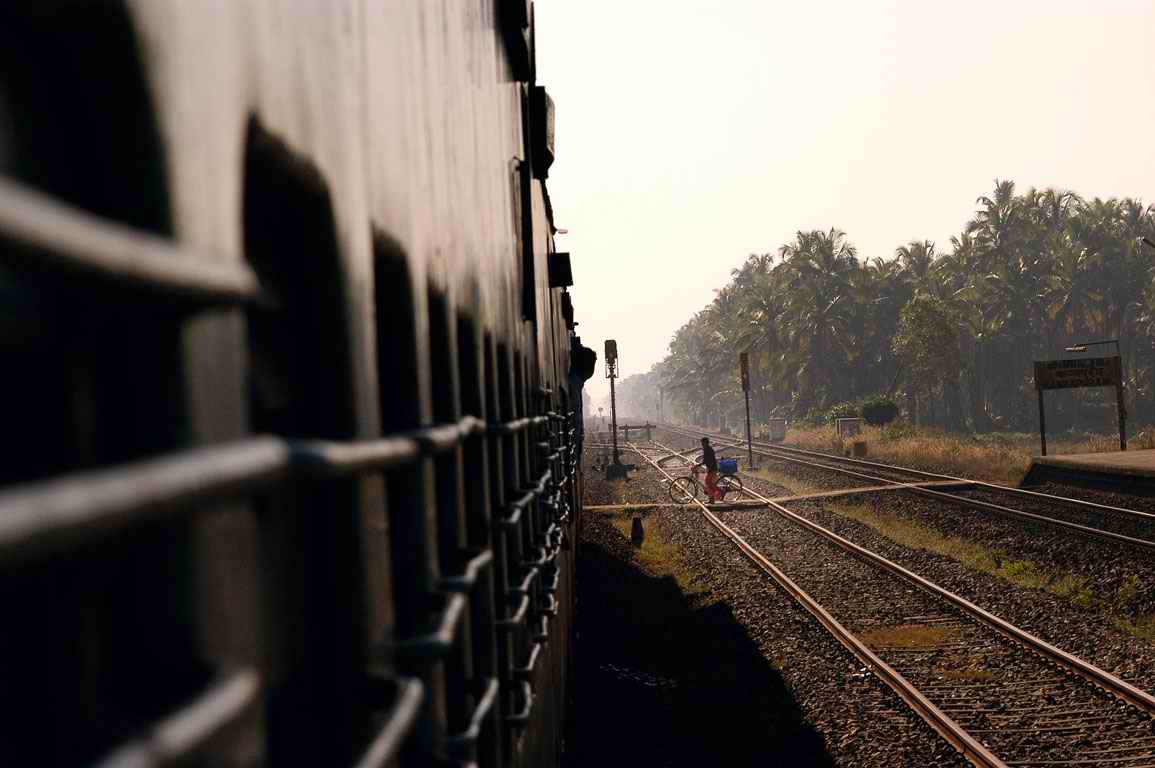
Britta Jaschinski/APA
Look for vendors selling food and sweets, the ticket collector on his or her rounds. Trains in India are always an event, with illegal peddlars and people riding on the outside of carriages.
If you photograph from the train, the movement may suggest a high shutter speed to counter camera shake, but equally the streaking motion blur of the landscape passing by with a slower shutter speed such as 1/30sec might be convey the sense of speed better. Try also stepping back to include part of the train in shot, such as the window frame or a passenger looking out.
At halts and railway stations there are further photo opportunities, although some countries have restrictions on photography here, particularly if you appear to be doing it intensively and professionally.
A major terminus like Chhatrapati Shivaji in Mumbai (formerly Victoria terminus) can provide a whole picture story, with period architecture and crowds of dabbawalas delivering lunchboxes to city workers from their suburban homes.
Heritage railways are a great source of material for shooting, and all over the world are becoming a part of the tourist infrastructure. They include the Darjeeling Himalayan Railway, nicknamed the “Toy Train”, the Eastern and Orient Express between Singapore and Bangkok, the North Yorkshire Moors Railway, featured in the Harry Potter films, and the Cuzco and Machu Picchu Railway.
Sleeper trains are always evocative, from the Transiberian Express, where a detail of a samovar or the panelled car interiors provide quality images, while Canadian Pacific runs special train breaks that take you into the wilds.
It is worth staking out viewpoints for photographing from a distance, such as bridges or bends in the track. A head-on view with a telephoto lens is usually effective, particularly with a steam engine billowing smoke.
| Exotic Transport |
|---|
Some countries, even some towns, have exotic vehicles that make good photographs. Many places have remained wonderfully resistant to the improvements in road safety that dull the interest. Buses can be spectacular old smokes while the idiosyncratic decoration of Pakistani and Turkish trucks are worthy of a full-blown photographic project – as are the 6,000 Fifties American cars in Cuba. Horse-drawn carriages are popular with locals as well as tourists, such as coches in Cartagena, Colombia (all red, while the ones in Santa Marta up the coast are all white), calesas in Vigan, the Philippines, hantours in Luxor, Egypt, and colonial-era carriages in Pyin U Lwin (formerly Maymyo), Myanmar. Meanwhile, donkeys, camels and buffaloes are still earning their keep by pulling carts. |
Boats
Water transport is more varied than land vehicles, from canoes to lake steamers, inter-island ferries and cruise ships. They can also take you places otherwise hard to access. A boatman, for example, at one of Varanasi’s ghats will give you views of morning prayers and ablutions along the Ganges.
Hire an ancient dhow on the Nile, or a boat in Vietnam’s Mekong Delta, rowed standing with two crossed oars by a young woman with conical hat. Your chauffeur, of course, is an essential part of the shot, usually best captured up close with as wide an angle of focal length as you have, so that you have the person and the water scene around.
From land, look for higher viewpoints so that you can look down at an angle on craft; a headland is one possibility, as are bridges. Fit a telephoto lens or use the longest focal length possible, and look in particular for shots of boats en masse, such as a fishing fleet in harbour or waterborne markets. The floating market south of Bangkok, for example, although now thoroughly organised for tourism, can still present a scene packed with life as the one-person boats loaded with produce and food being cooked jostle in the small klongs.
Public ferries offer a wealth of shooting opportunity, not least because they are real local transport, whether a typically over-crowded inter-island ferry in the southern Philippines, the commuter ferries in Lisbon or Istanbul, or the double-decker wooden boats plying the main Amazon river.
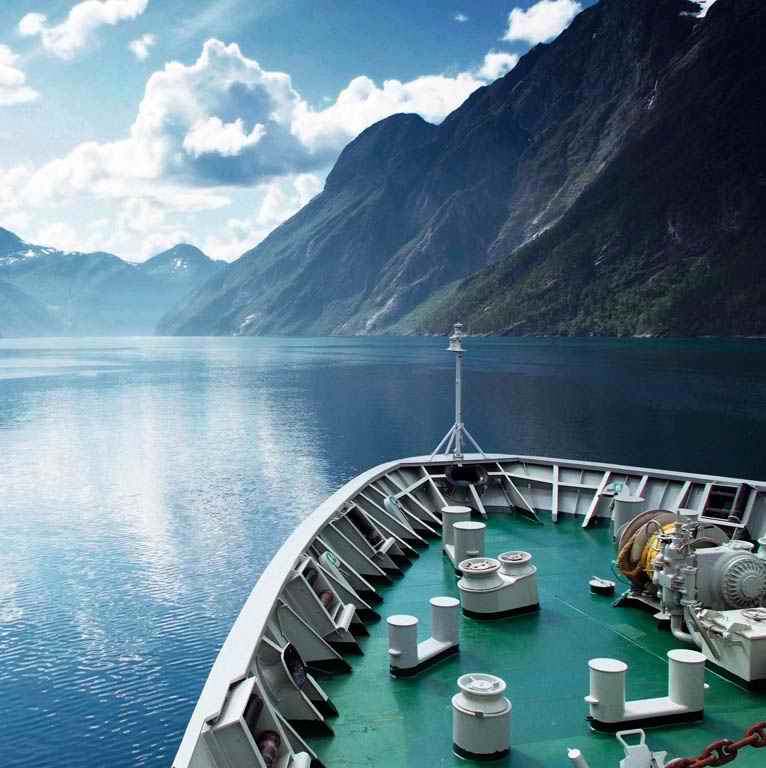
Glyn Genin/APA
Cruise ships are a different world altogether, and the size and scale is something to aim for. Look for the best overview available, and if possible, talk to a crew member to see if there is special permission for other viewpoints.
Take advantage of the height above the water and the views from the top deck as you come into a Caribbean port, or approach calving icebergs in Antarctica. Arctic and Antarctic cruises are highly specialised, and there will usually be a photography expert on-board to point out photo opportunities and to give advice.
Cruising tall ships offer good opportunities for photographing the crew at work in the rigging.
| Cruise ship photographer |
|---|
A photographer or “videographer” on a cruise ship sounds ideal, but it is a round-the-clock occupation, with little time for sight-seeing. Quarters are cramped and usually shared, and the pay is sometimes no more than the commissions you get for persuading passengers to buy their picture. On the plus side, you don’t have to be a proven professional, and you will get to see different places. Lots of energy and enthusiasm may secure you a post, perhaps as one of several on-board photographers working for a photographic manager, who overseas printing and sales in the ship’s photographic department. The main demand of such a job is a rapid learning curve, and if a photographer can succeed in these conditions, their confidence and ability will receive a boost. |
Your own transport
Cycling is an increaingly popular way of seeing the world. IATA regulations permit bicycles to be carried on flights with your baggage. Bikes are ideal for photography, giving you plenty of time and flexibility. Trail bikes also allow off-road opportunities.
Weight and bulk are key considerations on a cycling holiday, unless you are doing it in an organised way with a support vehicle to carry baggage. In any case, the more compact the camera, the easier it will be, and a single-lens mid-range super-zoom, for example, would be ideal.
Cycles themselves can be photogenic, from sit-up-and-beg sensible Dutch numbers and ranks of hire bikes to cycle rickshaws and taxis.
Motorcycling is possibly even more photography-friendly, as it takes care of some of the weight restrictions. Pack the camera well and carefully in a side pannier that is convenient to open without dismounting.
Horses and camels
Horseback has a lot to recommend it for photography in areas where you would otherwise be trekking – not least speed and comfort. But also, the horse gives you added height, which is always useful (if you are unfamiliar with the horse, hold the reins lightly when you stop to photograph).
It’s worth mentioning camels here, as in desert regions from western Rajasthan to the Gobi you will usually find them on offer for riding in tourist areas. They are less tractable to novice riders than are horses, so rely on the guide if you want to stop the animal to take photographs (the extra height is very useful for flat desert landscapes).
The riding position is unfamiliar for most people, being on the rear of the hump (except for Bactrian camels, which conveniently have two humps for a central riding position). The swaying gait is moderately relaxed for shooting, but you should never undertake a long ride (several hours) without practice, as it can be hard on your spine.
And remember that a camel gets up and down in two stages, each of them putting you, the rider at a different angle, so lean forward after mounting as it rises on its forelegs, and lean backwards at the end of the ride as it first kneels.
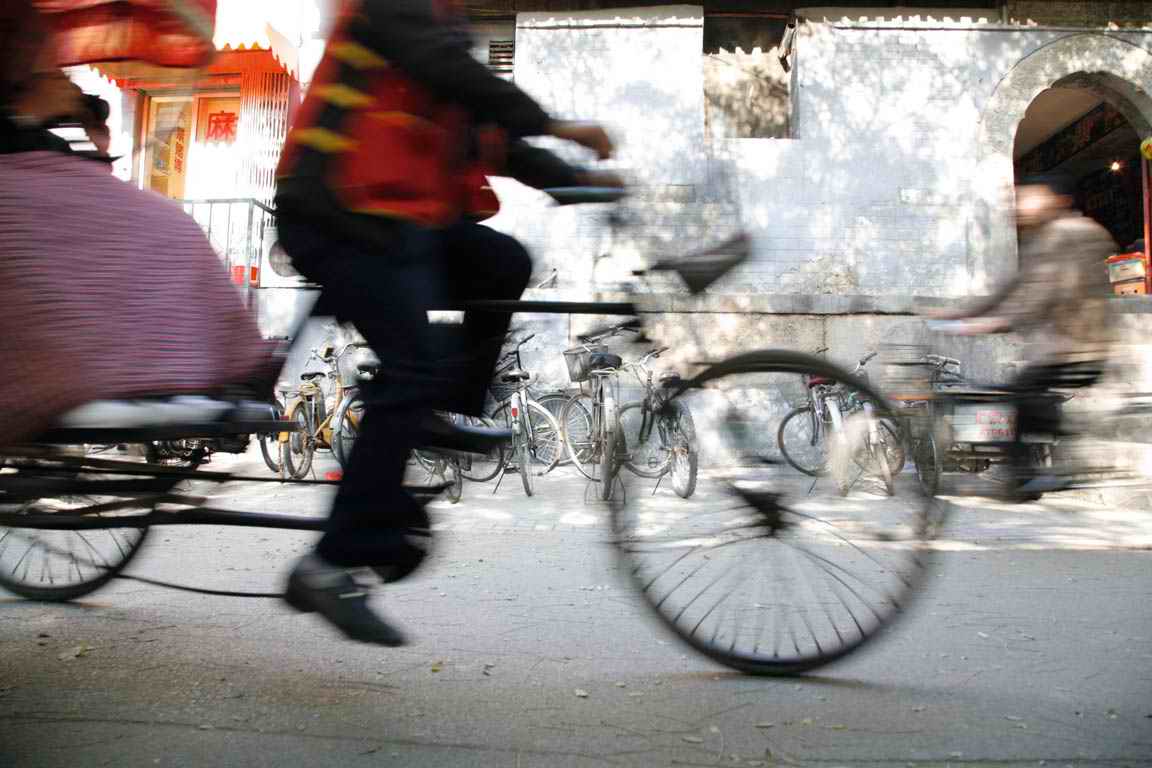
Ming Tang-Evans/APA
A charterd aircraft, fixed-wing or (even better) a helicopter, comes close to photographer heaven. It is expensive, but the cost varies from country to country, and also depends on the location. The United States, for example, has a higher percentage of private aircraft than anywhere else, and close to National Parks there are likely to be aircraft with pilots used to doing short pleasure rides.
The very first thing, which may decide your choice of aircraft and even if it is worth flying at all, is that you must be able to heave either your passenger window open or have the door taken off pre-flight. Photographing through plastic seriously reduces image quality. Not all pilots appreciate this, and not all are willing to open your side of the aircraft in flight, so check this point before anything else.
To make maximum use of expensive flying time, know in advance what subjects you are looking for and what kinds of image you will take; discuss these with the pilot, preferably over a map, as he/she will have to file a flight plan.
Oblique or vertical
There are generally two kinds of aerial image: oblique and vertical. Oblique shots are more usual, and easier to deal with. Once you have identified a target, such as a small offshore island, or a ruined temple, or a small lake surrounded by forest, make sure the pilot understands that he needs to keep it on your side of the aircraft and at a comfortable distance – not directly over, nor too far away.
Ideally, photograph it as you pass, with the aircraft flying slowly. Even better is if the pilot puts the aircraft into a gentle bank and drifts in towards the subject.
Vertical aerials are more challenging to organise, but they can produce graphically powerful results, as in this photograph (below) of Grand Prismatic Spring in Yellowstone National Park. The only sensible way to shoot vertically downwards is for the aircraft to fly in a tight circle, banked at around 45 degrees, with the target in the centre of the circle. This is not easy, as the pilot cannot see exactly what you see, and it may take a few goes.
The right lens
Zoom lenses definitely have the edge over fixed lenses, as changing lenses in flight wastes time over your target and can be tricky if the aircraft is moving a lot. Wide-angles are good for an overall view, and help overcome the common haze problem by using them while flying low – shorter distance to the ground equals less haze. But your vertical view may be restricted by the aircraft’s wing tips or a helicopter’s rotors. These move too fast for you to see anything but a pale blur, but a fast shutter speed will catch them on the image. A wheel may also get in the way if the undercarriage does not retract.
The widest you can normally use is 24mm equivalent focal length. At the other end of the range, a telephoto focal length of, say, 200mm equivalent may transmit too much camera shake, and there will be more haze effect also.
Noise and vibration
The noise and buffeting inevitable from having a window or door open makes it difficult for first-time aerial photographers to concentrate. If you are wearing headphones to communicate with the pilot you are unlikely to hear the shutter tripping each time. There is always some vibration, and this can interfere with calm composition. It can also affect your ability to judge sharp focus, so make sure than the auto-focus is working; many cameras have focus locks and switches that can be switched off inadvertently.
The movement makes it important to set a fast shutter speed to avoid motion blur, and shutter-priority is a sensible shooting mode. How fast depends on the focal length of lens (faster with a longer lens) and on your ability to hold the camera firmly, but to be sure never slower than 1/250 sec, and ideally at 1/500 sec or 1/1000 sec. Avoid any vibration from the aircraft’s engine by keeping your hands, arms and elbows away from the seat or any part of the airframe.
Also resist any temptation to lean out; the airflow can pull the camera out of your hands. Keep the camera strap secure around your neck, and if you fly with a door off, you need to be securely strapped in to your seat, and you should also secure your camera bag. Do not leave second cameras or lenses lying about: either keep them in the bag, or have a second passenger take charge of them and hand them.
Lighting
Lighting is critical in aerial photography, more so even than in normal landscape photography. Even from as low as 1,000 metres, the texture of buildings, trees and other features is on a quite a fine scale of texture, and unless there are some obvious real contrasts in tone or colour, the results will look disappointingly flat under any kind of cloud cover or when the sun is even moderately high. Although it may sound like too rigid a formula, the best lighting conditions are a low sun in clear atmosphere (good visibility, which the airport will have measurements and forecasts on). Clear and low bright sunlight casts distinct shadows, and for almost any subject, the longer they are, the better.
On a commercial plane
From a commercial aircraft there are occasions when you can make photographic use of a window seat despite the physical limitations, so it’s worth having your camera accessible. Watch out for interesting cloud formations and sunsets/sunrises from commercial flying altitudes of about 10,000–12,000 metres (33,000–40,000ft).
To make the least of scratches and imperfections in the window material, press the lens right up against it, and use a fairly wide aperture (blemishes on the image can be removed later in Photoshop, and contrast can be improved). Be aware that some countries do not allow photography from overflights; the crew will know about this.
| Hot-air Balloons |
|---|
Hot-air balloons are a wonderful alternative to aircraft or helicopter, and what they may lack in manoeuvrability and speed they make up for in photography by providing a silent, stable platform that moves slowly and smoothly – perfect for shooting. Typically you will be in one corner of a wicker basket, and as most hot-air balloon rides are in naturally scenic spots (the Serengeti for wildlife, Cappadoccia for the pillar-like landforms, or Bagan for the Burmese temples), the pilots know exactly what you will want. A good pilot under the right weather conditions can also manoeuvre the balloon in ways you might not have thought possible. Early mornings are best in most locations, because the air layers will still not have had time to mix, and the raking light will be ideal for photography. |