The Python programming language provides us with a number of libraries and frameworks for building robust web applications. This includes the ability to handle incoming HTTP requests, serve up content in a variety of forms including HTML and JSON, and retrieve data from a database and share it with a visitor.
In the first application we will write, we will display the directory structure of the python_programs folder.
Start by opening a new file called fifth_python_prog.py.
Let's start by adding the following block of code to the file and taking a look at what it does:
#!/usr/bin/python

import SimpleHTTPServer
import SocketServer
First, we include the shebang, and following this we import two libraries.
The first library is SimpleHTTPServer. As you may have guessed from the name, this library provides all the functions and tools necessary for processing and sending HTTP requests and responses.
The next library we include is the SocketServer library. This is responsible for providing us with the tools for creating a TCP server, which allows for continuous streams of data between a client machine and a server:
def main():
    port = 8080
After including out headers we now need to define the main() function. The first line we include in this is a variable called port. We assign the value 8080 to this. As you will see shortly, this allows us to choose which port on the Raspberry Pi the web server will run on, and can thus be visited by browsers to view our web content:
    handler = SimpleHTTPServer.SimpleHTTPRequestHandler
    httpd = SocketServer.TCPServer(("", port), handler)
    print "Serving on port", port
    httpd.serve_forever()
After defining the port we get to the heart of our web server. To start with, we define a variable that is responsible for handling HTTP requests. Following this, we define the httpd variable. This is responsible for creating the TCP server, which will handle the HTTP requests on port 80.
Note
TCP stands for Transfer Control Protocol and is usually suffixed with IP (Internet Protocol) to make TCP/IP. TCP is responsible for breaking up data into small chunks, called packets, and sending these across the Internet. These packets are then reassembled at the other end. You can read more about TCP/IP here: http://www.w3schools.com/website/web_tcpip.asp
Next, we print a message, saying which port the server is running on, to the console.
Finally, we say we wish the server to run forever, thus accepting multiple HTTP requests:
if __name__ == '__main__':
    main()
The final line of our program should be familiar to you from our previous Python scripts. Here, once again, we tell the program to call the main() function once it has been executed.
Save this program and exit. We can now try running the application. Use the following command:
sudo python fifth_python_prog.py
You should see the port number that the app is running on displayed on the command line.
Next, from the Raspberry Pi or via a second machine, access the Raspberry Pi on port 8080 in your web browser, for example: http://localhost:8080/
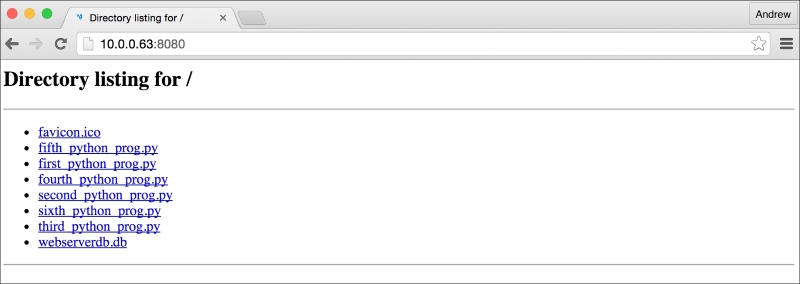
A directory listing of the python_programs directory should be visible in your browser.
Now take a look at the console window in Linux.
A message saying the application has started on port 8080 should be visible, but also a number of errors:
Serving on port 8080
127.0.0.1 - - [11/Jan/2016 09:27:09] "GET / HTTP/1.1" 200 -
127.0.0.1 - - [11/Jan/2016 09:27:09] code 404, message File not found
127.0.0.1 - - [11/Jan/2016 09:27:09] "GET /favicon.ico HTTP/1.1" 404 –
These errors are present as there is no index.html file and no favicon.ico file.
When we first hit the IP address of our Raspberry Pi using NGINX as the web server, we saw a welcome page. We will now look at how we can do the same with our Python web server.
Typically, a web server will list a folder directory (unless this option is disabled) if no index.html page is present.
So let's create a simple index page to greet a visitor:
<html>
  <head>
  </head>
  <body>
  Hello World.
  </body>
</html>
Here we have created a few tags, and in the body tag we have the Hello World. message.
Save this as index.html in the python_programs directory.
Once you have done this, restart the web server and navigate back to the URL.
You should now see the following:
Hello World.
We have written an application that serves up a static HTML page and tested it works.
To learn more about HTML, you can follow the tutorials at http://www.w3schools.com/html/html5_intro.asp.
Let's now add a favicon. You can use the following website to design your own:
Save the file into the python_programs directory.
Finally, if you restart the server you should see the error messages have vanished. The favicon should appear on the browser tab. This console can be a useful tool when debugging your web applications in the future.