In this chapter, we will explore how we can integrate third-party microcontrollers into a project using the Raspberry Pi. This allows us to then build a variety of projects, from home automation to robotics. Here, we will bring together some of the skills we have learned over the previous chapters. In this chapter we will cover the following topics:
- The Genuino/Arduino microcontroller
- Setting up the Arduino software
- Working with the serial and I2C pins we enabled earlier in the book
- Communicating between devices using Python and the Arduino programming language
For the projects in this chapter you will need the following components:
- Genuino/Arduino Uno
- USB cable
- 1.6 and 3.3 Ohm resistors
- Wires and breadboard
- Ethernet shield (optional if you wish to try out the Arduino web server examples)
We have chosen the Ardunio Uno microcontroller as it is popular, cheap and versatile. Next, we will look at it in more detail.
Genuino/Arduino is a range of open source microcontrollers developed by Massimo Banzi in Italy during the early 2000s. They have been geared toward students and the open source hardware hacking community. With products ranging from wearable microcontrollers to the wireless Arduino Yun, the range of projects available to enthusiasts is only limited by the imagination.
In the US, the product is branded with the Arduino name. Outside of the US you will see the Genuino branding. This is due to an ongoing legal dispute over the copyright outside of the US. You can read more about this at http://makezine.com/2015/05/16/arduino-adafruit-manufacturing-genuino/.
The full range of boards can be found at the official Arduino website at https://www.arduino.cc/en/Main/GenuinoBrand.
Software developed for Arduino is done via a free programming development environment. The Arduino sketch programming language was based upon the open source Wiring platform. You can read more about this at the Wiring website at http://wiring.org.co/.
Typically, Arduino boards are made up of a microcontroller chip along with a number of other features, including GPIO pins and USB ports.
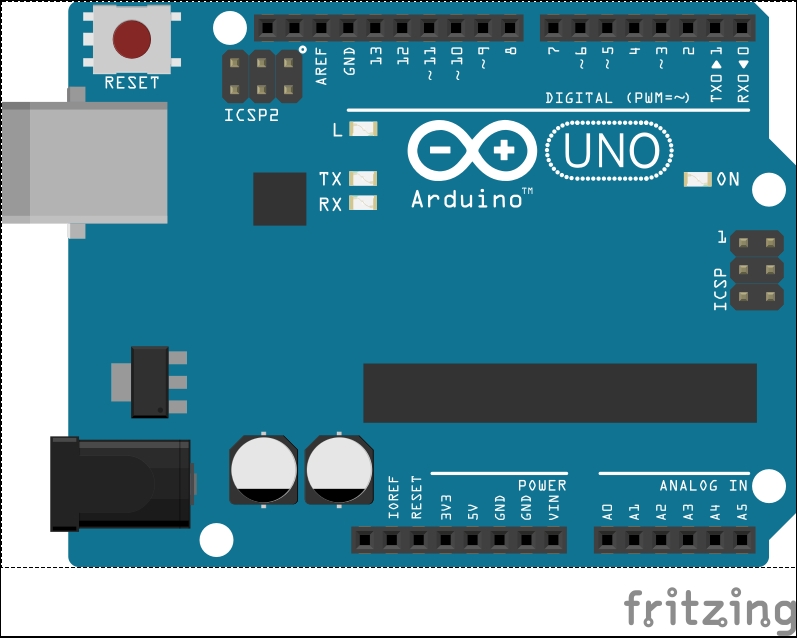
We are going to be using the Arduino/Genuino Uno as well as an Uno-compatible Ethernet Shield. The following image demonstrates the layout of the board:

A complete guide to the device and its microcontroller chipset can be found at the arduino.cc website:
https://www.arduino.cc/en/Main/ArduinoBoardUno
Looking at the image, you can see there are a number of GPIO headers located on both the top and bottom of the board. These give us access to the power pins and data pins. The data pins are both analog (six total) and digital. The board also contains a reset switch, an ISCP header, a power connector and a USB port. For the power you will need an AC-to-DC power adapter. When the device is plugged into a computer via USB, it can draw power through the USB cable.
Let's now take a look at the software you need to install to program the Uno.