
“However small your garden, you must provide for two of the serious gardener’s necessities: a tool shed and a compost heap.”
— Anne Scott-James, gardening author, Down to Earth
There are a wide variety of ways to store compost as it matures, and this chapter explains several of the most common methods for creating an outdoor compost bin. When deciding on a type of composting system, keep in mind the building materials you have available, the space you have set aside for your compost system, your building skills, and any local ordinances regarding the nature of compost containers in your neighborhood. Also, take into account the effort it will take to maintain and use each type of system. No matter what method you choose, you will most likely want a place to store materials until you can include them in the compost pile. This will help keep everything in balance and keep your compost cooking along at a healthy rate.
Do it Yourself
There are a variety of do-it-yourself methods for creating simple compost systems. The methods described here will all work if you have a yard or garden and some simple tools and materials. The cheapest and simplest methods are discussed first, followed by the more advanced kinds of bins and containers. All will yield good compost, but in differing amounts and with different investments in time, money, and energy.
Cardboard box composting
Cardboard is biodegradable and can be composted in any kind of compost system. You can also use cardboard on its own to make a temporary compost bin. This is useful if you have nowhere else to put the compost or just need a temporary storage container before moving the compost into a more permanent system. It is also good if you have accumulated more compost materials than you have room for in your regular compost bin. The box can hold the materials and allow them to break down until you have the space to move them into another bin.
Supplies
• Large cardboard box
• Four to eight bricks or rocks
Instructions
1. Open the bottom flaps of the box and set it on level ground in an out-of-the-way location with the bottom box flaps sticking out. You can set it right on top of grass; there is no need to remove the sod.
2. Weigh the box down by putting bricks or rocks on top of the extended flaps.
3. Fill the box with materials you wish to compost. Add water if the compost materials are dry, but not so much that your box disintegrates right away.
4. If you want to fold the top flaps over the compost to shield it from wind and rain, pull them out of the box before filling it with compost. Otherwise, you can tuck them inside before you fill the box. The box itself will still get wet and slowly break down.
5. When the box disintegrates so much that it can no longer contain the compost, move the compost into a regular compost container. Tear up the box and add it to the compost as well.
Wire bin composting
A wire compost bin is cheap and easy to build. It is a circular structure made of chicken wire or similar material that is placed on the ground so that worms, insects, and bacteria can easily enter. Its open sides provide good exposure to the air. The wire bin can be opened to access the finished compost, or you can lift the bin, move it aside, and redistribute the material back in the bin to turn it. Because this kind of compost pile is open to the elements, there is a chance it can get too wet or too dry. You should cover it during heavy rains and keep it watered during dry spells to maintain the proper level of moisture. You can also line the bin with sheets of cardboard to retain warmth and aid decomposition. A wire bin system is fairly small and will not get very hot, so it is not meant to kill off weed seeds and pathogens. Keep that in mind when filling this kind of bin.

Example of a wire bin composter. Courtesy of USDA.
Supplies and Tools
• Galvanized chicken wire (10 feet long and 3 feet wide)
• Heavy wire or plastic zip ties
• Four or five 3- to 4-foot-tall wooden or metal posts
• Wire snips
• Mallet
• Pliers
Instructions
1. Create an edge along each short end of the wire strip by using the pliers to fold back 3 or 4 inches of wire. This will make it safer to handle and easier to latch.
2. Shape the wire strip into a tube and place it where you want the compost pile.
3. Use the wire or plastic ties to secure the ends of the chicken wire together. Use wire if you intend to open the bin from the side. Plastic ties are all right if you plan to remove the whole wire tube from the posts to take out compost.
4. Pound the wooden posts into the ground with the mallet, making sure they are evenly spaced inside the wire tube and that they are snug against the wire.
5. To mix the compost in a wire bin, stir the mixture using an aerating tool or pitchfork. You can also pick up the bin, move it to a new location, and put the compost back into it, redistributing it as you do so.
Trash can composting
You can use ordinary household trash cans for composting, but it is harder to turn the materials in a trash can because the contents have to be dumped out and scooped back in. This is messy and time consuming, and it also cools the compost, slowing decomposition. If the lid is secure, and the trash can is cylindrical, you can turn and roll the trash can to mix the compost. You can attach a bungee cord over the lid to keep it on if you want to try this method of mixing. A trash can looks neater than an open wire bin and might be more suitable for your location. A trash can system will not get very hot, so it is not meant to kill off weed seeds and pathogens. Avoid adding any diseased plants or animal products to it.

Example of a trash can composter. Courtesy of USDA.
Supplies and Tools
• Metal or plastic trash can with a lid
• Bungee cord or duct tape
• Drill with 5/16-inch drill bit
Instructions
1. Drill rows of holes all around the trash can about 4 to 6 inches apart. These holes will allow air to flow into the compost.
2. Drill several holes in the bottom of the trash can. These holes will allow excess moisture to drain out of the can and will allow small organisms to enter the compost and help break it down.
3. Line the bottom of the can with wood chips or straw to facilitate drainage and absorb moisture. Layer in the compost materials, alternating brown and green materials.
4. Secure the lid to the can with the bungee cord or duct tape.
5. Roll the can on the ground to aerate the contents. You can do this on a schedule that suits you — every week or two, or just when the contents seems to be going anaerobic. You will know by the smell if it has started to go off.
6. You may want to remove the lid and check the moisture level periodically. If it is very dry, water it. If it is too wet, add more dry brown materials, or roll it to make sure the moisture is evenly distributed.
USE CAUTION WHEN DIGGING!
Before digging a hole or trench, check with utility companies or local authorities to make sure you will not be digging into gas lines, water mains, or electrical lines. Most states have a toll-free number you can call or a website where you can make a request for someone to come out and mark any gas, water, or electrical lines. Some require a few days notice, so make sure to call them at least a week or so before you plan to dig so that they have time to mark the lines for you. In some states, you are required by law to call ahead of time. The authority will give you a date when you are allowed to begin work, and you must work within the time frame specified.
Trench composting
Trench composting requires a patch of ground where you can dig trenches of whatever size you need to accommodate your compost. Using this method, dirt dug from the trench is used for planting while composted items are kept in a trench near the plants. As the compost items break down, they leach minerals and other nutrients into the soil beside the plants. The compost also serves to keep the area near the plants moist. A trench system will not get very hot and is not meant to kill off weed seeds and pathogens. You should also avoid placing diseased plants or animal products in this kind of compost system. This kind of composting may attract animals if you do not cover the compost promptly. Because you will be using the dirt dug up from the trench for planting, you may have to use dirt from elsewhere on the property to cover the compost as you add it to the trench. If you do not cover the compost, be aware that animals may visit and steal food items out of it. This generally is not a bad thing unless you have creatures like rats, skunks, or other undesirable animals in your area.
Supplies and Tools
• Garden spade
Instructions
1. To create a trench compost system, create a row about 3 feet wide. Divide the row into three 1-foot-wide trenches, A, B, and C. Each trench should be 8 to 10 inches deep and can be as long as you want to make it.
2. Dig a trench in row A, putting all the dirt in row C and leaving a walking space (row B) between the trench and the dirt mound.
3. Plant flowers or vegetables on the resulting dirt mound along row C.
4. Begin layering compost materials into the trench (A).
5. Use the empty space between the trench and the plants (B) for a walking path.

1st season
6. The following season dig up the dirt where the plants were (C) and cover the previous year’s compost trench (A). Row A will be the new walking path.
7. Start composting in the new trench (C) formed in Step 6 when you dug up the plants.
8. Plant flowers or vegetables where the walking path was the previous year (B).

2nd season
9. In the third year, move the plants to the previous year’s walking path and dig a trench where the plants were.

3rd season
10. Continue moving the trench year to year or move the compost to another area of the property where the soil needs enriching.
Trench composting in a dry environment
If you live in a very dry environment, such as a desert, or an area with very compacted subsoil, you can use trench composting to bury smelly, wet, or weedy waste. This will dispose of the waste in an aesthetically pleasing way and will enrich your soil by introducing organic material and water. This method requires some initial effort, but once the waste is buried, you will not need to turn or harvest your compost, so you can cover it up and forget it. Follow the safety advice about calling the utility company to check for gas lines, water mains, and any other underground cables. If you find any large tree roots while digging, you may want to fill in the hole, and dig elsewhere because damaging tree roots can kill the tree.
Supplies and Tools
• Digging fork
• Piece of rebar for making holes in hard soil and for prying out large rocks Rebar is a steel bar used to reinforce concrete and masonry structures. It comes in various sizes from 1/2 inch to 5/8 inch and can be found at any hardware store.
• Garden spade
• Mattock or pick for digging up or breaking rocks A mattock is a digging tool similar to a pick. It can have a hoe on one side of the head and a pick on the other, or an axe on one side and a pick on the other. Swing a mattock just like you would an axe.
• Heavy hammer, like a sledge hammer
• Garden hose with nearby water source, or buckets of water
Instructions
1. Use the fork to poke holes in surface turf and perforate the soil as deeply as you can. If soil is very compacted, hammer the rebar into the dirt every few inches to loosen it up.
2. Soak the area thoroughly with water and wait a day or two until the dirt softens up.
3. Dig up the topsoil and set it aside.
4. Pick out and set aside any rocks you find. If a rock is larger than your head, use the rebar to pry it out of the ground. Do not use your spade because you risk breaking the handle or the shovel portion. Use the pick or mattock to break up any rocks that seem likely to crumble.
5. Dig down at least 12 to 14 inches. A trench 24 inches deep is best because the deeper you dig, the deeper the water will penetrate and break up the compacted soil.
6. After digging as deeply as you can, pound holes into the subsoil with the rebar to allow water to infiltrate it.
7. Layer compost materials in the following order:
a. 3 inches of coarse material such as hay, small sticks, or dead fibrous plants to help with drainage
b. 2 inches of shredded leaves or shredded paper if you have no leaves
c. 1 inch of soil
d. Sprinkle the trench lightly with dry organic fertilizer and water it.
e. 2 inches high-nitrogen material such as green grass clippings, manure, or green compost (Green compost is alfalfa or other high-nitrogen plants.)
f. 2 inches brown ingredients (shredded paper, cardboard, small wood chips, etc.)
g. 1 inch soil
h. Sprinkle lightly with dry organic fertilizer and water the compost.
Continue layering in this manner until the material is 4 inches higher than ground level. Do not walk over the trench because that will compact it. You can plant in your compost pile by adding pockets of soil at least 4 inches square. You can also build a raised bed over the trench, fill it with soil and finished compost, and plant flowers in it. Watering the raised bed and the action of the plant roots will combine with the microbial action in the compost to loosen the compacted subsoil even more, allowing more water and healthy bacteria to infiltrate the soil.
If you do not plant on top of the trench, keep adding compost and mulch as the pile sinks into the trench. In the fall, dig all the plants and materials into the trench and add more soil if necessary to bring it up even with the rest of the surrounding ground. Check the pH level and amend the soil if necessary. Instructions for checking pH with commonly available pH testing kits are in Chapter 6. The following year, dig a new trench and repeat the process. If you do this year after year, you will eventually enrich even the driest, most inhospitable soils.
Wood trench composting
A wood trench is an above-ground, single-row version of trench composting. It is useful if you do not want to have to dig into the ground by hand, or do not want to bury the compost. The compost in a wood trench is mixed using a rototiller. A rototiller is a motorized cultivating machine that turns the soil with rotating blades or tines. You can rent one from an equipment rental or home improvement store. If you plan to use it often, you can purchase one. If you have a community garden, it may be something that the members want to buy and share. A wood trench system will not get very hot and is not meant to kill off weed seeds and pathogens, so do not put any diseased plants or animal products in it.
Supplies and Tools
• Post-hole digger (A post-hole digger is an implement used for digging holes for posts. It consists of two shovel-like blades hinged together and attached to a pair of long handles. There are also motorized post-hole diggers with large augers. These normally require two people to operate them. You can also get post-hole digger attachments for tractors. These are especially useful when putting up a large fence that requires a number of holes, but might be overkill for a small project like this.
• Four sheets of 4x8-foot exterior grade plywood
• 18 2x4 stakes, each 5 feet long
• Hammer
• Nails
Instructions
1. Bury the stakes 12 inches deep in two parallel rows, nine stakes to a row. Make each row 16 feet long and 2 to 3 inches wider than your rototiller.
2. Nail the plywood sheets on the insides of the stakes, creating a passage between them.
3. Pile compost material in a pyramid shape between the boards with the highest point of the pyramid in the middle and the sides tapering out to the open ends of the trench. Use the rototiller to mix the compost after it has finished its first cycle of heating and cooling.
When the compost has finished decaying, you can shovel it into a pile to cure for a few weeks and re-fill the trench. Curing in this context means to allow a substance (in this case compost) to become stable. Compost is full of living organisms, so allowing it to cure will give the microbes time to finish their job and die off before you use the compost. You can reuse the trench over and over until the plywood breaks down. That should not happen for several years and when it does, you can replace the plywood and keep composting.
Hole or pit composting
Composting in a hole or pit is similar to trench composting except that the composted material is buried right away. A pit system will not get very hot and is not meant to kill off weed seeds and pathogens. There is no need to line the hole, but you should top it with a heavy lid to keep animals out while you fill it with kitchen scraps. A pit of this kind may attract flies, but a secure lid such as a heavy door or piece of plywood weighted with rocks should keep out any foraging animals.
Supplies and Tools
• Garden spade
• Lid of some kind (heavy door, sheet of plywood)
Instructions
1. Dig a hole 12 to 14 inches deep and about 20 by 36 inches long and wide.
2. Dump in the compost materials, which can include yard waste and kitchen scraps. There is no need to layer it.
3. Cover the compost with soil and pack it down. Organisms and insects in the soil will break the compost down over the course of several months to a year (depending on how much is there).
4. Cover the soil with the door or plywood to keep animals from digging up the scraps.
5. When you are ready to use the compost, you can dig it up and move it or simply plant on top of it. Make sure the compost has completely decomposed before planting any vegetables in this area because some people report that growing vegetables in unfinished compost can cause illness when they are eaten. You can plant flowers, shrubs, or any non-food items on top of the trench at any time, just be sure to add enough soil for them to root properly. Finished compost should not contain any obvious pieces of kitchen or garden scraps. It should be dark brown and crumbly and smell like fresh, clean soil.
Straw or hay bale compost piles
If you live on a farm or in a rural area, straw or old, dry hay should be easy to come by, and both are excellent materials for building your compost pile because they provide structure, insulation, and a source of carbon. Straw is most likely the cheaper option. Even in suburban areas, you should be able to find straw bales for sale at large garden centers or some farmers markets. It is often sold in the fall for Halloween and Thanksgiving decorations, so you can build your compost in the fall and let it age over the winter. The following summer it should heat up nicely as long as you feed and turn it properly. This type of system, if large enough — at least 4 feet by 4 feet and at least 4 to 5 feet tall — and kept covered and properly moist, will get very warm and may kill off some weed seeds. If it is well maintained and turned regularly, it may heat up enough to kill pathogens, but do not count on this unless you are sure you will maintain it. If in doubt, do not put any diseased plants or animal products in it.
Supplies and Tools
• Nine straw or hay bales for a single bin, or 21 for a three-bin system
Instructions
1. Arrange six bales on the ground to form a U-shape with an interior space of 3 to 4 feet.
2. Along the back of the square, add another three bales to create a taller back section, overlapping the bales like bricks with one in the middle and two on either side.
3. To create a three-bin system, use six bales across the back. Create four walls of two bales each, and then place the rest of the bales across the back and on top of the walls.
Unlike wire, wooden, or concrete block compost bins, the walls of this compost bin will decay along with the contents, adding carbon to the compost pile. After several months of the composting process, the bales will be noticeably changed. At this point, you have three choices:
1. Remove the baling twine and mix the straw into the compost, making nutritious mulch for your garden. This will look like compost with straw mixed in, so it will be a dark-brown, dirt-like substance with pieces of straw.
2. Let it sit another couple of months to let the straw break down more before using it.
3. Empty the compost piles without disturbing the bales and produce another batch of compost inside them before mixing the bales into the second batch of compost.
Concrete block compost bin
You can use a concrete block bin for composting or for holding compost materials that will be added to another compost bin later. This type of bin is easy to build, although it may be more expensive than a simple wire bin or a straw bale bin if you have to purchase the concrete blocks. This kind of bin is also larger and more obvious than smaller bins and is better suited for rural properties where there is more room available. Concrete block bins allow the compost to touch the ground, which is good for drainage and for introducing beneficial organisms.
The concrete blocks act as passive solar collectors and will warm up in sunlight, keeping the compost warm. Just like the straw bale compost system, a brick bin will get very warm and may kill off some weed seeds. The bin will stay warmer if it is large enough — at least 4 feet by 4 feet and at least 4 to 5 feet tall — and kept covered and properly moist. If it is very well maintained and turned regularly, it may heat up enough to kill pathogens, but do not count on this unless you are sure you will maintain it. If in doubt, do not put any animal products or diseased plants in it.

Example of a cement block compost bin. Courtesy of USDA.
Supplies and Tools
• 46 concrete blocks for a single bin or 110 blocks for a three-bin system
• Wood or metal posts
• Mallet
Instructions
1. Line up five blocks for the back of the bin. Place blocks about ½ inch apart to allow for air flow or lay them on their sides so that the holes provide ventilation.
2. Form two rows, one at each end of the first row, to create a U-shaped bin with an open front.
3. Continue stacking the blocks, stepping them back a half step from the front and staggering them to create a three-sided block enclosure.
4. You should have enough blocks to create a bin four rows high. On the top row, you will have four blocks across the back and three on either side.
5. If you did not lay the blocks on their side in Step one, use your mallet to drive several posts through the holes in the blocks to keep the walls secure.
6. If you have 32 additional blocks, you can create another bin next to the first, with a shared wall. This second bin can be used as a holding area or a second compost area while the first bin matures. An additional 32 blocks will allow you to build a three-bin system. Using a three-bin system is described in the next section.
7. If you choose, you can use baby gates or a piece of fencing across the front openings to keep the compost in the bin. You may have to tie the fencing to the posts to keep it upright.
Three-bin composting
More advanced composters might want to construct a three-bin system. These can be made of straw bales or concrete blocks, as described previously, or they can be made from wood with various other materials. A three-bin system has many advantages because it allows you to have one bin full of materials that can be added into the compost as needed, one bin full of maturing compost, and one bin full of completed compost that is ready to be used. This means:
• You do not have to disturb the working compost pile to get to the finished compost.
• You do not have to worry about finding a place to store materials until the time is right to add them.
• You will have a continuous supply of finished compost after your first batch is done.

Example of a three-bin composter. Courtesy of USDA.
This type of system is more expensive to build if you have to buy wood, but often you can get free pallets or salvaged wood. This kind of system is also more useful for the dedicated gardener because of the volume of compost it can produce. A three-bin system, like the straw bin and the concrete block bin will get very warm and may kill off some weed seeds. Make sure it is large enough — at least 4 feet by 4 feet and at least 4 to 5 feet tall — and that you keep it covered and damp. A well-maintained system that is turned regularly may heat up enough to kill pathogens, but do not count on this unless you are sure you will maintain it. If in doubt, do not put any animal products or diseased plants in it.
This type of compost system consists of three bins side by side. You can make a simple and inexpensive three-bin system using ten wooden pallets (also called skids). You can often get free used pallets from stores or warehouses that are disposing of them, or you can buy them. The National Wooden Pallet and Container Association has a searchable database you can use to find a pallet vendor near you: www.nwpca.com/SearchNew/ZipSearch.asp.
Make sure the pallets are in good condition and wire or tie them into a series of three boxes using three pallets for the back row, four pallets to create the dividers, and three pallets for the front. This will create three adjoining boxes without a top on them. To keep the piles warm in cool climates, you can line the bins with sheets of cardboard, which will have to be replaced periodically as they break down into compost. A sheet of old carpeting can be laid over the top to keep the heat in, and the heaps can be turned every few days as they start to cool.
To build your own three-bin system from scratch, you can use various materials for the interior walls, including sheets of plywood, corrugated iron or aluminum, poultry fencing (also called chicken wire), or pieces of hardware cloth in wooden frames. These instructions will describe how to use corrugated iron or aluminum sheets, but you can use whatever works best for your situation. Pressure-treated wood is mentioned here because it is durable, but if you want to avoid the possibility of contaminating the compost with the chemicals that may leach from the wood, you can use redwood, cedar, cypress, or any other weather-hardy wood. You can also paint the wood with water-based latex paint, or coat it with linseed oil to protect it from the elements.
You can also make a smaller two-bin system if you do not have enough space for a three-bin. You can find instructions for that on the Lowe’s website: www.lowes.com/cd_Build+a+Compost+Bin_850412832_.
WHICH MATERIAL IS BEST?
A variety of materials can be used to form the walls of a wooden bin. You can use plywood, corrugated iron or aluminum, poultry fencing, pieces of hardware cloth in wooden frames, or any other sturdy material you can obtain easily. The material you use will depend on what you can get in your area, and what you feel comfortable working with. Not everyone will be at ease operating an electric saw or be able to use tin snips to cut through corrugated iron or aluminum, so use what seems best and easiest for you. The point is just to get the compost bins made and not to fret over exactly what materials they are made from.
If you are composting in order to help divert materials from a landfill, re-purposing used materials is a great way to do that. You can find used materials at second-hand shops, and at places like The Habitat Re-Store, which is a re-sale shop where you can find new and used building materials. The Re-Store (www.habitat.org/env/restores.aspx) is run by Habitat for Humanity. You can also often find useful materials on Freecycle.org. Freecycle is a non-profit, grassroots movement of people who are trying to keep items out of landfills. You can see if there is a Freecycle group in your area, by visiting their website: www.freecycle.org.
Supplies and Tools
• Post-hole digger (either manual or motor-driven)
• Garden spade
• Hammer and nails
• Drill and drill bits
• Wood screws
• Level
• String
• Tin snips
• Concrete mix (optional)
• Eight square or rectangular posts, each 5 feet long
• Four sheets of corrugated iron or aluminum, approximately 40 inches by 40 inches. They should fit between the posts.
• One sheet of corrugated iron or aluminum, approximately 10 feet long. It should fit along the back of the compost bins.
• Two 2x6s, each 8 feet long
• Two 2x2s, each 8 feet long
Instructions
1. Dig four holes in a straight line, 18 inches deep and 40 inches apart, measuring from the center of each hole.
2. Dig four more holes 40 inches in front of the holes dug in Step 1 so that you have a grid of eight holes. (Think of the pips on a die and you will have the correct placement.)
3. Insert the posts into the holes and stabilize them with concrete or by firmly packing the soil back into the holes. Use the level to ensure that the posts are level and straight. Measure the distance between the posts to make sure all the openings are the same size.
4. Using tin snips, cut a piece of corrugated iron or aluminum the same length as the entire compost bin. Attach it to the back row of posts with screws. You may have to drill through the metal first.
5. Cut four lengths of corrugated iron or aluminum to fit the ends and inner walls of the compost bin. Attach them between the posts with screws to cover the two outer walls and the two inner walls of the bin.
6. Measure between the front posts to ensure the distances are the same. Cut nine pieces from the 2x6s each ½ inch smaller than the distance between the front posts. These slats will close off the front of the bins.
7. To hold the slats in place, cut 12 pieces from the 2x2s about 14 inches long and screw them to the inner edges of the front posts, leaving a gap of at least 2 ¼ inches between them. The slats will slide between these guides to hold the compost in as it is added to the bin.
A three-bin system can look as polished as you want it to. This HGTV website has instructions for creating a lavish three-bin system that will look at home in any backyard: www.hgtv.com/landscaping/an-attractive-compost-bin/index.html. The trellised walls can support climbing vines, which will beautify and conceal the compost.
Build a tumbling barrel composter
If you have basic building skills and a few common tools, you can make your own tumbling barrel composter. The plans that follow were written and illustrated by case study participant Robert Post.
Supplies
• Two 2x4s, each 8 feet long (pressure treated to withstand the elements)
• One 1x6, 8 feet long (pressure treated to withstand the elements)
• 40 bricks (to elevate the structure off the ground)
• 16 2 ½-inch long size 8 deck screws
• One 1 ¼-inch paddle-style drill bit
• ¾-inch threaded iron pipe cut into the following lengths: one piece cut 4 feet long and two pieces 18 inches long. (You can have it cut at the hardware store because cutting threaded pipe requires specialized tools that most homeowners will not have.) * Note: Do not substitute PCV, CPVC, copper, or other types of pipe, as they are not strong enough for composters.
• Two ¾-inch threaded pipe elbows
• ¾-inch pipe cap (optional)
• 55-gallon plastic, food-grade barrel with lid (Steel drums can be used, but are more difficult to modify.)**
• Electric drill with a Phillips screw bit (or Phillips screwdriver) and ¼-inch drill bit
• Circular saw (or hand saw to cut through the 2x4s and the side of the barrel)
• File
• Vise and pipe wrench
• Four hinges 2 inches long (or one piano hinge 10 inches long) and ¼-inch bolts each 1 inch long, with nuts
• Three 1-inch lengths of 1 ½-inch plastic pipe to act as spacers (You may want to wait until the time comes to insert the spacers and measure to have a more accurate idea of how long to make them. This will vary depending on the particular barrel you have.)
• Two latches (salvaged window latches will work) and ¼-inch bolts each 1 inch long, with nuts
• One small (1 ½ inch by 1 ½ inch) repair panel or mending brace with pre-drilled holes. The photo below shows what they look like.

• 1 foot long piece of 1x1-inch angle iron and four ¼-inch bolts (each 1 inch long) with nuts
• Two ¼-inch bolts, each 2 inches long
• Measuring tape, carpenter’s square or ruler, pencil, marker
To save money, buy the plain pipe, also known as black pipe. Galvanized pipe is available in this size, but at a higher cost, and the plating is not necessary for this project. You can also buy a discounted ceiling fan part for the long shaft. They are available already cut to 48 inches and threaded on one end, so they are perfect for this project.
** Food-grade barrels are steel or plastic barrels (also called drums) that have been approved to store or transport food fit for human consumption. Make sure that the barrel you use is food grade and that is has not been used to hold anything toxic. They can be purchased new or used and range widely in price. You may be able to find one free on Freecycle (www.Freecycle.org) or inexpensively on Craigslist (www.Craigslist.com) or from a scrap dealer. You can also purchase them from several online retailers for a price ranging between $10 and $250. You may also be able to purchase barrels from a hardware store, home improvement store, or farm supply store.

The finished compost barrel.
Instructions
The barrel composter is a 55-gallon drum hung horizontally on an axle. The axle has a handle at one end to turn the barrel, and the whole thing is suspended from a wooden stand. The barrel itself has a hinged opening for adding material and removing compost.
Build the legs
From each 2x4, cut two pieces each 31 inches long. (If desired, make the legs 6 inches longer so they will sit directly on the ground. In the example shown here, bricks keep the wood from touching wet soil. At this elevation, you can roll your wheelbarrow under the composter when it is time to unload the compost.)
1. Measure and mark a 1 7/8-inch taper at one end of each piece. Cut on the marked line as shown in Figure 1.

Figure 1: Diagram of 2x4 dimensions and cuts.
2. From a 1x6, cut two pieces 36 inches long. These will form the bases for the legs.
3. Lay one base board and two 2x4 legs on the floor and fit them loosely together. Align the taper cut ends of the 2x4 legs with the base board at the bottom as in Figure 2 to make sure it all fits together.

Figure 2: Diagram of one set of legs showing screws and attachment to base.
4. Align the top corners of the 2x4s and mark the screw holes as shown in Figure 2. Leave enough room between the screw holes to drill a 1 ¼-inch hole for the axle. The location of the axle hole is shown in Figure 3.

Figure 3: Diagram of one set of legs, showing placement of screw and axle holes.
5. Connect the pair of 2x4 legs together with just one 2 ½-inch long deck screw at the top. This will hold them temporarily and allow for minor corrections and adjustments later. (The screw is slightly shorter than the distance through the wood so the sharp end will not protrude.)
6. Connect the base to the legs with deck screws, using two screws per leg. Notice how the legs are stacked on top of each other and are offset at the base. (Refer to Figure 4 to see the offset.)

Figure 4: Side of composter showing legs, brick support, and handle.
7. Install the other three deck screws where the 2x4 legs come together at the top.
8. Using the paddle drill bit, drill a 1 ¼-inch diameter hole between the screws for the axle, situating it as shown in Figure 3. The axle, which is made of ¾-inch pipe, has an outside diameter of 1 1/16 inches and so should turn smoothly in a 1 ¼-inch hole.
9. Repeat Steps 1 through 8 to make a second set of legs. Use the axle hole drilled in Step 8 to mark the location of the axle hole on the second set of legs. This will ensure that the holes are even and that the axle will not be out of alignment.
Making the axle/handle
1. Use ¾-inch iron pipe and threaded elbow fittings to make the Z-shaped axle and handle shown in Figure 5. Be careful when handling these pipe parts because the threaded ends can be very sharp. For best results, clamp the pipe in a vise and use a pipe wrench to turn the fittings.

Figure 5: Diagram of axle and handle.
2. Attach a pipe cap at the end of the handle to cover exposed threads. This will protect your hands when turning the handle. If the handle is not threaded, you will not need a pipe cap. Just be sure to smooth any sharp edges with a file.
Prepare the barrel
1. Using a marker and carpenter’s square or ruler, draw a 12x12-inch square on the side of the barrel. This will be the hatch through which you fill and empty the barrel.
2. Use your circular saw (or hand saw) to cut along the marked lines, taking care to make the cuts straight. The piece you remove will become the door of the hatch.
3. Smooth the edges with a file to avoid injury when filling or emptying the composter.
4. Add hinges to the door. Fasten either the individual hinges or the piano hinge (whichever you have) to the barrel and the door using ¼-inch nuts and bolts.
Notice how the hinge bolts work as agitators for the compost inside. This can be seen in Figures 6 and 7 where some of the compost material has snagged on the hinges. These pictures also show the axle running through the middle of the barrel. This helps to break up larger clumps of compost as it tumbles.

Figure 6: Photo of open composter, showing axle and compost.

Figure 7: Photo of open composter, showing hinges and compost.
5. Install two latches to secure the door. Secure them with the same kind of ¼-inch nuts and bolts as before. You can see detail of the latches in Figures 8 and 9.

Figure 8: Close-up photo showing closed latch.

Figure 9: Close-up photo showing open latch and the doorstop inside the barrel.
6. Before mounting the second latch, round one corner of the door stop with the file. You will add the stop along with one latch as shown in Figure 9, using the same bolt used to attach the latch. The stop will keep the door from swinging into the barrel. Figure 10 shows the metal doorstop with one corner rounded off. (The other corners will be up against the inside of the barrel and should not pose a problem.)

Figure 10: Diagram of metal plate used as a doorstop (left) and photo of the type of plate used in this project (right).
7. Drill a 1-inch hole in each end of barrel for the axle. Center the holes on the ends of the barrel so the composter rotates evenly. To find the center of the barrel, divide the diameter by two to get the radius. Measure from the edge of the barrel toward the center and draw a line. Measure the same distance from another angle and draw another line. It is not necessary to measure at a perfect right angle when drawing these lines. The center of the circle is where the lines cross. Use this technique on both ends of the barrel. Figure 11 shows two different ways to mark the center of the barrel. Both will work, despite the angle of the lines.

Figure 11: Diagrams showing how to mark the center of the barrel.
Connect the barrel to the axle
A piece of flat steel can be welded to the axle and bolted through the bottom end of the barrel as shown in Figure 12. However, most homeowners do not have access to welding equipment, so an alternative method is described here which uses angle iron.

Figure 12: Photo showing attachment of barrel to frame using a flat bar welded to the axle and bolts through the bar into the barrel.
1. Drill holes in the angle iron as shown in Figure 13. You can do this with a household drill and ¼-inch drill bit. Drill holes 1 inch and 3 inches from each end of the iron on one side. On the other side, drill a hole directly in the center, at the 6-inch mark.

Figure 13: Diagram showing placement of drill holes in angle iron.
2. Dry fit the angle iron to the axle and barrel. Make sure that the angle iron is attached to the bottom of the barrel and not the lid. Although the lid may be tightly fitted, there is a chance that it will unscrew and work its way loose as the barrel is turned.
3. Align the center hole in the angle iron with the center of the axle. Mark the holes on the barrel and the axle with a marker.
4. Drill matching ¼-inch holes through the axle and barrel on the marks.
5. Use ¼-inch bolts and nuts to connect the angle iron to the axle and barrel as shown in Figure 14.

Figure 14: Diagram of handle, legs, and barrel, showing angle iron bolted to axle and screwed to barrel.

Figure 15: Photo showing placement of spacers and retainer bolt in end of axle.
Assembling the composter
1. Cut three pieces of plastic tubing, each 1 inch long, for spacers. These spacers prevent contact between the barrel and the legs, making the composter easier to turn.
2. Assemble the components as shown in Figure 16.
3. Add a spacer between the leg and the side of the barrel on the end where the handle is. This is shown in Figure 16.
4. Add the other two spacers at the other end of the barrel, one between the barrel and the legs, and the other between the legs and the retainer bolt. This is shown in Figures 16 and 17. Depending on the lid of your barrel, it may be necessary to insert an additional spacer between the lid and legs on that side or to make a longer spacer to fit the gap. This is due to the different shape lids that some barrels have. Some are convex and some are concave. The concave lids bow into the barrel and will require longer or additional spacers.

Figure 16: Diagram of the assembled composter as shown from the top.

Figure 17: Photo of side of the composter, showing the spacer between the leg and the barrel.
Start composting
1. Move your new composter to a level area. If necessary, stack bricks two levels high to elevate the composter and keep the wood from coming in contact with the ground. This will help prevent the wood from rotting. Make sure your wheelbarrow will fit under the composter so you can easily empty out the finished compost.
2. If there are children nearby, show them what you are doing and why. Explain that this composter is not a toy and is not something they should play on or around.
3. Follow the instructions in this book to create your own compost.
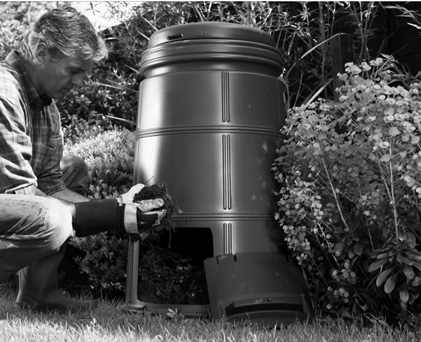
Commercial Outdoor Compost Bins
If you do not have the time or expertise to build your own compost system, you can purchase one from nearly any garden supply company or from a variety of online sources. They are available in a wide assortment of styles and sizes to suit any space. Commercial compost bins come in two forms: tumbling or stationary. Some cities and towns provide free or low-cost compost systems to their residents. Check with your municipal trash department if you have one, or with your town or city hall first for the most economical option and also to make sure you are aware of any municipal regulations regarding the placement and use of composters.
Tumbling bins
Most tumbling compost bins are barrel-shaped and turn either end-over-end or horizontally depending on the type. Some are operated by hand and some by foot pedal. The larger the bin, the harder it is to turn, especially when the barrel is full of composting material, so take this into account when deciding on a size and style, and choose one that you can easily manage on your own. Some tumblers are round like a ball and are mixed by pushing the ball along the ground. Because tumblers are aerated and sealed and usually elevated off the ground, you can put cooked food and a small amount of cooked meat waste into them. One drawback of this type of bin is that it does not hold enough material to get hot enough to kill weeds or pathogens.
To give you an idea of the cost, Gardener’s Supply Company (www.gardeners.com) sells a tumbling bin that holds about 6.5 cubic feet of compost for $149 and a larger one that holds 22.4 cubic feet for $495. Some models are on wheeled stands so they can be tipped and rolled to where you need them. Others are stationary, and you must empty the compost where the tumbler sits and transport it where you need it.
Stationary bins
Stationary compost bins that sit in one place have lids on top and a compartment at the bottom to remove the finished compost. Some types of stationary bins are self-aerating.
There are a few types of stationary bins.
• The Dalek type, which is smaller on top than on the bottom and resembles the alien race from the television show Doctor Who. This is the sort of bin that is often available inexpensively from city or town composting groups. Dalek-type composters come in a range of sizes, but there are limits on what should be put into them. Unlike hot compost heaps, these plastic bins cannot handle any form of cooked food, meat, or other animal products. They should not be used to compost diseased plants because they do not get hot enough to kill the pathogens.
• The Green Johanna™ Hot Komposter is shaped similarly to the Dalek type, but allows you to compost a wider variety of items including meat, fish, and bones. This style of composter was designed for the cold climate in Sweden and can heat compost up to 150 degrees. You can stir this kind of bin with an aerating tool and can purchase an optional cover (called a jacket or a duvet, depending on where you live). Green Johanna™ composters have reinforced, rat-proof bottoms, making them a good choice for areas where pests might be a problem.
• The New Zealand type, which resembles a large upright barrel and contains three inner chambers, composts scraps in stages. Stage one is the warmest stage where thermophilic microorganisms break the material down. In stage two, the mesophilic microorganisms kick in and compost the materials further. In the final stage, the compost matures and can be scooped out for use. This type goes by the brand name Earthmaker®.
• Self-aerating compost bins resemble barrels or trash containers. They often have a pipe jutting up from the bottom of the bin that allows air into the center of the pile. The base of this kind of bin is perforated to allow liquid to seep out of the bin and to allow air to come in. On some models, this liquid can be collected and made into compost tea. Chapter 6 discusses making and using compost tea.
• Some stationary bins are pyramid-shaped and consist of stacking layers and a perforated lid that allows rainwater to enter and dampen the compost. One brand of pyramid-shaped bin is called the Eco Stack™ Composter. After the bin is filled, you remove the sections of the bin one at a time, setting them aside, then fork the compost back in to finish decomposing. This particular brand does not require turning because it self-aerates through holes in the bottom of the bin. It can take more than a year to produce usable compost using this type of bin.
All of these bins are good for small yards and some can be used on balconies. They are also good for people who may not have the strength or ability to turn a tumbling model. The self-aerating models, although usually more expensive (in the $400 range) are probably the easiest to use because you do not have to mix the compost by hand or by tumbling.
Digesters
A digester consists of a basket with holes in it that is buried in the ground and has a tall plastic cone that fits over it. You add waste through the top of the cone, and insects and microorganisms in the soil decompose the waste into compost under the surface of the ground. Liquid waste drains into the soil and worms, and insects carry away some of the solid waste. The digester has to be moved every couple of years, depending on how often you use it, to prevent the compost from building up in one place. The compost usually is not dug up from where it is created, so this is a good way to enrich small areas of soil. Digesters can take any kind of kitchen scraps, including cooked meat and fish, cheese, and other cooked foods.
You can make your own digester by drilling holes in the sides and bottom of a metal trash can and burying it in the ground. Let a few inches of the trash can stick up out of the ground; fasten the lid with a bungee cord or other method to keep animals out. Make sure the spot you choose drains well and does not have too much clay. High clay content will prevent the liquid waste from seeping into the surrounding soil. When the trash can is full, you will have to dig it up, empty the remaining compost into the ground, and cover the hole with dirt. Move the can to another area of the yard that needs enriching and start composting again.
Whether you make a bin or buy one, composting is a fun and important pastime. It gives you the satisfaction of recycling waste, helps divert organic materials from landfills, and helps your garden grow. Before diving into composting, think about the different types of composting systems discussed, and choose one that will work for you. If you do not have a yard or garden, be sure to check out Chapter 7 on vermicomposting and the sections of Chapter 8 on indoor composting to see if one of those methods will work better for you. If you plan to do outdoor composting, however, read on to find out how to build effective compost piles.
Case Study
Linda Stephenson
Amateur composter
Santa Cruz, California
“My ‘garden’ is the small front yard of my rented house, and not a place where I can freely experiment with plantings. Santa Cruz has just been through a severe drought, with equally severe water rationing. Fortunately, the xerophytic landscape came through well, and looks none the worse now after a wet winter. (Xerophytic landscaping is the use of plants that can survive with very little water. It is practiced in desert areas and towns and cities that rely on water from distant sources.)
Enriching the soil with compost has not been a goal here, but I have composted with worms and without worms for many years in order to keep garbage out of the landfill. I do not have room for a big compost pile, so I just use the worm bin. I give the worms most of our family’s vegetable waste including peelings, cores, abandoned leftovers, and used coffee grounds and filters. The compost I have made in past years was just spread in the back yard, where a few citrus trees struggled for light. Now that I have no back yard, I usually spread the worm castings under a grapefruit tree on the side of the house.
I have to keep the front yard looking neat and tidy, so I bought a tidy-looking vermiculture contraption from the local recycling company that subsidizes all its composters. It is plastic, but looks like stone, and is not conspicuous. It is a stack of three, 14-inch-square bins, each 6 inches deep, over a sealed bottom box, and it has a slanted cover that fits tightly over all. Each individual bin has drainage holes. I moved a cardboard box full of red wrigglers from our old house to the new house and put them in the new worm bin. I keep the stacked worm bin at ground level on the side of the deck where it is mostly in the shade. Our climate is mild year-round, so the worms are happy in there.
The general idea was to start the worms in the bottom bin in some torn and dampened newspaper and keep adding vegetable waste until that bin was full of finished worm castings. Then, to make it easier for me (rather than having to manually separate the worms from their castings), I could start putting food waste in the next bin up, and hope the worms would migrate up to the food. That was the idea, but it has never worked terribly well. They seem reluctant to move, even when their food source gets sparse. I end up doing a good bit of manual sorting, because I cannot bear to dump out perfectly healthy little worms into an environment they can’t survive in. Red wrigglers do not do well in ordinary garden soil.
I compost because it is pleasant to do. I do not have a smelly garbage can to deal with, I do not needlessly fill up the landfill, and I am fond of the hungry little fellows. If I buy a bunch of cilantro and fail to use it before it spoils, I take some comfort out of feeding it to the worms instead of wasting food. When my kids were young, they liked to help me feed the worms to keep them healthy and watch how they multiplied when conditions were good. The red wrigglers were just another creature that we enjoyed having around — along with silk worms and a succession of small rodents, cats, and a dog.
Sometimes I miscalculate and overfeed the worms. When I have miscalculated, the worm bin has gotten gooey, smelly, and unpleasant to deal with. When that happens, I have to discard the household waste in the garbage can until the worms have a chance to catch up.