“… cabbage leaves and pieces of onion were … devoured with much relish by worms … Judging by their eagerness for certain kinds of food, they must enjoy the pleasure of eating.”
— Charles Darwin
Vermicomposting is the process of using worms to help break down the organic matter in a compost pile or bin. If your outdoor compost pile sits directly on the soil, there will most likely be worms in it when it is cool enough for them to survive. They will use the pile for food and shelter, appreciating the dampness in the heat of summer and relative warmth in the cold of winter. Worms will burrow away if the pile gets too hot for them, but often return when the pile cools down.
You can practice vermicomposting indoors or outdoors, and it is an ideal composting system if you do not have a yard or cannot manage outdoor compost systems. Even if you have an outdoor system, you can use vermicomposting so that your cooked food scraps do not go to waste. Castings from vermicomposting help many plant species, and some, such as carrots, cucumbers, tomatoes, peppers, corn, grapes, strawberries, and marigolds, do especially well in casting-enriched soil.
VERMICOMPOSTING — A GREAT WAY TO GET KIDS INVOLVED!
Kids love playing in the dirt and love learning how things work. Teaching them about composting with worms is a great way to encourage their love of nature and to get them involved in creating a healthier environment for their own future.
• Children can help make bedding for the worms by sifting finished compost or by shredding newspaper. (If you are using an electric paper shredder, be sure to provide adult supervision. Tearing the paper into small strips will work just as well.)
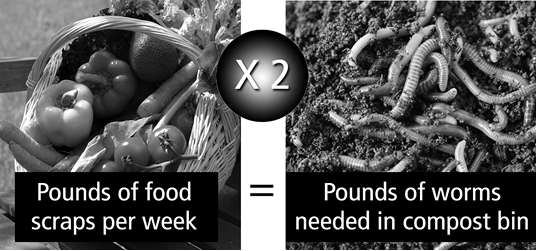
• Determining the right size of worm bin to use involves weighing family food scraps for a week and doing some simple calculations to determine how many worms you need in the bin. Once you know how many worms you need, you will know how large your bin has to be. This is a great way to show kids that math and geometry have practical applications.
• Kids can help deliver the worms to their new home and can help feed them and collect the castings. They may even want to make worm-casting tea to water the garden plants or their own houseplants. (See the instructions for making worm tea later in this chapter.)
A worm bin can make a great show-and-tell project for younger children and can even make a nice science fair project for older ones. If you are a teacher and would like some free worm composting-related curriculum materials, check out The California Education and the Environment Initiative www.calrecycle.ca.gov/Education/Curriculum. This website offers educational information and ideas to help children of all ages learn about composting. They also offer a vermicomposting guide for teachers with information on how to start and run a worm bin in your classroom: www.calrecycle.ca.gov/Education/Curriculum/Worms.
Worms — Nature’s Own Compost Machine
Worms live in the soil all over the world except in very cold polar regions. They move by expanding and contracting muscles that run down their sides and search through their underground habitat for food. For many years people thought that worms served no useful purpose or were actually harmful to plant roots. In fact, people used to try to kill worms they found in their gardens. In the early 1800s, Charles Darwin began a series of observations and experiments with worms to learn more about them. He even did some early experiments in vermicomposting (although he did not call it that) by burying parts of vegetables and bits of meat in pots of earth containing worms. He then dug up the pots days later to find that the food had been consumed. In 1881, he published a book called The Formation of Vegetable Mould throughthe Action of Worms that described the habits of worms and extolled their virtues for making soil more fertile. Farmers who did not already know that the digging action of worms tilled the soil became fans of worms, but eventually that admiration waned when synthetic fertilizers and mechanical ploughs became more common and widespread. But as Darwin pointed out, having worms in your yard is beneficial in a number of ways.
• Some species pull organic material from the surface of the soil down into their burrows that can be several feet deep. They act on the soil physically, pushing and tunneling through it and pushing or dragging plant matter down into the earth. This helps aerate soil and allows water to infiltrate deeply into soil that might otherwise remain compacted.
• Worm castings are essentially worm manure and contain calcium, iron, phosphorous, and nitrogen. The casting’s complex biochemical makeup helps plants in iron-rich soil absorb nitrogen that would otherwise not be available to the plant.
• Worm castings release nitrogen slowly, allowing plants to feed in a consistent manner. This helps some plants, especially carrots, grow straighter roots. Carrots grown in vermicompost have fewer bad-tasting “hair” roots.
• Castings repel worm-like creatures called root-knot nematodes. These are parasitic creatures that cause deformed roots and drain the nutrients out of the plant. They are responsible for up to 5 percent of crop loss globally.
• Worm castings contain anti-fungal chemicals that can help delicate plants, such as strawberries, by killing off fungal spores that often infect the fruit. Use castings in planting holes or till castings into the earth before planting to help combat or prevent fungal diseases in soft fruit.
• Worms are prey for many other insects and animals. While this may sound like a bad thing, it is actually good for your garden. The same insects and animals that prey on worms eat many garden pests such as slugs. If there are enough worms to keep them fed when there are no slugs or other prey, they will stick around, and when their preferred prey arrives in your garden, they will switch gears to eat those creatures instead of your worms.
• Worms, particularly red worms, consume contaminated soils and clean the contaminants out of the ground. They can eat materials that have been saturated with PCBs (Polychlorinated biphenyls), for example. The chemicals are broken down by the worms’ digestive tracts, leaving the soil safe. PCBs are man-made organic chemicals that were used in many products such as paint, adhesives, and fire retardants. They are non-flammable, chemically stable, and have a high boiling point. PCBs were banned in the United States in 1979 when it was discovered that they cause cancer and problems in the immune, reproductive, nervous, and endocrine system. They still exist in the environment and can be released by accident from toxic waste sites.
As you can see, worms not only produce castings, but they also perform a wide variety of helpful tasks that improve the soil, keep plants healthy, and clean up toxins. They are a vital and valuable part of our ecosystem.
Worm physiology
Worms thrive in the same pH range as most plants (a neutral 6 or 7). They find and identify edible items with the help of special cells surrounding their mouths. These cells can detect a variety of edible chemicals in their environment. Worms can only ingest very small particles and rely on bacteria to break large pieces of food down into small, manageable portions. Worms pull particles of food down into their crop for temporary storage. A crop is an enlarged portion of the gullet that exists in birds and some insects. Because they have no teeth, worms grind food in their gizzard in much the same way that birds do. To do this, worms need a source of grit as described a bit later in this chapter.
Worms are hermaphroditic (meaning they have both male and female sex organs), but they cannot reproduce on their own. Instead, they partner and exchange genetic material in the form of secretions from the clitellum, which is the ring-like collar around the midsection of the body. These secretions harden into a tube, which then forms into a cocoon that may contain up to 20 minuscule worm embryos. Typically, only two or three offspring from each cocoon survive. The cocoons may hatch within weeks in warm weather, but cocoons that are created in the winter may remain dormant until springtime.
Worms digest compost material by grinding it as it passes through their bodies. Their castings, which are rich in nutrients, are essentially a mild fertilizer, not compost, and you can spread them directly onto garden soil or in flowerpots, container gardens, and window boxes. Castings can also be diluted in a mixture of ten parts water to one part castings and used as liquid fertilizer for use on the ground, or as a foliar fertilizer, which is one that is sprayed directly onto the leaves. Instructions for collecting worm castings and make worm tea out of them are given later in this chapter.
USE CAUTION WITH NON-NATIVE WORM SPECIES
If you order worms online or through a store or garden center, make sure that they are native to your area. The vendor should be able to tell you what areas of the country the worms are native to. If you are using a non-native worm species, make sure they do not escape into the wild. As with any other invasive species, non-native worms can wreak havoc on the local ecosystem. Some, such as red wigglers, reproduce very rapidly. In 11 weeks, one red wiggler worm can produce up to 99 offspring. They can disrupt the environment in hardwood forests by eating the leaf litter too quickly. The leaf litter on the forest floor provides cover for hard-shelled nuts, and without it, the nuts cannot mature into trees. Removing the leaf litter prematurely also affects the pH balance of the soil and can cause erosion. The introduction of worms into northern climates where they did not formerly exist has caused changes in the kind of plants that grow there.
Worm species
There are several species of worms acceptable for use in worm composting.
• European Night Crawlers, also called dew worms, are very large worms. While they do not reproduce quickly, making only about 38 cocoons per year, they can eat coarse materials, such as paper and cardboard. They are often present in outdoor compost piles. They typically reach lengths of 5 to 10 inches and can live for three to six years. They are dark red, and their head end turns grayish as they age. They get their name from their habit of crawling on the surface of the ground at night while they search for food. They pull organic materials down into tunnels that can be as much as 6 feet deep. This helps nourish soil from below and allows air and water to filter down into the soil. Night crawlers are best left outdoors because their habits are not conducive to indoor vermicomposting.
• Red worms, or red wigglers, are the most common type of worm sold for composting. They are mostly red with a pale yellow bottom and range in size from 1 to 4 inches long when fully grown. They can live for two to three years and prefer to stay near the surface, often under compost or manure. They also congregate under objects on the ground when the soil is saturated with water. They produce 70 to 100 cocoons per year.
• Tiger worms can be identified by a characteristic red and yellow stripe pattern. They are similar in habit to manure worms and compost worms, which are purple, red, or maroon. All three species grow to be between 1 and 5 inches and can live up to four years. They reproduce quickly, making up to 400 cocoons per year. These worms do not burrow into the soil, preferring to live under manure and compost heaps. Because of this tendency, and their very fast reproduction cycle, they make great vermicompost worms.
HOW MANY WORMS DO I NEED?
Red Wiggler worms can double their population in one to three months in a well-maintained worm bin. Mature worms can eat up to half their own body weight in scraps daily.
To determine how many worms you need, weigh your food scraps every day for a week. If your household produces 1 pound of scraps per day, you will need 2 pounds of worms, or approximately 2,000 worms. The worm bin should be large enough to allow 1 square foot of surface area per pound of scraps. If you produce 2 pounds of scraps per day, you will need a bin with a surface area of at least 2 square feet. Worms will quickly reproduce, and within a year, you can end up with 15,000 to 20,000 worms in your worm bin.
If your worm bin becomes over crowded, you can separate some of the worms and put them in a new bin. If you do not need a second bin at home, consider sharing your worms (and your knowledge) with a friend, or keeping a bin at work to eat scraps from lunches. You might also consider donating a new bin complete with worms, fresh bedding, and instructions to a school where the children can learn about composting.
Buying your worms
If you are making the bin yourself, you should purchase the worms through a garden-supply company that will provide the right kind of worms. You can buy worms from WormsWrangler (http://wormswrangler.com) or Wormfarm.com (www.wormfarm.com). Ordinary earthworms that you can dig up in your yard are not the best candidates for a worm bin because they are not used to eating a rich diet and can only live in soil, not compost. Vermicomposting incorporates special species of worms that have been bred to live on a diet of household waste. The most common type of composting worms, red wigglers, sells for between $20 and $45 per pound depending on the source.
Worm Bins
You can either purchase or make a worm bin. If you are just starting out, it is easier to buy a system that already has everything you need, including the right number and species of worms.
Buying a worm bin
You can purchase worm bins from many garden supply stores and from several websites. A few of these sites are listed in the Resources section. When buying a bin, think of the cost, the quality of the bin itself, how it will look in your home or yard, and how easy it is to maintain the bin and collect the castings. Worm bins come in a wide variety of styles and range in price from about $43 for a small wooden bin to up to more than $600 for large, insulated, heated bins.
Vermicompost bins all include a way to collect the liquid that drains out of the compost and a way to drain it off without disturbing the worms. Some commercial bins have several trays that are stacked in layers, one on top of the other. You put the worms in their bedding on the bottom layer, and as that layer fills with castings, you add fresh bedding and food to the upper layers so that the worms can eat their way to the top. The bottoms of the trays are usually made of some kind of porous material, such as plastic screening, with openings big enough for the worms to climb through. The bottom usually has a drip pan to catch the liquid that drains out of the compost. On most types of stackable worm bins, you can remove the castings from the lower layers of the stack without disturbing the worms by simply pulling out the tray.
Making your own worm bin
To begin a worm bin, first figure out where you are going to put it. Worms like to be cool, preferring temperatures between 50 and 84 degrees, so an indoor spot in a basement or mudroom is ideal. You can also keep the bin in an enclosed porch or unheated closet as long as the temperature does not get too hot or cold. It should be some place where you will remember to feed them and not in an area, such as a garage, where they might freeze or die of heat. If you can afford a heated, insulated worm bin, then you can place it in a cooler area as long as you have a reliable source of power to run the thermostat and heater. You can put your worms outdoors on nice days as long as they are protected from the sun and predators. The bin should always have a ventilated lid to keep the worms contained, whether it is kept indoors or out. If you have small children, you may want to use a bungee cord or ratchet strap to hold the lid on and keep kids from playing in the compost.
To start the worm bin, gather the materials and order the worms ahead of time. You will have to keep the worms chilled until their new home is ready. Keeping them very cool will slow their metabolism so that they do not starve before they are placed in their new home. They can be kept in a refrigerator for a day or two. The cold will make them sluggish, but should not kill them. Make sure to keep them moist because worms breathe through their skin. If your worms dry out, they can die within minutes. Also, make sure that they are not in an airtight bag or container. The container they were shipped in should provide a good environment to keep them in. Always check with the store or website you buy the worms from to get their recommendations for storing them until you are ready to put them into the bin.
You can make your own worm bin from a variety of materials. These instructions describe how to make one using a plastic tub or trash can. You may want to use rubber instead of plastic because plastic will eventually split and crack and rubber will last longer. Galvanized tubs can also work, as can wooden boxes. Make sure that your container is no deeper than 2 feet because composting worms will not burrow any deeper than that. The total size of the container will depend on how many scraps your family produces.
Supplies and Tools
• A large tub, trash can, or box (If you are using a rubber or plastic bin, make sure it is opaque so that no light can get in to disturb the worms.)
• A lid for the container to keep the light out and worms in
• A piece of plastic window screen large enough to cover the bottom and up the insides of the bin (This will keep the worms from crawling out through the air holes.)
• Drill, 1-inch drill bit, 1/8-inch drill bit
• ½-inch cork (optional)
• ½-inch drill bit (optional)
• Plastic pan larger than the tub or trash can and deep enough to hold a couple of inches of water
• Bricks or a wooden frame to keep the bin off the floor
• Bedding for the bin (see below)
Instructions
1. Drill 1-inch holes every few inches around the top of the plastic container to allow air in.
2. Drill several 1/8-inch holes in the sides of the container, starting approximately 4 inches from the bottom. These holes will provide ventilation in plastic, rubber, or metal tubs. They are not necessary in wooden boxes as long as there are cracks and openings between the boards.
3. Drill 1/8-inch holes in the bottom of the container.
4. Use a watertight container under the bin to catch the liquid. Place a few bricks or boards in the watertight container; then place the bin on top of these bricks to keep it up out of the water. It is best if this container is on a raised surface like a countertop or table and has a tap on it so you can easily drain the liquid without disturbing the worms.
5. You can create a makeshift tap by drilling a ½-inch hole on one corner of the container and plugging it with a ½-inch cork. Remove the cork when you want to drain off the water. If you keep your bin outdoors, you can just let the liquid seep out onto the ground, or let it evaporate if you do not plan to use it.
6. Place the plastic window screen inside the bin, making sure all the air holes are covered with the screen.
Filling the worm bin
1. Place a 3- to 4-inch layer of bedding on the bottom of the bin. The bedding can be leaf mold, sifted compost, shredded newspaper or cardboard, rotten sawdust or wood chips, or a mixture of these items. If using paper or cardboard, soak it in water for about ten minutes and shred it into pieces smaller than 3 inches by 3 inches. Cardboard has a relatively high pH value, but worms will still eat it and use it for shelter. If using wood chips, soak them in water overnight to dampen them, and squeeze out the excess water before putting it into the bin. The bedding must be kept damp because the worms will suffocate if they dry out.
2. Place the worms on top of the damp bedding and cover them with 1 or 2 inches of dry shredded newspaper. Let the worms get used to this new environment for a few days.
3. When you notice that they have started to eat the bedding, it is time to feed them. Feed them only half the normal amount for the first two to four weeks until they get comfortable. The “normal amount” will depend on how many worms you have and how many scraps your household produces. In the initial stages, feed them only about a ½ pound per day until they get used to their new home.
4. Slowly increase the amount you feed them over the course of a few weeks, up to the maximum amount for your bin, so as not to overwhelm them.
5. Keep in mind that you will have to provide fresh bedding about once a month or as needed. You may need to increase the amount of bedding you provide as the population of worms increases.
A worm bin fed entirely on kitchen scraps mixed with paper or cardboard will give you compost that is high in humic acid that is very beneficial to plants. Humic acid is a natural by-product of the microbes that decay plant material. It is found in all non-sterile soil, but compost contains a much higher amount of it because of how compost is made. Humic acid is not a fertilizer, but acts as a complement to fertilizer. According to Natural Environmental Systems (www.naturalenviro.com), humic acid:
• Adds organic matter to organically deficient soils
• Increases root vitality
• Improves nutrient uptake
• Increases chlorophyll synthesis
• Allows for better seed germination
• Increases fertilizer retention
• Stimulates beneficial microbial activity
• Results in healthier plants and improved yields
Now that you have filled your worm bin and your worms are getting settled in, what should you feed them?
What to Feed (and Not Feed) Your Worms
When you purchase your worms, the dealer should let you know what foods they can consume most easily and what foods you should avoid feeding them. Worms can eat many things that cannot be put into an outdoor compost pile, including bread and cooked food scraps. Worms can safely eat fresh or cooked vegetables, most fruit (although not the pits), leaves, paper, tea leaves, and coffee grounds.
In general, you want to avoid large quantities of raw fruit and vegetable matter. This should go into the outdoor compost bin instead. If you do not have an outdoor bin, you can give these foods to the worms, but citrus peels should be avoided because they contain limonene, which can be poisonous to worms. A surplus of citrus or coffee grounds can also change the pH of the bin by making it acidic and killing the worms. If you notice that your worms are not eating a particular kind of food, just take it out of the bin and feed them something else. They often avoid odorous foods such as garlic, onions, and broccoli, but let them try these anyway. Your worms might like them, and that will be one less thing you have to throw away.
You should avoid feeding worms any kind of food with seeds (such as peppers, squash, tomatoes, cucumbers) because worms will not eat the seeds, and there will not be enough heat generated in a worm bin to kill the seeds. This means the fruits or vegetables may start growing in your worm bin or later in your garden. If you completely remove the seeds from peppers, then you can feed worms the flesh of sweet peppers. Do not feed them hot peppers because the same substance (capsaicin) that burns your mouth will hurt the worms.
Worms typically avoid eating parts of plants that have the potential to grow, such as potato peels with eyes and the tops of root vegetables like carrots and turnips. You may want to avoid feeding your worms these types of foods, or puree them before feeding them.
Worms like stale or moldy bread and leftover pasta (just do not give them pasta with an oily sauce, such as fettuccine Alfredo, because the oil is not good for the bin.) Plain corn meal will give worms a lot of energy in a hurry, but be sure there are no other ingredients in it. Worms need a source of grit in their diet to help them digest fibrous plant matter. One good source of grit is very finely ground eggshells. Rinse the whites from cracked shells, grind the shells in a food processor, mortar and pestle, or with a rolling pin and sprinkle the calcium-rich grit into the worm bin. You can also sprinkle some sand into the bin.
As with an outdoor compost bin, adding greens will increase the nitrogen content, and adding browns will increase the carbon and phosphate. If your worm bin gets too hot, too wet, or smelly, you should increase the amount of brown materials, the same way you would with a regular compost bin in that condition. Worms need greens (kitchen scraps) to eat, so you will need to continue feeding them the required amount according to how many worms you have. You may also add composted cow manure or uncomposted rabbit, sheep, or goat manure to the worm bin. Bury the manure at least 3 inches down in the bin.
You should not feed worms vinegar, hot peppers, sauces, oils, greasy foods, fresh grass clippings, dairy products, fruit pits, or very salty or very sweet foods because each of these foods can cause problems in the bin. Vinegar will change the acidity of the bin, making it inhospitable to the worms. Hot peppers can burn the worms the same way they burn your skin. Sauces, oils, and greasy foods can suffocate the worms. Fresh grass clippings will decompose very quickly and will heat up the bin, which can kill the worms. They may also make an anaerobic mess just as they can in outdoor bins. Dairy products will spoil and smell bad. Fruit pits are too big for worms to eat and will not decompose. They may also take root and begin growing. Salt or salty foods will kill the worms by dehydrating them, and sweet, sugary foods can cause an overgrowth of yeast in the bin, which can be as harmful to the worms as a yeast infection is to humans.
You should not feed meat to your worms. Rotting meat stinks and will attract flies, which lay their eggs on it. While small amounts of cooked meat can be buried in outdoor vermicomposting bins and regular compost heaps, there is always a chance that you will invite unwanted creatures into your yard. If you live in an area where raccoons, rats, foxes, possum, or other carnivores visit your yard, you should probably avoid composting meat altogether. Even neighborhood dogs can be a nuisance if they find meat in your compost.
In an indoor bin, the smell of rotting meat alone will convince you not to use it. Generally, composting meat is something that only experienced composters take on, and then only if they have a very fast-decomposing hot heap to put it in. You can give it a try, but if the worms are not eating it quickly, or if odor becomes a problem, stop feeding meat and fish and stick to non-animal scraps.
To prepare kitchen scraps for your worms, run them through a blender or food processor, perhaps with some water. The smaller the pieces are, the easier it will be for the worms to eat. Because they do not have teeth, they can take in only very small particles of food. Feed the worms about three times a week once the bin is established. At first, you may want to feed them weekly, especially as they are becoming acclimated to their new home. Feed them by spreading small amounts of kitchen waste just under the bedding. Spreading shredded newspaper over the food will discourage fruit flies and other pests and encourage the worms to come to the top of the bin to eat. Do not pile the newspaper on thick or the waste will start to compost and the bin will heat up, killing the worms. Feeding your worms a small amount of food every day or two will help them reproduce, which is what you want when starting a new bin. Feeding them a large quantity of food less frequently (once a week or so) will lead to fatter worms, so if you plan to use your worms for fish bait, this will be a good thing.
Make sure to feed them only as much as they can eat and not more, because you do not want the food to rot or start to compost. As a guideline, worms can eat half their own weight in food each day, so if you start off with 2 pounds of worms, feed them 1 pound of food in small meals over the course of the day. As the worms reproduce, you will have to increase the amount you are feeding them. Increase the amount of food slowly over the course of several weeks. If there is not enough food, the worms will be able to eat their bedding for a few days until you get the balance just right. Because it is not possible to know exactly how many worms you have once they start reproducing, you will have to keep an eye on how much food they eat. If there are a lot of leftovers and the food is spoiling, give them less. If all the food is eaten up quickly, give them a bit more.
Place the food under shredded newspapers on top of the bedding, but not in the castings. The castings are a waste product and worms do not like to live in them. The castings will generally be toward the bottom of the bin because worms tend to eat in an upward direction. However, they will be obvious when you see them because they resemble shiny dark coffee grounds. You will need to add more shredded newspaper as the worms consume the older bedding. This will help to keep the contents of the bin from getting soggy. Worms prefer to live under the shelter it will provide.
Do not worry if you have to go away on vacation for a week or two because your worms can live by eating their bedding. Simply feed them before you go away, and make sure there is enough fresh bedding so that they can eat the paper if they run out of food scraps.
HOW MUCH SHOULD I FEED MY WORMS?
If you are concerned about how much to feed your worms, there is a simple method called the quadrant system. Used in the vermicomposting curricula provided free to school teachers, this system is easy enough for children to understand. Begin by imagining that the worm bin is divided into four quadrants. If you are doing this with children, it might help to draw lines on the outside of the bin, and number them as below. This will also help in case your bin is turned around and you are no longer sure which corner is which.
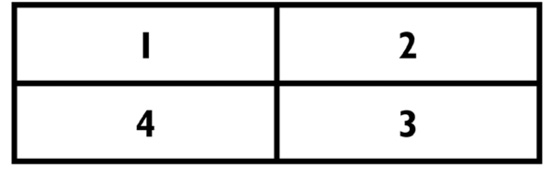
Begin burying food in quadrant number one. A few days later, place food in quadrant number two. A few days after that, place food in quadrant three, and so on, until you are back to quadrant one. If there is still food in quadrant number one when you go to feed, that is a signal that you are overfeeding the worms. Give them some time to eat what is already in the bin, and then begin again. This time, feed them less often and give them a smaller amount of food. However, if you get to quadrant one and the worms have already eaten up all the food in quadrants one, two, and three, you may want to give them a little more food or feed them more often.
Harvesting the castings
It may take six or seven months before your worm bin produces enough castings to use in your garden. Once a new bin becomes established, the worms will eat more because they will have started to reproduce and, thus, will have more castings. After the first harvest of castings, you should be able to gather it about every three months. For information on how much you need and where to use it, see the section titled “Where to Use Vermicompost” later in this chapter.
Worms generally start eating at the bottom of the bin and work their way to the top, leaving their castings behind on the lower layers as they move up. There are several ways to remove the castings, but, essentially, you will have to move the worms and the top layer of compost aside or into another container to get to the castings. The contents of the bin may be sticky and mud like, so you may want to wear gloves.
It may be easier to harvest if you tip the bin on its side with a layer of newspapers under it to catch anything that falls out or if you dump the contents of the bin a little at a time into a large shallow pan or tray. Do this outside on a warm sunny day or point a bright light at the compost because the light will cause the worms to burrow into the bedding. This process can take ten to 15 minutes. Remove the castings from the top of the pile by hand, being careful not to capture any worms along with it. Doing this by hand allows you to sort through the castings and return any stray worms to the bin (or put them into a newly prepared bin, if you are separating the worms). After you have removed the castings down to the level where the worms have burrowed, you may need to wait and let them burrow deeper before harvesting the next layer.
You can watch a video of Bentley Christie, the Compost Guy, retrieving worms from a bin at www.youtube.com/watch?v=h6h3N8OIQYM. This video shows Christie using a bright light method to cause his worms to burrow and then sifting out the castings by hand. You can find out more about vermicomposting on his website: www.redwormcomposting.com/.
After you have removed the castings, put in fresh bedding, replace the worms and the compost material on top of the bedding, and let the worms keep working. Some commercial stacking worm bins make this step easy and allow you to remove the bottom layer of the stack, dump out the castings, and replace the empty container on the top.
You can also sort out vermicompost by pushing the contents of the bin to one side and filling the other side with fresh bedding and food. After a couple of weeks, the worms will have migrated over to where the food is and you can scoop out the castings from the vacated side of the bin. Some people even use a sheet of cardboard pushed vertically most of the way into the bin to divide it. The worms can burrow under the cardboard to the side with the food, and the cardboard helps you know where to start scooping. This is a slow process, but it helps ensure that you are not scooping out worms along with the castings.
After you have retrieved the castings and sorted the worms out, you will need to dry the castings before you can store them. You can dry castings by spreading them on layers of newspaper to dry in the sun. Check the castings carefully for stray worms, because they will die if left to dry out. Once the castings are dry, sift them through a plastic colander with large holes. Return any undigested food bits to the bin. Castings can be stored in plastic buckets or containers as long as you drill or punch holes in the sides to allow air to circulate. Keep castings very lightly damp by occasionally spritzing them with water from a spray bottle, and give them proper ventilation to help maintain the biologically active components.
How to Make Worm Tea
Worm tea is similar to compost tea, but has a few extra ingredients. Molasses or corn syrup provides food for the microorganisms. Rainwater is the best type of water to use, but you can use water straight from the tap if you have a well. If you have a municipal water supply that is treated with chlorine, leave the bucket of water sitting out overnight to allow the chemicals to dissipate. If you have a rainwater cistern, you can use this as well. If your cistern is filled by chemically treated water that has been trucked in, then the same caveat applies as for municipal water — let it sit out overnight to let volatile chemicals dissipate.
Do not worry if you cannot collect two cups of castings from your worm bin on the first try. Just follow the instructions above for drying and storing castings, and save them up until you have enough to make worm tea.
Supplies and Tools
• 2 cups worm castings
• 2 tablespoons corn syrup or molasses
• 5-gallon bucket
• Old sock or pantyhose (with no holes)
• Water
Instructions
1. Pour the castings into the sock or stocking, and tie it closed.
2. Submerge the stocking in the water.
3. Add the corn syrup or molasses to the water.
4. Let the castings soak for at least 24 hours, stirring often.
5. Use within 48 hours to water potted plants, flower beds, or gardens.
Optionally, you may use an aquarium bubbler to aerate the mixture. Follow the instructions and precautions on the package when setting up the bubbler.
Using worm tea
As with regular compost tea, worm tea can be added to your gardens and houseplants. It can also be used as a foliar fertilizer and sprayed on plants. If you have enough vermicompost, you can brew up very large batches of worm tea so you have enough for a vegetable garden. If you are very dedicated to vermicomposting, you may have enough to sell to friends and neighbors.
Troubleshooting a Worm Bin
Like any compost system, worm bins can have problems if they are not properly maintained. Most of these problems are easy to resolve and avoid if you take some precautions. Below are some symptoms of problems that might arise in vermicomposting bins and what to do about them.
|
Symptoms |
Cause |
Solution |
|
Unconsumed or moldy food |
Overfeeding |
You have to feed worms only as much as they can eat so that the food does not rot or start to compost. The worms may ignore certain foods, such as onions, broccoli, garlic, onions, citrus, and other strong-smelling foods. If this happens, stop feeding that particular kind of food because it will rot. If food starts to go moldy, and the worms do not eat it, remove it from the bin to prevent the spread of molds in the bedding. While mold will not kill the worms, it can indicate that the bin is too acidic; if not remedied, this will eventually cause problems. Make sure to air out a bin that has had mold in it, and keep a close eye on it to make sure the balance goes back to normal. |
|
Worms are sluggish, not eating much |
Lack of air |
Worms need to breathe and need a supply of fresh air. If the bin does not have enough ventilation holes, or if the holes have become plugged, the worms can become sluggish. Check that the air holes are clear, and leave the lid off the bin for a few hours to let air in. |
|
Worms trying to escape |
Too much moisture (see also, "Too much light") |
If your bin develops mold or your worms try to escape, you may have a problem with moisture. Just like after a heavy rain when worms burrow to the top of the soil, worms in a wet bin will wriggle up to the top in an effort not to drown. They may climb right out of the bin if they have to. You have to empty the liquid from the bottom of the bin regularly to keep the worms from drowning. If the bin has holes in the bottom and is set up on bricks so the liquid has somewhere to drain, you do not have to worry about your worms drowning. If your bin does not have drainage holes, you can suck the liquid up with a turkey baster. If there is any mold in the bin, wipe it out with paper towels, and then tear the towel up for the worms to eat. While most molds are harmless to the worms, black or green molds may give off spores that can be harmful to humans. If you have any sort of breathing difficulty or allergies, be very careful if you see black or green mold in your bin. You may want to air the bin out by leaving it outdoors in a shaded spot until the mold subsides. If you are worried, you can always move the worms to a new bin, and thoroughly clean the old one. If you use limestone to dry out a worm bin, make sure to add only a very small amount and to stir it in well over several days, because it can react with the compost and release carbon dioxide, which will suffocate the worms. |
|
Bedding dried out, worms dying, or not reproducing |
Too little moisture |
If the bin dries out completely, the worms can suffocate from the lack of moisture. If the bin is damp, but not damp enough, the worms may stop reproducing. When you feed the worms, turn the compost over with your hand (you may wish to wear gloves for this), and check to make sure that all the paper in the bin is damp. If not, spray it with water from a spray bottle until it is moistened. |
|
Bin smells bad or worms dying |
Too much heat |
Just like with a normal compost bin, if you add too many nitrogen-rich, green items, the compost will heat up. This heat can kill the worms, so make sure to add a very small amount of green products in comparison to brown. You must keep the bin at a reasonable temperature so that the worms do not dry out and die. Insulated bins help keep the worms warm enough in cool climates and seasons. Bins with thermostats are expensive, but do help regulate the temperature. |
|
Worms trying to escape |
Too much light (see also, “Too much moisture”) |
The bin must be opaque because worms do not like bright light. Keeping the bin in a lighted area will discourage worms from climbing out of the bin, but too much light can make them unhappy and keep them from eating and reproducing the way they should. |
|
Insect pests invading the bin |
Bin is too wet or food is not buried in bedding |
Mites can infest a bin that stays too wet. These will look like very tiny red or brown dots. Most mites are not harmful to the worms, although there are one or two species that are parasitic to insects. According to Bentley Christie of Redwormcomposting.com, these parasitic mites typically attack arthropods (creatures like beetles and spiders) and do not attack worms. You can read more about worm bin mites on his blog: www.redwormcomposting.com/worm-bin-creatures/parasitic-worm-bin-mites/. If you want to get rid of mites, drain the liquid or add more shredded newspaper to dry the bin a little bit. To test to see if you got all the mites, put a slice of bread on top of the food and leave it overnight. If there are mites on it in the morning, cut back on feedings or add more bedding to dry the bin further. The presence of mites will not harm the finished product — the castings, but they can be unnerving and unsightly. |
|
Fruit flies are another common pest and will typically be attracted by fruit waste in the bin. To discourage them, bury the food scraps under the bedding. You can also lure them away by placing a cup of cider vinegar near the bin. The flies will be attracted to the vinegar and drown in it. Do not place the cup in the bin because the acidic vinegar will be toxic to the worms. Pot worms are tiny pink or white worms that live in healthy soil. They eat fungi and like to live in very damp environments where fungi are plentiful. If you see several of these little worms (they are less than ½ inch long), it could mean that your bin is too damp. On the bright side, these worms make excellent castings and will not tolerate soils contaminated with heavy metals such as lead or copper, so their presences means your bin is healthy (albeit too damp). Ants may infest your bin if they find it on food-foraging journeys. If they do, use store-bought ant traps outside the bin. Make sure the bin is moist enough because ants prefer to live in dry areas and will not come into your bin if it is damp. Pour a line of borax around the ant bin because ants (and other insects) will die if they crawl across borax, but it is harmless to humans. Ants will eat worms, and the scouts that locate a food source (in this case your worm bin) will lead all their fellow ants to the bin to harvest the food and take it back to their nest, and so they must be dealt with immediately. Centipedes are carnivorous insects and will eat worms if they can. They like to live in moist areas, so make sure the worm bin is not too damp. If you can catch them, you can release them outside or kill them. You may be able to place sticky insect traps around the bin to prevent centipedes from crawling into the bin in the first place. |
||
|
Animal pests invading the bin |
Bin not in a secure location or not properly covered |
Keep the bin away from animals that might try to break into it to eat the scraps and the worms. If you place the bin outside, make sure that it is securely covered to keep birds, raccoons, possums, and other small animals from digging in it. Birds will want to eat the worms and larger animals may go after the food at first, but quickly discover the worms and wipe out your bin in an afternoon. |
RUNAWAY WORMS!
Worms may be confused or agitated when they are first transported to their new home because they are very sensitive to vibrations. This keeps them alive when they are in the ground because they can detect the vibrations caused by a predator’s footsteps. However, in a worm bin this can cause trouble. To keep worms from escaping, leave the bin uncovered in a well-lit room for a few days (or shine a lamp on the bin). This should keep the worms burrowed safely into the center of the bin until they calm down. Do this any time you move the bin to a new location, such as when you move it indoors after having it outside in the summer.
Worms may also flee the bin if it is too hot, too wet, or overcrowded. Make sure to drain water from the bin, keep enough bedding in it to absorb excess water, and keep it in a relatively cool place. If overcrowding is a problem, start a new bin, release some of the worms into your outdoor compost pile or garden, or share them with friends. Keep in mind that compost worms such as red wigglers are bred for and are used to a very food-rich environment, so if you do want to set them free, the compost pile will be the most comfortable place for them.
Where to Use Vermicompost
Like regular compost, vermicompost can be used everywhere in the garden or wherever you have plantings. Unlike regular compost, vermicompost contains more than just nutrients. A worm’s intestinal tract produces enzymes that have antibiotic, insecticidal, and fungicidal properties. These chemicals not only protect the worm, but these enzymes also help plants resist disease and insect infestation when worm castings are used to amend the soil around them. For this reason, worm castings, whether from wild worms or in the concentrated form of vermicompost, are vital to the health of all your house and garden plants.
Here are some ways to include vermicompost in your garden:
• Use vermicompost in flowerpots and containers. Mix about 20 percent vermicompost to 80 percent potting soil. The vermicompost will give a gentle fertilization to the flowers and the potting soil gives the roots something to cling to.
• Use vermicompost as a top dressing in tired out flowerpots and containers. Spread about ¼ inch of vermicompost on the surface before watering. The vermicompost will release nutrients slowly into the soil and feed the plants rather than shocking them as a large dose of synthetic fertilizer might.
• Use vermicompost on outdoor flower beds by spreading it on the soil beneath the mulch and watering thoroughly.
• Mix vermicompost into planting holes for shrubs, trees, and perennials. The slow release of nitrogen will encourage rooting while not burning tender roots.
For a complete lesson in vermicomposting, read Worms Eat Our Garbage by the late Mary Appelhof. Known as “The Worm Lady,” Appelhof is well-known in compost circles for her efforts to tell the world about worm composting. Her website, www.wormwoman.com, contains several back issues of her newsletter, WormWoman’s WormEzine and a wealth of information on vermicomposting, including how to winterize a worm bin, how to harvest worm castings, and making and using worm casting tea.
Case Study
Kimberly Roy
Amateur composter
Middletown, New Jersey
I love taking part in creating rich, organic matter to use for plants. I began composting about ten years ago while living on the north shore of Lake Tahoe, California. I loved plants, but there was no soil there because the terrain consisted of rock, sand, and evergreens. Potting soil was not only an extra expense, but also difficult to obtain because my main mode of transportation was a bike or the bus. After doing some research at the local library on vermicomposting, I began raising worms and making my own dirt and plant food with compost tea.
I ordered a 2-pound bag of about 500 Canadian earthworms. These guys were 6 inches long and about the diameter of a pencil. I settled them into their new home — a plastic foam cooler with shredded and moistened bedding and food scraps, set this cooler in the kitchen of my small studio apartment, and went out for the evening. Upon coming home, I was horrified to find worms all over the place. They covered the white linoleum kitchen floor, the carpet of the main living space, and a few had even made it into the bathroom.
It is important not to over feed worms as the waste turns anaerobic and toxic. If compost stinks badly, the worms will want to leave. It becomes a very unhealthy place for them.
Occasionally, I put some pieces of vegetable scrapings, eggshells, tea bags, or other non-meat or dairy food scraps into the worm bin for food. The worms eat and digest the organic matter at a faster pace than it would decompose on its own. The worms simply could not eat all the scraps we produce, and the food would turn rotten, smelly, and toxic for the worms, so we put some of it on the outside pile. We shovel or rake this highly nutritious material into selected areas of the garden or use it to supplement potting soil.
If done right, composting is a rewarding and enjoyable hobby. I enjoy the smell of dirt and raising worms. It is neat when they have babies.