FLOORS
Floorcoverings wear out faster than other interior surfaces because they get more traffic. And so they require more maintenance. The issue with floors is not just cosmetic: surface damage can affect more than appearance. Scratches or gouges in resilient flooring and cracks in grouted tile joints let moisture into the floor underlayment, leading to rot. Whether your floorcovering is wood strips, parquet, sheet vinyl, laminate, or anything else, it is helpful to view it as a protective membrane for the bones of your house.
Bathroom floors suffer the most from moisture problems, with kitchen floors coming in a close second. You can fix most problems yourself, including squeaks, scratches and dents, and other minor damage to floorcoverings.
There is a reason that some flooring products are described as “low maintenance.” If you are considering installing new floorcoverings, maintenance is definitely something to think about. In very broad terms, on the next page is a ranking of floorcoverings and their maintenance requirements. It is also worth knowing this information if you are interested in keeping your current floorcoverings in good repair: some types simply require more attention than others.

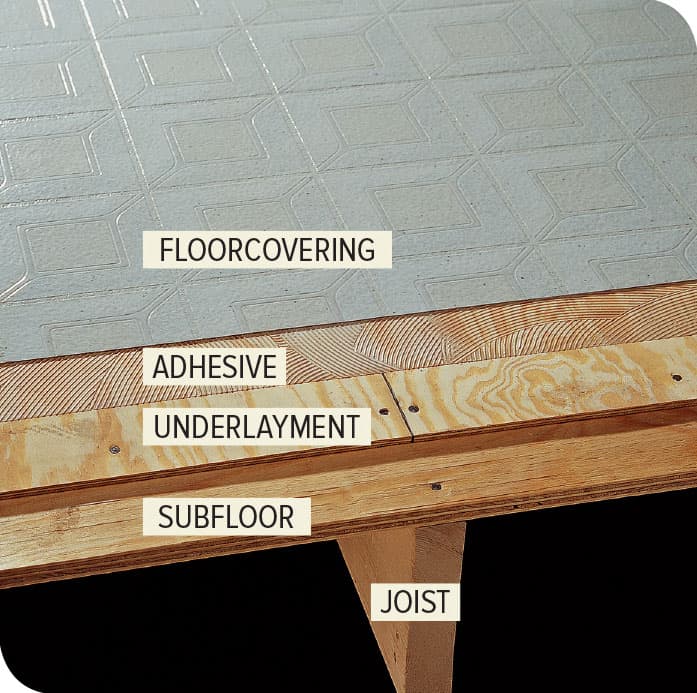
In a typical residence, the floors in the habitable spaces have a foundation of subfloor (usually 3/4" plywood or oriented strand board) attached to the floor joists. The subfloor is too rough and uneven to serve as a good substrate for floorcoverings, so it is usually covered with a thin (1/4" thick is typical) underlayment of sanded plywood or lauan plywood. The floorcovering is bonded to the underlayment (sheet vinyl or nonceramic tile). Ceramic tile is bonded to an underlayment of cementboard, not plywood. Laminate “floating” floors rest on the underlayment without attachment—the individual flooring strips interlock and typically “float” on a thin, cushiony pad. Traditional hardwood strip flooring is nailed down, usually with an underlayment of rosin paper or, in older homes, tar paper.
CLEANING & MAINTAINING A WOOD FLOOR
Cleaning resilient floor surfaces like sheet vinyl and ceramic tile is pretty easy—basically, you sweep or vacuum and then mop. Wood floors, however, are a bit trickier. With wood floors it is important to evaluate the floor carefully before charging in with a bucket of soapy water. The type of finish and its condition are critical in choosing the right type of cleaning products and methods.
Wood floors are among the most durable flooring materials you can install, but like any flooring, they require occasional maintenance to preserve their look and function. Years of regular use can wear out the surface finishes, and even the hardest woods can be scratched by pets with sharp toenails or by furniture dragged along their surface. Impact by heavy items—tools or even heavy dishes—can dent a wood floor. And the biggest enemy of all is water.

Begin by sweeping, vacuuming, then removing dust from the floor using a pad-mop equipped with a wet pad. Scuff marks can be lightly scrubbed by hand using a soft cloth, not an abrasive pad.
How to Evaluate & Clean Wood Floors

If the floor finish is not sound, water will soak into the wood immediately. Do not clean with a water-based product, because it will stain and damage the floor. Instead, clean the floor with cloths dampened with mineral spirits. An unsound floor finish will eventually need to be either recoated with the same finish currently on the floor or rewaxed.
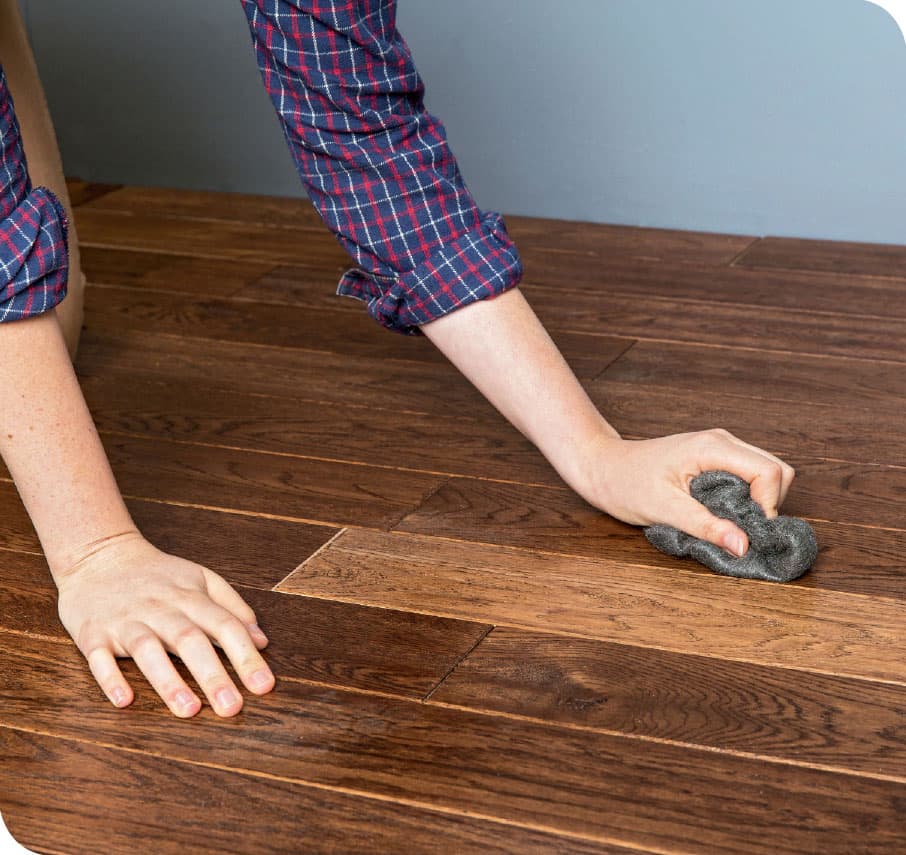
Next, test to see if your floors have a paste wax finish. Slightly dampen a piece of extra-fine steel wool and rub the floor in several areas. Paste wax will show up by leaving a gray smudge on the steel wool pad. On a paste-wax floor, clean the floor with cloths moistened with odorless mineral spirits. Let dry completely, then apply a new coating of paste wax, and buff it thoroughly, following manufacturer’s directions.
NOTE: NEVER apply a finish coat over a waxed floor.
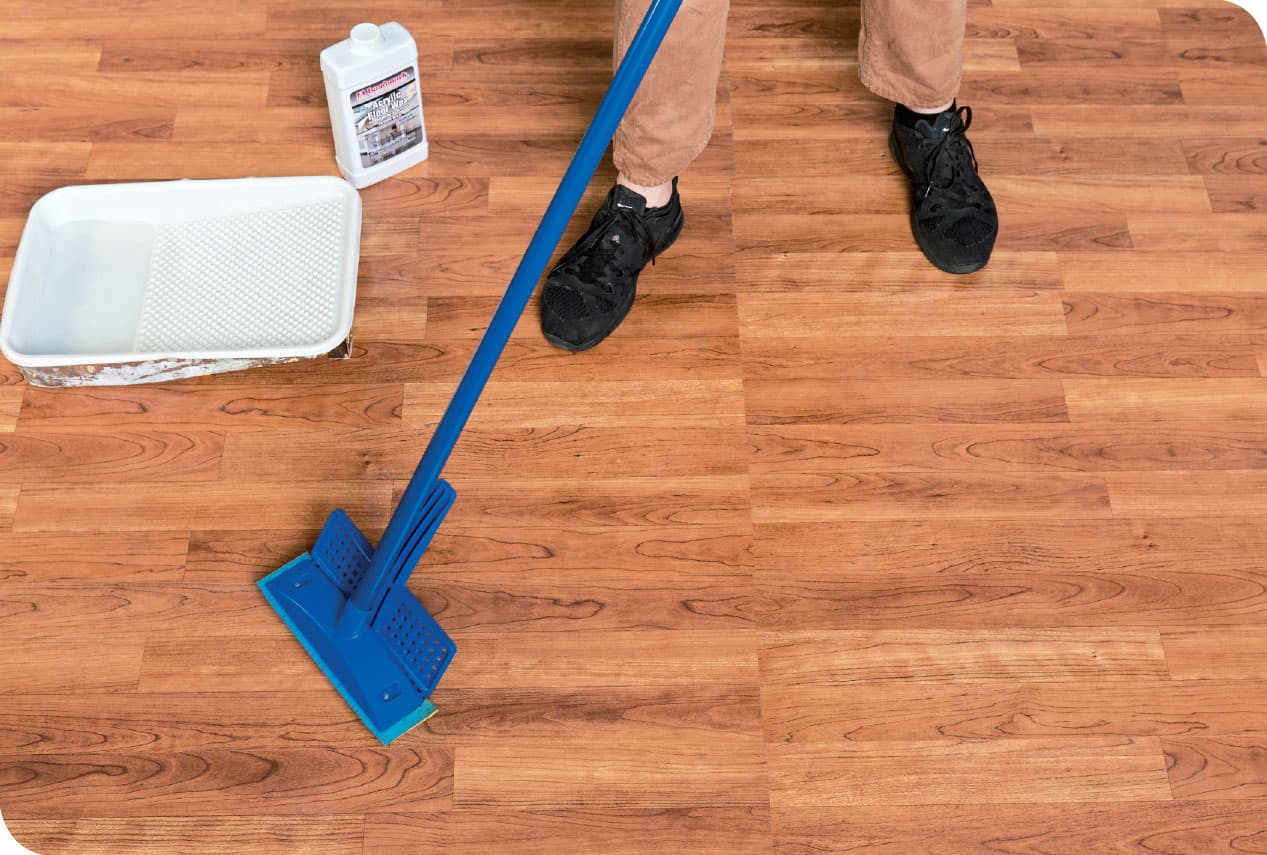
Does your floor have an acrylic wax? These newer waxes are best identified by the dirty, patch-like appearance they have as they begin to wear. If your floor has this kind of synthetic wax, use an ammonia-based wax stripper to remove the wax layer, then apply a new layer of acrylic wax. Be aware that acrylic waxes will need frequent reapplication.
REMOVING STAINS FROM WOOD FLOORS
Just about anything can stain wood floors. Many stains are surface discolorations that may be able to be removed with nothing more than a light scraping or rubbing with an abrasive pad or fine sandpaper. Always try this before reaching for more serious solutions, some of which require the use of dangerous chemicals.
Some stains, especially water stains or stains from pet urine, can soak very deeply into the wood and are difficult or impossible to fully remove. In these instances, you should consider replacing entire floorboards. Another solution is to use a bleach to lighten the color of the stain. Be aware, though, that bleach does not remove a stain, but just lightens it. After bleaching, you will likely be left with the task of restaining the bleached area to match the surrounding floor.

Products you may need to remove stains from a wood floor include extra-fine nylon scrubbing pad (A); sharp scraper (B); sandpaper (C); mineral spirits (D); lacquer thinner (E); oxalic acid (F); putty knife (G); chlorine bleach (H); protective gloves (J); eye protection (K); Goof Off stain remover (L); baking soda (M); and vinegar (N).
How to Use Wood Bleaches
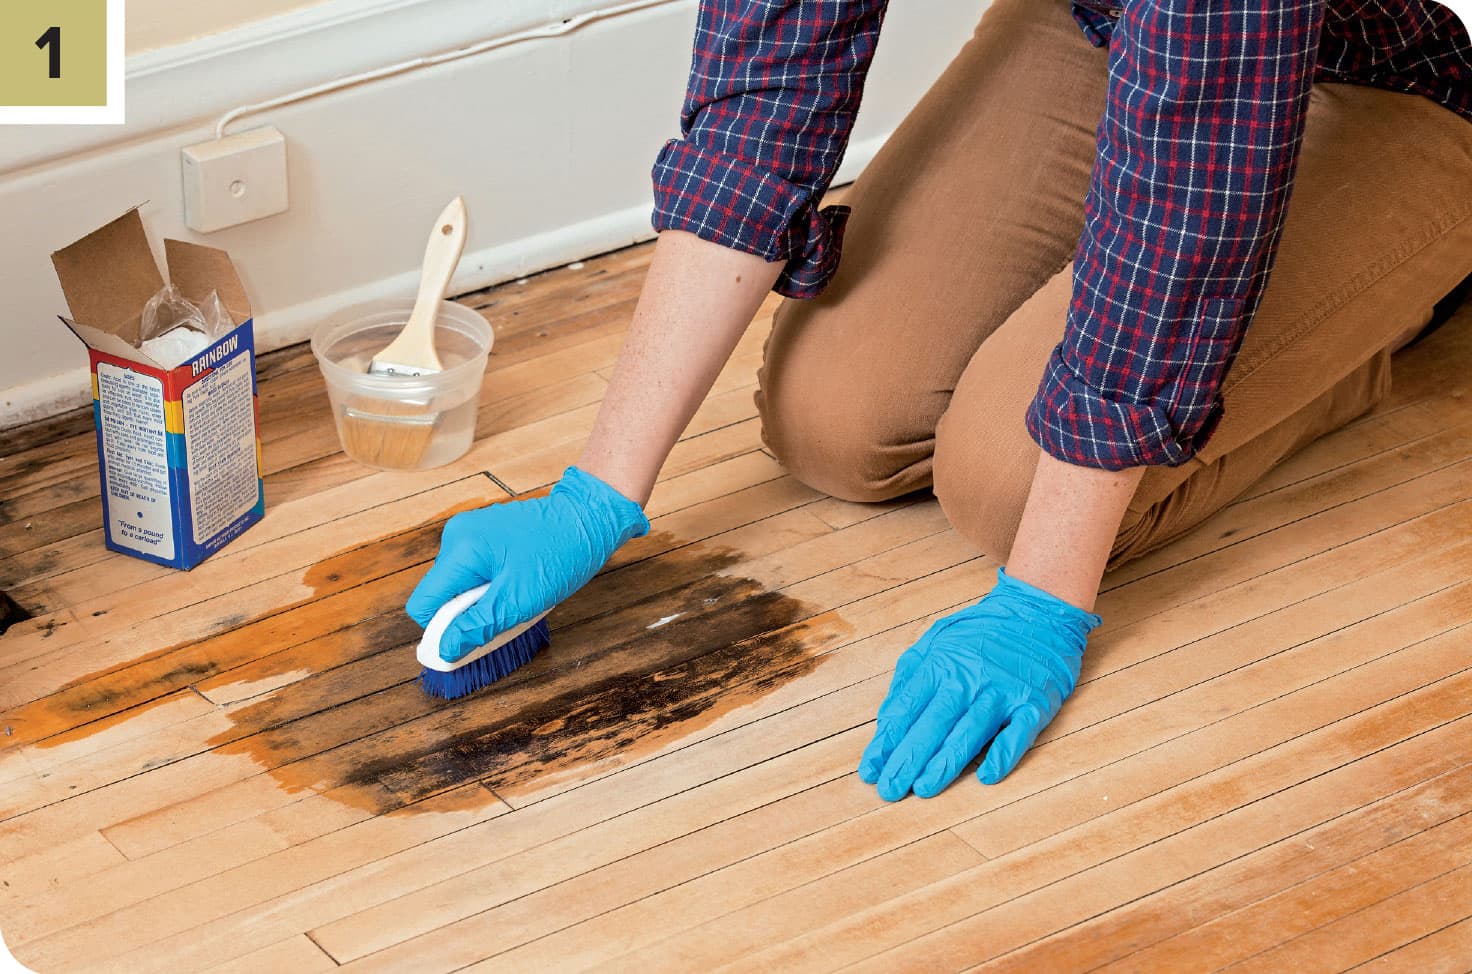
Choose a bleach appropriate for the stain. Wearing protective gloves, apply the bleach solution to the stain area, being careful to confine it to that area. Let the bleach remain on the stain for the recommended time, then neutralize the bleach with the recommended agent (baking soda solution for oxalic acid, vinegar solution for household bleach, clear water for Klean Strip). Wash the area thoroughly with clear water, wipe up excess water, and let dry.
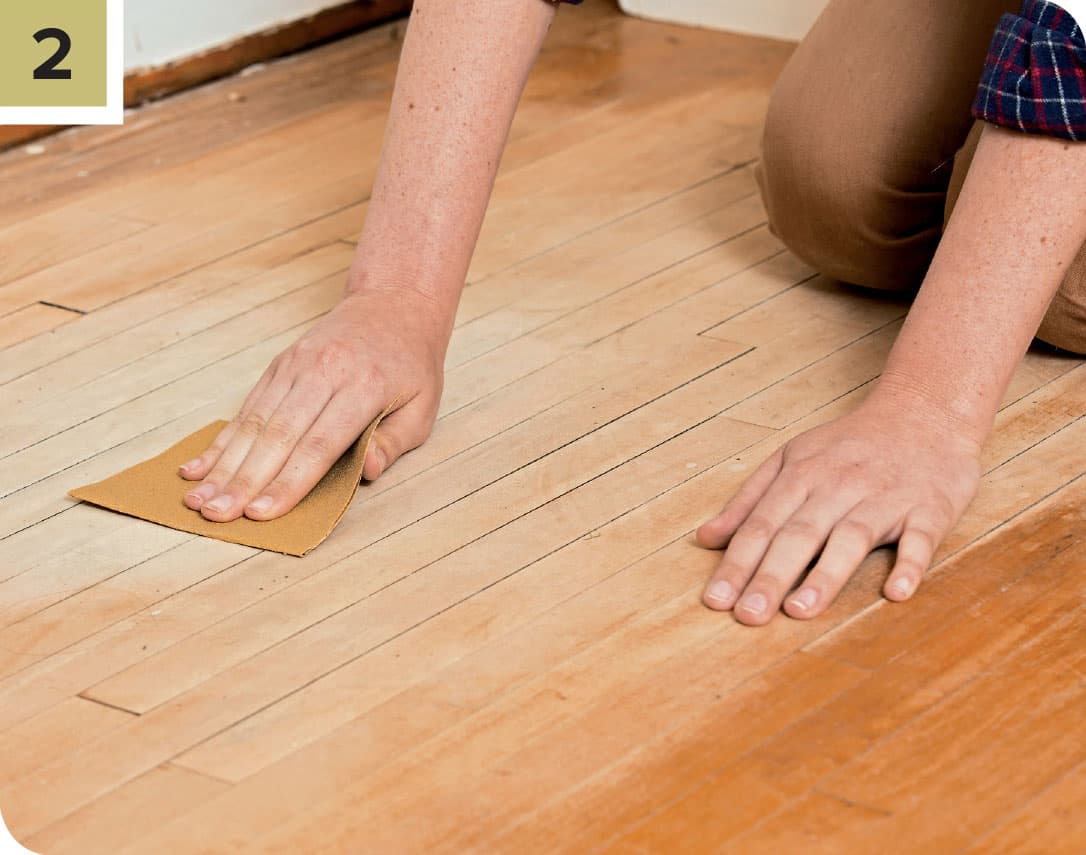
Once dry, lightly sand the area. All bleaches will raise the wood grain, and before applying a wood stain, the grain must be sanded smooth.
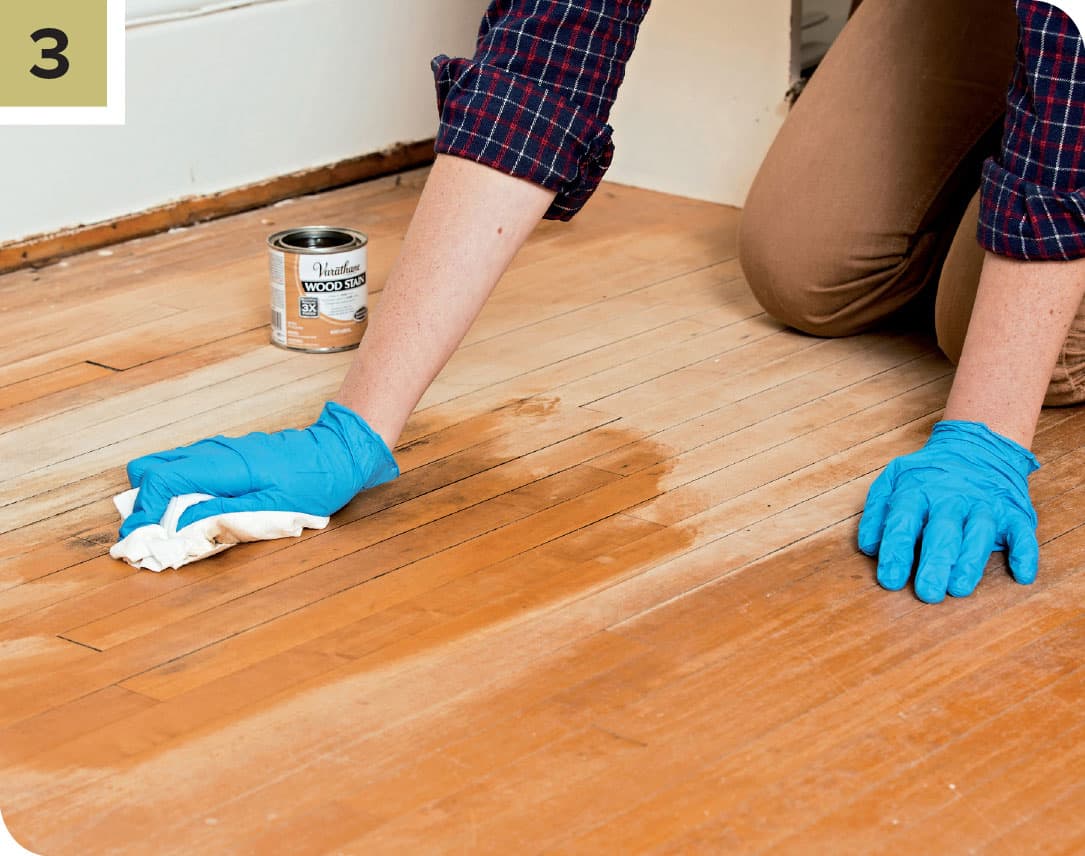
Apply a rub-on wood stain that closely matches the tone of the surrounding floor using a soft rag. Let dry completely, then carefully apply a polyurethane or other matching surface finish to blend the stain area with the surrounding floor.
REPAIRING SCRATCHES & DENTS IN HARDWOOD FLOORS
Most scratches and dents in solid wood floors can be repaired. Dents occur when wood fibers become compressed. If the wood fibers are not broken, dents can often be removed by expanding the wood fibers using heat and moisture. Whatever repair you attempt, confine your work as narrowly as possible to the damaged area only—the smaller the repair area, the less noticeable it will be.
Often the trickiest part in making a scratch or dent disappear is matching and blending the surrounding finish. This is especially true if you end up taking sandpaper to the damage area, so view sanding as a last resort. Most hardware stores and flooring specialty stores sell touch up pens or pencils in a range of tints. These are worth a try. If you don’t find an exact match, choose one that is slightly darker rather than lighter.
If the easy fixes fail and the scratch is still there, then you’ll need to go for the sandpaper and perhaps some wood putty. Here’s how to do it.
How to Repair Shallow Scratches
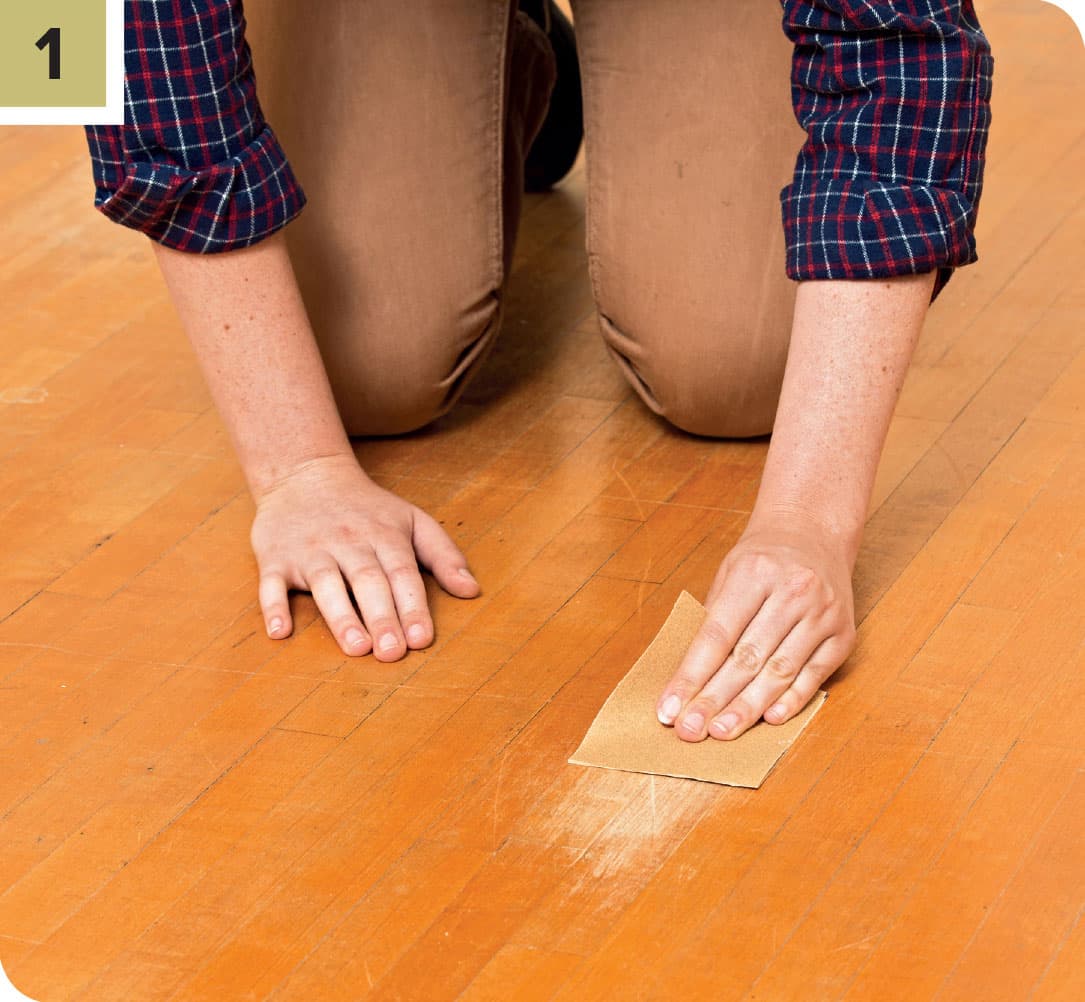
Sweep the floor clean, then wash the area around the scratch with a cloth moistened with odorless mineral spirits. Let the floor dry. With fine or very fine sandpaper (150 grit), lightly sand the scratched area, sanding parallel to the wood grain and periodically wiping away the sanding dust. It is possible that light sanding will remove the scratch if the damage is only in the surface finish.
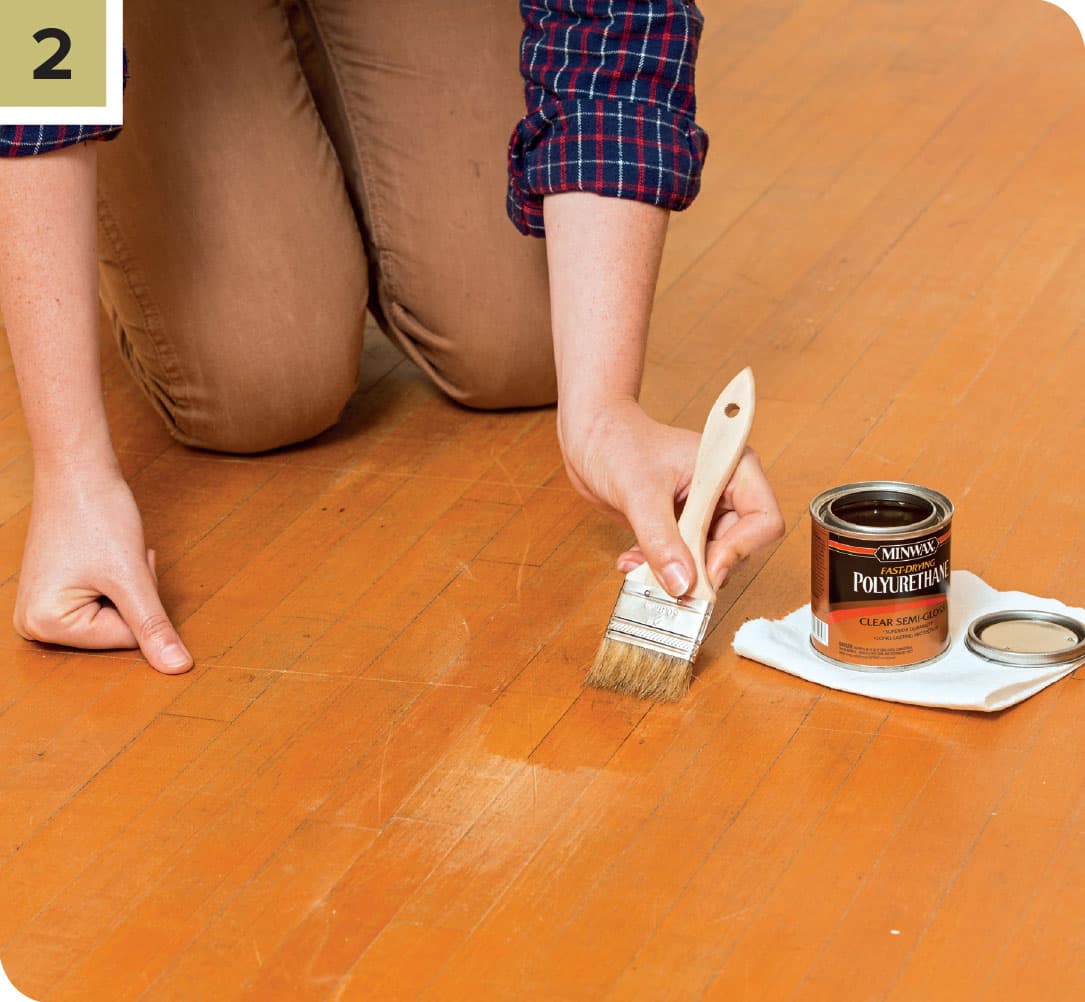
After the scratch is removed, clean the area with mineral spirits, let dry, and lightly touch up the surface with the same finish used on the rest of the floor, restoring its shine.
How to Repair Deep Scratches
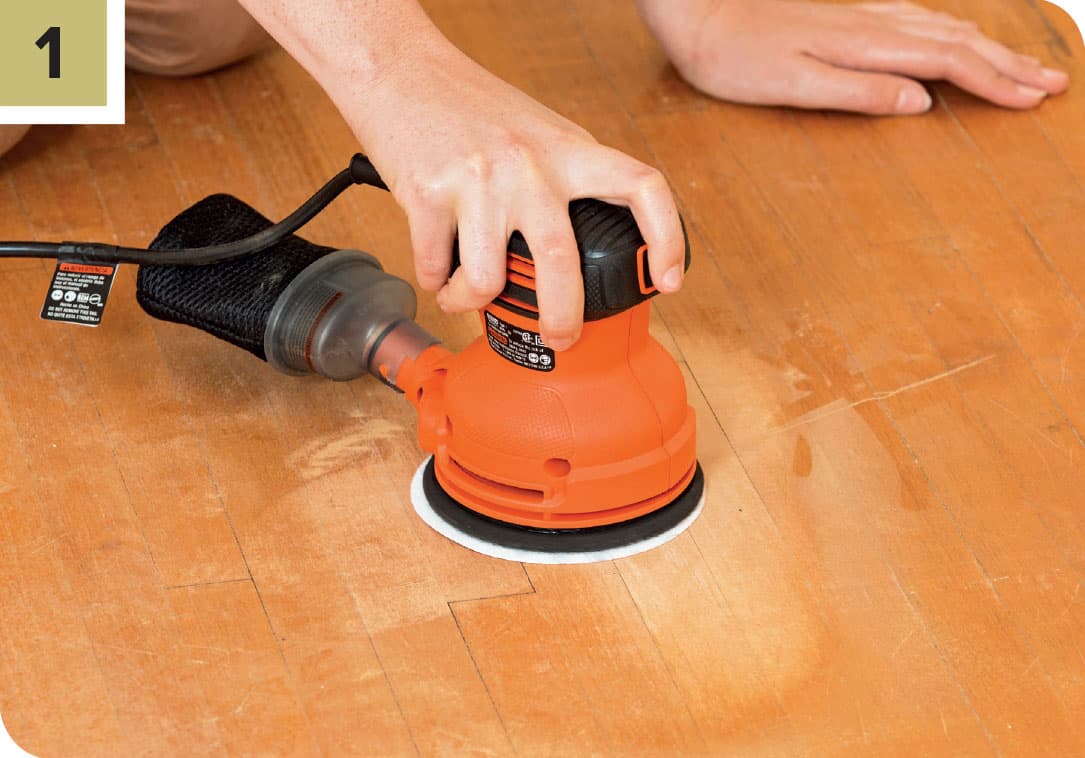
Clean the scratched area with odorless mineral spirits, then lightly sand away the surface finish down to bare wood, using 150-grit sandpaper. For faster results use a random orbit sander. For more control, hand sand.
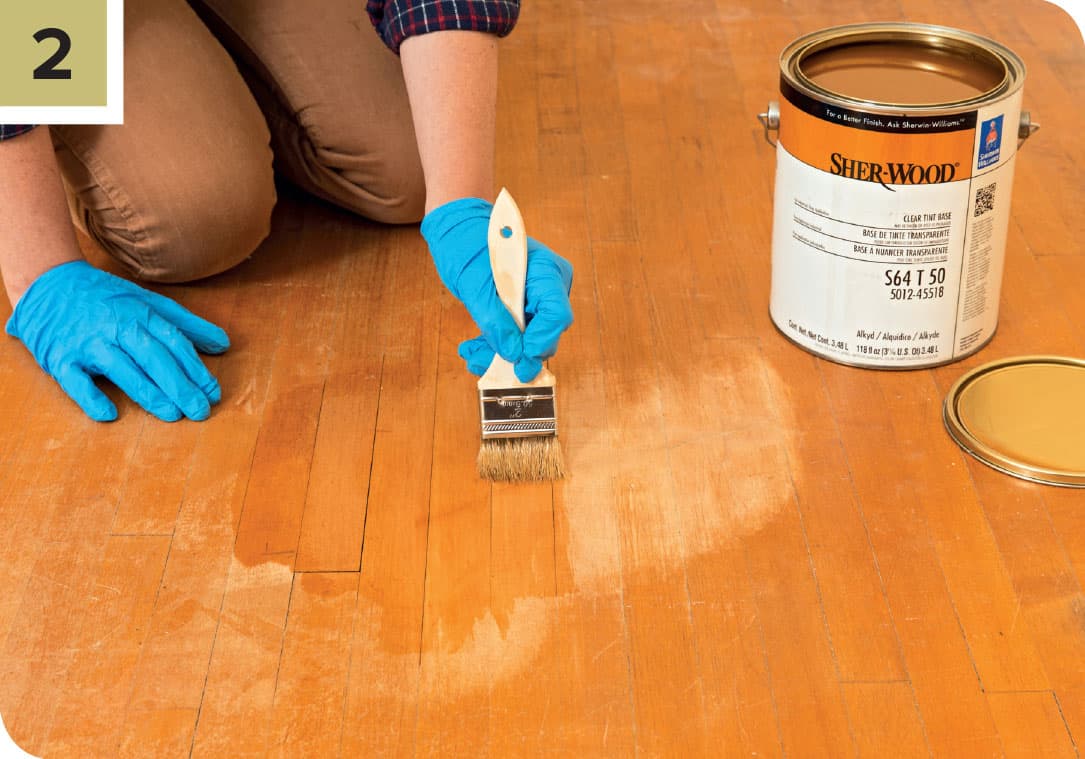
When the bare wood is exposed, carefully apply a nonwax wood filler to the crack. Colored wood fillers may be available that closely match the color of your floor. If not, you can apply an uncolored wood filler, then stain it to match the floor. After the filler dries, lightly sand it. Wipe away all dust, then apply a rub-on wood stain or finish with a small brush, if needed. Reapply as needed.
How to Repair Dents
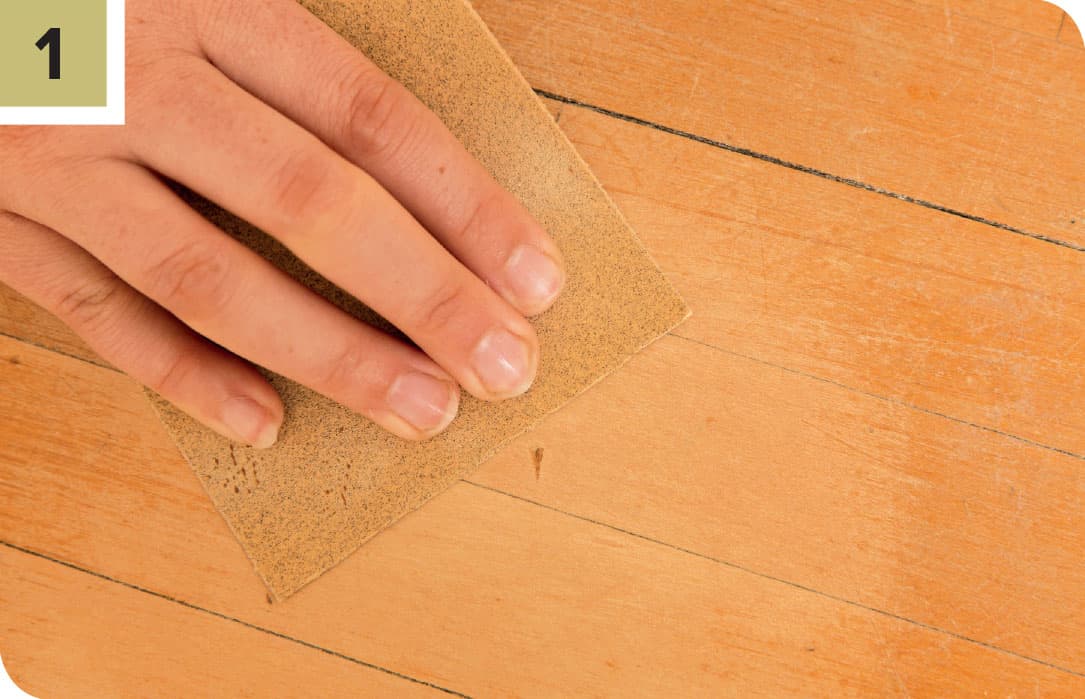
Clean the area around the dent, then sand the dented area with fine (150-grit) sandpaper to completely remove the surface finish down to bare wood. Sand very lightly past the damage area to “feather it in” so you do not have any hard ridges of finish.
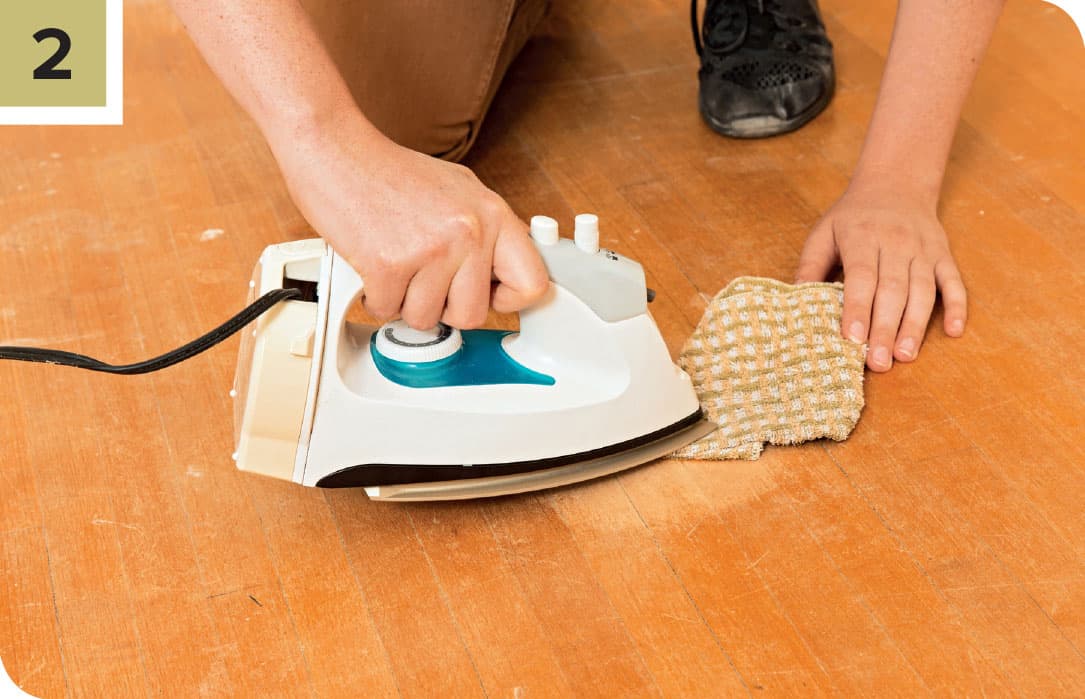
Moisten a clean cloth with water and place it over the dent. Apply the hot tip of a household clothes iron over the wet cloth, moving it around to drive moisture down into the wood fibers. Try to avoid steaming the surrounding wood finish, as it may discolor it. The dented area should soon swell back, eliminating the dent. Let the wood dry completely overnight. Sand the area lightly, if necessary, and remove the dust. Carefully apply finish touch-ups to match the rest of the floor.
FIXING LOOSE & SQUEAKY FLOORBOARDS
Loose floorboards can be extremely obvious or as subtle as a faint squeak. Deciding whether to fix the problem should start by questioning if the loose board or boards present any kind of a tripping hazard. If so, naturally, the floorboards should be secured. This can be done either from above, working through the surface or edges of the floorboard, or from below if you have access to the joists to which the floorboards are fastened. Simple squeaks are another matter. If they irritate you, the remedies are generally easy to effect. Or you can choose to live with the squeak—it’s a good way to keep tabs on your kids.
Solutions for Loose Floorboards
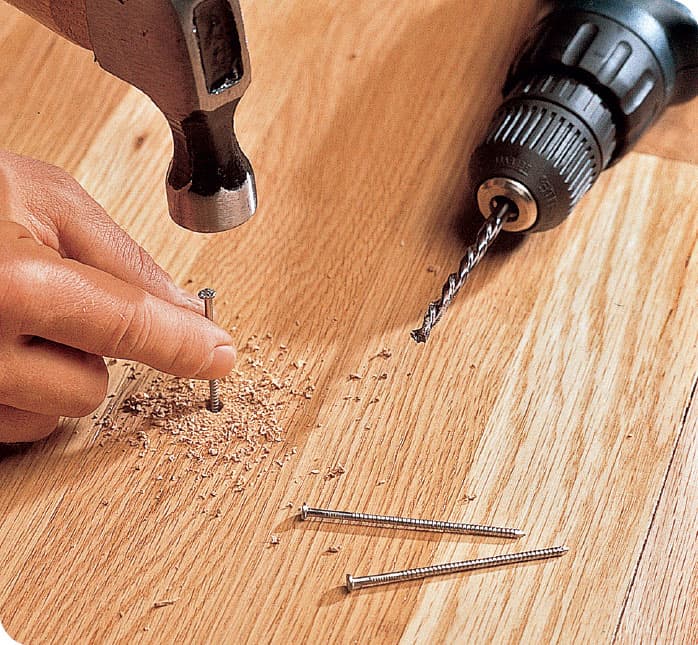
The surest way to reattach loose or buckled floorboards is driving new fasteners from above. Start by drilling pilot holes for several flooring nails in the floorboard only. The nail will grip better if you do not predrill the wood underlayment and subfloor. Flooring nails are spiral or ribbed for better gripping power.
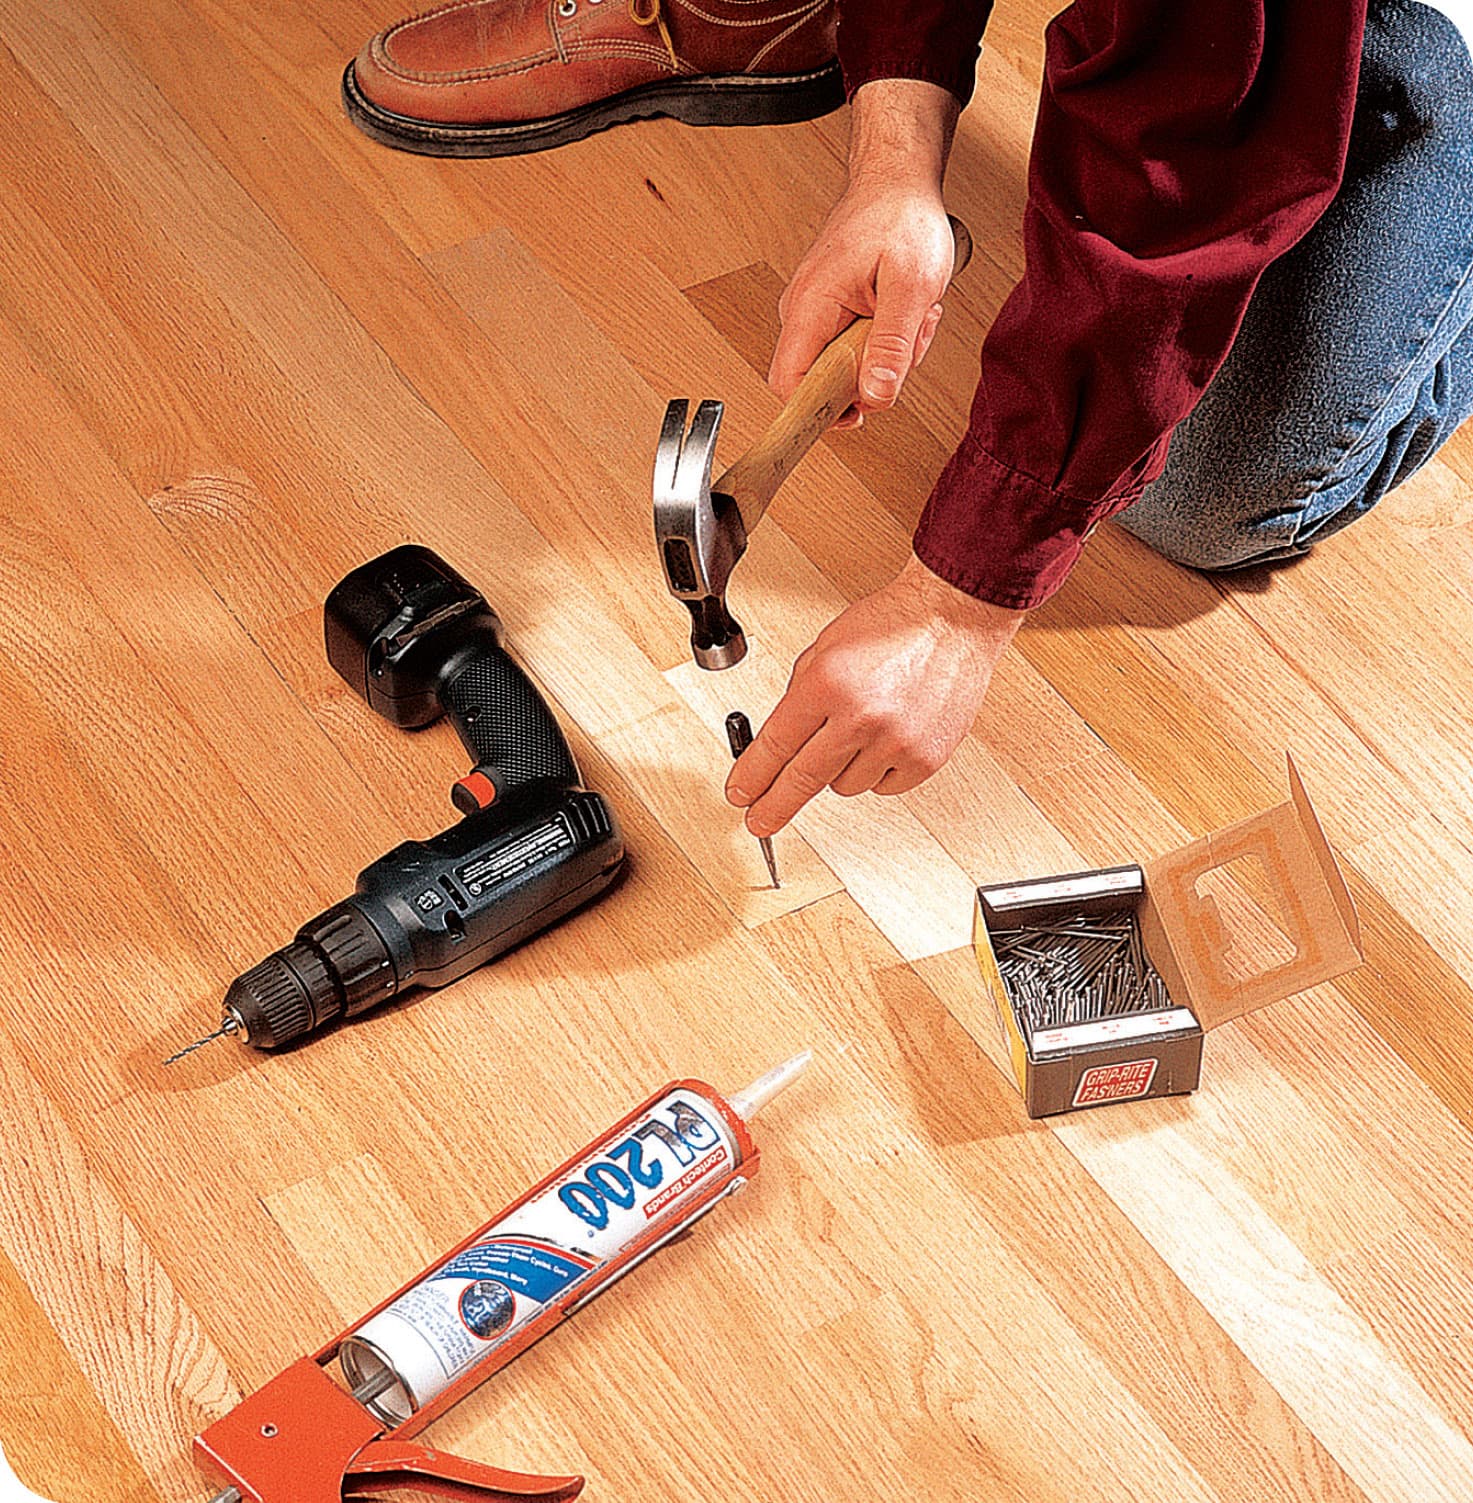
Existing flooring nails may have simply loosened from the underlying subfloor, allowing the floor to buckle upward. Look for nail heads securing the flooring, and use a nail set to drive them back down into the subfloor. If the nails are hidden in the tongue-and-groove joints, drill pilot holes on the loose floorboards, and drive finish nails down into the subfloor. Recess the nail heads with a nail set, then fill the holes with wood putty.
Solutions for Squeaky Floors
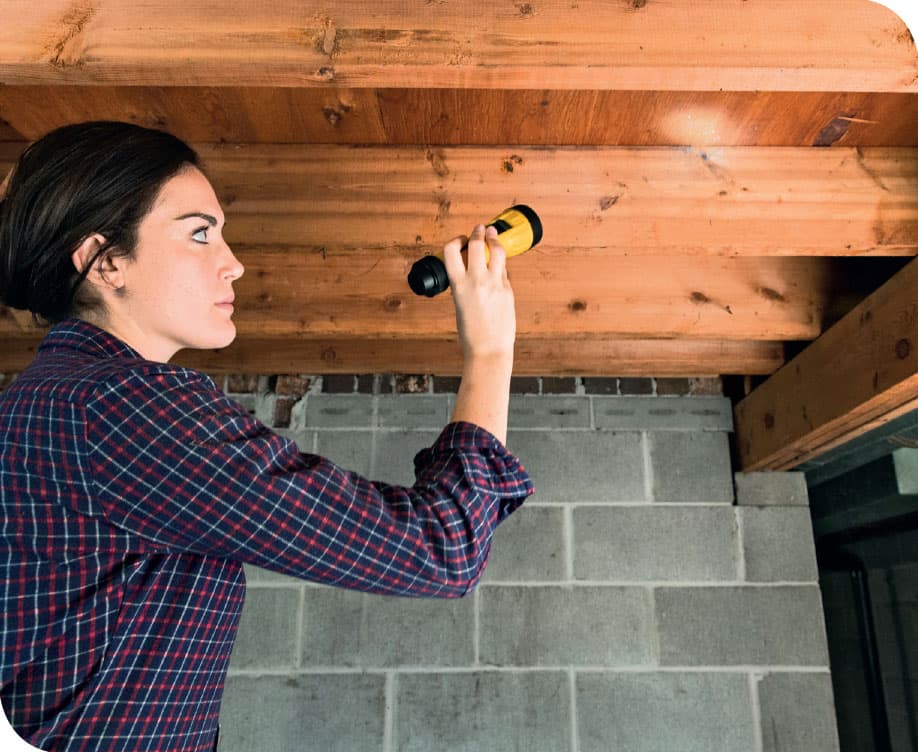
Find the source of the squeak, if possible. Look for flexing or gaps between the subfloor and joists. Fill these areas with shims glued into place or with construction adhesive that will dry hard and eliminate the space for movement (below). This method also works if you spot areas where the subfloor is flexing and rubbing against pipes or HVAC ducts.
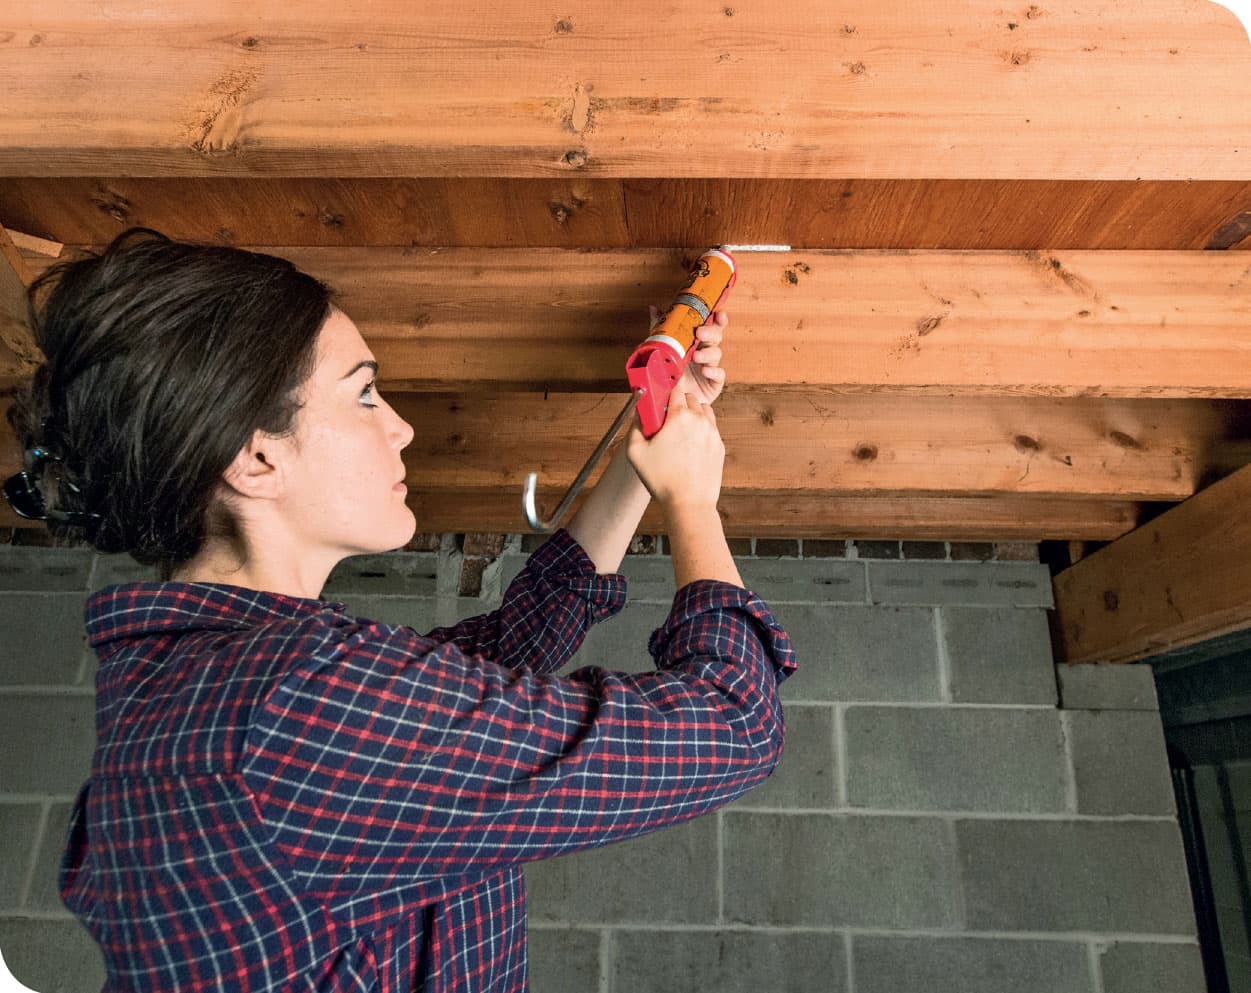
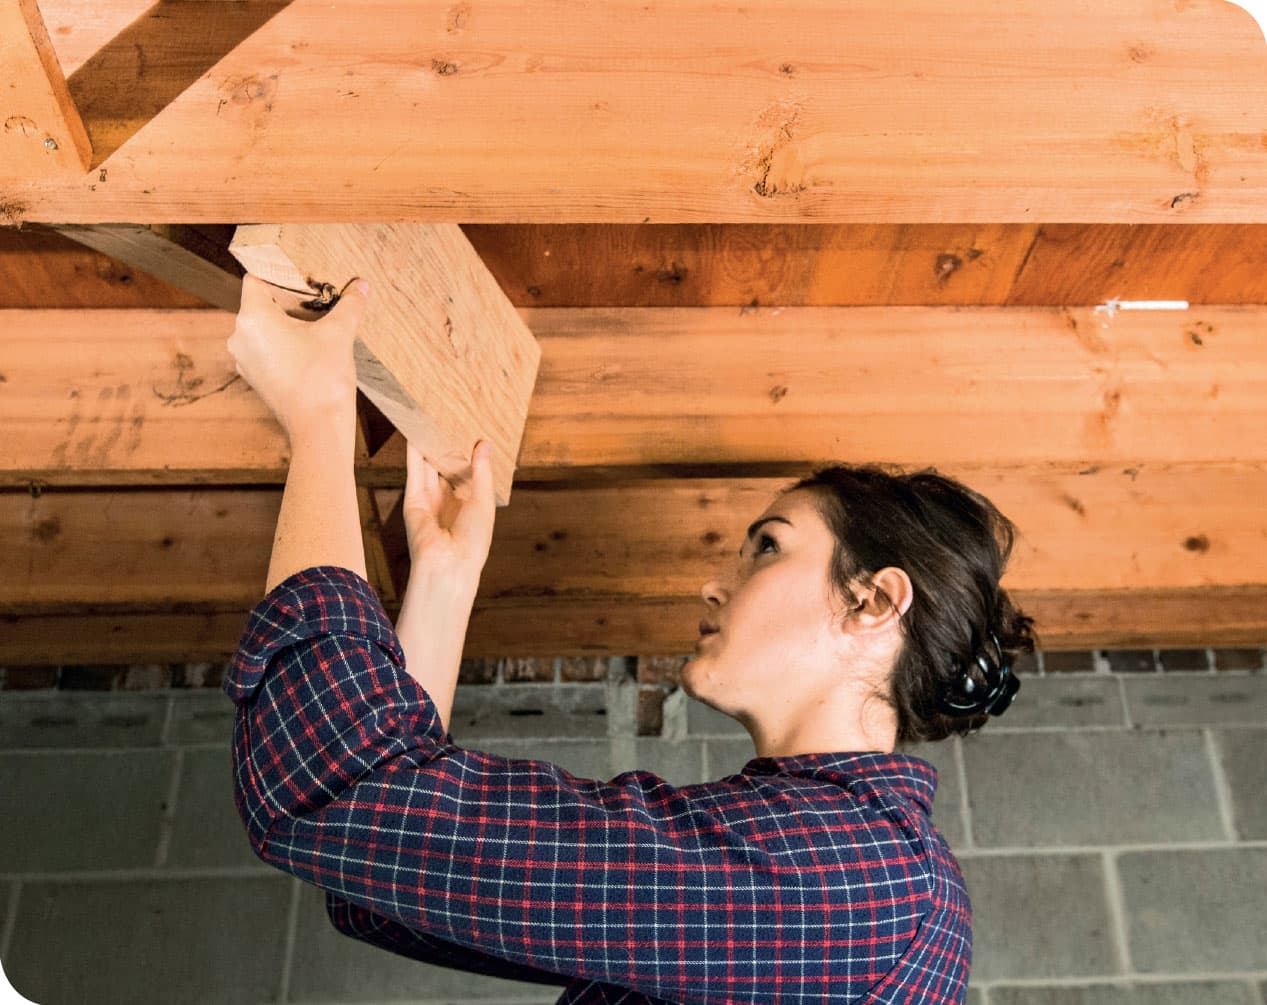
Install solid cross blocking between joists to reinforce the floor and eliminate the squeak by eliminating flexing. Apply a bead of construction adhesive along the top of the blocking, then nail it to the adjoining joists so it is flush up against the subfloor.
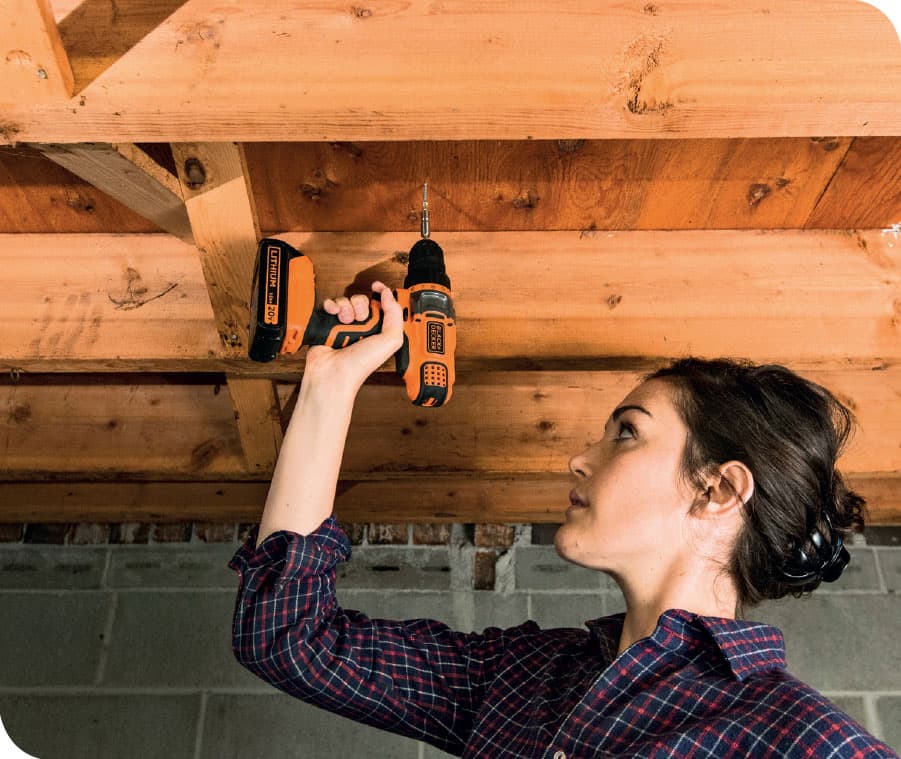
The squeaking may also be caused by gaps between the surface flooring and the subfloor. The solution here is to drive screws from below, drawing down the surface flooring and snugging it up against the subfloor
REPLACING DAMAGED FLOORBOARDS
There will be instances in which flooring boards are too badly damaged or stained to be repaired with acceptable results. In these instances, replacing the boards will be the best option, and in most cases it will be possible to do this in a way that makes the repair invisible to all but the keenest eye.
On a solid hardwood floor, a very good time to replace floorboards is when you are already planning on sanding and refinishing. Once the replaced flooring is installed, a complete sanding down to bare wood will nicely blend in the original floor with the new replacement boards.
Whenever possible, hardwood boards should be replaced along their entire length, not just patched in as a short segment. A replacement board running full length and matching the pattern of the other boards will be almost invisible, especially if the entire floor is being refinished. Where this is not possible, you can outline the damaged area, cut it away with a circular saw and chisel, and cut a tight-fitting replacement piece to insert in the space.
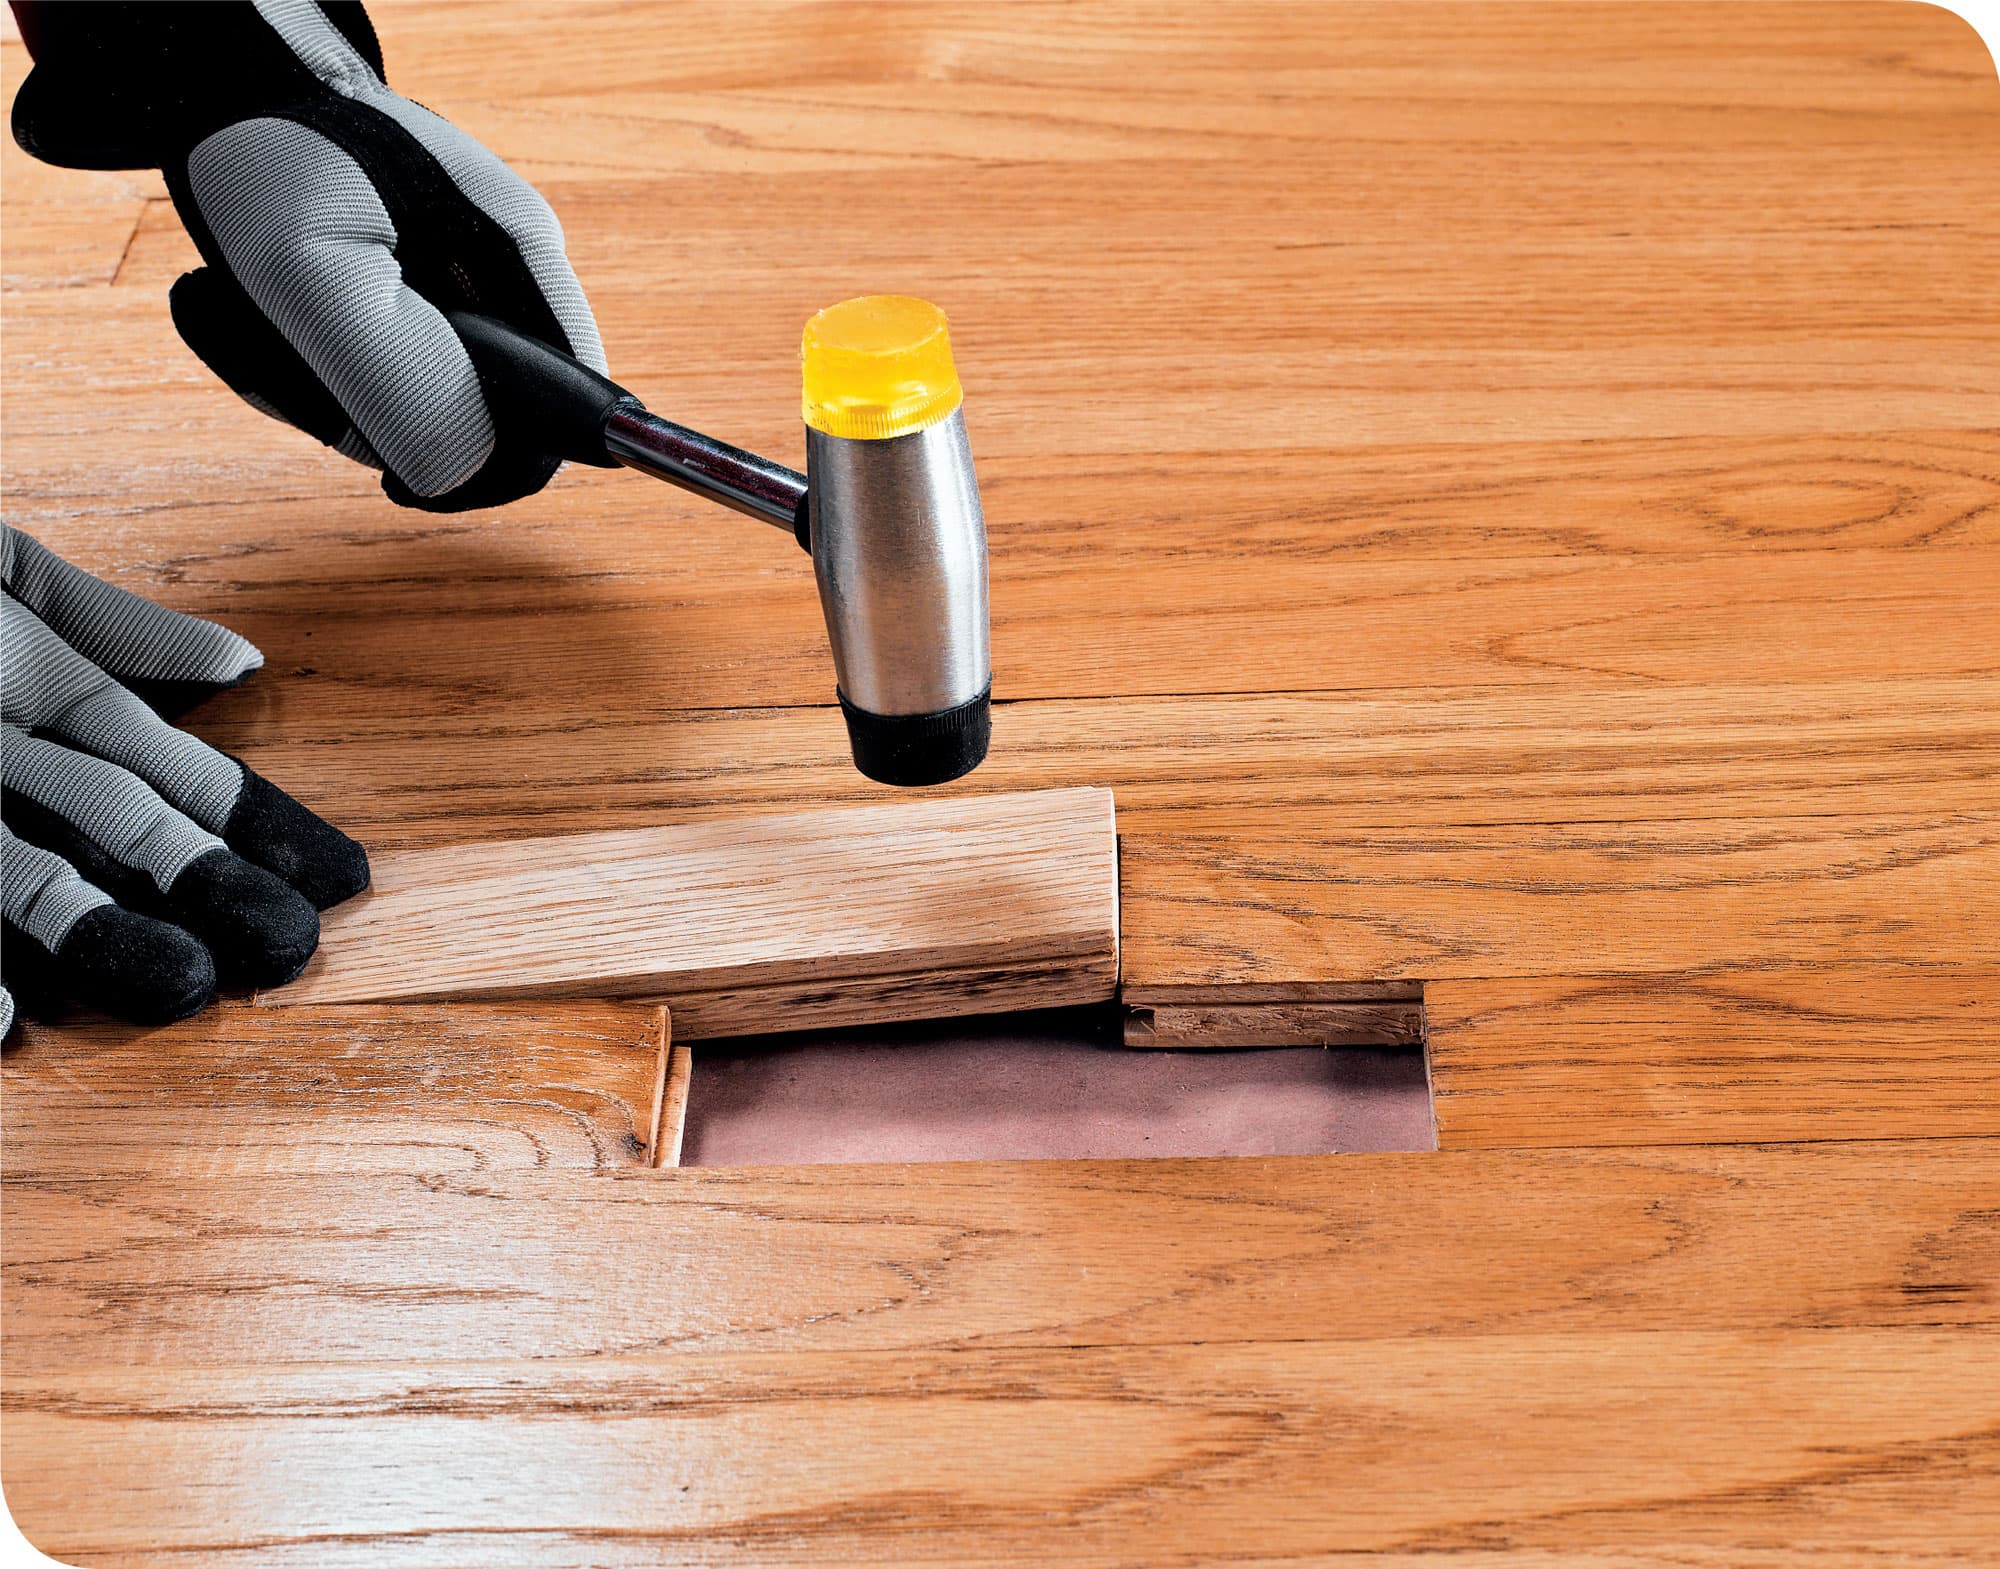
Ideally, floorboards are replaced in full lengths so the original pattern can be preserved. However, it is sometimes most expedient to replace only the damaged area with small, custom-cut segments and do your best to blend it in.
How to Replace a Hardwood Plank
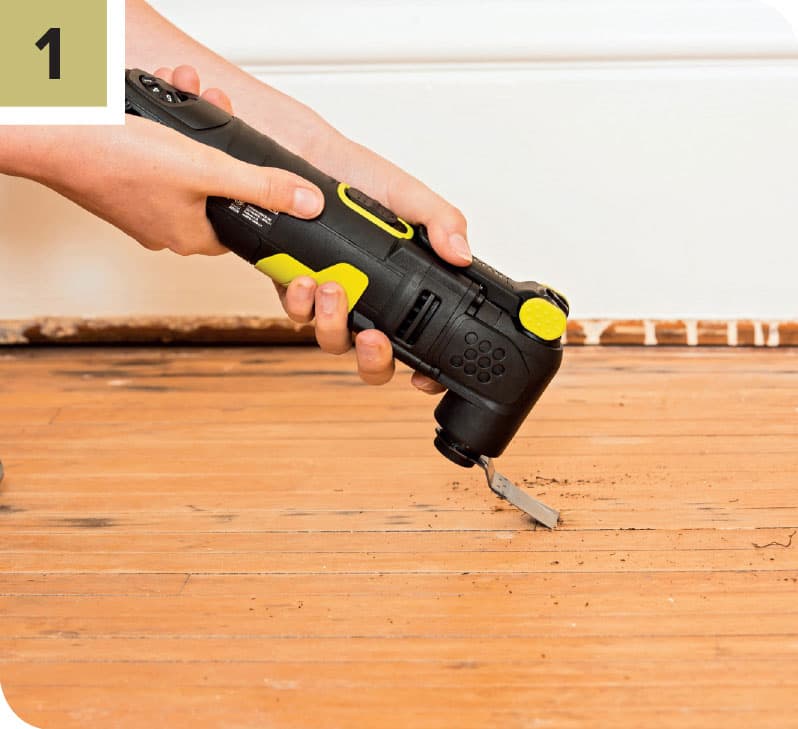
Use an oscillating multitool to cut the end of a hardwood plank. These relatively new power tools are good for making isolated cuts.
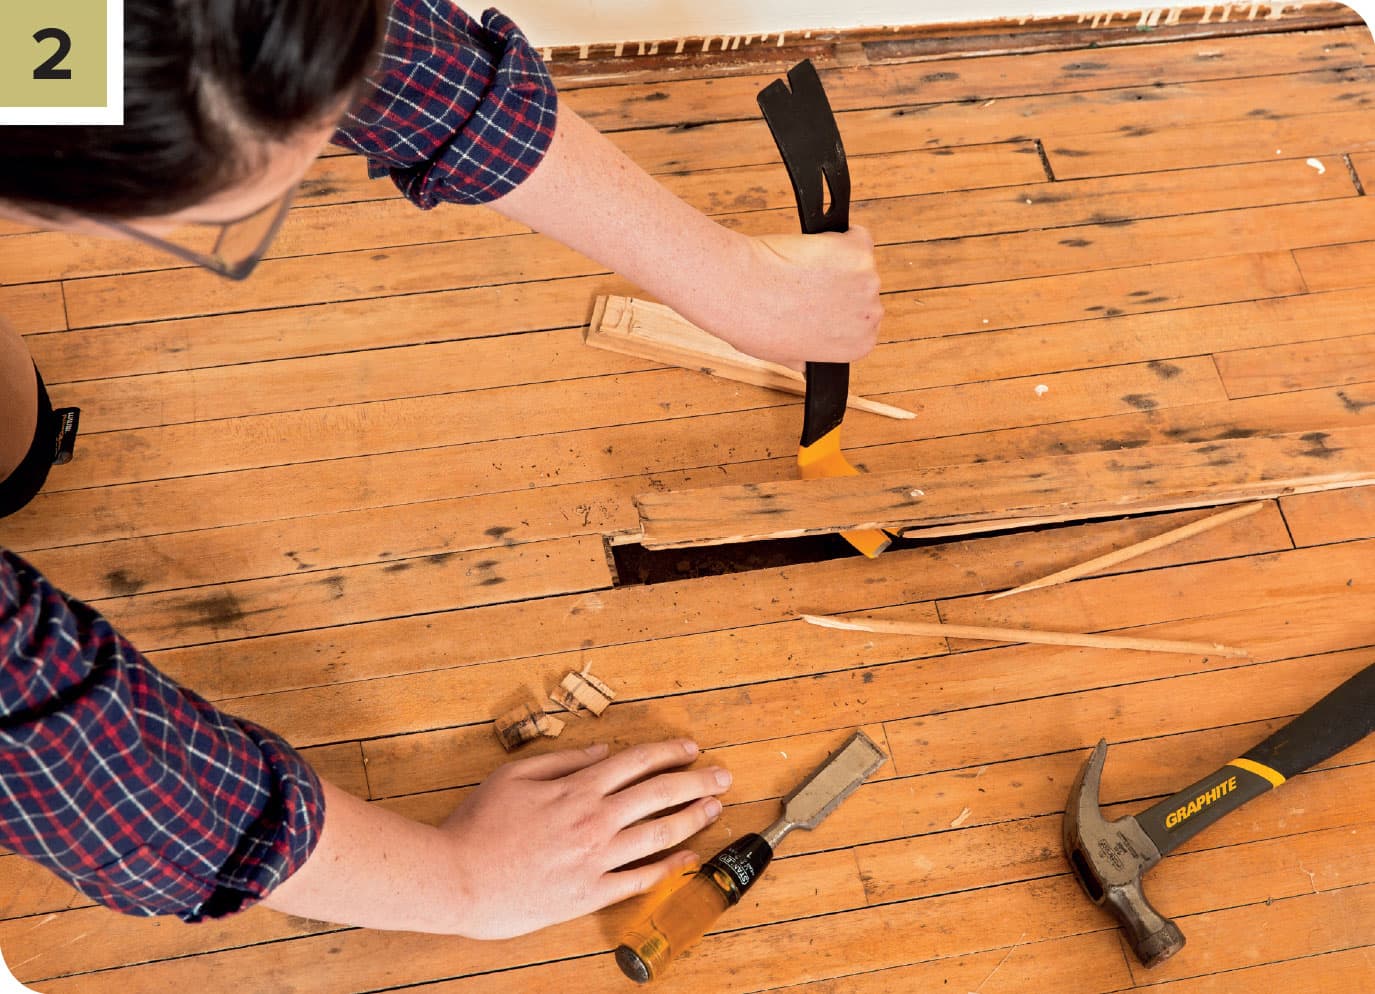
Use a chisel to pry out the flooring pieces, and to complete the cuts at the end of the board so they are smooth. Remove any exposed nails visible in the cutout area.
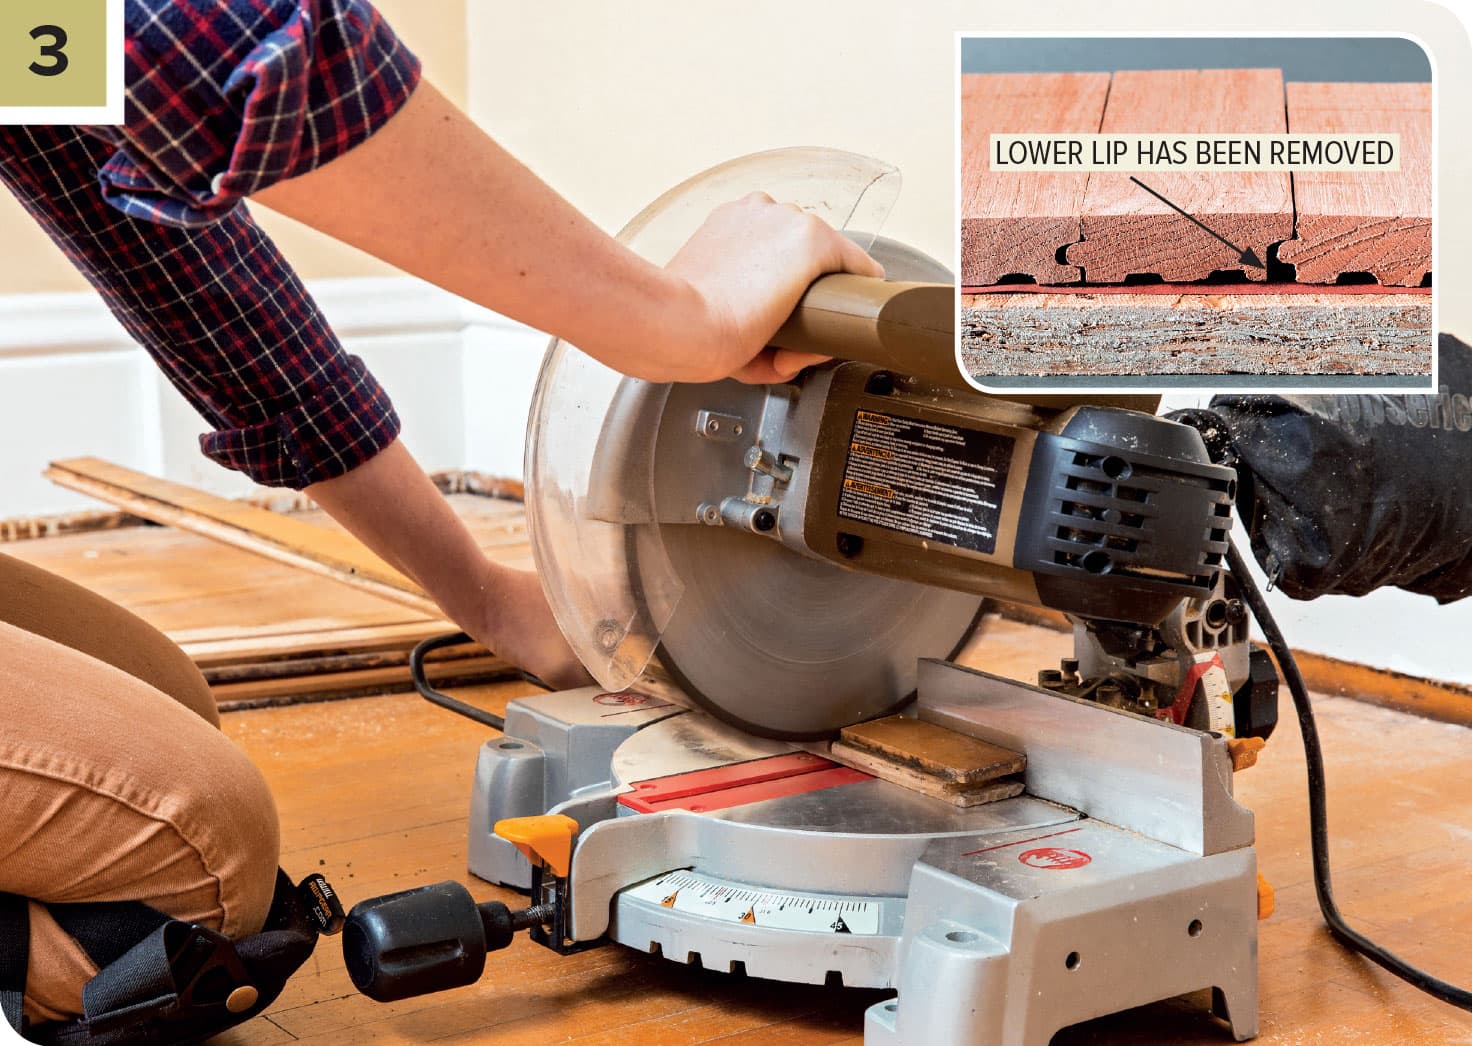
Cut a new flooring board to length. Then use a circular saw, table saw, or wood chisel to cut away the bottom lip of the board’s groove. Insert the tongue edge of the new board into the groove of the existing board, and lever the board down into place, so that the remaining top groove edge fits over the tongue of the board at the other side of the cutout, as shown in the inset photo.
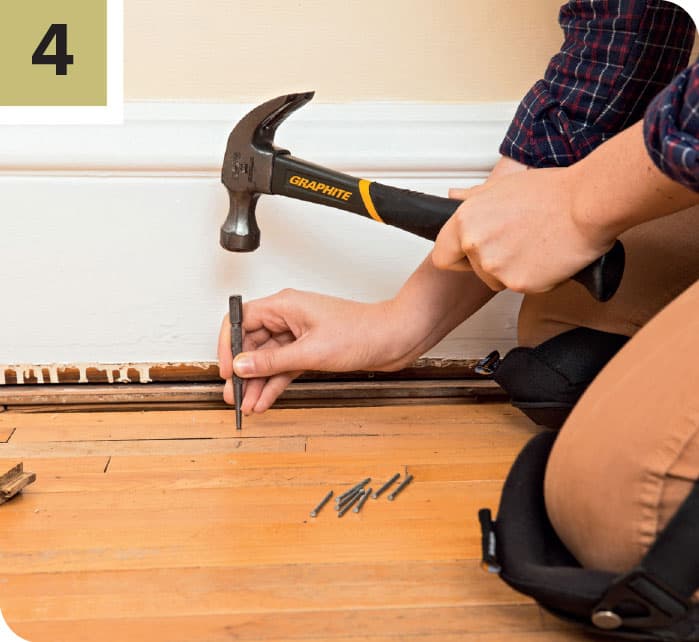
Facenail the new board in place by drilling pilot holes and driving finish nails down through the replacement board and into the subfloor. Recess the nail heads with a nail set, and fill the nail holes with putty. Finish the new board with stain and top coat finish to match the rest of the floor.
How to Replace a Section of Hardwood Flooring
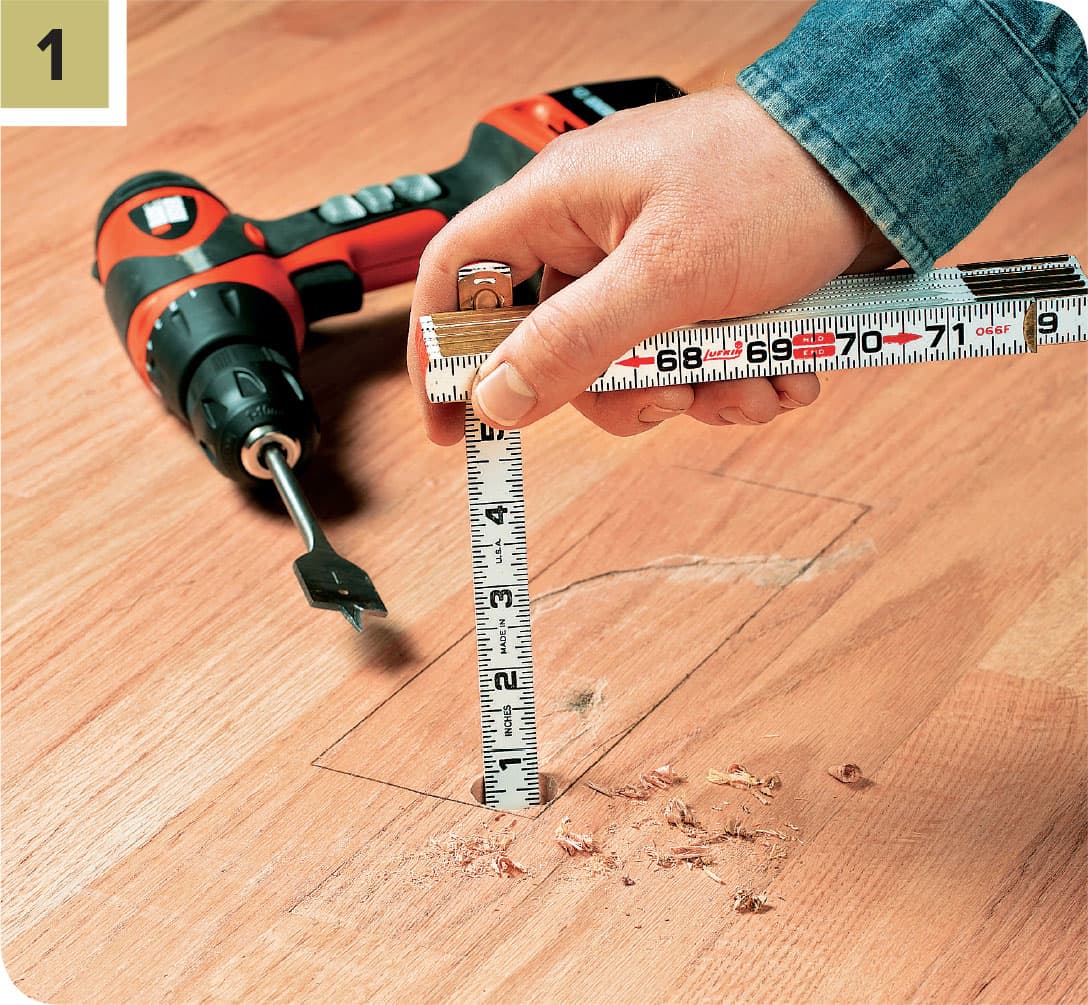
Outline cutting lines around the damaged board. To avoid nails, keep the outline at least 1/4" inside the seams between boards. Drill a hole through the damaged board, using a spade bit. Drill until you can see the top of the subfloor. Measure the thickness of the floorboard, then set your circular saw to this depth.
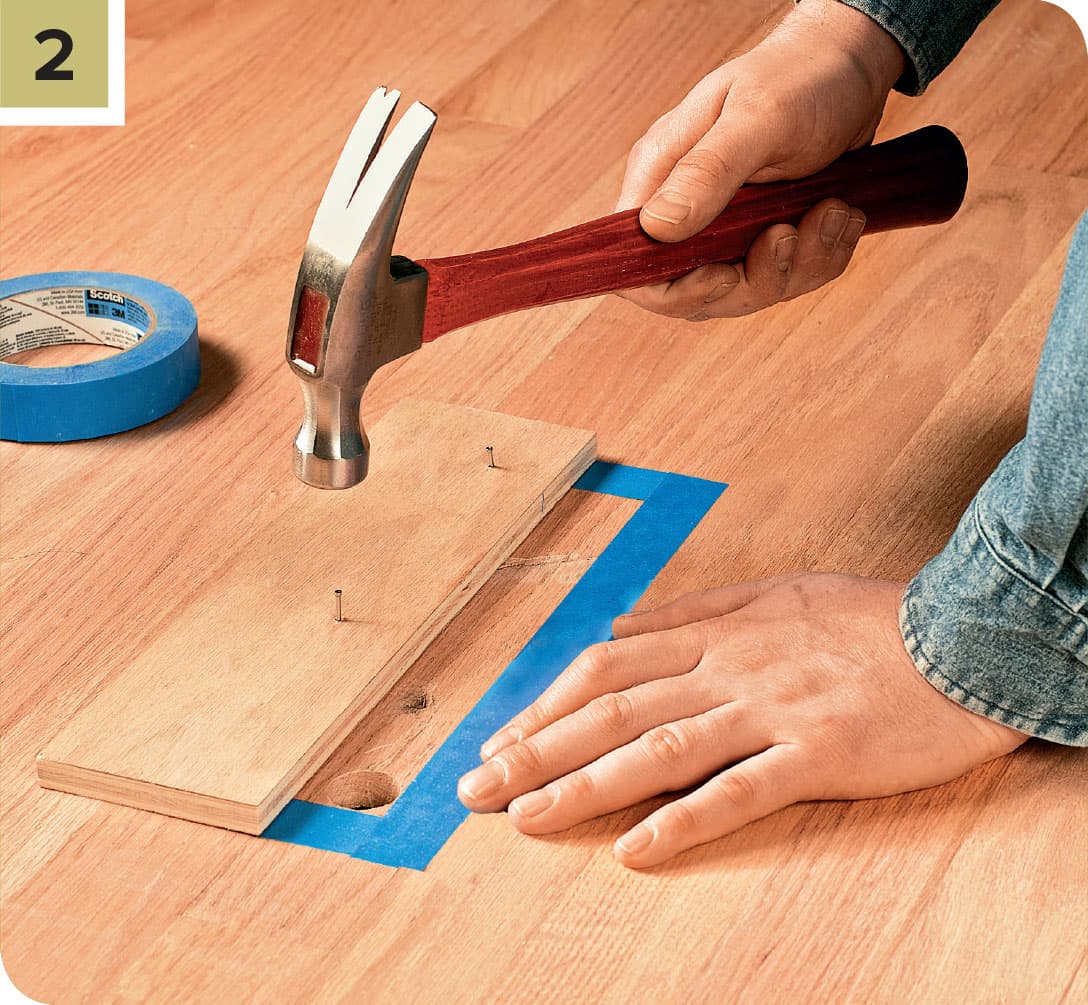
To prevent the boards from chipping, place painter’s tape along the outside of the pencil lines. To create a straightedge guide for your saw, tack a straight wood scrap inside the damaged area. Set this straightedge guide back from the cutting line a distance equal to the measurement between the saw blade and the edge of the saw foot plate.
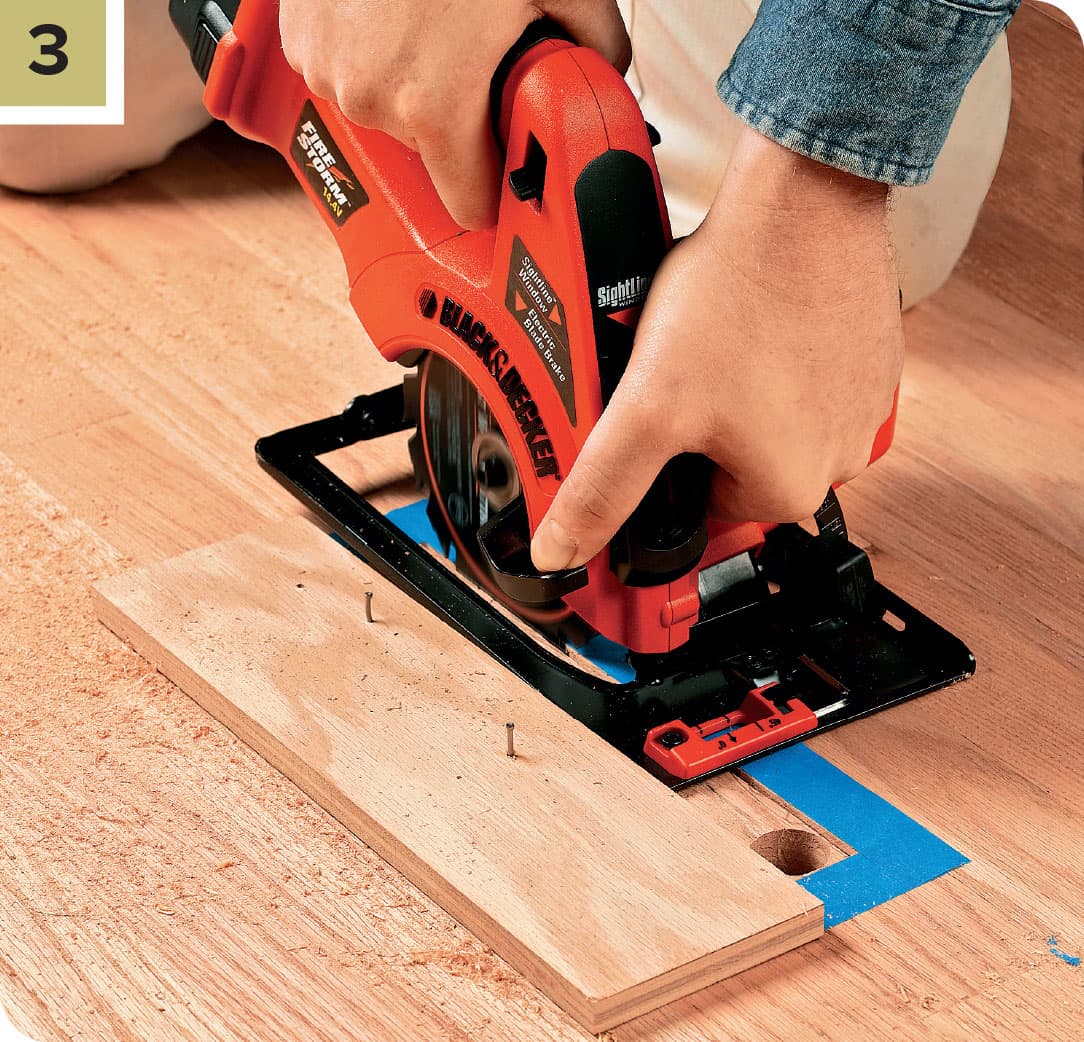
Align the circular saw so the front of the saw foot is against the straightedge guide. Cut along the cutting line, stopping 1/4" from the corners. Remove the straightedge guide and repeat along other cutting lines. Complete the cuts with a sharp chisel to loosen the damaged board from the subfloor. For clean cuts, the chisel’s beveled side needs to face the damaged area.
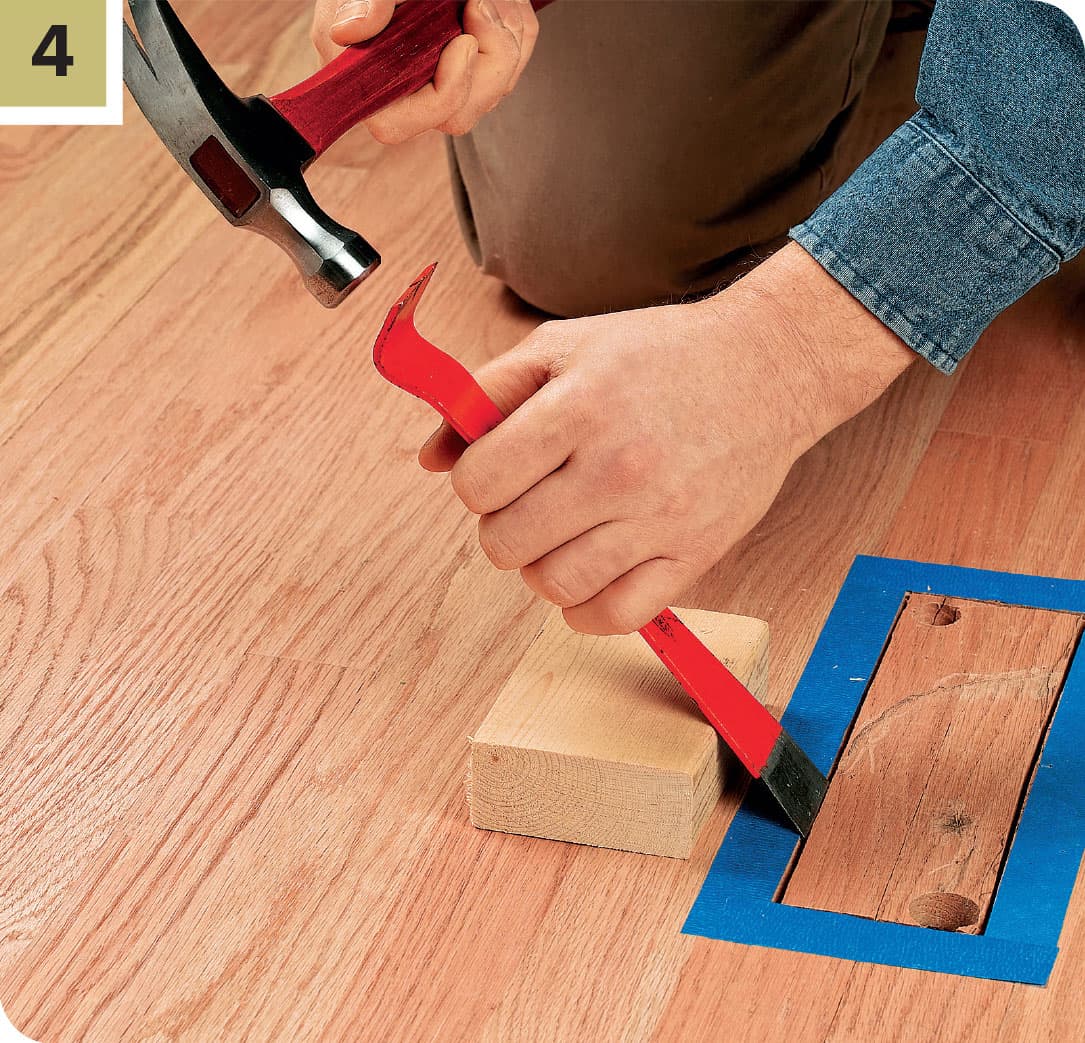
Using a pry bar, hammer, and 2 × 4 leverage block, pry up the split board. Remove any nails showing.
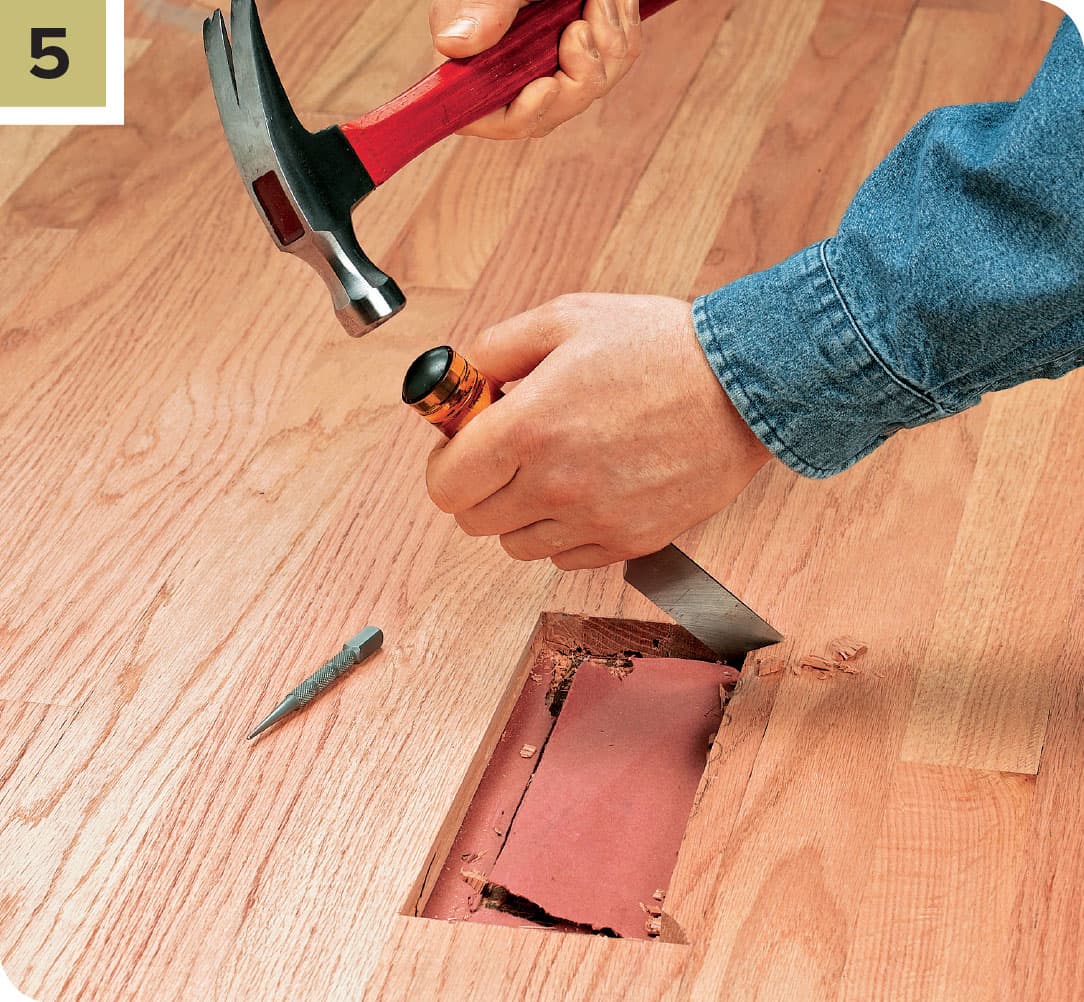
Use the chisel to remove the narrow strips of remaining wood between the cutout area and the adjoining flooring boards. For a good fit of the replacement board, it is very important to make these cuts as square as possible. Cut a segment of new flooring board to length, then cut away the lower lip of the groove on one side of patch board.
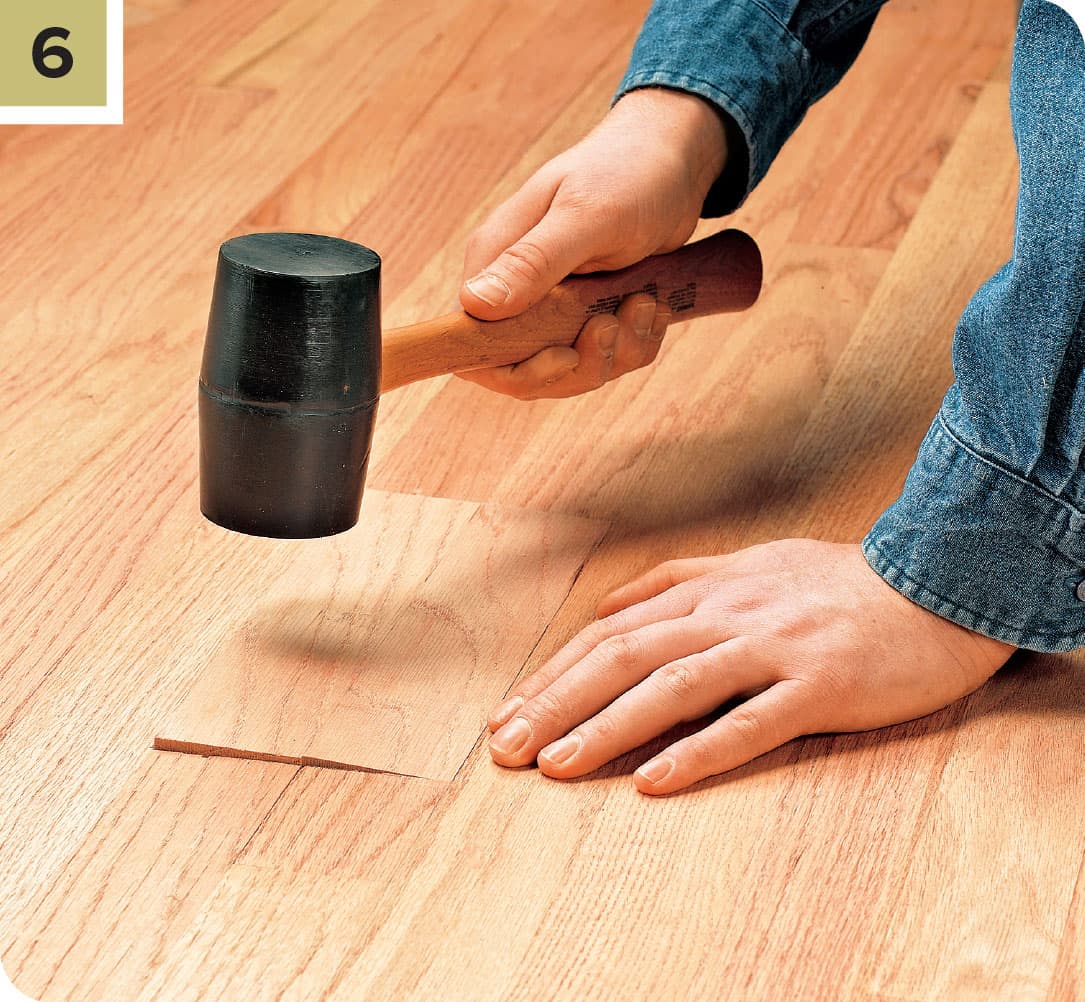
Hook the tongue of the replacement piece into the exposed groove of the adjoining old floorboard and use a rubber mallet to tap the groove side down until it is flush with the surrounding floor.
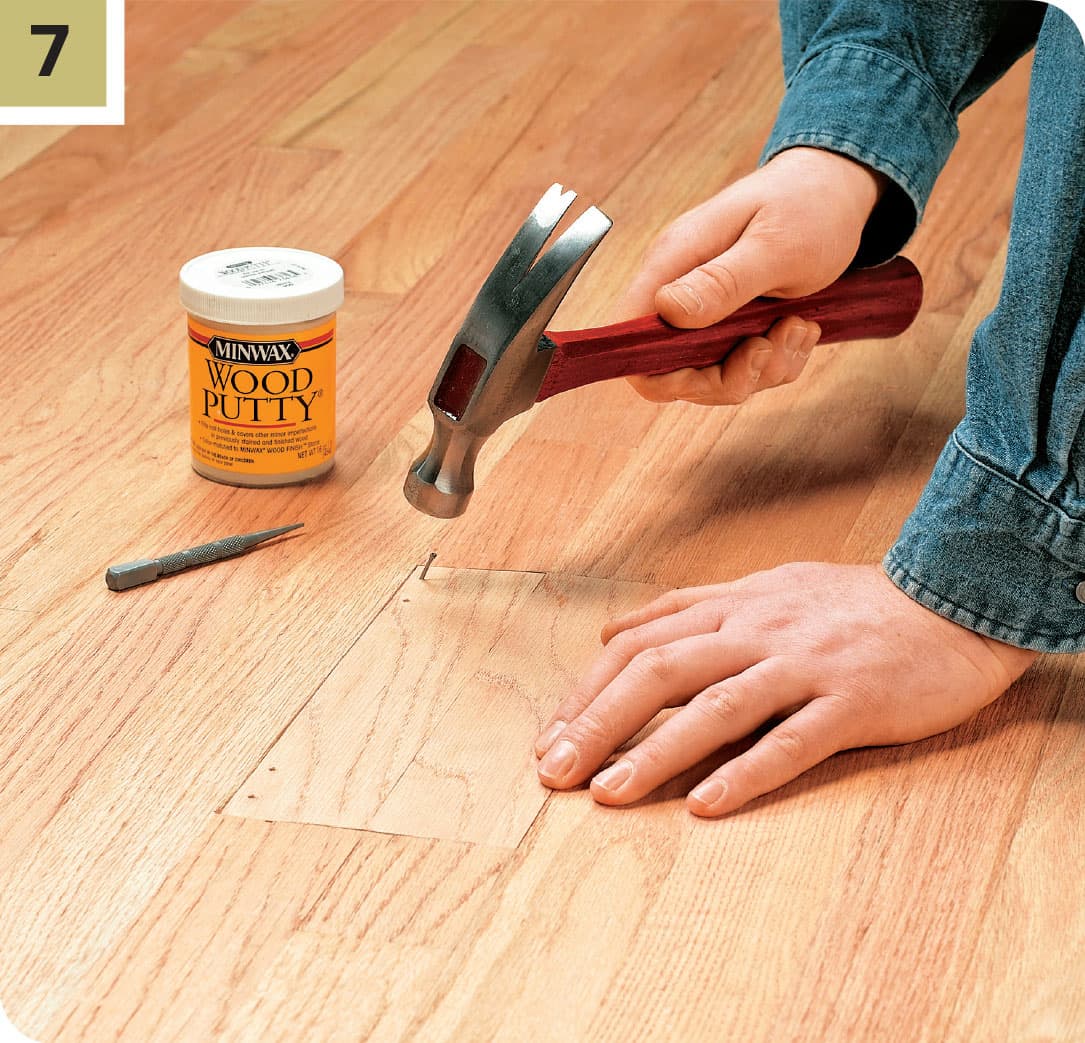
On the face of the replacement board, drill pilot holes angled outward at each end, about 1/2" from the ends. Drive 11/2" 8d finish nails into the pilot holes, securing the repair board to the adjoining floorboards. Recess the nail heads with a nail set, and fill the nail holes with wood putty. If there are any gaps along the edges of the replacement piece, also fill them with wood putty. Once the putty is dry, sand the putty and patch area smooth with fine-grit sandpaper. Apply matching wood stain, and let dry; then apply two coats of matching finish.
REPLACING LAMINATE FLOORING
In the event that you need to replace a laminate plank, you must first determine how to remove the damaged plank. If you have a glueless “floating” floor it is best to unsnap and remove each plank starting at the wall and moving in until you reach the damaged plank. However, if the damaged plank is far from the wall, cut out the damaged plank. Fully-bonded laminate planks are secured directly to the underlayment. When you remove the damaged plank, you run the risk of gouging the subfloor, so work with care or call in a professional.

From bottom to top, laminate planks are engineered to resist moisture, scratches, and dents. A melamine base layer protects the inner core layer, which is most often HDF (high-density fiberboard). This is occasionally followed by kraft paper saturated in resins for added protection and durability. The print film is a photographic layer that replicates the look of wood or ceramic. The surface is a highly protective wear layer. The tongue-and-groove planks fit together tightly and may be glued together for added stability.
How to Replace Laminate Planks
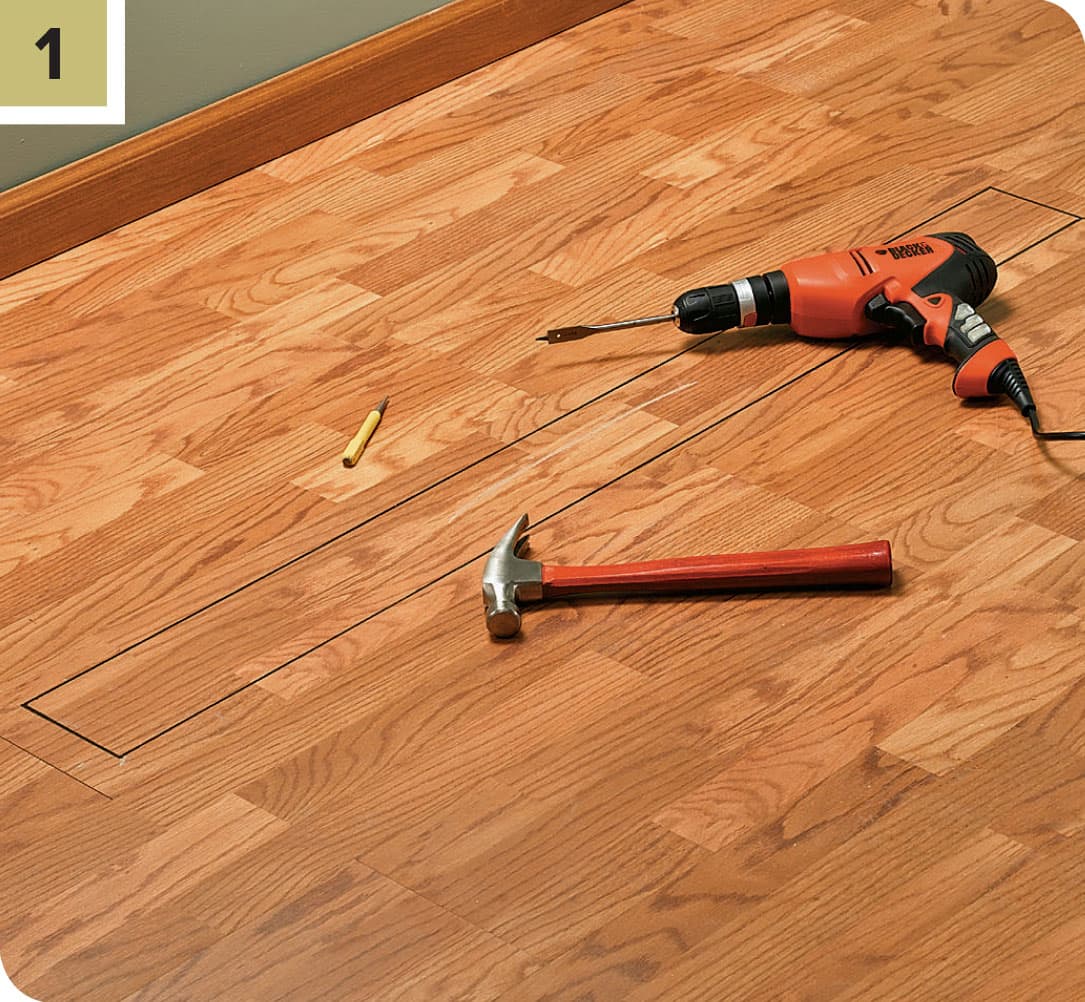
Draw a rectangle in the middle of the damaged board with a 11/2" border between the rectangle and factory edges. At each rectangle corner and inside each corner of the plank, use a hammer and nail set to make indentations. At each of these indentations, drill 3/16" holes into the plank. Only drill the depth of the plank.

To protect the floor from chipping, place painter’s tape along the cutlines. Set the circular saw depth to the thickness of the replacement plank. To plunge-cut the damaged plank, slowly lower the saw blade into the cutline until the foot rests flat on the floor. Push the saw from the center of the line out to each end. Stop 1/4" in from each corner. Use a hammer to tap a pry bar or chisel into the cutlines. Lift and remove the middle section. Place a sharp chisel between the two drill holes in each corner and strike with a hammer to complete each corner cut. Vacuum.
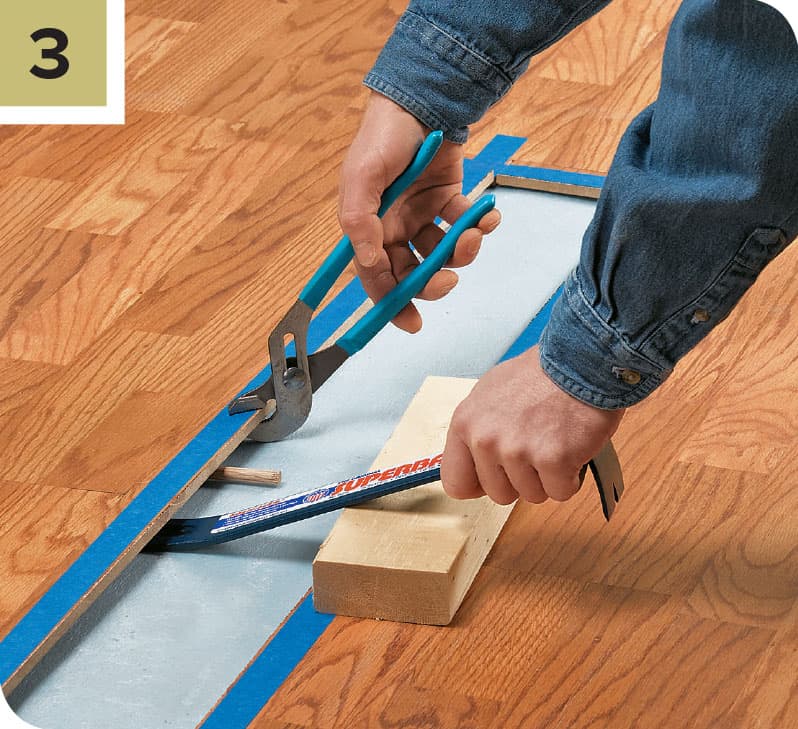
To remove the remaining outer edges of the damaged plank, place a scrap 2 × 4 wood block along the outside of one long cut and use it for leverage to push a pry bar under the flooring. Insert a second pry bar beneath the existing floor (directly under the joint of the adjacent plank) and use a pliers to grab the 11/2" border strip in front of the pry bar. Press downward until a gap appears at the joint. Remove the border piece. Remove the opposite strip and then the two short end pieces in the same manner. Remove all of the old glue from the factory edges with a chisel.
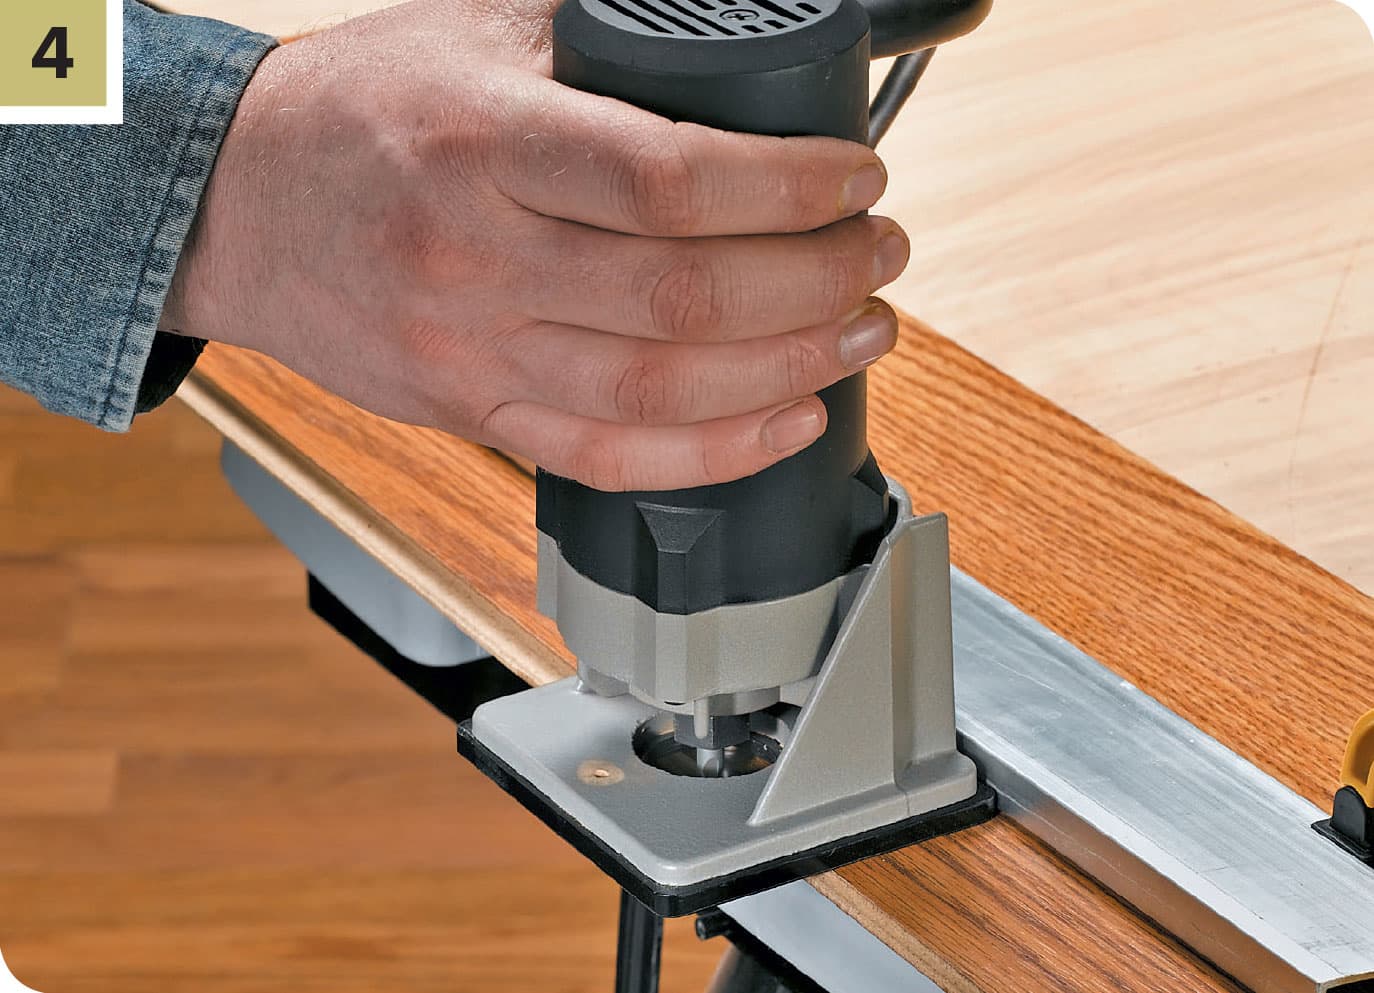
To remove the tongues on one long and one short end, clamp a straight cutting guide to the replacement plank so the distance from the guide causes the bit to align with the tongue and trim it off. Pressing a router or laminate trimmer against the cutting guide, slowly move along the entire edge of the replacement plank to remove the tongue.
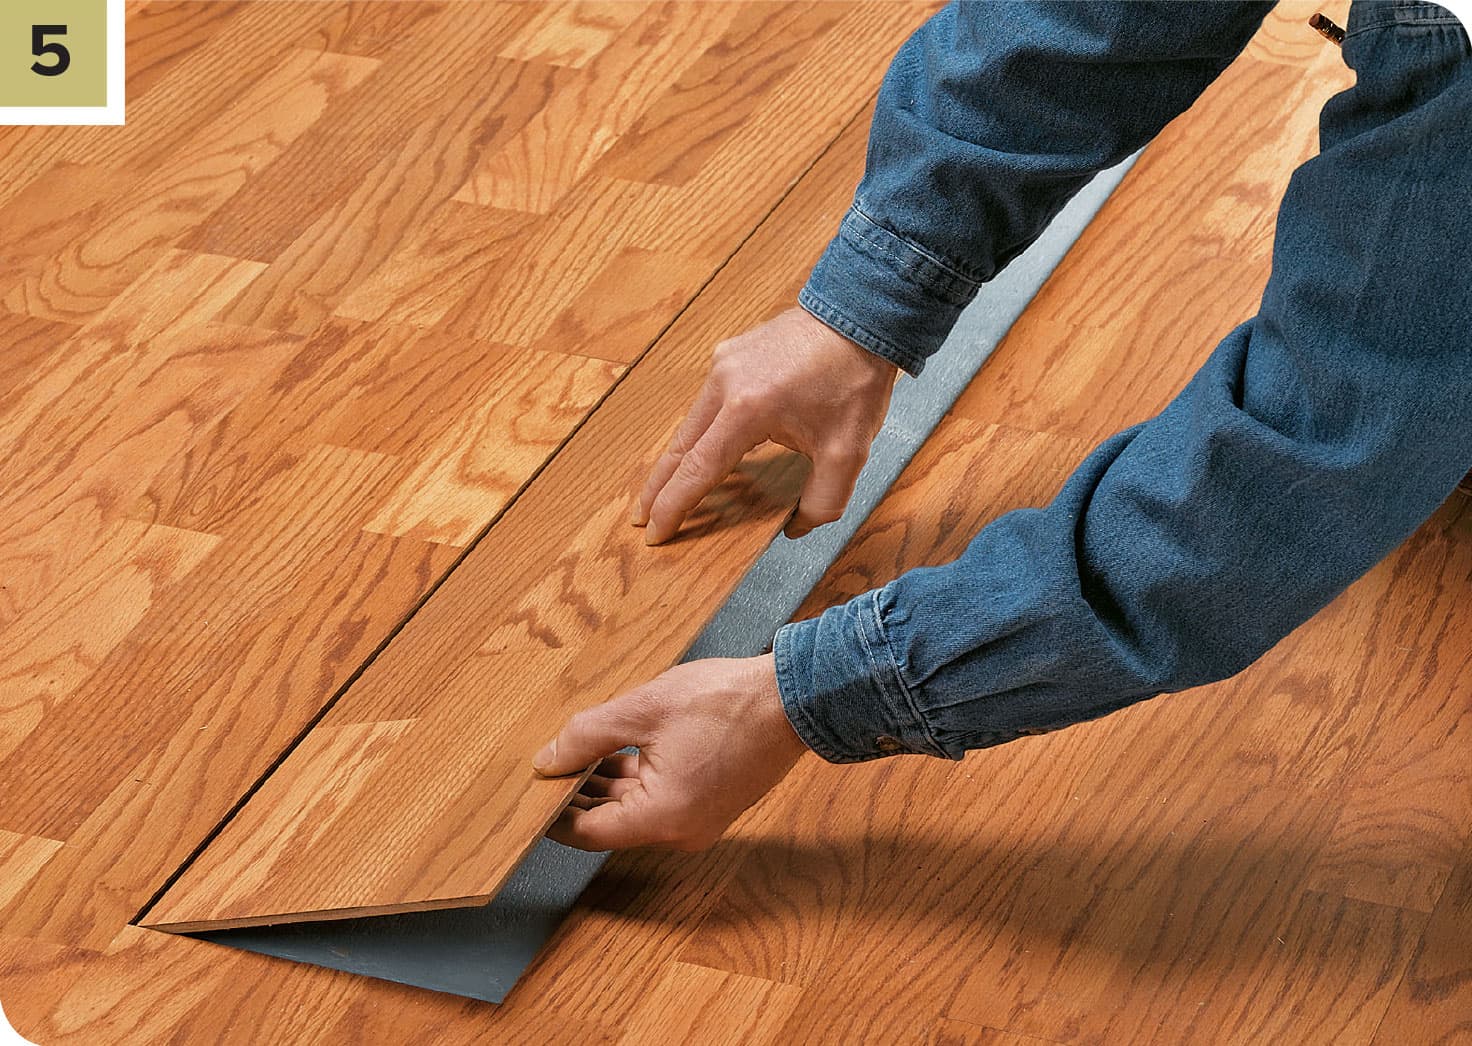
Dry-fit the grooves on the replacement board into the tongues of the surrounding boards and press into place.
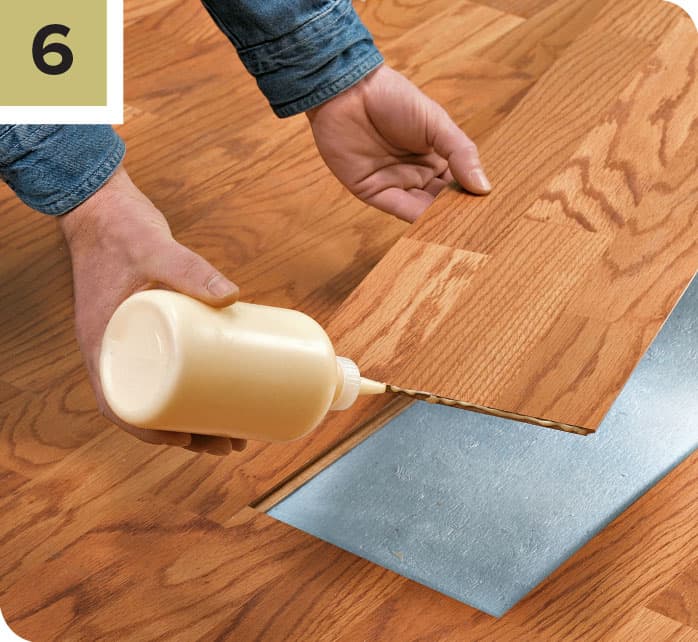
Set the replacement plank by applying laminate glue to the removed edges of the replacement plank and into the grooves of the existing planks. Firmly press the plank into place. Clean up glue with a damp towel. Place a strip of wax paper over the new plank and evenly distribute some books on the wax paper. Allow the adhesive to dry for 12 to 24 hours.
REPAIRING VINYL FLOORING
Repair methods for vinyl flooring depend on the type of floor as well as the type of damage. With sheet vinyl, you can fuse the surface or patch in new material. With vinyl tile, it’s best to replace the damaged tiles. Small cuts and scratches can be fused permanently and nearly invisibly with liquid seam sealer, a clear compound that’s available wherever vinyl flooring is sold. For tears or burns, the damaged area can be patched. If necessary, remove vinyl from a hidden area, such as the inside of a closet or under an appliance, to use as patch material.
How to Replace Resilient Tile
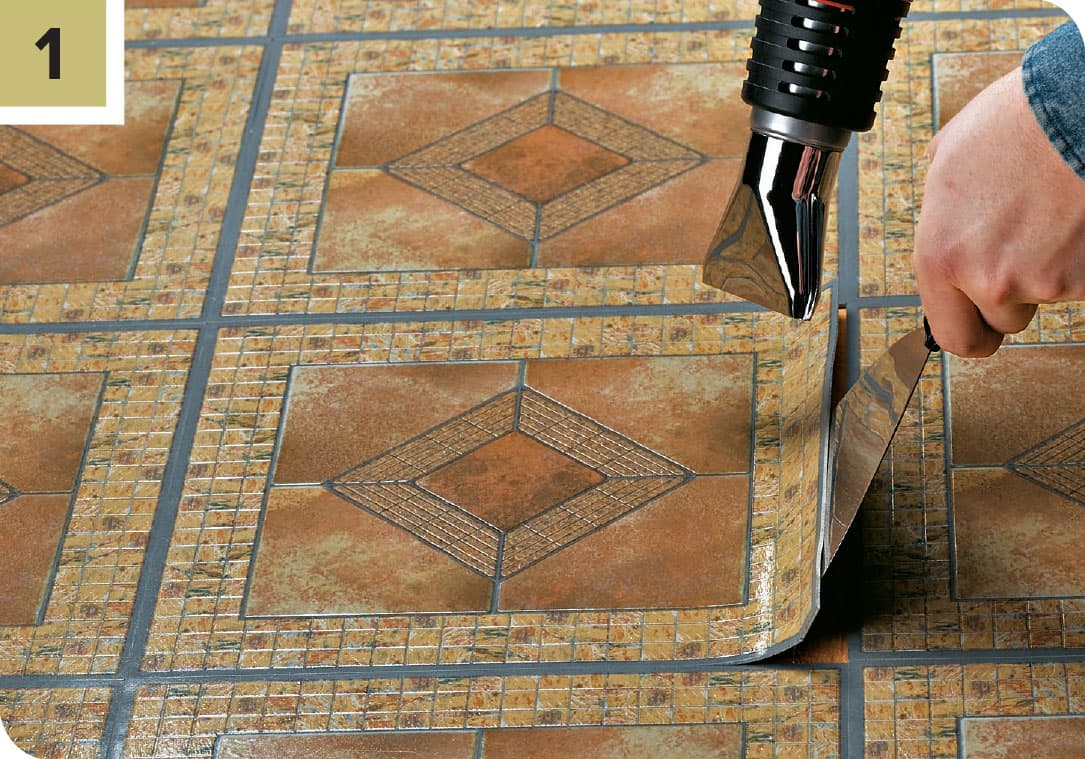
Use an electric heat gun to warm the damaged tile and soften the underlying adhesive. Keep the heat source moving so you don’t melt the tile. When an edge of the tile begins to curl, insert a putty knife to pry up the loose edge until you can remove the tile.
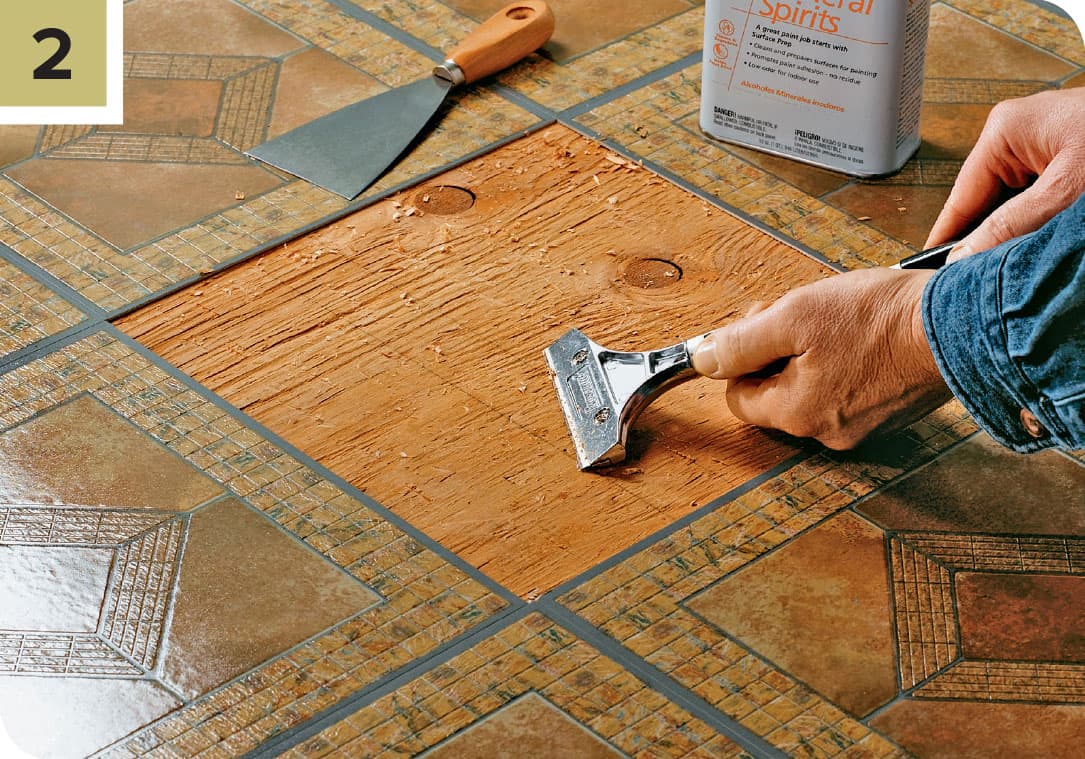
Scrape away remaining adhesive with a putty knife or, for stubborn spots, a floor scraper. Work from the edges to the center so that you don’t accidentally scrape up the adjacent tiles. Use mineral spirits to dissolve leftover goop.
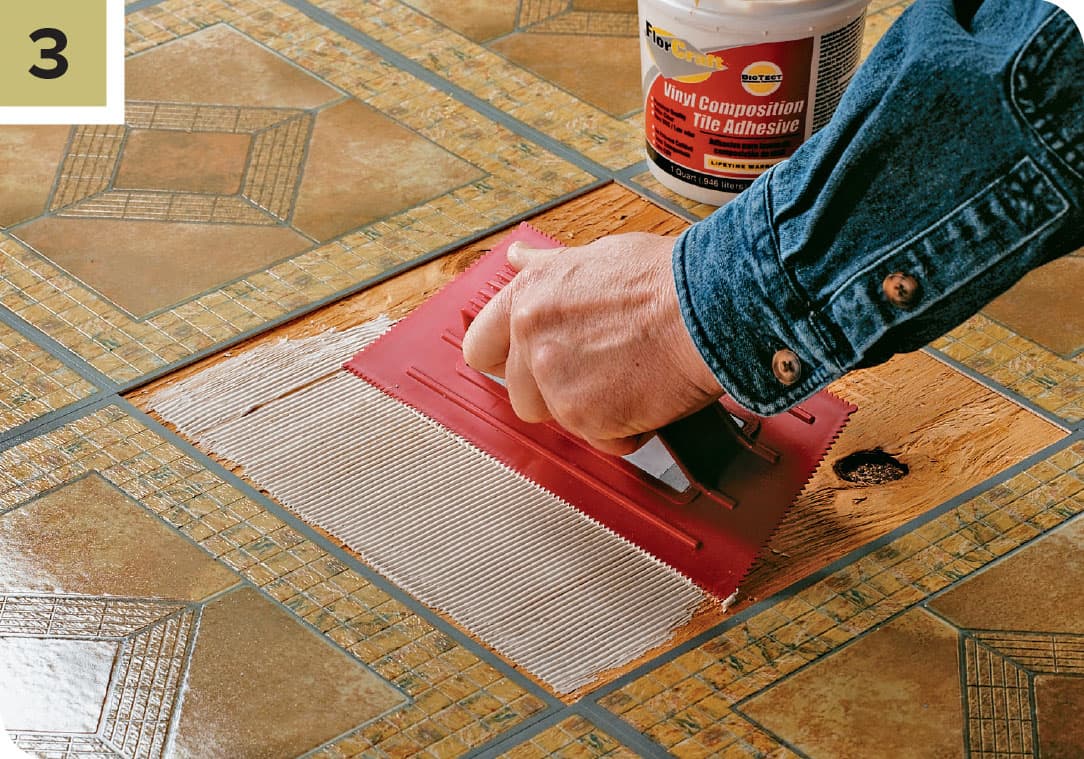
When the floor is dry, use a notched trowel—with 1/8" V-shaped notches—held at a 45° angle to apply a thin, even layer of vinyl tile adhesive onto the underlayment.
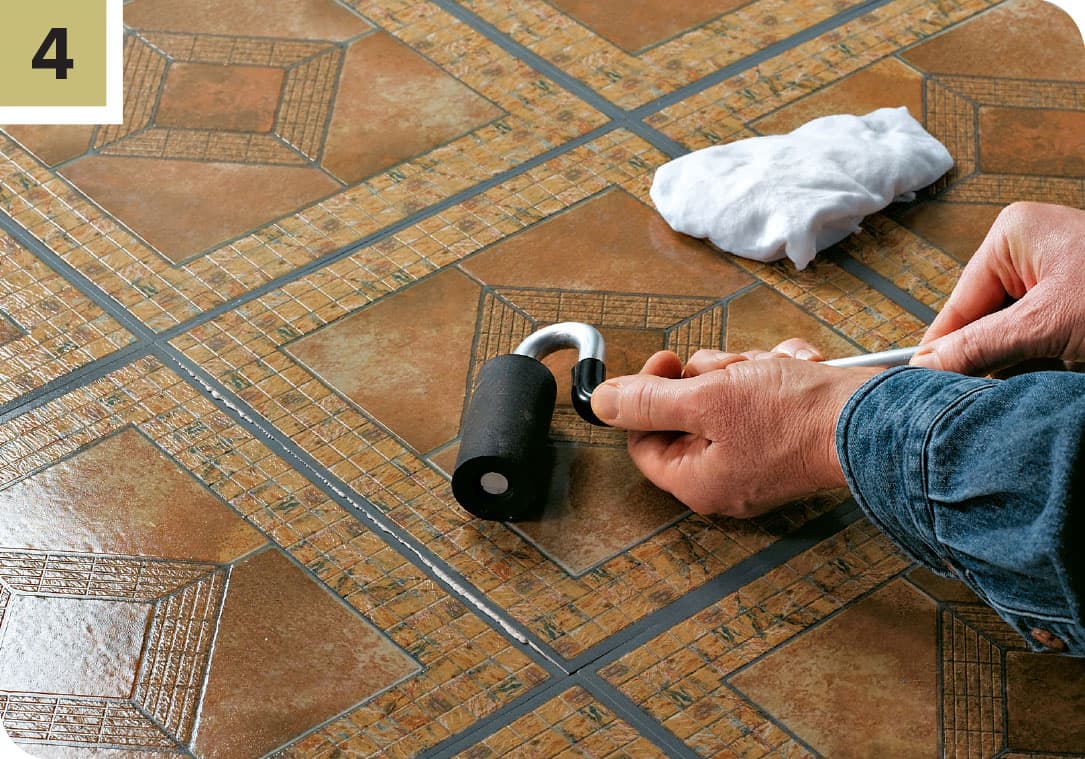
Set one edge of the tile in place. Lower the tile onto the underlayment and then press it into place. Apply pressure with a J-roller to create a solid bond, starting at the center and working toward the edge to work out air bubbles. If adhesive oozes out the sides, wipe it up with a damp cloth or sponge. Cover the tile with wax paper and some books, and let the adhesive dry for 24 hours.
How to Patch Sheet Vinyl
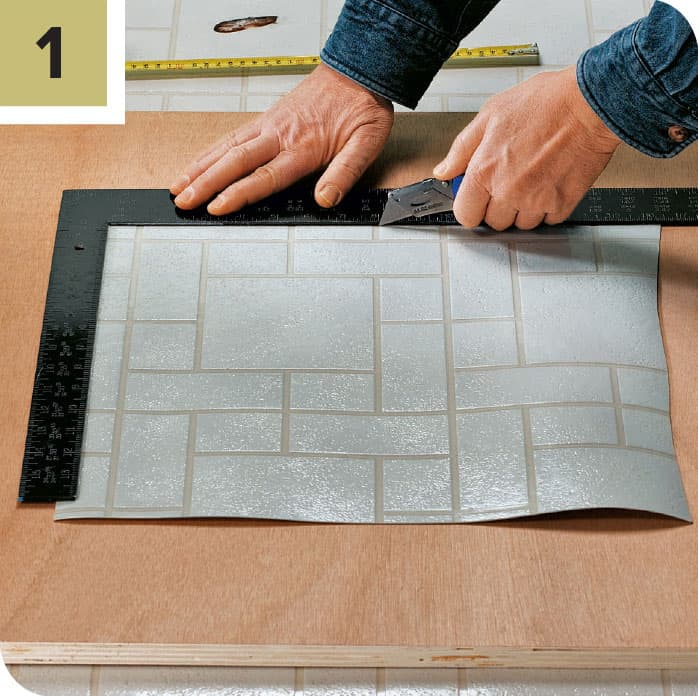
Measure the width and length of the damaged area. Place the new flooring remnant on a surface you don’t mind making some cuts on—like a scrap of plywood. Use a carpenter’s square for cutting guidance. Make sure your cutting size is a bit larger than the damaged area.
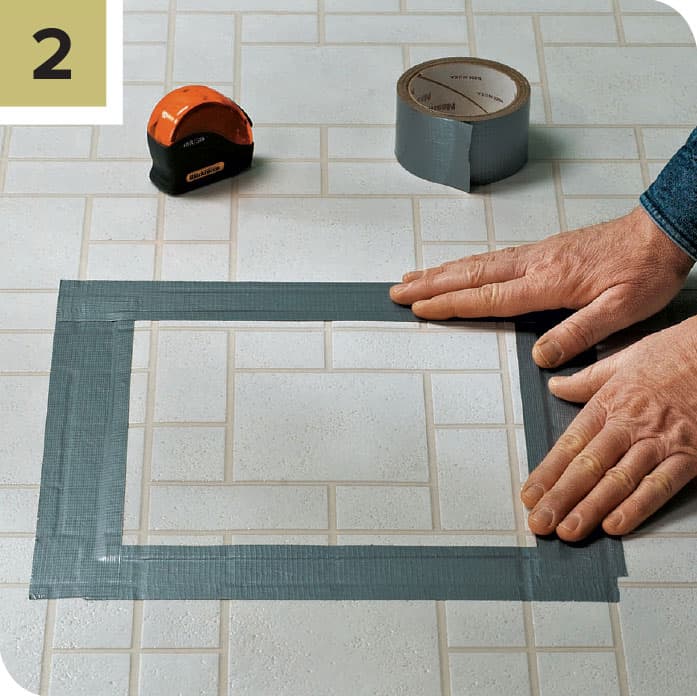
Lay the patch over the damaged area, matching pattern lines. Secure the patch with duct tape. Using a carpenter’s square as a cutting guide, cut through the new vinyl (on top) and the old vinyl (on bottom). Press firmly with the knife to cut both layers.
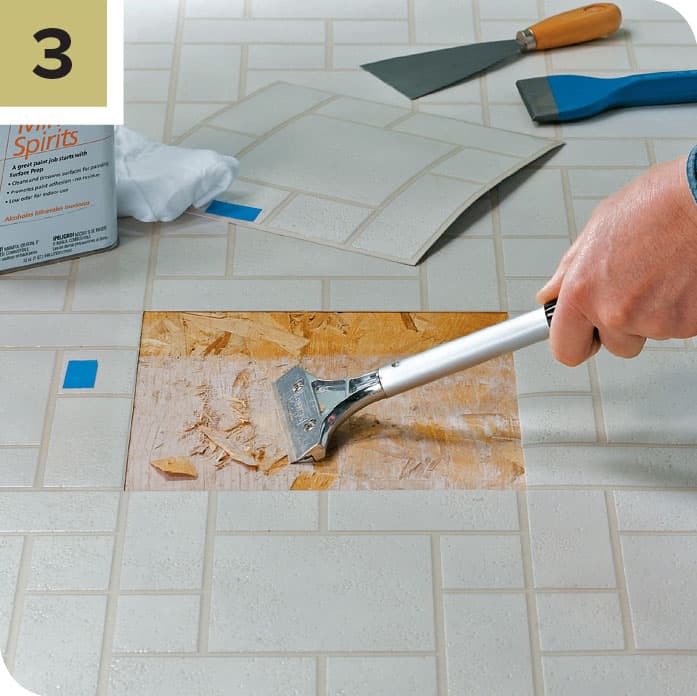
Remove the damaged section of floor. Work from edges in. When the tile is loosened, insert a putty knife and pry up the damaged material. Scrape off the remaining adhesive with a putty knife or chisel or paint scraper.
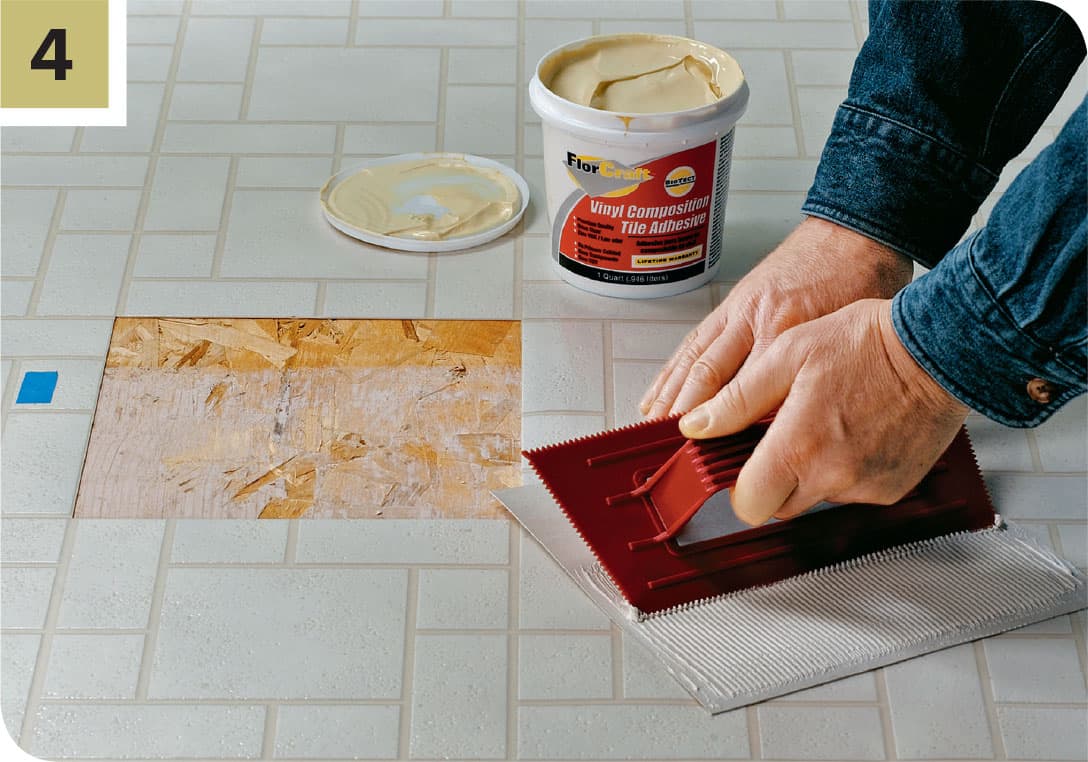
Apply adhesive to the patch, using a notched trowel (with 1/8" V-shaped notches) held at a 45° angle to the back of the new vinyl patch.
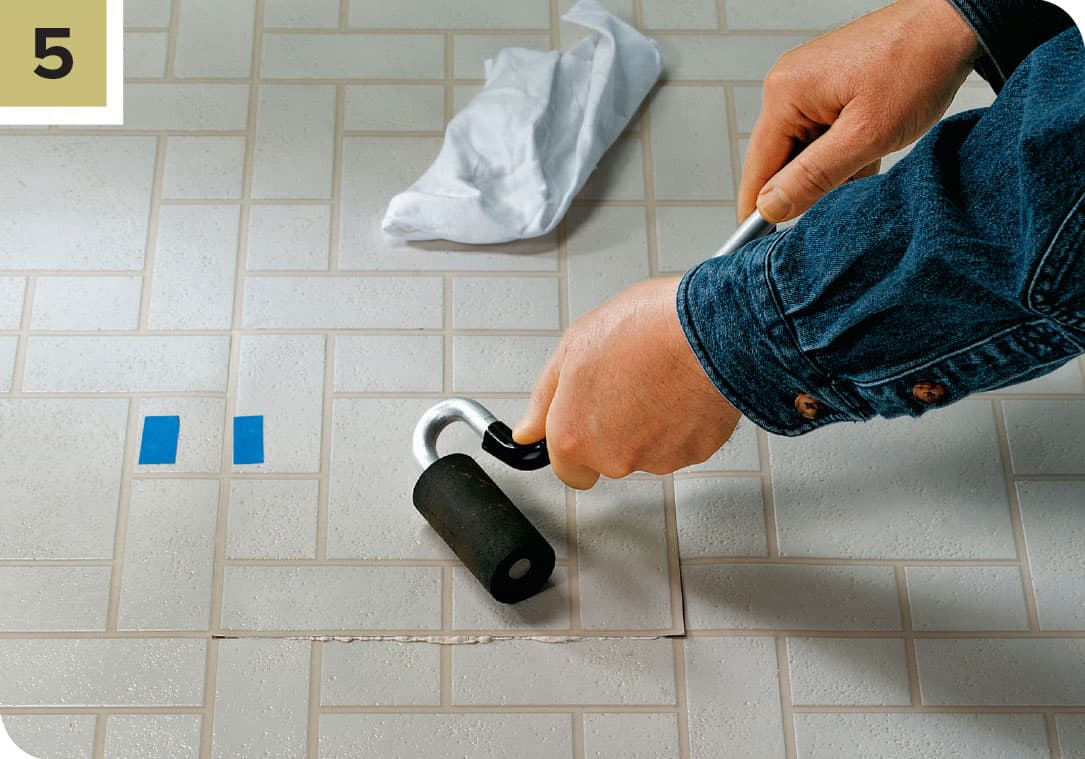
Set one edge of the patch in place. Lower the patch onto the underlayment. Press into place. Apply pressure with a J-roller or rolling pin to create a solid bond. Start at the center and work toward the edges, working out air bubbles. Let the adhesive dry overnight. Use a soft cloth dipped in lacquer thinner to clean the area. Mix the seam sealer according to the manufacturer’s directions.
REPAIRING TILE FLOORS
Although ceramic tile is one of the hardest floorcoverings, it is also fragile and sometimes problems occur. Tiles break and crack. Usually fixing the problem is simply a matter of removing and replacing individual tiles. However, floor movement can cause the adhesive layer beneath the tile to deteriorate. In this case, the adhesive layer must be replaced in order to create an effective, longlasting repair.
Any time you remove tile, check the underlayment. If it’s no longer smooth, solid, and level, repair or replace it before replacing the tile. When removing grout or damaged tiles, be careful not to damage surrounding tiles. Always wear eye protection when working with a hammer and chisel. Any time you are doing a major tile installation, make sure to save extra tiles. This way, you will have materials on hand when repairs become necessary.
How to Replace Ceramic Tiles
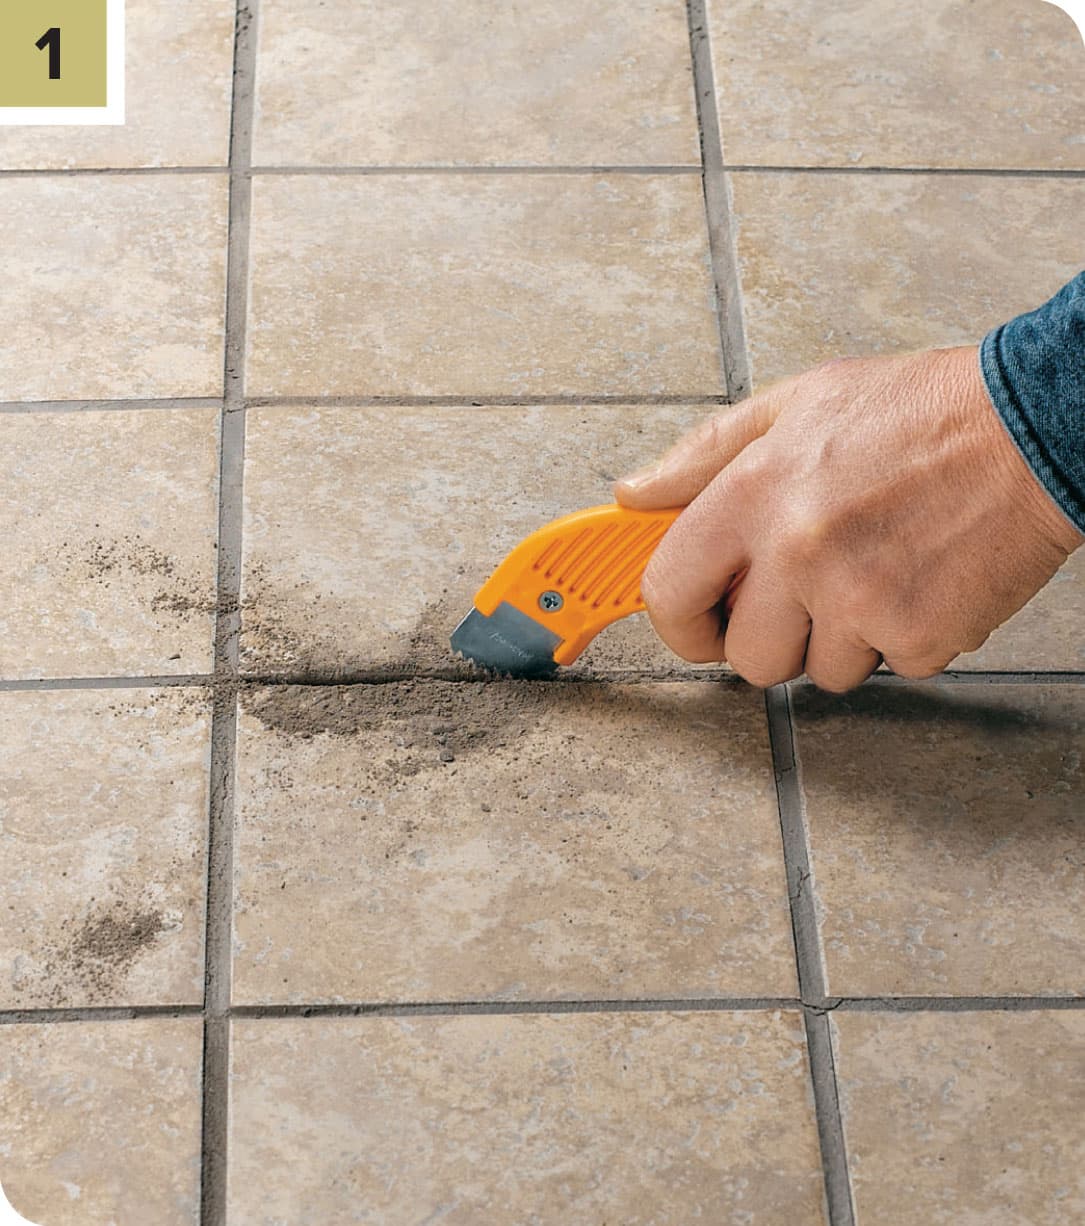
With a carbide-tipped grout saw, apply firm but gentle pressure across the grout until you expose the unglazed edges of the tile. If the tile is not already cracked, use a hammer to break the tile by tapping a nail set or center punch into the field area. Alternatively, if the tile is significantly cracked, use a chisel to pry up the tile.
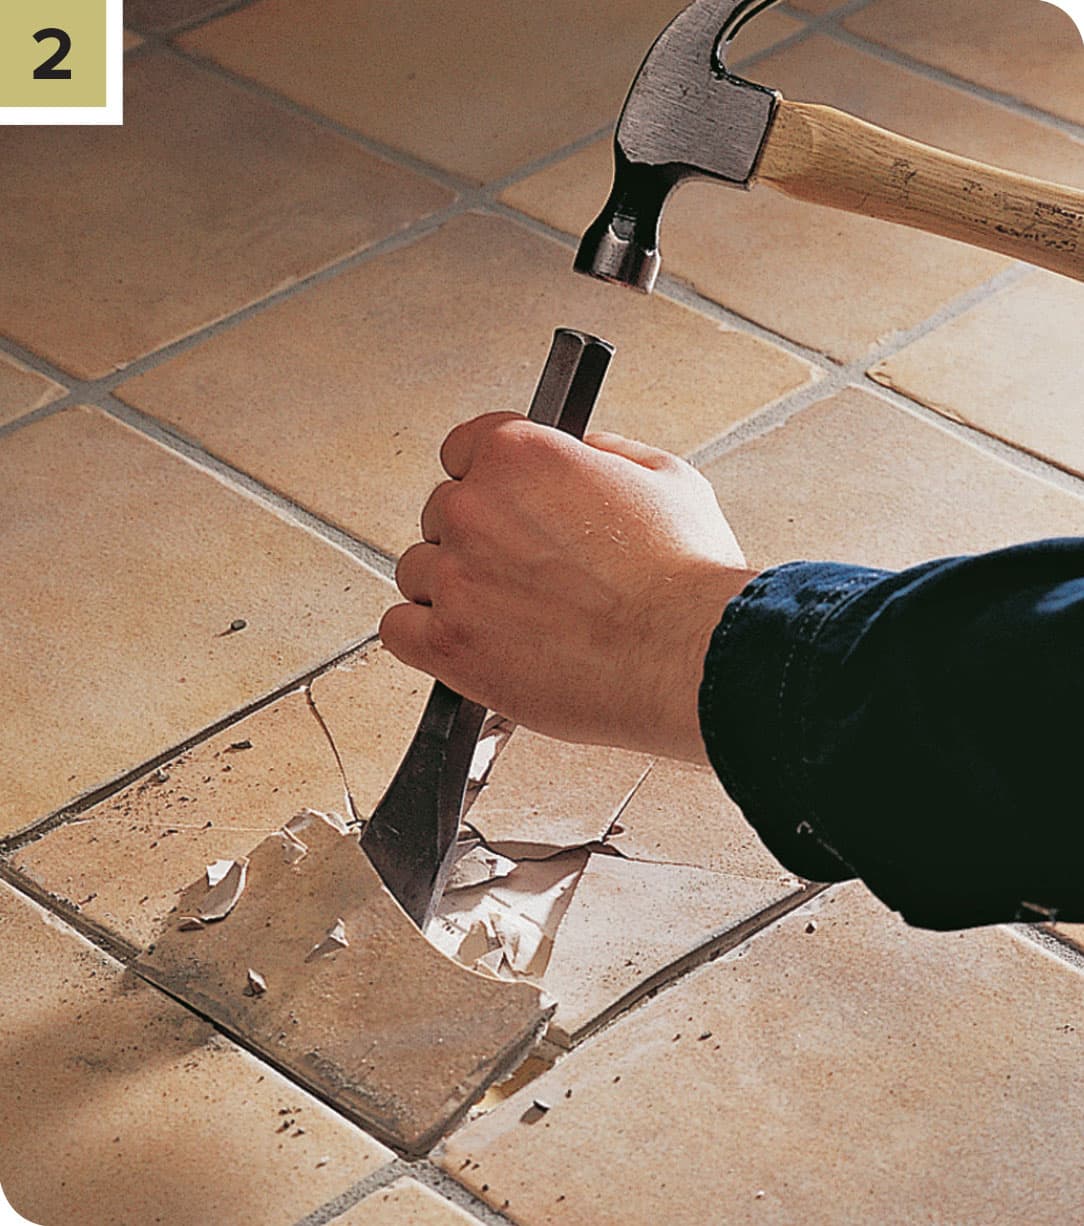
Insert a cold chisel into one of the cracks and gently tap the tile. Start at the center and chip outward so you don’t damage the adjacent tiles. Be aware that cementboard substrate looks a lot like mortar when you’re chiseling. Remove and discard the broken pieces.
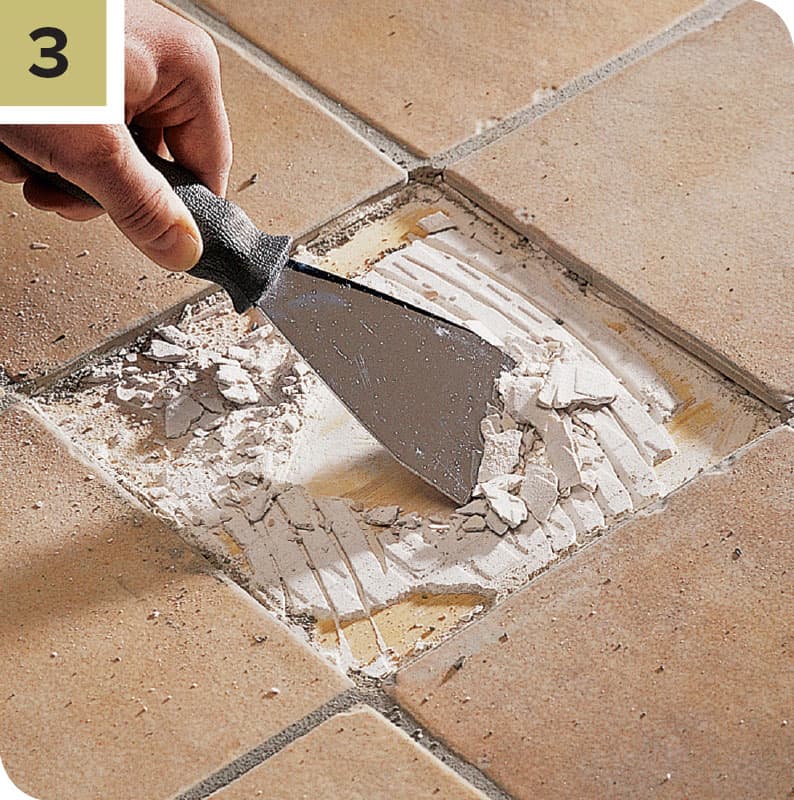
Use a putty knife to scrape away old thinset adhesive; use a chisel for poured-mortar installation. Once the adhesive is scraped from the underlayment, smooth the rough areas with sandpaper. If there are gouges in the underlayment, fill them with epoxy-based thinset mortar (for cementboard) or a floor-leveling compound (for plywood).
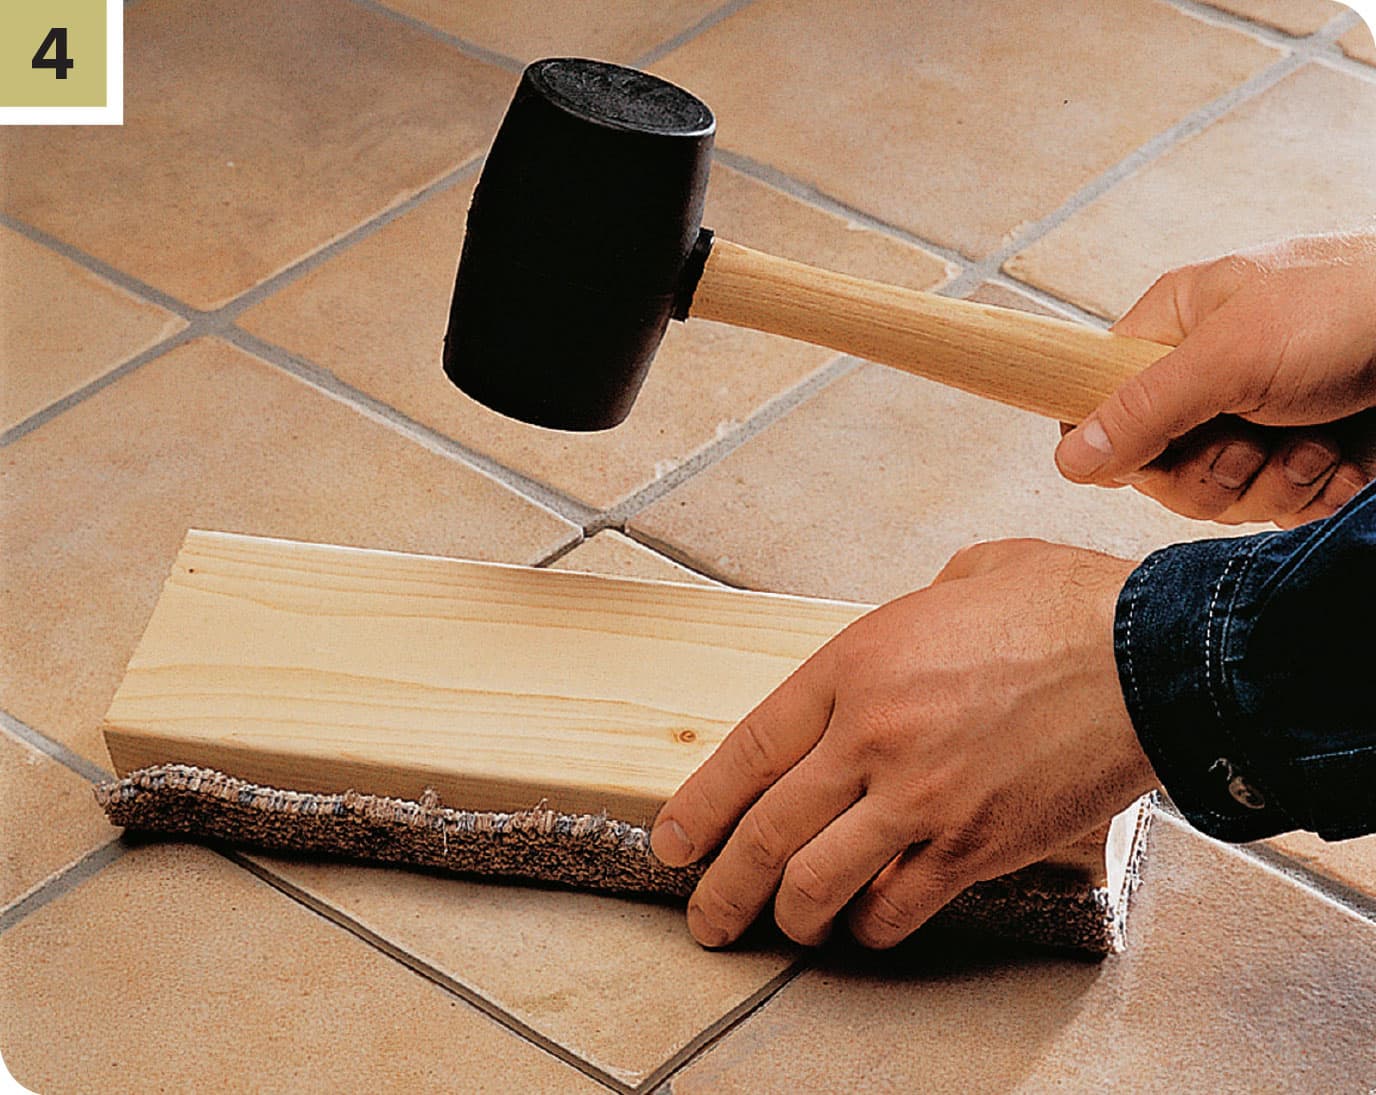
Use a notched trowel to apply thinset adhesive to the back of the replacement tile. Set the tile down into the space, doing your best to get it as level as you can with the surrounding tile and to keep it centered in the open area. Use a mallet or hammer and a block of wood covered with cloth or a carpet scrap to lightly tap on the tile, setting it into the adhesive.
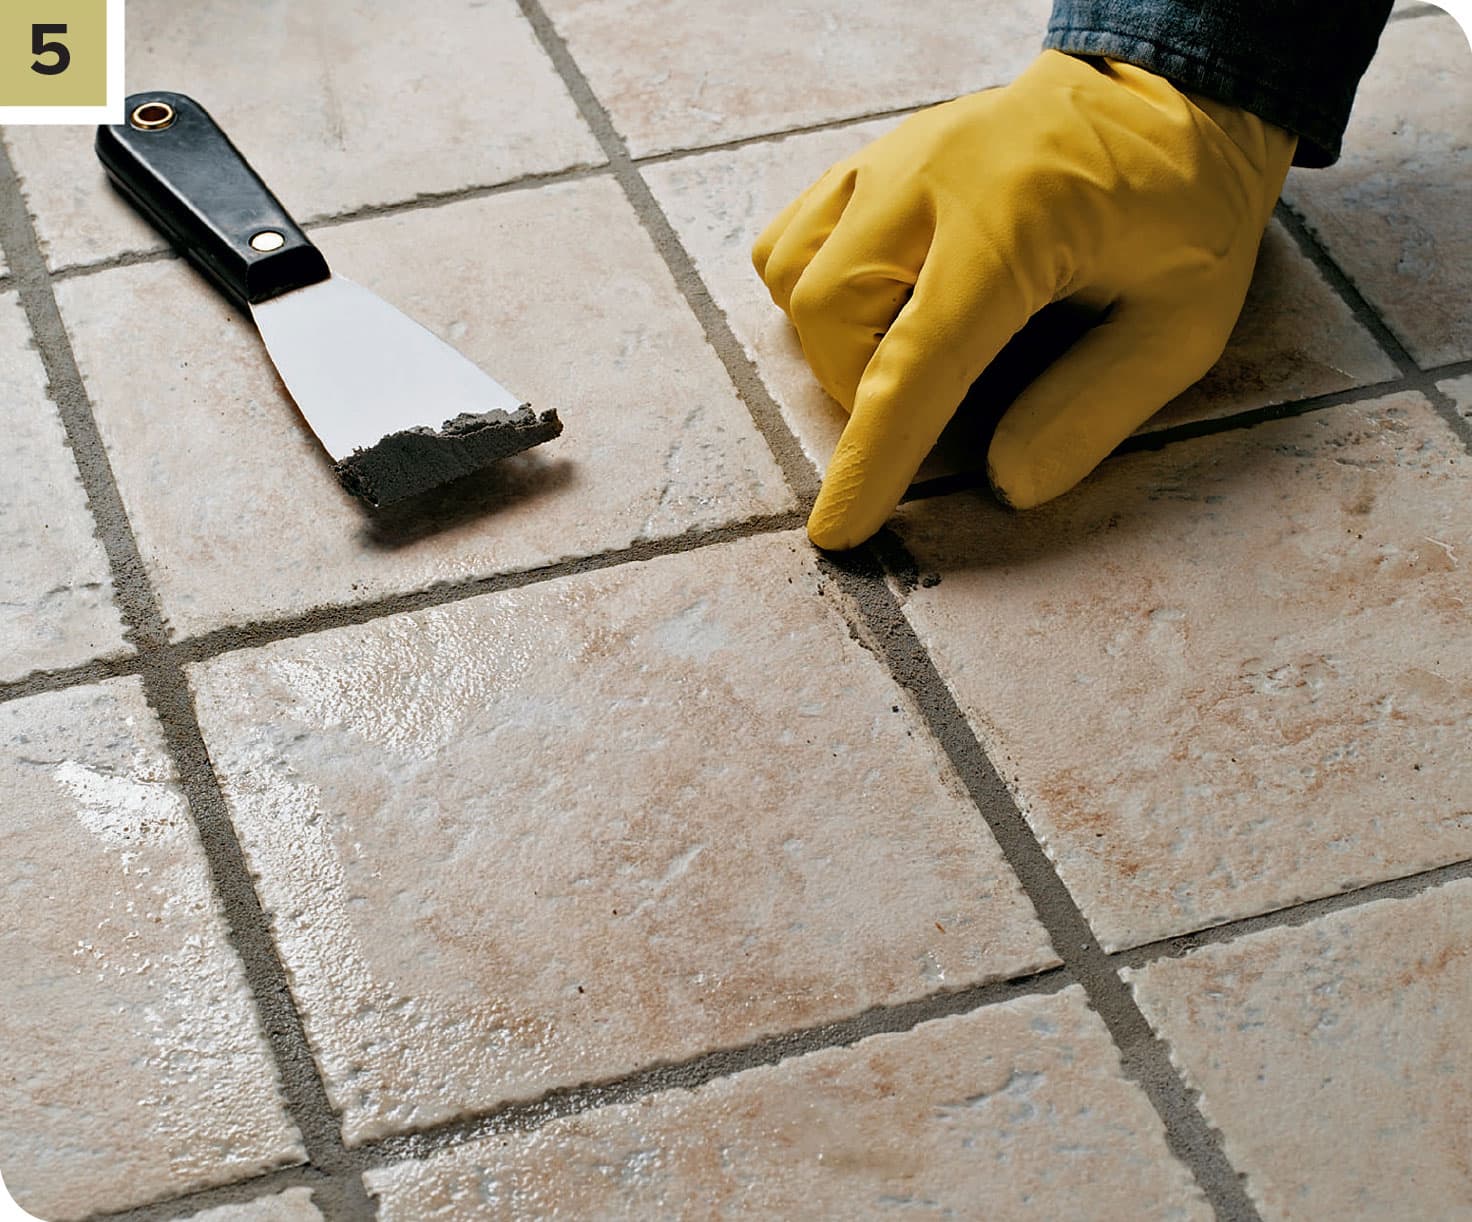
Use a putty knife to apply grout to the joints. Fill in low spots by applying and smoothing grout with your finger. Use the round edge of a toothbrush handle to create a concave grout line, if desired. Wipe away excess grout with a clean, damp sponge.
REPAIRING CARPET
Burns and stains are the most common carpeting problems. You can clip away the burned fibers of superficial burns using small scissors. Deeper burns and indelible stains require patching by cutting away and replacing the damaged area.
How to Repair Spot Damage
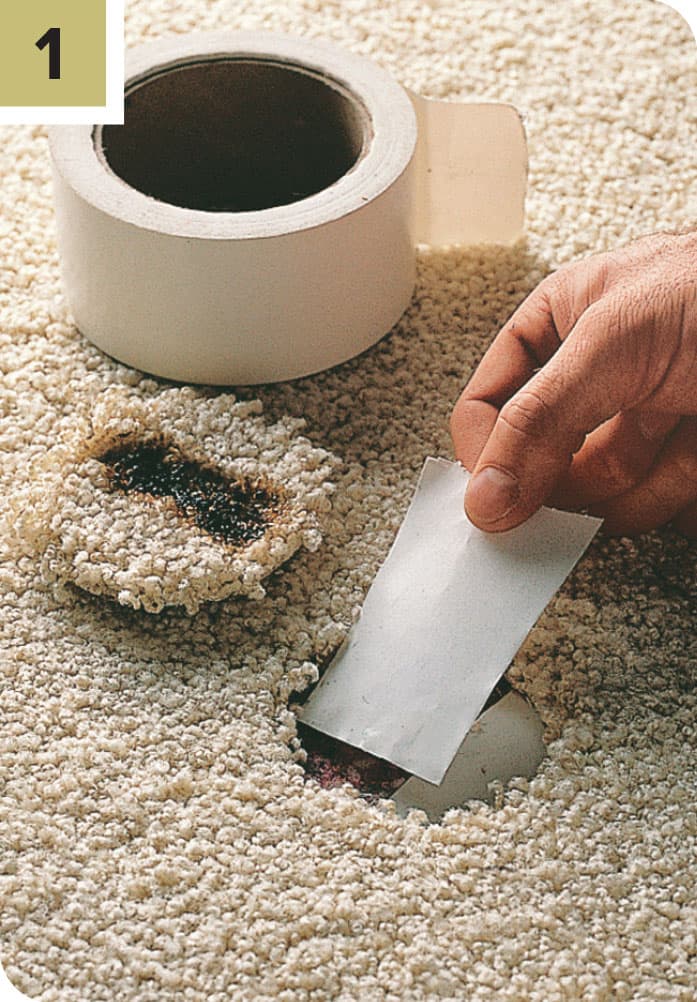
Remove minor damage or stains with a “cookie-cutter” tool, available at carpeting stores. Press the cutter down over the damaged area and twist it to cut away the damaged carpet.
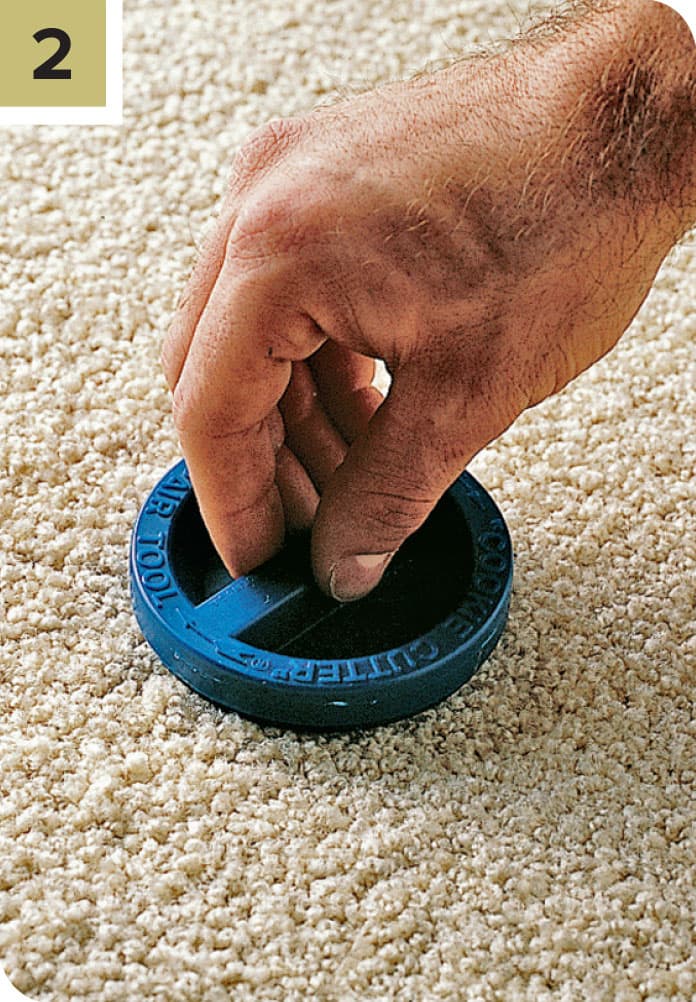
Using the cookie-cutter tool again, cut a replacement patch from scrap carpeting. If you did not reserve any, check in a nearby closet for usable, matching material. Insert double-face carpet tape under the cutout, positioning the tape so it overlaps the patch seams.
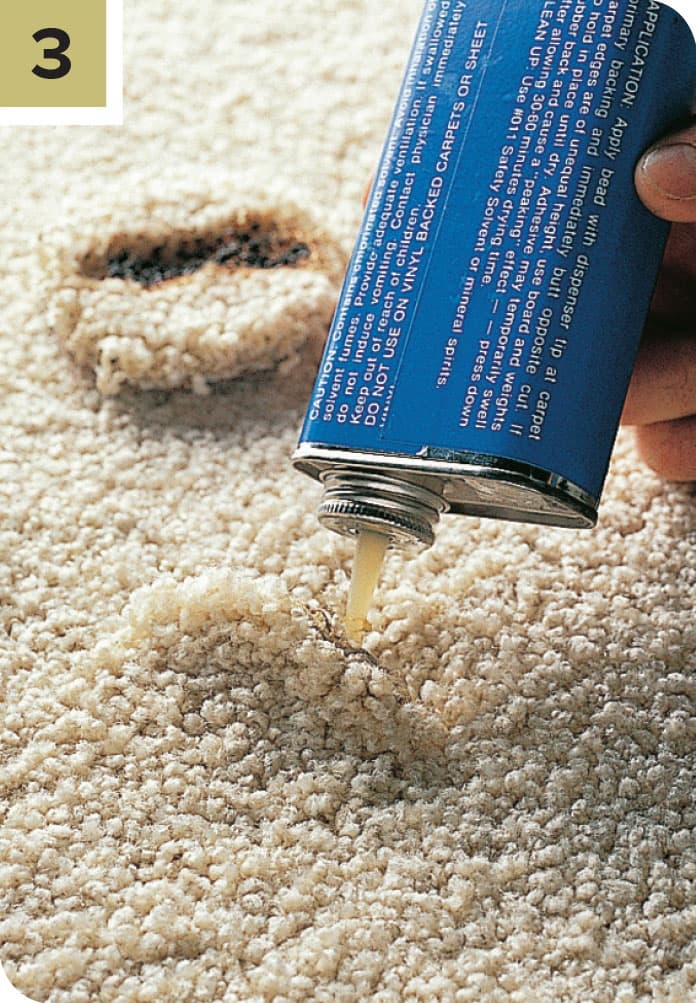
Press the patch into place. Make sure the direction of the nap or pattern matches the existing carpet. To seal the seam and prevent unraveling, apply seam adhesive to the edges of the patch.
How to Restretch Loose Carpet
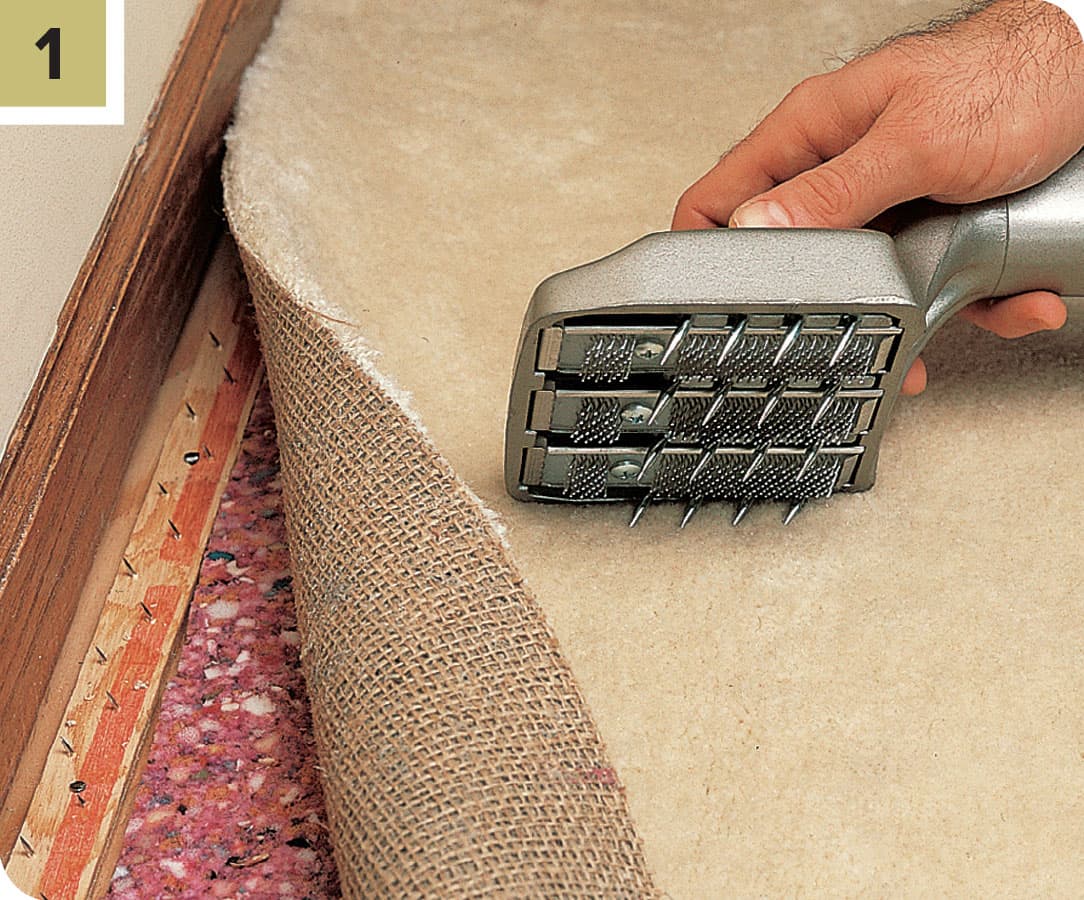
Adjust the knob on the head of the knee kicker so the prongs grab the carpet backing without penetrating through the padding. Starting from a corner or near a point where the carpet is firmly attached, press the knee kicker head into the carpet, about 2" from the wall.
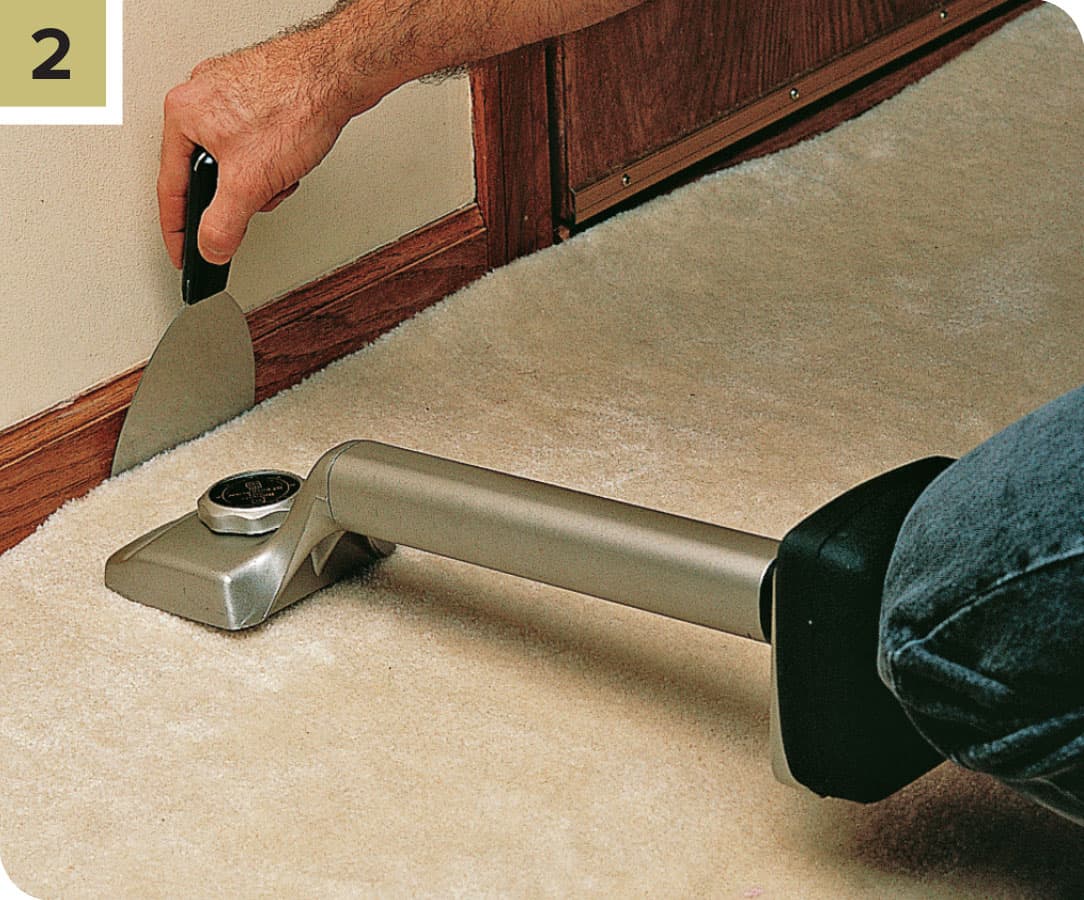
Thrust your knee into the cushion of the knee kicker to force the carpet toward the wall. Tuck the carpet edge into the space between the wood strip and the baseboard using a 4" wallboard knife. If the carpet is still loose, trim the edge with a utility knife and stretch it again.