When you first begin animating with keyframes, you may add one, two, or even hundreds of keyframes by accident! Also, you might want to toggle the animations you create on and off to see how your video looked before and after the animations. Let's look at a few ways we can achieve that.
- Locate the
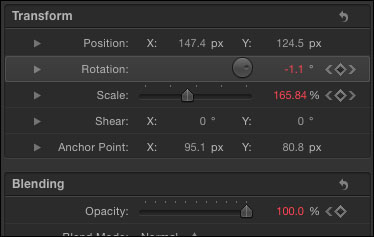
Chapter4folder and navigate to the04_02project. Double-click on it to open. - Play back the project by pressing the Space bar. This is the same picture of the cat used in the last recipe, except keyframes have been added to Opacity and Rotation. At the beginning of the animation, the image fades in from black, and over the 10 second duration, the picture scales and rotates slightly. We can identify all the keyframe parameters in the Properties tab by looking for any number that is highlighted in red. See this for yourself by pressing F1 with the still selected, using the following screenshot as a guide:
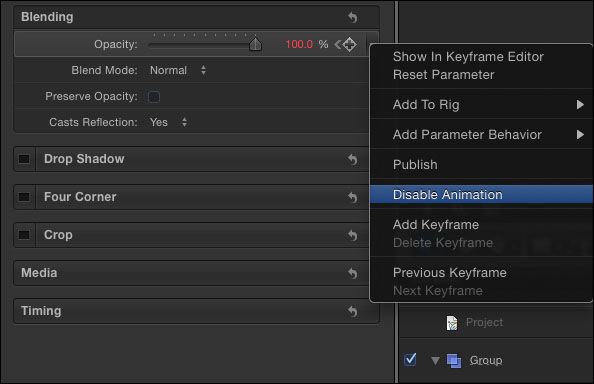
- Let's say we want to temporarily disable an animating parameter such as Opacity. Make sure your playhead is at the one second mark in the mini-Timeline. In the Properties tab, to the right of the diamond next to Opacity, click on the downward arrow (the Animation menu) and select Disable Animation (shown in the following screenshot). A disable parameter is identified by a dash in the Properties tab. Play back the animation once and see that the still no longer fades in at the beginning. Disabling an animation does not delete any keyframes from the parameter. To enable the opacity animation again, simply go back to the Animation menu and choose Enable Animation. Play back the animation and see that the fade-in appears again.
- When you want to delete a keyframe, we've got a few options. Let's say we no longer want our image to rotate. In the Properties tab, make sure we are on the first rotation keyframe. Go to the Animation menu and choose Delete Keyframe. Move to the last keyframe and this time just click the diamond and notice that the keyframe disappears.
- Press Command + Z a few times to bring back both keyframes on rotation. Let's say that we want to delete all keyframes from the Transform properties. Rather than having to click on every single keyframe, we can reset all the parameters. Click the hooked arrow at the top-right of the Transform window to reset all the values. You can see the reset arrow in the following screenshot. Both Scale and Rotation have been reset, but Opacity remains animated.

- To reset Opacity, click on the hooked arrow to the right of the Blending Properties. Now no parameters have keyframes.
- Press Command + Z a few times until all the keyframes come back.
You've got tons of options for deleting keyframes, even in the Timeline.
You can also select and delete keyframes in the Timeline. Simply select the keyframe under the layer and press Delete from your keyboard. Keep in mind that if two or more parameters are keyframed at the same position in time, they will all be deleted.

While a lot of keyframing can be done in the Inspector, for fine-tuned animations we go to the Keyframe Editor.
For fine control over your keyframes and individual values, we need to look beyond the Timeline and the Properties tab. Here comes the Keyframe Editor. We can access it from the Window menu, by pressing Command + 8, Ctrl + clicking a keyframe in the Timeline, or clicking on the keyframe icon at the bottom-right of the Timeline. In the Keyframe Editor, we can copy and paste keyframes, see how various keyframed parameters interact with one another, and get an understanding of how Motion interpolates the values between your keyframes. We'll see more of the Keyframe Editor in the next few recipes, but for a sneak-peek, have a look at the following screenshot:
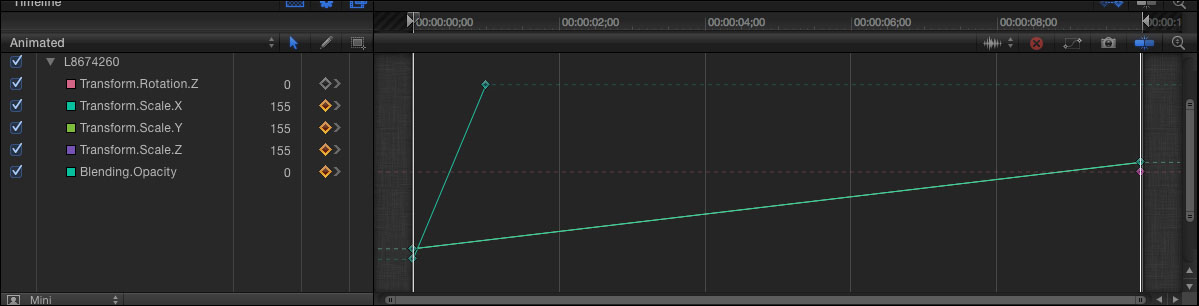
In the Keyframe Editor, the lines you see between keyframed parameters represent interpolation.
Interpolation is the path of travel between two keyframes. Basically, as an animator, you add keyframes and Motion interpolates the values in the middle. As we'll see, not all interpolation is the same. For instance, some values you keyframe, such as scale, are automatically given a linear interpolation, meaning the rate of speed does not change between keyframes. On other values such as position, the interpolation will be Bezier or have curves, so the rate of speed changes over time. This is to try and mimic the way things move in real life. Rarely do objects travel along straight, linear paths. Take your car, for instance. When you start driving at a green light, your car slowly makes its way up to the speed limit. When it stops, your car slows down before coming to a rest.