Sometimes we may want a little more control from our behaviors beyond the listed parameters that we can tweak. The great thing is we can convert behaviors into keyframes for more manual control any time we want.
- From this chapter's exercise files, open the
04_09project. - Press the Space bar to play back the project. It's a ball that has been animated to fade in, grow, and jump from side to side.
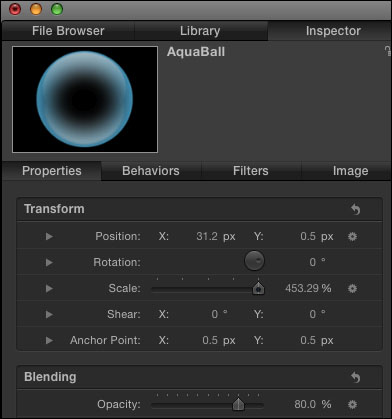
- Select the ball and press F1 to go to the Properties tab of the Inspector. Notice how a gear icon appears next to every property that's being controlled by behaviors. In this case, it's Scale, Opacity, and Position, as indicated in the following screenshot:

- We want to have the ball ease in and out when it jumps from point to point, and there doesn't appear to be an option to switch this in the Behaviors parameters. Stop playback and with the AquaBall selected, choose Object | Convert To Keyframes.
- Press Command + 8 to bring up the Keyframe Editor. Scroll up the window so that you can see the graphs clearly, as shown here:

- There may be more keyframes created than you had intended. If there are too many, simply select the unwanted keyframes and press Delete. You can also right-click a keyframe and choose Delete from the menu, as shown:

- Option + click the checkmark next to Position X to solo it. Try to remove as many keyframes around the peaks that we don't need. The next screenshot shows quite a few that you might not want. Try marquee-selecting multiple keyframes to help you save some time. Make sure not to select the peaks.
- Shift + click each of the keyframes at the peak of the graph to select them. Right-click any one of them and choose Ease Both. Look to see how the graph changes. Play back the animation. Repeat the preceding two steps for the lower ends of the graph.

- Option + click the Position X parameter in the Keyframe Editor to unsolo it. Turn off Position and Opacity by clicking the checkbox, so only Scale X and Scale Y can be seen. Let's say we want the ball to scale up a bit, hold its value for a second, and then increase to its final value.
- Make sure both Scale X and Scale Y are selected. Draw a square around one of the middle keyframes and press Command + C to copy it.
- Move one second forward from the keyframe you just selected and press Command + V. Draw a box around the previous keyframe and Ctrl + click. Choose Interpolation | Linear as shown in the following screenshot. Play back the project.

See the word for a text behavior and don't know what it does. Go to the Library tab and preview the animation in the upper-left corner once selecting it.
- Applying a Fade in/Fade Out and Grow/Shrink behavior to a still in Chapter 3, Making It Move with Behaviors.