So far, we've created our own particle systems by selecting objects to place into cells referenced by the emitter. Motion ships with over 200 presets! One of the best ways to learn Motion is to dissect how some of the particle presets were created. Let's take a look at what it has to offer!
From this chapter's exercise folder, double-click on the 07_05 project. There are two particle presets in this project but one has been turned off. Play back the project and familiarize yourself with the Magic Dust preset. Stop the playback. Turn off the Magic Dust group and turn on the Buskerit group. Play back the project again. In this recipe, we'll take a look at each of these presets and change a few parameters to look at how the animations were created.
Let's now tweak these parameters of our presets in more detail:
- Reveal the content of the Buskerit group by clicking the disclosure triangle next to it. It contains a group called busker and seven still images that have been turned off. The images are being referenced by the emitter.
- Click the disclosure triangle next to the Busker group. It contains the content of the Busker emitter and the seven cells that hold information from those layers that have been shot off. The Emitter also has a Scale Over Life behavior in it. While the object continually changes scale over the animation, the Scale Over Life behavior was used to animate the "pop-up" intro of the instruments, whereas keyframes were used to change the scale over the project.
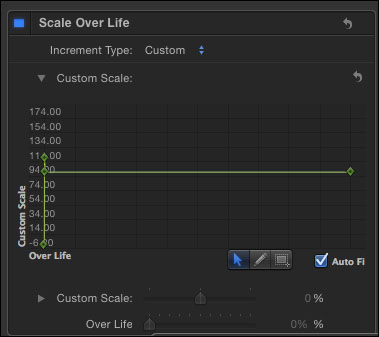
- Select the Scale Over Life behavior and press F2 to go to the Behaviors tab of the Inspector. Notice the Increment Type parameter set to Custom. Click the disclosure triangle next to Custom Scale to see the graph, as shown in the following screenshot:
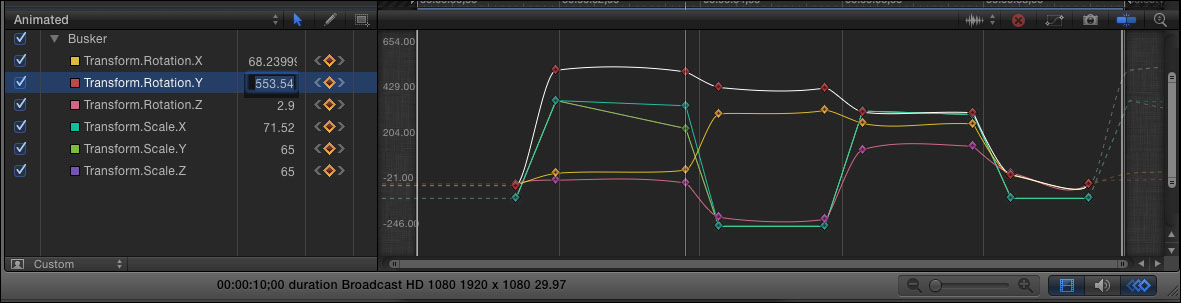
- Select the Emitter in the Layers tab and press Command + 8 to open the Keyframe Editor. Notice that both the scale and rotation of the emitter are keyframed periodically throughout the entire animation, as shown in the following screenshot. In the Keyframe Editor, press Shift + K to move forward between keyframes. Change the Rotation and Scale values by double-clicking the values while on an existing keyframe. You'll know you're on one because the diamond shape will appear highlighted!
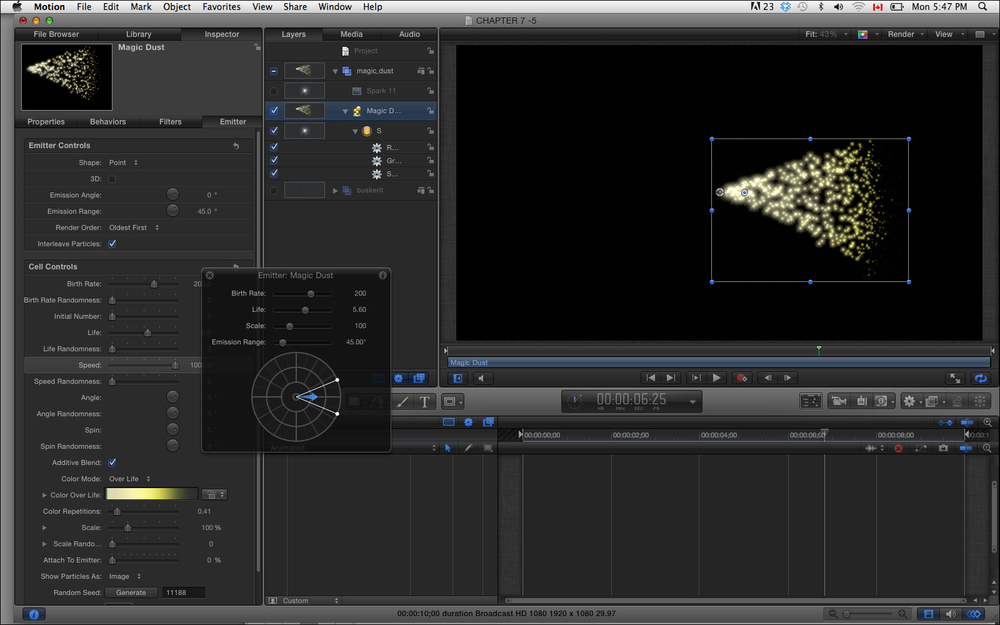
- Click the disclosure triangle to close the Buskerit group, turn it off, and turn on the Magic Dust group. Click the disclosure triangle to open it. A still image of a spark was used as the source for the Emitter. Several behaviors were used to animate the sparks.
- With the emitter selected, press F4 to go to the Emitter tab of the Inspector. Set Emission Range to 45, Birth Rate to 200, and Speed to 1000. Play back the project to see the effect it has and compare it to the following:
- Select the Magic Dust group and go to the gear icon under the mini-Timeline. Choose Basic Motion | Motion Path. Tweak the path as desired. Play back the animation.
Learning how particle presets work is a great way to get used to Motion.