In the last recipe, Motion did a lot of the initial work for us. In this recipe, we'll select our own key color to remove the green and fine-tune the edges in the image. From there, we'll refine the key and look at some additional ways we can add, take away, and refine our selection.
Find a piece of green screen footage on your system as well as a file that you'd like to use as a background. Launch Motion and create a new project based on your clip settings. Make sure your playhead is at the beginning of the project. Go to the File Browser and find your footage. Click on the Import button to bring both files into your project.
Let's start by adding a Keyer to our clip like the last recipe.
- Select the green screen clip in the Layers tab and press Command + 2 to go to the Library.
- Go to Filters | Keying | Keyer. Drag the Keyer to the green screen clip in your Layers tab. Press F3 to go to the Filters tab of the Inspector.
- The Strength slider is what controls the initial green selected from the Keyer. To make your own selection, set the Strength amount to
0as shown in the following screenshot. All the green returns to the image.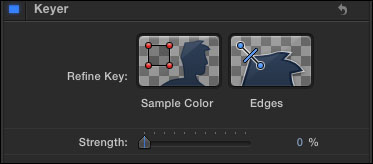
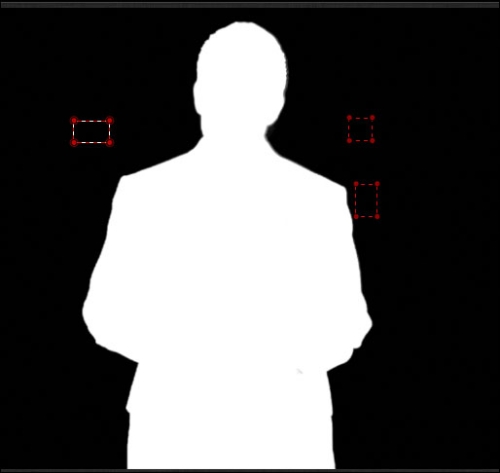
- Switch the View to Matte. Click on the Sample Color button. In your Canvas, drag out a rectangle around a small section of the green screen area. In you're unsure of where to start, try somewhere close to the subject. If you need to sample more green colors, hold down the Shift key and draw out another rectangular selection in the Canvas. Use the following screenshot for reference.
- Click on the Edges button. Draw a line extending from you subject's hairline to the black area that's now transparent. What you're trying to do is define the area of semi transparency. Drag the middle line back and forth to adjust the selections.
- Change the value of View back to Composite. Play with the Fill Holes, Edge Distance, and Spill Suppression parameters as required.
- Open the Color Selection settings by clicking on the disclosure triangle. You have two options here: Scrub Boxes and Manual. If you wanted to, you could bypass the Refine Key section and select your chrominance and edge values. In the Scrub Boxes tab, the adjustments we make here affect our edge selection. Play with the Chroma wheel and the other parameters to see the effect it has on the edges of your selection. Click back and forth between Matte and Composite mode to get a sense for the changes from both views.
- Click the disclosure triangle next to Matte Tools and Light Wrap. These settings allow you to adjust your selection even further. Play with the parameters under Matte Tools and notice the effect it has on your image. Do the same with Light Wrap, paying close attention to how the edges try to blend in with the background image.
If your subject stays near the center of the image, you may want to create a mask around your image to remove unwanted areas and focus on the green closer to your main subject. This will create less work for you at the end and is commonly referred to as creating a garbage matte.