Motion 5 offers a lot of ways for you to navigate throughout a 3D environment using the different viewports available. With our viewports, we're able to see our world from a series of different perspectives. This allows us to better orient ourselves within the 3D space.
From this chapter's exercise files, double-click the 10_03 project. It appears to be the same exercise from the last recipe, but with a few additions. There are two groups within the project. One contains the floor, a light, and the rectangles we're currently looking at. The other group contains the floor, a light, and the circles that are 4000 pixels to the left of our location. We can't see this other group because our camera is currently pointing at the first group. Click on the Scene 2 group and, in the Properties tab of the Inspector, verify its Position X. Click on Scene 1 and the Camera to verify their Position coordinates.
Let's see how we can get an overall better sense of this project by looking at our project in different viewports:
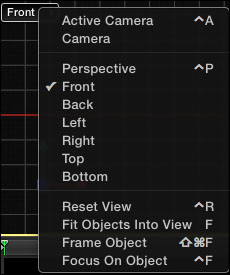
- At the upper-right of the Canvas is a rectangle icon next to the View menu. Click it and choose the third icon from the top (View | Horizontal), as shown here:
- Your screen splits into two views. The top view currently displays the Active Camera view while the bottom view displays a different view of your world. Make sure the menu on the left-hand side of that view reads Top, as shown in the next screenshot.
Once you make the change, notice the view being selected, which is indicated by a yellow box outlining it.

- The Top view is one of several orthographic views. These views look directly down an axis, in this case y, to give us a set of different eyes on the scene. Open the content of the Scene 1 group and select the Rectangles layer. You should see it selected as a line in the Top view. If you don't see it, use the dolly camera and pan around controls in the active viewport to frame the group, as shown in the following screenshot. Notice how this has no effect on the Active Camera view.
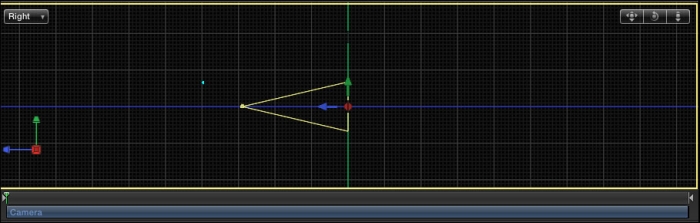
- There is a compass on the lower-left hand side of the viewports. Click the red button to jump into the Right view. Select Camera in the Layers tab and notice how you're looking at it from the right-hand side, directly down the x axis, as indicated in the following screenshot. Once again, there is no change to the Active Camera view.
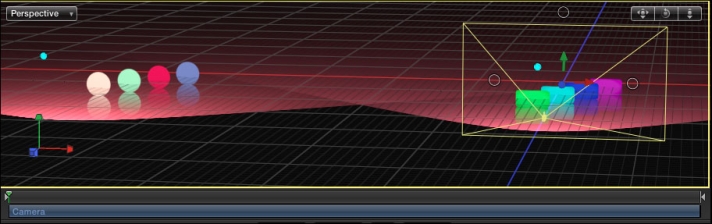
- From the drop-down menu that currently has Right selected, choose Perspective. Unlike orthographic views that look down the x, y and z axis, Perspective view offers you a new set of eyes by also introducing some orientation. As a challenge, use the camera controls in the viewport to dolly out until you can see the second group. Use the pan camera tool as well, if you need to. Use the following screenshot for reference. Select Camera from the Layers tab to see where it's positioned:
- With Camera still selected in the Layers tab, press F1 to go to the Properties tab. Scrub the X Position value to the left and watch both viewports update. You should see the camera moving towards the next scene. Stop scrubbing and enter
-4000for X. Use the following screenshot for reference:
If you ever select a view where your layers or groups are not well framed within the viewport, you can always try to frame or fit your object in the view by selecting it from the Camera View menu, as shown in the following screenshot. Just make sure the objects you want to frame are selected in the Layers tab!