While publishing parameters to FCP X gives us a lot of flexibility, publishing rigs gives us even more. A rig allows us to have control over several parameters at once while, at the same time, helping us to create a more simplified user interface for the FCP user. In this exercise, we'll explore some of the similarities and differences between publishing and rigging.
From the exercise files of this chapter, double-click on the 11_05 project. Play back the project. The project consists of four animated arrows that are interacting with lights and have a Colorize filter placed on the group they're in. If you look directly under the Project layer, you'll see a rig has already been created called Arrow Color. In the end, this rig is going to allow the FCP X user to choose between four colors for his arrows. Before we can do that, we'll have to add one additional snapshot to our rig and publish it over to Final Cut.
- Select the Arrow Color layer directly under Rig in the Layers tab and press the F4 key to reveal the Widget tab of the Inspector. The type of rig that has been added to this project is a pop up. It allows the FCP X user to choose different settings from a pop-up menu; in this case, the color. Change the value of Arrow Color from Red to Green as shown in the following screenshot:
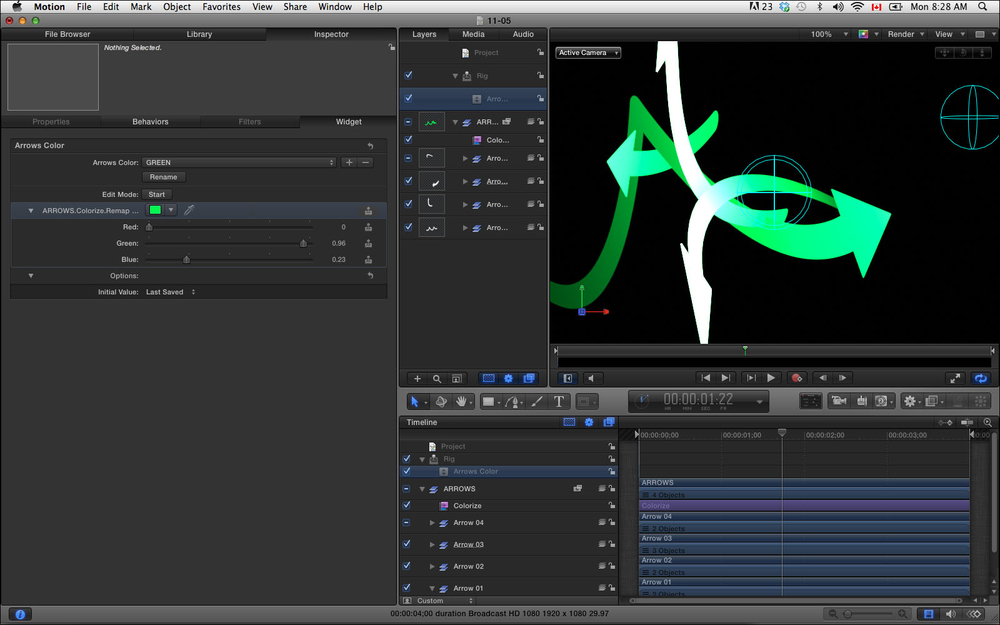
- Click-and-drag in between the Inspector and Layers tab until you can clearly see the name of the parameter with the color well set to green. This parameter is from the Colorize filter. We've told Motion that, when the pop-up menu displays green, the remap white parameter is set to green. Change the value of Arrow Color from Green to Purple. Notice how the color well changes to purple. We want to have access to one more color option in Final Cut before we publish our rig over.
- Next to the Arrow Color pop-up menu, click on the plus icon to add a snapshot. Rename the snapshot as
blue. Ctrl + click on the Color well and set it to a blue color. Flip between each of the different colors again to make sure each color is displayed appropriately. - While the pop-up widget appears to be working fine, we need to publish the rig in order for the FCP X user to have access to it. Ctrl + click on the word Arrows Color and choose Publish. Select the Project layer and notice how the rig has been published over. Set the value of Arrows Color to Red. This will be the first color the user sees in FCP X.
- We need to save this project as a template to have access to it in FCP X. From the File menu, choose Publish Template. Name the template
Colored Arrowsand click on the Publish as Final Cut Generator box. Create a new category and theme of your choice and select Publish. Use the following screenshot for reference:
- Launch Final Cut Pro. Search your Media Browser under Generators and bring Color Arrows into a project. Look in the Inspector to see the pop-up widget. In the next exercise, we'll add another widget to our rig in order to control the amount of arrows we see.
Please note, you can't publish a parameter that's controlled by a rig. In the last exercise, the Colorize filter's remap white parameter was controlled by the rig. It's important to note that rigged parameters can't be published. Essentially, when a parameter is being controlled by a rig, publishing that parameter will have no effect.
- The Creating a lower third for FCP X recipe in Chapter 5, Let's Make Text
- The Publishing a Motion 5 generator and its parameters to FCP X recipe
- The Creating a transition for FCP X recipe
- The Creating an effect for FCP X recipe