In the next exercise, we'll begin to create a complex rig that allows the FCP X user choices over a simulated lighting effect.
From the exercise files of this chapter, locate the 11_07 project folder. Drag the content of the folder to the Effects folder by navigating to Movies | Motion templates from under your user on the computer. Double-click on the .moef project from this location. Press the Space bar to play back the project. It consists of a still photo that has a light interacting with it. Two properties of the light have parameter behaviors applied to them; Intensity and Position. Turn each behavior on the Light on and off to see its effect. We want to link a few parameters from each of these behaviors to a slider so the FCP X user can control how much the light changes intensity and moves simultaneously.
Let's add some of our behavior parameters to a rig.
- Select the Light in the Layers tab and press the F2 key to go to the Behaviors tab of the Inspector. You'll see two parameter behaviors; Light Movement and Light Flick. We're going to link the amount and frequency parameters from each behavior so the FCP X user will have control over them. Ctrl + click on the word Amount from the Light Movement behavior and navigate to Add to Rig | Add to New Rig | Create New Slider as shown in the following screenshot. A new rig and slider are created in the Layers tab. Name the rig
Lighting Controlsand the sliderLight Animation Intensity.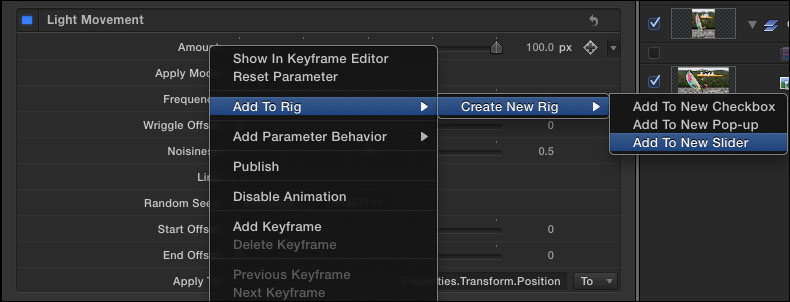
- Select Light and press the F2 key to go back to the Behaviors tab of the Inspector. Under Light Movement, Ctrl + click on the word Frequency and select Add to Rig | Lighting Controls | Add to Lighting Animation Intensity.
- Repeat the preceding step for the Amount and Frequency controls for Light Flick. Select Rig in the Layers tab and verify each parameter has been added in the Rig tab of the Inspector.
- If you use FCP X or Motion often, the slider will look very familiar. The only difference for us Motion users is that it now controls several individual parameters. Think about it as one master control to rule them all! We need to set the states for the slider. In the Rig tab of the Inspector, move the Light Animation Intensity slider down to
0and set all the parameter states underneath to0, as shown in the following screenshot. Play back the project and notice that no flicker or movement of the light occurs.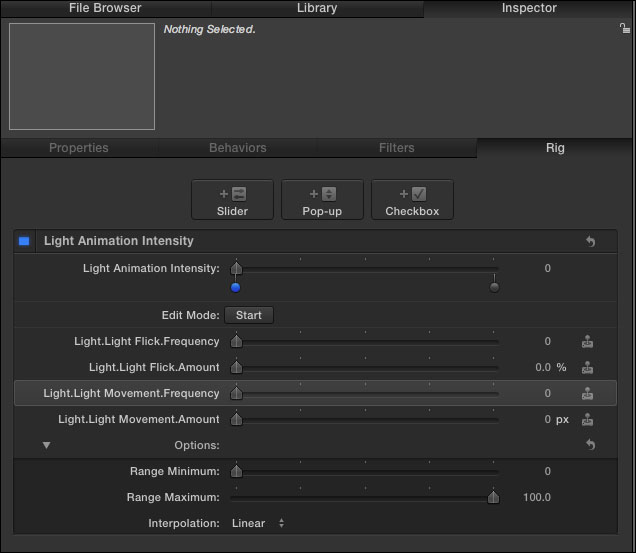
- In the Rig tab of the Inspector, drag the Light Animation Intensity up to
100. Set the Light Flick Frequency to1, the Light Intensity to150, the Light Movement Frequency to2, and the Light Movement amount to150. Play back the project and notice the light settings when the slider is set to 100. Drag the Light Animation Intensity slider up and down to move between the two states. - Ctrl + click on the word Lighting Animation Intensity in the Rig tab and from the menu that appears choose Publish. Select the Project layer and verify in the Project tab of the Inspector that the slider has been published. Set the slider to 50.

- Since the project has been saved already, press Command + S to update the template.
- Launch Final Cut Pro. Search in your Media Browser under Effects and bring the Lighting Effects into a project. Look in the Inspector and verify the content there.
As a bonus step in Motion, there is a Bad TV filter that's been placed on the Effect Source, temporarily turned off. Select a few parameters from the Effect to add and control from the existing slider.
- The Creating a lower third for FCP X recipe of Chapter 5, Let's Make Text
- The Publishing a Motion 5 generator and its parameters to FCP X recipe
- The Creating a transition for FCP X recipe
- The Creating an effect for FCP X recipe
- The Publishing parameters versus publishing rigs 101 – part 1 recipe
- The Publishing parameters versus publishing rigs 101 – part 2 recipe