PROJECT • 6
Harvey Ellis Bookcase
BY ROBERT W. LANG
Gustav Stickley once wrote that the best way to learn furniture design was to build a proven design. He wrote that the student “learns from the start the fundamental principles of design and proportion and so comes naturally to understand what is meant by thorough workmanship.” This bookcase is one of the finest examples of proportion and detail that make the Craftsman style more than just a simple piece of furniture.
In 1903 Harvey Ellis designed this glass-door bookcase while working as a designer for Stickley. The first time I saw an original example of this piece of furniture I was struck by how perfectly proportioned it was and how well all of the details combine.
These details also present some challenges in building. While this is a relatively simple piece, the joinery must be precisely executed. Before I began, I spent some time tuning up our table saw and jointer, made sure my squares and measuring tools were in order, and sharpened my chisels and planes.
True to the Original
Original Craftsman furniture was occasionally made in mahogany or figured maple, but the vast majority was made from quartersawn white oak. This method of sawing yields more stable material than plain sawn oak, and the distinctive rays can be absolutely stunning. White oak is much more of a furniture wood than red oak, giving a smoother and more refined appearance.
In addition to using this wood, I also decided to use the same method of finishing that was originally used, fuming the finished piece with ammonia, and using shellac followed by wax.
Tannic acid in the wood reacts with the fumes from the ammonia, yielding a distinctive coloration in the rays and flecks, as well as in the rest of the wood. Staining, glazing and dyeing can come close to the color of an original Stickley piece, but fuming can match it exactly.
I had to glue stock together to obtain the widths required. Because the final color was dependant on a chemical reaction, and the tannic acid content of white oak will vary from tree to tree and board to board, I was careful to match boards for color as well as for figure. I also cut most of the parts for the door from the same piece of wood so that the color would be as close as possible.
Mortising With a Template
I began the joinery work with the through mortise-and-tenon joints at the bottom of the case sides. I made a template from ½-thick plywood, which helped me locate the mortises and the arched cut-outs. I cut the mortises in the template with a ½″-diameter bit in my plunge router, guided by the router’s fence, and squared the ends with a chisel and a rasp.
I could have used this same method on the actual cabinet sides, but by using the template I only had to do the layout work once, and if I slipped with the plunge router, the damage would be to a piece of plywood, not my finished end panel.

The template locates the through mortises precisely, as well as the arched cut-out and the location of the dado for the bottom of the case.
With the template clamped to the bottom of the end panel, I drilled most of the mortise with a ⅜ Forstner bit, and then used a router with a flush trim bit to trim the sides of the mortises flush to the template. I used the smallest diameter flush trim bit I had to minimize the amount of material left in the corners. With the template still clamped to the panel, I used the edges of the mortise in the template to guide the chisel in the corners. A riffler and a flat rasp completed the work on the mortises.

Dados and Rabbets
On the inside of the end panels there is a dado to hold the bottom and a rabbet from the top down to the dado to house the back. I made both of these cuts with a router and a ¾″-diameter straight bit. I used a shop-made T-square jig for the dado, and used the router’s edge guide to make the rabbet, stopping at the dado for the bottom. I also ran a ¾″-wide by ¼"-deep rabbet along the back edge of the cabinet bottom.
With the work on the side panels complete, I turned to the tenons on the ends of the two arched rails that sit below the bottom and penetrate the sides.
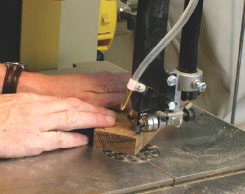
I always like to “sneak up” on the fit of tenons, especially when they are exposed. The tricky part with through tenons is that the final cut that yields a good fit must also be smooth enough to give a good finish. I made the initial cuts on the table saw, using a jig that rides on the fence as shown.
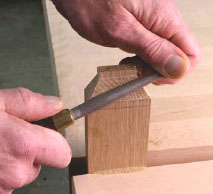
With the bottom in place in its dado, I held the rails in place, and marked the locations of the top and bottom of the tenons directly from the mortises in the end panels. I made these cuts on the band saw, then I cleaned up all the saw marks with a shoulder plane. As I got close to a good fit, I switched to a card scraper. Once I had the tenons fitting nicely, I took a piece of  "-thick scrap, and placed it on the outside of the cabinet with its edge against the tenon. I then marked a pencil line around the tenons. This established a starting point for the rounded ends of the exposed tenons. I used my block plane and a rasp to bevel and round over the ends of the tenons, shown above.
After the tenons were complete, I marked the midpoint of the arch, and drove a finishing nail ⅛″ below that point. I also made a mark ⅜″ in from each end at the bottom edge of the rail. I then bent a ⅛-thick strip of wood across these three points, and marked the curve with a pencil. The curves in the end panels had been marked from the template, and all of these cuts were made with my jigsaw.
The next task was to join the two stiles and top rail that make up the face frame of the carcase. I cut tenons on the end of the rail with a stack dado set in the table saw, and made the mortises at the top of the two stiles with a hollow chisel mortiser. I glued the rail between the stiles, and set this subassembly aside while I worked on the back panel.

The long mortises on the ends of the rails are cut with this tenoning jig that rides along the table saw fence.

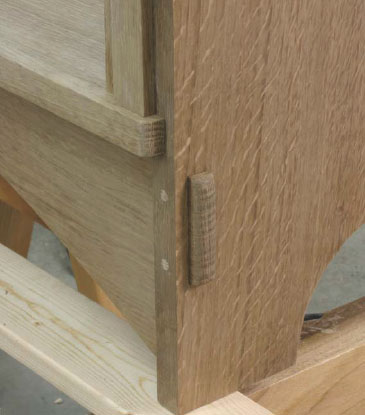
After the tenons are trimmed to fit with a shoulder plane and scraper, the exposed ends are rounded with a block plane.
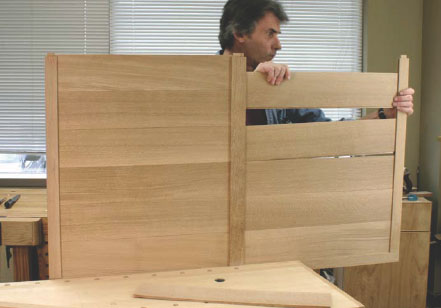
With the rails already glued to one stile, the shiplapped boards for the back panel are slipped into the groove in the rail. When they were all in place, I glued on the remaining stile.
Panelled Back
Backs in original Craftsman pieces varied depending on when they were made, and could be V-grooved or shiplapped planks, or frame-and-panel assemblies. I chose to make a back panel, as this would help keep the cabinet from racking.
The stiles and rails for the back are all ¾″-thick material, with a ¼"-wide by ⅜″-deep groove centered in one edge. Mortise-and-tenon joints hold the panel together, and the ¼"-thick shiplapped panels float in the grooves in the stiles and rails. You also could use ¼"-thick plywood for the back panels, or make the entire back from one piece of ¾″- thick plywood.
To assemble the back, I first glued one end of each of the three rails into one of the stiles. After letting the glue dry overnight, I slipped the shiplapped panels into place, then applied glue to the tenons on the rails, and clamped on the remaining stile.
Assembling the Case
With one of the end panels flat on the end of my assembly table, I inserted the tenons for the bottom rails part way in their mortises, and then applied glue to the tenons. This keeps the glue from squeezing out on the outside of the joint. I tapped the rails home with a dead-blow mallet, and then eased the bottom in to its dado, as shown at right. With these parts together, I put glue on the tenons of the rails, and edge of the bottom before clamping down the remaining side panel.

To control glue squeeze-out on the exposed tenons, I get the tenon started in the mortise, then apply glue directly to the tenon.

I then laid the cabinet on its back, and glued and clamped the face frame in place. After letting the glue dry for an hour, I glued the trim piece on the front edge of the bottom. The seam between the face frame and the end panel is covered by a ¼"-thick strip that runs from the top edge of the bottom to the bottom of the top face-frame rail.
These small additional pieces add interest to the design by creating steps in an otherwise flat surface. They also hide the joints and display quartersawn figure on the front of the cabinet.
I made a template out of ½″-thick baltic birch plywood that located the holes for the pegs that support the two adjustable shelves. After drilling the holes, the carcase was complete, except for the two blocks that cap the trim on the top front of the cabinet. I laid out the blocks on each end of a piece of wood about a foot long to give me room to hold them while cutting them on the band saw.
This extra material also provided a way to hold the blocks in my bench vise while cleaning them up with a rasp. After all the surfaces were smooth, I glued them in place.


With the two bottom rails in place, I spread glue on the top edges of the rails and in the dado before tipping the bottom in to place.

Because of the mechanical fit of the rails and bottom, it only take a couple clamps to secure the bottom of the case assembly.
After spreading glue on the end of the bottom, and the cheeks of the tenons, the remaining cabinet side is carefully put in place.

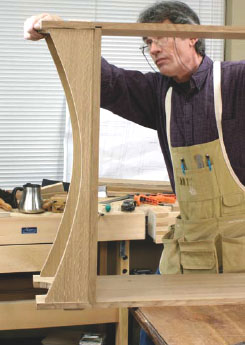
The trapezoid shaped block is laid out on each end of a long piece of wood to make cutting and handling easier.
All of the cuts to form the capital block were made on the band saw, as shown here. The final cut will be made after the block is smooth.
Leaving the block attached gives me plenty of material to clamp in the vise while I smooth out the saw marks with a rasp, followed by a file, and then #150-grit sandpaper.
Door
With the back panel completed, and the case parts assembled, It was time to work on the door. The glass sits in a ¾″-wide by ⅜″-deep rabbet and is held in place with ¾″-square strips of wood. This glass stop is nailed in place after the cabinet is finished. The outer stiles and rails are held together with mortise-and-tenon joints. The intermediate stiles and rail also have tenons on their ends. The door tenons all have a step in them to accommodate the rabbet for the door’s glass. The ¾″-wide mortises are in line with the inside of the rabbet.
At the upper portion of the bookcase door, the intermediate rail joins the two narrow stiles with a half-lap joint as shown top, near right. I made the joints for the outer stiles and rails, and then clamped the door together to lay out the joints for the intermediate stiles and rails. I cut these joints, as well as the all tenons for all the door parts, with a stack dado set in the table saw.
I assembled the door in stages, to avoid putting together a lot of parts at once. I assembled the half-lap joints first. The top and bottom rails were then put on the ends of the smaller stiles and clamped. While this assembly was drying, I cut the mortise for the lock, and carved the recess to inlay the brass escutcheon for the keyhole.
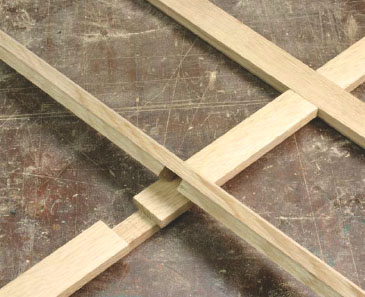
Half-lap joints hold the intermediate stiles and rails of the doors together.
I secured one of the long stiles in my bench vise (as shown bottom right), and put glue in the mortises before placing the tenons of the rail assembly. Next I put some glue on the top edges of the tenons on the rails. Then I tapped the second rail in place before I began clamping.
Fumed Finish
Fuming white oak with ammonia is an exercise in faith; the color doesn’t look right until the piece is finished with shellac and dark wax. There is also a distinct risk that some parts won’t come out the same color as others, or, perhaps worse, that there will be some sapwood present that won’t take on any color at all.
Supplies
Lee Valley Tools
800-871-8158 or leevalley.com
1 • 1⅜ mortise cabinet lock
#00N25.35, $10.80
1 • ½ extruded brass
escutcheon
#00A03.01, $2.30
Rockler
800-279-4441 or rockler.com
2 • Antique brass ball tip hinges 3 long x 2 wide
#56962, $27.99 pair
8 • Desktop fasteners
#21650, $4.49/package of 10
Craftsman Plans
1 • Large format shop drawings, includes full size details and cut list, #GST700, $16.95
Prices as of publication date.
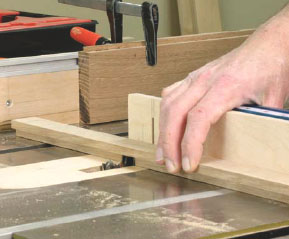
The half-lap joints, as well as all of the tenons for the door were cut with the dado head on the table saw as you can see here. The block clamped to the saw’s fence locates the cuts without trapping the parts between the dado cutter and the fence.

I assemble the door in stages. Here I’m placing a subassembly of the intermediate stiles and rail to one of the door stiles. The remaining stile will be placed on top and clamped.

After “fuming” for 24 hours the tent was aired out and the plastic removed. Here you can see the construction of the tent frame, and the change in color.

After sanding all of the parts, I placed them in an airtight fuming tent, located by the back door of the shop.
Twenty-six percent ammonia is used in blue print machines, and is a much stronger solution than household ammonia, which is about five percent. Such a strong chemical requires great care in handling, as the fumes can quickly damage eyes, skin and lungs. Make sure to where gloves, goggles and a respirator when handling it. I also took steps to minimize the time that the ammonia was exposed to the environment in our shop.
Before fuming the entire piece, I did some tests on scraps. As I worked on this project, I saved the cutoff pieces from the end panels and top. I put these, along with other scraps in a plastic container with an airtight lid. I put some ammonia in a small plastic bowl in the larger container, sealed the lid, and let this sit for 24 hours. Satisfied that the final result would be close to matching, I built a frame from inexpensive 1 by 3 pine and covered it with 4-mil-thick plastic sheet, as shown above left.
I tucked the plastic under the wood frame at the floor, and secured it to the frame with spring clamps to get an airtight seal. I left one end open so that I could place the assembled cabinet and all of the parts inside. Once everything to be fumed was inside, I clamped most of the opening closed, leaving just enough room at the bottom to reach in and pour the ammonia in to a plastic container. After this, I sealed the rest of the end and waited a day.
When it came time to remove the cabinet from the tent, I put on my goggles, gloves and respirator, opened the bottom of the end, and put a lid on the plastic container inside. I then put a fan in the opening, and exhausted the fumes outside. After letting the fan run for an hour, I opened the tent completely.
Most of the pieces came out close in color, but there were a few parts that were a bit lighter, and a couple edges that didn’t take at all. Overall though, I was happy with the results, and prepared to deal with the inconsistencies.
The first step after fuming was to smooth all of the surfaces with a nylon abrasive (Scotchbrite) pad, and give everything two coats of garnet shellac, in a two-pound cut. I then mixed some aniline dye (Liberon Fumed Oak light) with some alcohol. With a 1"-wide sash brush, I applied the dye to the lighter areas, brushing on slight amounts until the color was close. I followed this with two more coats of shellac.
The shellac changes the dirty-looking brownish gray of the fumed oak to warm brown. The photos at right show the progression of the color from raw wood, fuming and shellac. The color from the shellac, however, is just a bit too orange, and needs to be waxed to achieve the desired rich brown I was looking for. I smoothed all the surfaces with #320 -grit sandpaper, followed by a Scotchbrite pad.

The quartersawn white oak in its natural color.
After exposure to ammonia fumes for 24 hours, the oak has turned a grayish brown color.
The final step in finishing was to apply dark paste wax, which fills the open pores of the oak, and tones down the color from the garnet shellac, leaving the piece a rich warm brown.
With the finish complete, I installed the glass in the door, holding it in place with ¼″ x ¼″ glass stop. I mitered the corners, and attached the stop to the inside of the openings with 23 gauge pins.
All that remained was to install the lock and escutcheon in the door, hang the door and attach the top with figure-8 fasteners. I placed three fasteners in the front and back rails, and one in the center of each of the end panels.
Harvey Ellis’s association with Gustav Stickley lasted only a few months before Ellis died in January 1904. Ellis’s influence on Arts and Crafts design however was tremendous. The details he produced for Stickley have served as hallmarks of the period.
Ellis related the arrangement of spaces in good design to the notes in a musical chord. This bookcase combines the practical and architectural elements that he is known for in perfect harmony, and serves as a fitting tribute to his genius.

Garnet shellac adds some color, and highlights the distinctive grain. Dark wax will complete the finish.