PROJECT • 21
American Corner Cabinet
BY GLEN HUEY

There is something about corner cabinets that spooks most woodworkers. They look like trouble because they’ve got a lot of angles and the case isn’t square – it’s got six sides. Well allow me to let you in on a little woodworking secret. These are easy to build.
If you know how the case goes together, you’ll understand what I mean. Essentially, there are three important assemblies: a face frame for the front with a couple extra wings on it, the rear support (which has dados for the shelves), and the shelves themselves. You put these three parts together and everything else – the moulding, doors and back – is easy.
I’ve made this project even easier for you by providing the exact layouts for the shelves. Even the angled work is easy. You’ll only need to adjust your saw blade’s bevel to 22½° and 45° during this project, two common settings.
Pick your wood carefully for this project because what shows in the front has got to be good. I used curly maple as the primary wood, with poplar as the secondary wood for interior parts. Because so much of this project is behind the face frame, most of this project is made using common poplar.
So not only is this corner cabinet easy to build, it’s also pretty inexpensive for such a large case piece.

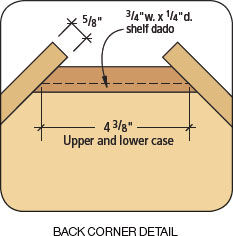
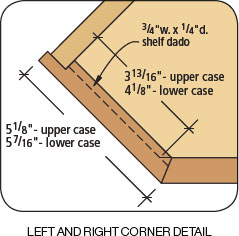
1. Begin by cutting the upper and lower side supports and rear supports to size. Then mark the shelf dado locations using the diagrams and rout ¼"-deep dados in all six pieces for the upper and lower shelves. Now cut a ¾″ X 儬" rabbet on one edge of each side support to hide the backboards, then rip a 22½° bevel on the other edge. On the back supports, cut a 45° bevel on each long edge.
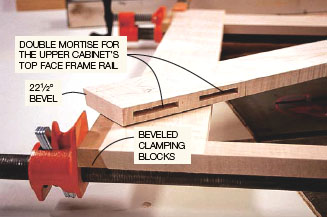
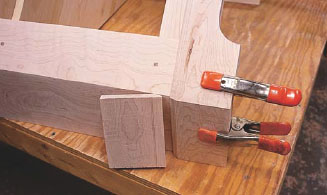
2. Cut the mortise-and-tenon joinery for the upper and lower face frames. Note that the mortise-and-tenon joint for the upper cabinet’s top frame rail is a double tenon, and the lower cabinet’s bottom rail doesn’t extend to the floor. Rip a 22½° bevel on the outside edge of each face frame stile. Assemble the two frames. Use small blocks with a corresponding 22½° angle to make clamping easy.
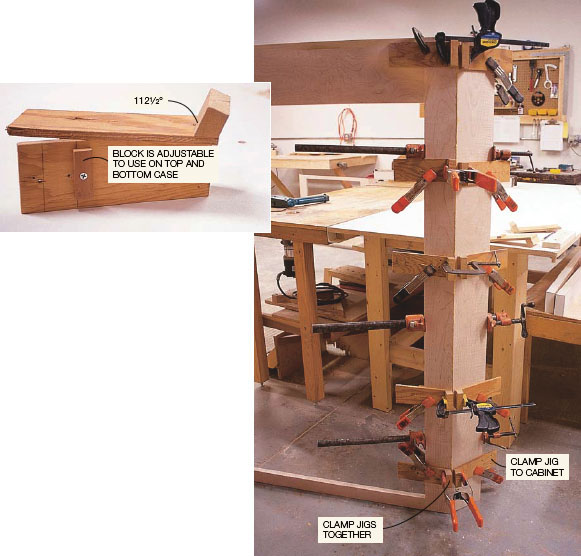
3. Sand the interior of all pieces and then glue the side supports to the face frames. To make things easier, add a few biscuits to the joint to keep things aligned during glue-up. I use a special clamping jig (see below and right) that I designed for assembling corner cupboards. Make sure you have plenty of clamps.
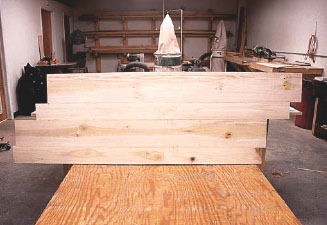
4. The shelves are nearly all the same size, so I milled and glued individual boards to create enough blanks for all eight pieces, using the larger, lower shelf dimension to start. By offsetting the boards, as shown in the photo, you can lay out two interlocking triangular shapes per blank, reducing waste.

5. Next, cut the shelves to size, following the patterns in the diagrams. I generally make one shelf for each section of the cupboard and then use them each as a pattern for the balance of the shelves. Make just three shelves for the top case with the cut as shown. The remainder are straight at the front edge.
6. Apply glue to the dados in the side supports and slide the shelves into place. Then set the rear support into place and use two #8 X 1¼″ screws per shelf to attach everything together.


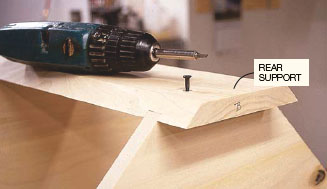
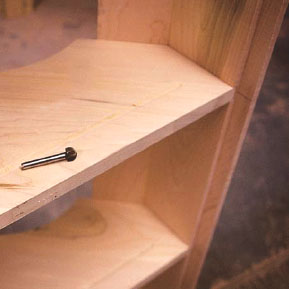
7. Set the unit upright and temporarily attach the face frame and side supports to the shelves using a scrap block and a #10 pan-head screw set in the center of each vertical piece as well as centered in the shelf. These screws hold everything where it belongs as you add the square-peg joinery. Lay the unit on a solid surface and remove the screws one at a time, and install a ¼″ square peg into each location. Complete this step for both units.


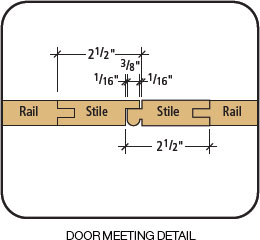
8. Build the door frames (see the story “Making the Doors” at the end of this article). After the doors are out of the clamps, use your jointer or a plane to fit the door frames to the cupboard, allowing a  gap on all sides. Then, with the doors in place, mark the location of each shelf on the doors. These will provide the locations for the muntins dividing the glass door, so they will align with the shelves.
Supplies
Hardware from Horton
Brasses, horton-brasses.com,
800-754-9127
Door hinges:
3 pair of #HH-2 3"hinges
$16.50 per pair
Upper door knob:
1 • H-97L - $6.50
Lower door knobs:
1 • K-12 (1") - $3.75 each
1 • H97 - $6.00
Interior finish:
Brierwood Green acrylic latex (#2024) from Olde Century Colors, oldecenturycolors.com, 800-222-3092

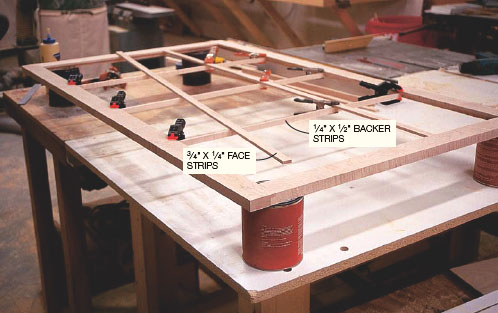
9. To begin the muntin section of the doors, cut three horizontal ¼″ X ½″ backer strips to divide the glass area into four horizontal rectangles. The fit should be snug, but not so tight as to bow the frame. Glue the backer piece into the rabbet area and clamp until dry. Flip the door over. Then install the two vertical ¾″-wide X ¼″ face pieces that divide the glass into three vertical rectangular sections. These are glued to the first three backer strips at the intersections, but left loose at the edges of the frame for now. This technique is covered in more detail in the August 2002 issue of Popular Woodworking.
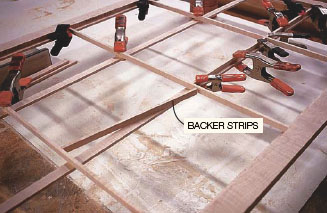
10. When your spring clamps are available again, flip the door to the back side and install the eight remaining vertical ¼″ X ½″ backer strips to the back of the two vertical face pieces. When dry, all that is left are the nine ¾″-wide X ¼″ facing strips on the front side of the door.
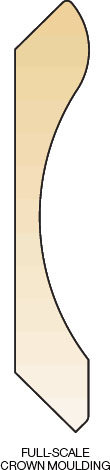
11. I used my table saw to mill the one-piece, bold crown moulding (as shown at right), then created a molded edge on both the top and bottom edges before final sanding. If this is a new technique to you, it is detailed in issue #117 of Popular Woodworking, or you can simply purchase a suitable pre-made crown moulding.

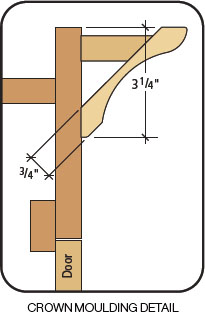
12. Next, cut the crown to length, fitting it to the upper case, and attach it using square-head reproduction nails. When finished, cut reinforcement blocks and install them between the face frame and the crown.


13. Mill the base moulding for the lower cabinet and rout the top edge profile. Fit and cut the base to the cabinet; but before attaching it, create the cut-away area on the front base. The curve is a 2" radius that starts 5½″ from the corner. Then glue and nail the base in place.

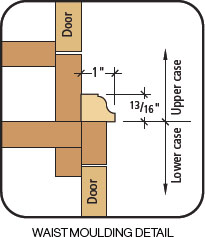
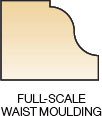
14. The waist moulding is next. Set the upper unit onto the lower unit, aligning the rear supports and sides. Fit the waist moulding to overlap the two sections, tacking the moulding in place on the lower unit, but not the upper unit. Separate the two sections, then finish nailing the waist moulding to the top edge of the lower unit.
15. Before attaching the back pieces, use a ½″ core box or roundnose bit to rout a plate groove into the top side of the three cut-out shelves and bottom shelf of the top section. Set the center of the cut at 1½″ from the wall sides of the shelves.
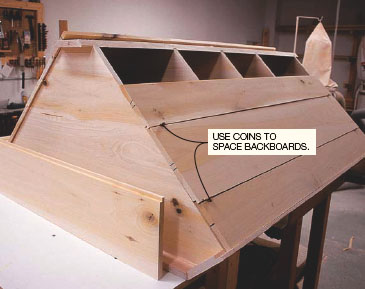
16. Create the backboards using half-lap joints, but leave the pieces loose at this time. Finish sand all the pieces, and you’re ready to add the finish. After the piece is stained and complete, paint the interior with two coats of a simulated milk paint, including the backboards. When dry, install the backboards using nails or screws, allowing a bit of a gap for expansion.

17. To complete the project, fit the glass into the upper door and install the hardware. The glass is held in place using Durham’s water putty. For the hardware on this cupboard I used surface-mounted H-hinges and brass door catches.

I dyed this project using J.E. Moser’s golden amber maple water-based aniline dye (available from Woodworker’s Supply (800-645-9292 or woodworker.com).
Making the Doors
The lower doors are simply a raised-panel style door with a half-lap center and a bead detail at the lap. A ¼"-wide X ½″-deep groove in the stiles and rails hold the raised panel.
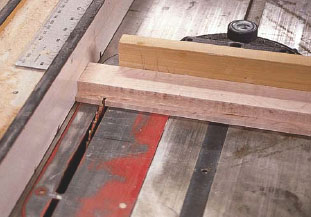
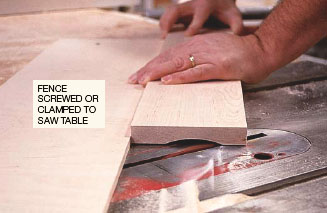
Make the face shoulder cut so that the blade just clears into the rabbet.

With the fence at the same location, cut to create the edge shoulder. Remove the cheeks and the shoulder, remembering that there are two different cheek heights
to cut.

Begin the upper glass door by milling the lumber according to the cut list and cutting the mortises in the stiles, leaving a minimum 儬" interior shoulder. Next, cut a  " X ½″ rabbet on the interior, inside edge of all four door pieces.

Next, change the fence location by " by moving it closer to the blade. Then make the second shoulder cut, creating an offset of the cuts.

With the joints finished, you are ready to assemble this door frame. As you can see, the rabbet for the glass is created, and the joinery is professional.