
So now you have raised your pig to the weight you want. The next step is to get it into your freezer or on your plate.
Generations of farm families have home-butchered pigs as a way to store meat over long periods. Processing a live animal into edible portions was not only a family-oriented event, but could include a wide circle of friends and relatives as a social gathering.
The butchering of farm animals—whether beef, pork, sheep, or chickens—was traditionally a late-year activity because of the cooler temperatures, especially before the advent of electric refrigeration. It was risky to butcher on warm summer days because high temperatures could quickly ruin the meat or decrease its quality. Cooler days made the strenuous work a little easier and gave the workers a little more time as the fresh meat would not spoil as quickly.
Although refrigeration is prevalent today, especially in meat markets that slaughter animals, you may not have access to it if you butcher at home. This does not mean you can’t process a carcass at home; it only means you need to be aware of ambient temperatures when you butcher an animal.
This chapter will look at all the issues involved with and the steps to be taken in harvesting a live animal and safely working with the resulting carcass.
FIRST STEPS
Home butchering is not for the faint of heart, but it also is a process that you and your family, along with help from friends, can complete with some guidance. The whole process and sequence of steps involved to safely and humanely kill a pig—which in simple terms is what you will be doing—and end up with packaged meat in your freezer will take some physical stamina. The full range of the butchering experience includes killing your pig, quickly deconstructing the carcass, packaging it, and freezing it. Once the process begins, you will need to carry through to the end or you will have spoiled meat.
There will be noises and odors that you may not have experienced before. However, this should not deter you from doing it and doesn’t mean you can’t become very good at it. Simply remember that it won’t be the same experience you have walking up to a meat case at the local market and selecting your favorite pork cuts. You will get them from your pig, but it will be through your efforts.
Home butchering will appeal to those who value self-sufficiency, are adept at or have some knife skills, have the necessary equipment, and can process a carcass in a short time window so that the meat doesn’t spoil.
You have three options when the pig you’ve raised has reached the desired weight and you are ready to butcher it: doing it yourself, locating a local licensed meat business to kill and dress the carcass for you, or a combination of these two.
Because one of the main points of this book is to explain the home butchering process, we will focus on that. You can contact a local meat market that slaughters and processes pigs and arrange to deliver your pig there and let them kill the pig, dress the carcass by removing the internal organs, and then cool it before you retrieve the carcass. This will allow you to work with a chilled carcass several days later to cut up at your home. You may have several advantages with this option.
First, it takes the killing process out of your hands if you don’t feel you can successfully accomplish it. And there’s no shame in acknowledging this. In fact, it may be a safer and more humane route than for you to attempt to restrain a live animal and then kill it. Botched attempts at killing a live animal usually have adverse outcomes for both the animal and the person doing it.
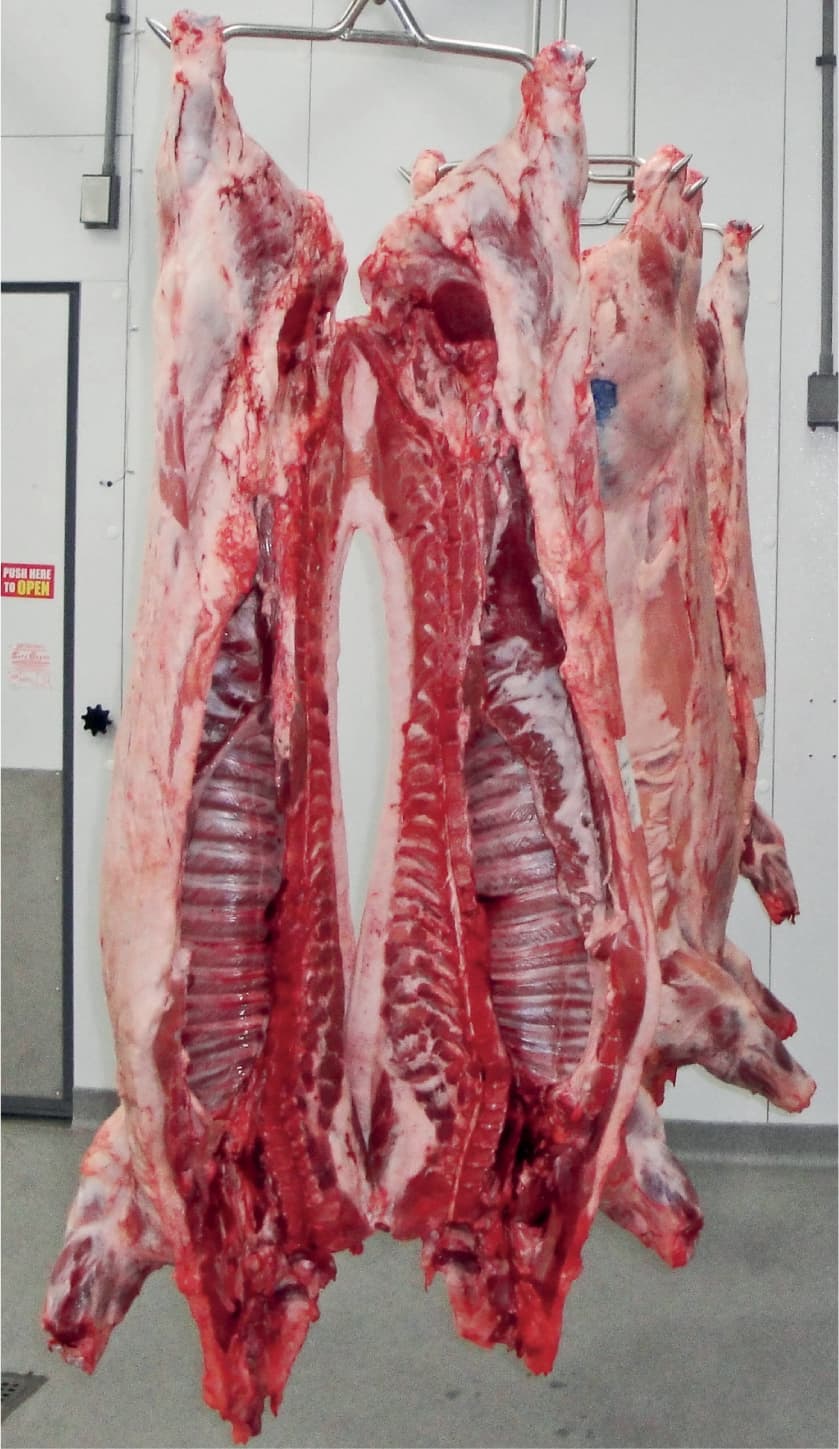
Envision the two halves of a pig’s carcass during your preparation time before butchering. This will be a large amount of meat to process in a short time.
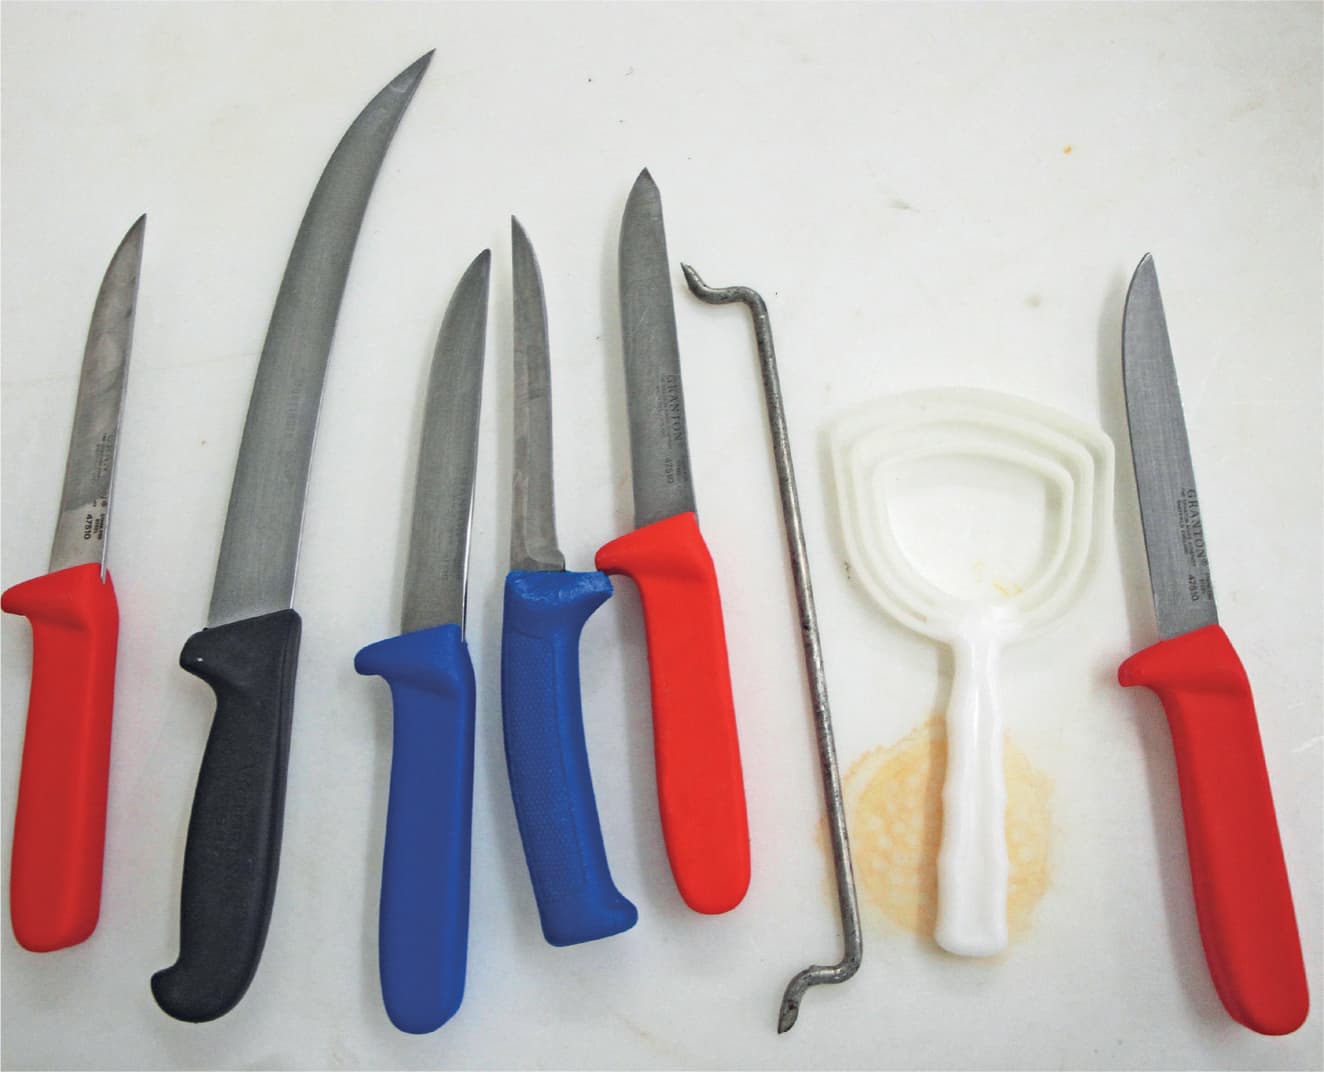
A variety of knives can be used to cut up a carcass. A metal meat saw will be needed to cut through hard bones. From left to right: 6-inch sticking knife, 10-inch breaking knife, 8-inch breaking knife, 4-inch boning knife, 4-inch skinning knife, cavity spreader, bone scraper, and 6-inch straight knife.
Secondly, arranging to retrieve the two halves of a chilled, split carcass at different times will allow you to cut up one half at a time. This will lighten your load of having to quickly deal with both halves at the same time, if that can be arranged.
If you choose this path, you will need to be ready to process the half carcass once you get it home, unless you have a large chest freezer in which to temporarily store it. You can cut the carcass into smaller units to make it fit so you can work on one section at a time. This option also gives you more time to cut up a carcass than would be available with a just-dispatched pig that is lying on a floor and needs to be quickly processed.
INITIAL PREPARATION
You need to develop a plan of all the steps involved before, during, and after the butchering. You don’t want to go blindly into this important part without knowing where you are heading. Having a plan will minimize mistakes, reduce the chance of injury to yourself or anyone helping you, and keep the meat from spoiling.
Set a target date for butchering and arrange your schedule to fit around it. Begin planning your steps as much as a week in advance. This will allow you time to
• arrange for help because you likely will not be able to kill a pig on your own
• acquire or assemble the necessary equipment to restrain the pig and then lift it once it’s been killed
• secure the appropriate knives and meat saws needed to deconstruct the carcass
• reduce any surprises during the butchering process
The first time you home butcher will be the hardest because all the steps will be new and you may feel awkward with it. But once you’ve accomplished it, you may find you have a new talent.
LET’S TALK NUMBERS
How much meat will you have to store? You need to plan for a large quantity of meat for your freezer from cutting up the carcass. Close estimates can be made for calculating a market weight, a dressing or hanging weight, and finally into the weight of various cuts. First, some definitions will provide a common language used in understanding the meat industry.
Market weight carries two meanings depending on the intent. It can refer to the target weight you are trying to achieve with your pig, say, 200 to 240 pounds. It can also mean the weight at the time a pig is sent to market, which may have a range between 225 to 250 pounds, or higher.
Hanging weight, dressed weight, or “on the rail” are terms used interchangeably to refer to the pounds of the carcass after the pig has been killed and eviscerated. At this stage the carcass has been split down the spine into two halves and the head has been removed. This is the weight for which local butchers will charge you if the pig is taken to them for processing, plus any additional fees involved with killing the pig.
Several other terms are helpful to understand, including side, dressing percentage, shrinkage, and cutting yield. You may encounter these terms being tossed around by local butchers, and knowing what they mean will make it less confusing. They all reference a carcass in various phases after the kill has been made.
• A side refers to one-half of the entire carcass. The carcass is split down the spine to help it cool better and to make the total weight of the carcass more manageable to cut up. Lifting half a carcass is easier than a whole one. A side of pork includes one matched forequarter and hindquarter of the same side.
• Dressing percentage is the proportion of the live weight that remains intact in the carcass after kill and before deconstruction. It is sometimes referred to as the yield. It is calculated as carcass weight ÷ live weight × 100 = dressing percentage
• Shrinkage is the weight loss that may occur throughout the processing sequence. It may happen due to moisture or tissue loss from both the fresh and processed product.
• Cutting yield is the proportion of the weight that is a useable or saleable product after trimming and subdivision of the whole carcass.
We can do some calculations to help you estimate how much meat there will be to work with. While these numbers may not exactly apply to your pig, the formula used will apply regardless of how much your pig actually weighs. And, you can do these estimates even before you begin to raise your pig, or while it is still small.
Let’s say you have a pig that has reached a live weight of 240 pounds. Let’s also say that you expect a dressing weight of 75 percent, which is within a normal range.
The total carcass weight then would equal 180 pounds (240 × .075 = 180). This means there will be 90 pounds per side (180 ÷ 2 = 90). At this point, this total will include the meat, bones, and fat, but not much of the blood as most of it would have been drained from the carcass during the early hanging period.
We can use an average cutout weight (cutting yield) for pigs that is about 60 percent. This equals 108 pounds (180 × 0.60 = 108). The other 72 pounds represent parts that typically aren’t used, including fat trim, bones, and skin (although you will find uses for them as this book explains).
The 108 pounds of yield can be further broken down into sections. The largest parts of the pig carcass are the hams, which can each be about 23 percent of the dressed weight. In our example, this equals about 25 pounds (108 × 0.23 = 24.8).
The side or belly and the loin areas each represent about 15 percent of the carcass, or 32 pounds total (108 × 0.15 = 16.2 each or 32.4 for both).
The picnic and Boston butt are each about 10 percent of the carcass, or 21 pounds (108 × 0.10 = 10.8, times 2 = 21.6 pounds, more or less).
There will be miscellaneous portions, including the jowl, feet, neck bones, skin, fat, bone and shrink, that will typically account for about 25 percent of the entire carcass weight, or about 27 pounds.
There may be some variance between pigs, but these percentages generally hold true for normal, well-developed pigs of that weight range.
THE PROCESS
So, after much thought, you’ve decided to plunge ahead and butcher your live pig at home. It will be an experience you won’t soon forget and a story you can regale your friends with later. What is there to know, right? You kill the pig and go from there.
Before heading down this path, three words need to be seared into your mind: safety, safety, safety. For you and those who work with you, and for the pig.
“Why the pig?” you might ask. Since you are going to kill it anyway, why should its safety be an issue?
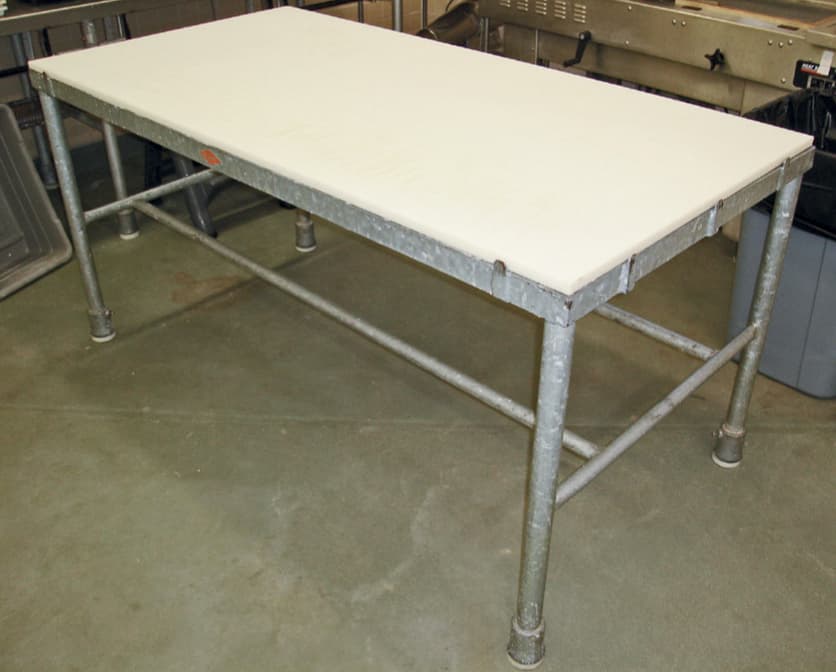
A sturdy table is essential to hold the weight of the carcass while you work with it. Always make certain the surface is clean and maintain cleanliness through the whole process.
Well, mainly because your pig is not likely to enjoy this experience. And too many distasteful and dangerous things can happen in a chaotic situation when guns, knives, and frightened animals are involved in close proximity.
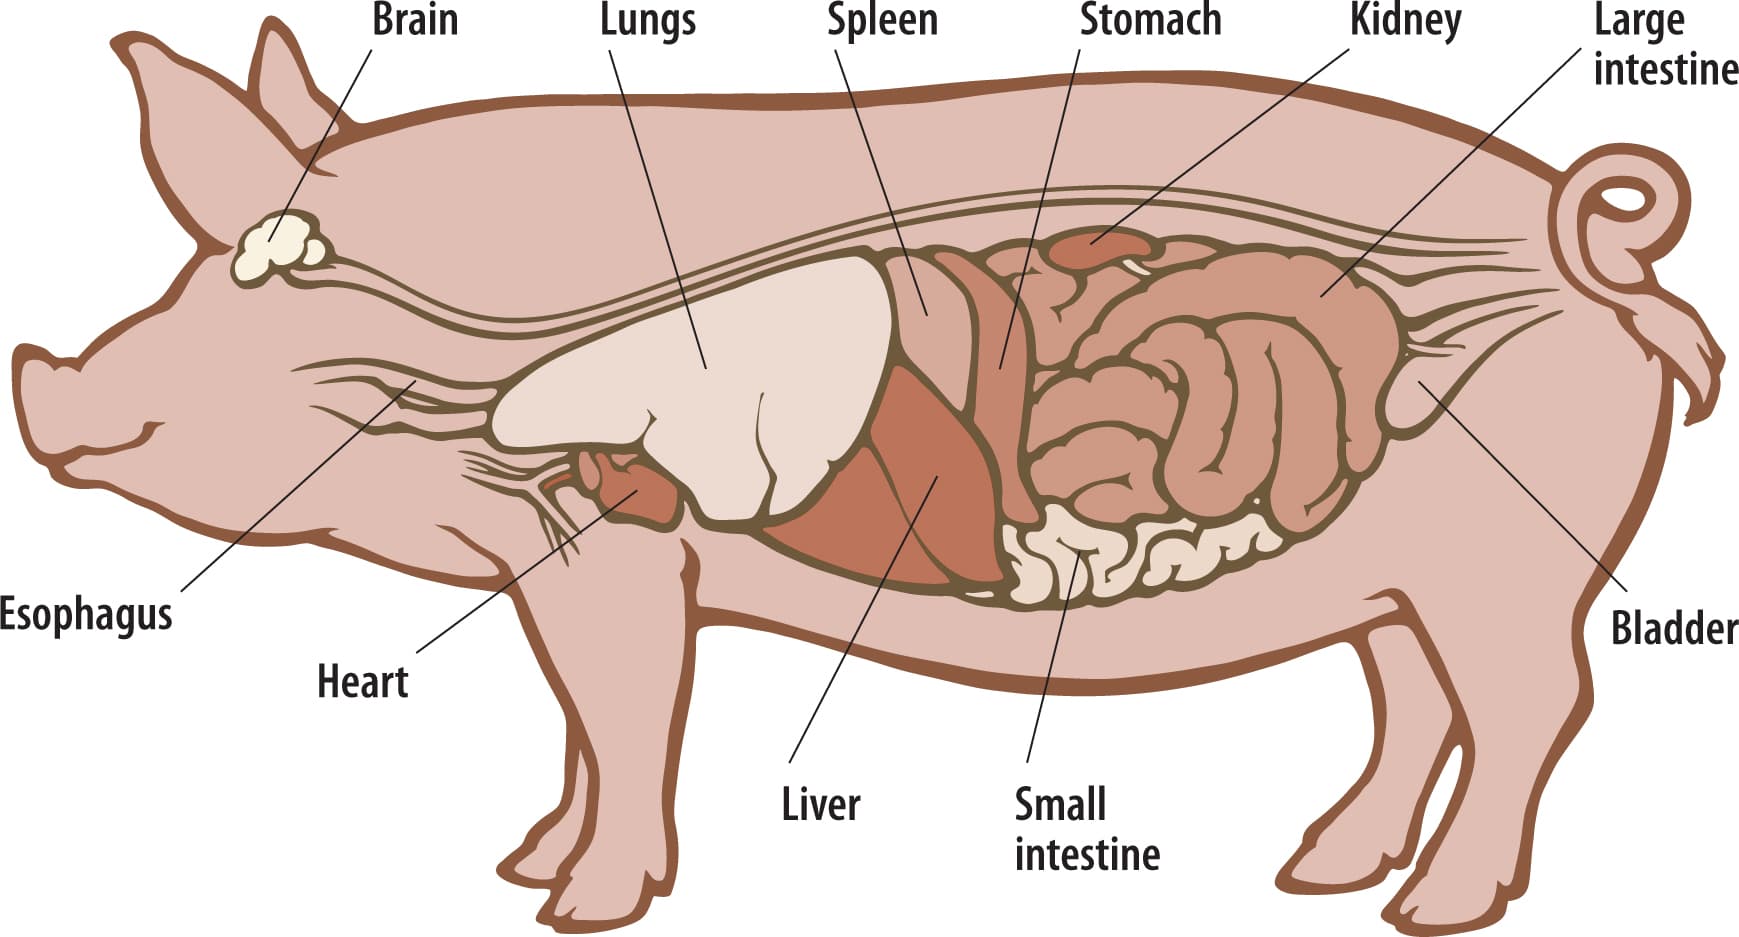
Let’s start first with your plan. You should make a list of all the steps needed to maneuver your pig to a convenient spot to kill it. You should make a list of all the necessary equipment and butchering tools needed to handle the pig and resulting carcass. These lists should be made well in advance, say several weeks, of when you set the butchering date. You should review diagrams of the skeletal structure, the digestive system, and placement of the internal organs, and you should have an understanding of the circulatory system so that you can make a clean, swift cut to the jugular vein for bleeding.
You will need to pay attention to cleanliness at all times once you start eviscerating the carcass. You need to be careful not to contaminate the carcass or organs with dirt, dust, flies, insects, and any other foreign matter. This requires that you find a level space, preferably a cement garage floor where you can have the greatest control over these conditions. Depending on the time of year you plan to butcher, heavy-duty, portable fans will help keep the air moving and deter flies, bugs, and insects from wanting to participate in this process. It is best if you do not include pets in your activity, especially in the run-up time to dispatching your pig so that it does not become agitated more than necessary.
LOCATION
It is best to use a shed or garage with a cement floor. This will keep dust to a minimum. Sweep the floor clean and wash it with disinfectant if you have the chance. Being under cover will provide a better atmosphere in case of inclement weather. No one likes to cut up meat in the rain or snow.
Several days before butchering, you will want to build a pen in your building to keep your pig. Moving it into this pen will help acclimate it to the new surroundings and you can put down bedding, feed, and water there. This will reduce the stress for the pig and likely for yourself and your helpers since it will minimize the distance the carcass has to be moved.
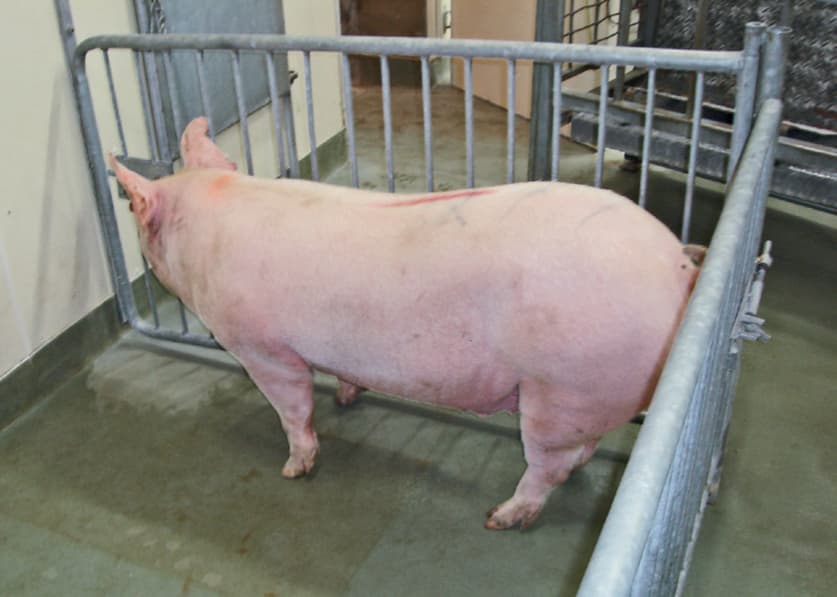
Close confinement prior to butchering is essential to maintaining a calm pig. Make sure the floor and surrounding area is clean and free of obstacles.
If you plan to scald the pig to remove the hair and make use of the skin, you can set up a scalding tub outside where it can be filled and the water heated before beginning. You will need a reliable and convenient heating arrangement for your vat and a means of swinging the carcass with a block and tackle, or some other lifting method, such as a skid-steer loader or tractor with a front-end loader, to safely place the carcass into the boiling water. Pig carcasses can be hung from tree limbs if strong enough or from heavy gambrel sticks.
Whichever method you use will require enough strength and support to hold a large pig upside down without collapsing and still be near enough to the scalding vat and cooling tub.
Collect a proper set of butchering tools for using during the day. These should include a sticking knife, a skinning knife, a boning knife, a butcher knife, a sharpening steel, a cleaver, a meat saw, and meat hooks. Other items that will be used are thermometers, hair scrapers if scalding and taking off the hair, hand wash buckets, dry towels, soap, and clean catch buckets or tubs.
PREPPING YOUR PIG
Use a small, solitary pen to house your pig several days before the planned event. You can restrict the amount of feed each day with decreasing amounts. This will decrease the amount of material in its stomach and intestines while still keeping its nutrition stable.
Give it plenty of water up until about six hours before the planned butchering. Then restrict its availability. Like with humans, this will keep the pig hydrated, which is an important component in helping regulate its muscle temperature. You cannot control the weather’s ambient temperature, so if the day ends up being hot or humid, provide a fan and keep the pig as cool as possible. You may have to provide water in this case so that the pig doesn’t overheat. Your goal is to do whatever is needed to provide a cool and calm environment to keep your pig rested and quiet. If its body temperature rises above normal levels, the resulting meat can easily become feverish. If that happens, it will be more difficult to chill it properly, and poorly chilled meat cannot be properly cured. Never butcher a pig that is overheated, excited, or fatigued because this will prompt a condition known as souring, which is affected by temperature and an adrenaline release into its system.
BACTERIA CONCERNS
Natural forms of bacteria are found in the blood and tissues of a live pig, and other livestock as well. Until recently, it was thought that all muscle tissue was, basically, sterile if it had not been injured, cut into, or bruised. However, researchers have now found viable bacteria within muscle tissue of animals that appear normal and healthy. If your pig has had cuts or bruises to its body, you will need to look closely at those spots when cutting up the carcass, and perhaps remove any damaged meat tissue and discard it.
Any bacteria that exists within a live pig’s muscles must be prevented from multiplying until the meat can be cured. This is also one reason butchering was historically done in the early spring and late fall before the advent of electrical refrigeration—it was cool or cold. You should think of it as a race between the bacterial action in the blood and tissue that are waiting to multiply when given the opportunity and the processes you use to inhibit that growth. It is a race you need to win to have safe food to eat or not have it spoil.
ABOUT SCALDING AND HAIR REMOVAL
This book is written to provide accurate information of all processes you can use to butcher your pig and harvest the meat. It includes precautions to take; it tries to alert you to avoid difficult or harmful situations that may unexpectedly and suddenly arise. However, it won’t try to dissuade you from trying or experiencing a variety of activities.
There is one major cautionary notice, however, that is given for scalding the pig’s carcass and scraping off the hair. We will go into a discussion later in this book about how to use the skin for making different crispy treats if you have the desire to utilize all the pig’s parts. To use the skin, you will need to remove the hair, and this can be done in two ways: razor removal and scalding. Unless you have a great need for the bristly hair or even the skin, then this scalding step can be eliminated and the skin completely removed with the hair still intact. This pelt can then be discarded or composted.
Scalding a pig carcass, while it’s entirely possible to do a good, safe job of it, is a laborious and dangerous process. You are working with extremely hot water in a large vat into which you need to submerge the entire heavy weight of the dead pig. This will require the killing be done in close proximity to the hot water and having a sturdy method of lifting and transporting that carcass to the vat and then being able to slowly submerge it into the hot water without splashing on anyone and causing severe burns. And then to remove this hot carcass, you will need to lay it on a table and let people scrape off the hair quickly so that you can open the carcass.
If you can safely manage all this with confidence, then go ahead. However, you will need to evaluate the value of the skin against the time lost in cutting up the carcass, plus the safety factor for yourself and anyone helping you. If you can’t assure their or your complete safety, then perhaps it is not worth the risk to remove the hair and skin by this method. Severe burns are simply not worth the risk for some pigskin. If you have a local butcher do the killing and chilling, the butcher will remove the hair and the skin will still be intact for you to trim and use later.
Scalding
OK, so you have decided to scald the carcass. First, the tank or vat you use for boiling water to make scalding possible needs to be large enough to immerse the pig completely. Few metal barrels are constructed in a way to completely submerge the pig while still being able to watch and monitor the process. It takes a long time to heat up that much water to get it to boiling, so if you use this process, you will need to start heating the water long before you dispatch the pig. Also, you will need to track the time the carcass spends in the boiling water to keep it from cooking the muscles. There will be a temperature difference between the boiling water and the carcass, and once the carcass is immersed in the vat, the water will need to reheat to reach boiling.
Gas or propane heaters will work best because they can provide a steady flame that can be quickly increased in volume. Using a pit fire with wood will take much longer to heat the water and will need attention as the flames die down. It will be more difficult to maintain the appropriate temperature with a wood fire, plus you will have the added safety concerns of an open flame.
For proper scalding, you will need to keep the water temperature between 150 and 160ºF. Once the water starts to boil, you can back the temperature down to that level. It is easier to come down with the temperature than get it to rise to the degrees you need. You will need a good thermometer to monitor the temperature at all times.
If you use a long horizontal tank, you should rotate the carcass until the hair starts to rub off, which may take 2 or 3 minutes. If using a smaller barrel tank, first lower the carcass head first into the water and submerge it as far as possible. Then lift it out and place the hooks in the lower jaw and lower the rear end into the water.
Be aware that this is a difficult process under the best of circumstances at home, but not necessarily impossible to accomplish. Be sure that all hooks are securely in place because you do not want the carcass to slip off. Retrieving a loose, heavy carcass in hot water will be difficult, and the longer it stays in the water the more the muscles will heat and cook.
Scraping
After removing the carcass from the hot water, you can lay it on a heavy table and begin to scrape off the hair. Using a hair scraper, or the blades of a dull knife, start first at the head and feet as these areas cool quickest. Your scraping strokes should go in the direction the hair lays, as it will come off easier. After finishing with the hair, use your scraper or knife and, in a circular motion, work out the dirt or scruff that may be imbedded in the skin.
One alternative to this process is to skin the carcass first and then dip it into hot water after the rest of the butchering process is finished. This will allow you to go directly to dressing the carcass and leave this less-valuable portion for later. The meat is far more valuable than the skin.
THE HUMANE KILL
Now that you have a clean place to work, sturdy tables on which to work, your knives are sharp and your equipment is clean and set out ready to use, you have enough people to assist you and they have been briefed on their tasks, and all the catch tubs are assembled, you are now ready to kill your pig. It is best to read through all the steps needed to process your pig before you begin rather than using this as a read-as-you-go text.
You can obtain a humane kill in three ways: stunning, shooting, and sticking. The first two are the easiest and offer the least safety concerns while the latter method is free of firearms or stunning equipment but also has the most potential for problems.
Stunning involves using a compression gun, which is a handheld device that can have either a long or short handle and can be a penetrating or nonpenetrating type. When a special-purpose blank rifle cartridge is fired inside the handheld stun gun, it activates a solid metal bolt that slams into the brain of the pig, knocking it unconscious so that it feels no further pain but allows for a complete bleed because the heart is still pumping. The stun gun has the advantage of being portable and easy to handle to administer the stunning. Restraint of the pig is essential so that it remains motionless just prior to firing the gun that is positioned on its forehead. To work correctly, the gun must touch the skull at the time it is fired.
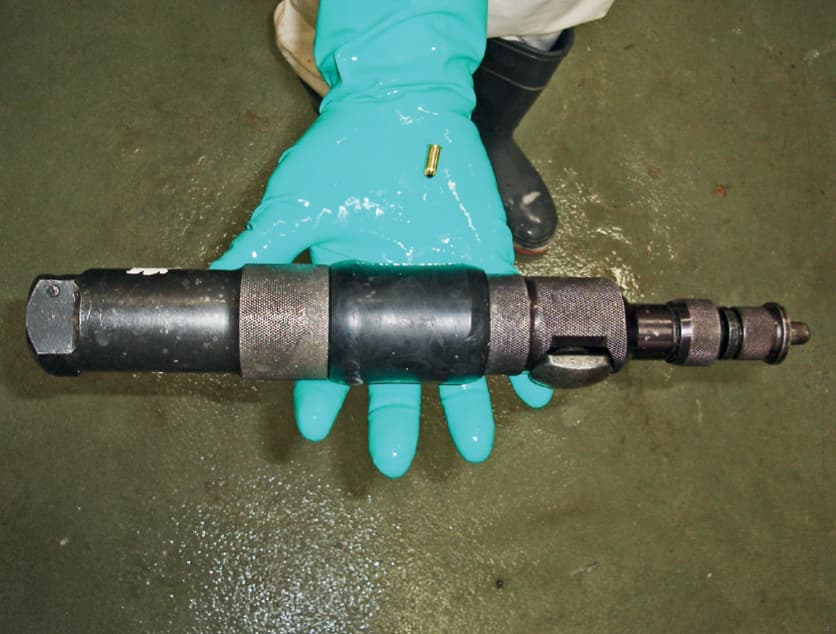
A cartridge discharge stun gun will render the pig unconscious so it feels no pain while the initial cuts are made and the bleeding is done.
Shooting involves using a rifle or small firearm to impel a bullet into the brain, also rendering the pig unconscious. If you use a rifle or small firearm, be sure all safety procedures are followed and that no one is near the animal except yourself. The rifle or small firearm should not be touching the skull when discharged because being too close to the hard skull may cause it to backfire and result in injury to you. One disadvantage with shooting the pig is that once it is dead the heart stops and the bleed may not be as complete. You will rely more on gravity to drain most of the blood from the carcass. However, it is a swift kill if done correctly.
Sticking is pushing the point of a knife into the throat to slice the jugular vein to begin the bleeding process. In this case the pig remains alive until enough blood has drained out of its body to stop the heart from beating. This method typically produces the best bleed but has some safety concerns.
In all three methods you will have to lift the pig and suspend it by its hind legs to let gravity help with the bleed. Sticking a pig while it is still standing on all four legs is a difficult maneuver, but not impossible. However, if not done accurately and swiftly, you may only slice its jowl and throat without hitting the jugular vein. This will undoubtedly agitate the pig greatly. And even if you do slice the jugular, in this position you will likely not be able to capture any of the escaping blood for later use.
Regardless of the method used, you will need sturdy equipment to suspend the pig once it has been killed. A chain or straps can be looped and tightened between the hock and the hoof on the lower part of its two rear legs to hoist it into the air. In this position, the chains or straps will not injure or bruise the hams.
Let’s assume that you have shot or stunned the pig and have raised it into the air with chains, straps, or gambrel hooks. You are now ready to slice open the jugular to capture the blood. This may take several minutes and will slowly come to a stop, at which point you can proceed to the next step of opening the belly.
If the pig is suspended while still alive, and this will likely be the method used if sticking the pig to kill it, there are things to be aware of. In this position, the pig has less ability to free itself while hanging upside down than if it is rolled on its back or side and held by your helpers before sticking to kill it. The upside-down position helps immobilize a live pig and will make it easier to complete an effective jugular severance. The most effective bleed occurs when its head hangs downward rather than its whole body lying flat on the floor. However, be aware that a live pig will not find this a comfortable position to be in and will typically flail its front feet. These must be immobilized by firmly holding them on either side or by tying them to a post so they can’t be used as weapons by the pig to defend itself.
After safely and sufficiently immobilizing your pig, you can cut the jugular vein. Begin by pressing the sharp blade point against the skin just in front of the breastbone and quickly sliding it into its neck. Then make a short vertical incision about 4 inches long in the center of the neck, followed by a horizontal slice across the inside of its throat to slice the vein. This should sever both veins that run along the esophagus and release large quantities of blood.
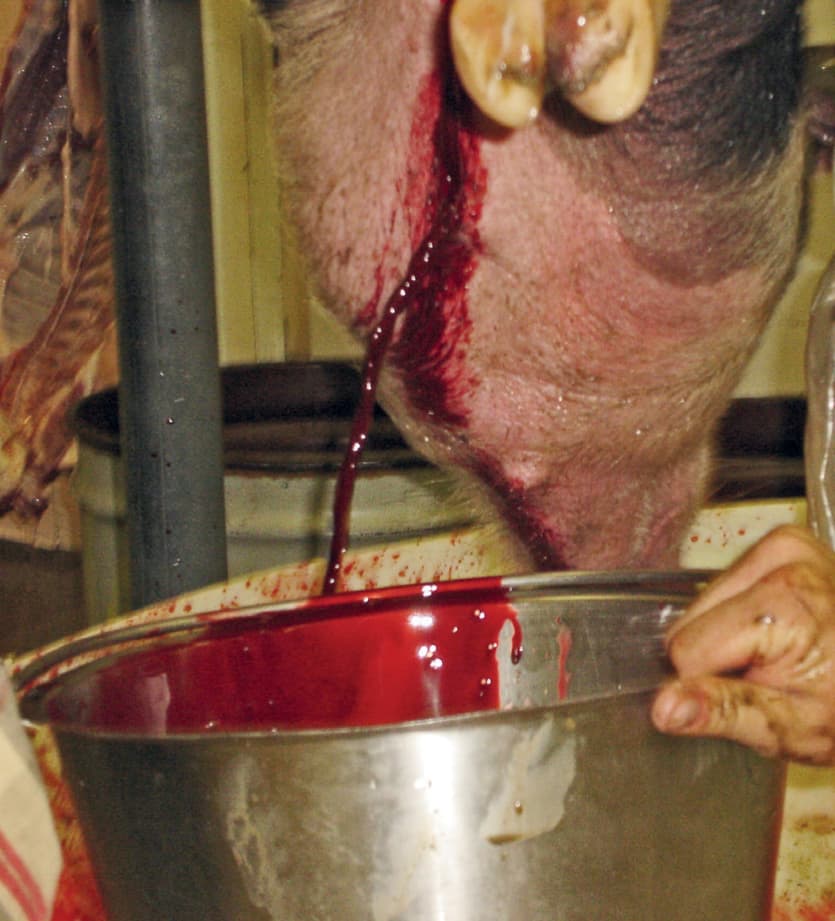
Lift the pig’s carcass by its hind legs and suspend it for bleeding. After severing the jugular, collect the blood for later use. It must be cooled immediately with salt added to prevent clotting and bacterial growth.
Your tubs should have been placed below the pig’s head to catch the escaping blood. Even if you have no plans for the blood later, using tubs will make the area easier to clean up. Remember that a pig’s total weight is about 7 percent blood. The example we used earlier of a 240-pound pig will yield about 17 pounds of blood. Not all the blood will drain completely from its body. About 60 percent will be recovered, and between 20 to 25 percent may still be retained in the heart and internal organs. Up to as much as 10 percent of the blood volume can be retained in the muscle tissue throughout its body.
Do not insert the knife point too far into the neck when you make your first incision. You do not want it to pass into the chest cavity because this will cause blood to seep into it. Also, do not stick the pig in its heart to kill it. You want the heart to continue pumping as long as possible, and it will do so for a time after the pig is unconscious.
The key to this phase is to get a good bleed as quickly as possible. When the blood flow has stopped or slowed to a drip, your pig can be moved to a table where it can be skinned, which, as mentioned, requires less time and effort to remove than scalding it.
The main problem associated with collecting blood is to prevent the contamination by bacteria from the skin. Coagulation can be prevented by the addition of cold water and anticoagulants, such as citric acid, sodium citrate, or salt. Also, the fibrin that binds blood clots together can be removed by vigorous stirring with a large spoon.
REMOVE FEET FIRST
You can remove the four feet before lifting the carcass. To remove the front feet, begin by making a circular cut at a point just below the back side of the knee joint. Cut all the way through the remaining skin until you reach bone. Severing these tendons will allow you to break the knee joint forward, snapping it. Then cut completely through the exposed joint to sever the foot. Do the same with the other front foot and place them in a tub for later work.
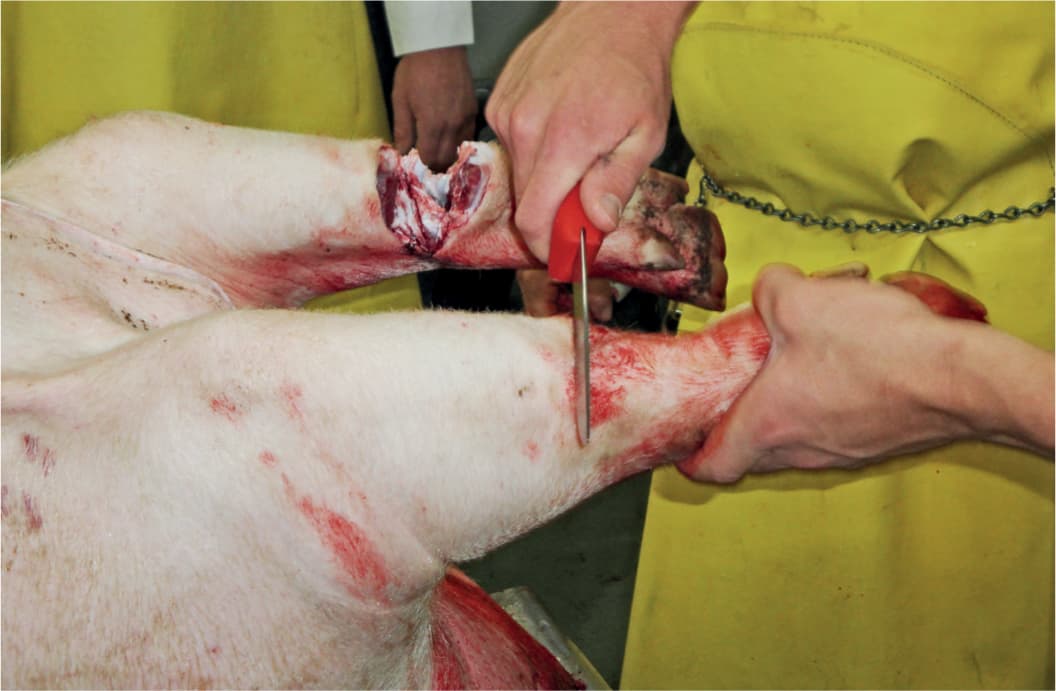
Begin the carcass deconstruction by removing the front and rear feet. Make a deep cut down to the bone on the backside of the knee joint.
For the rear legs, you do not want to cut through those tendons because you want them intact to lift the carcass. However, you can make circular cuts around the bottom of the hock joint until you reach bone. Snap the leg bone back against its normal position and it will crack open slightly. Then cut through the joint to remove the bottom part of the leg. Then do the same for the other rear leg and you should have two exposed rear leg joints with intact tendons.
There is a slight indentation between the tendons and the bone on each rear leg. This is located just above the joint you cut off. Using your knife, carefully make a 3-inch-long slit, keeping your blade tipped toward the bone so as not to cut the tendon. Then slip the gambrel ends through each slit and you are ready to lift the carcass.
A gambrel is often used to suspend a carcass. This is a long metal rod that is slipped between the tendon and the rear leg bone of each hind leg. These tendons are strong enough to hold the heavy carcass if they haven’t been cut.
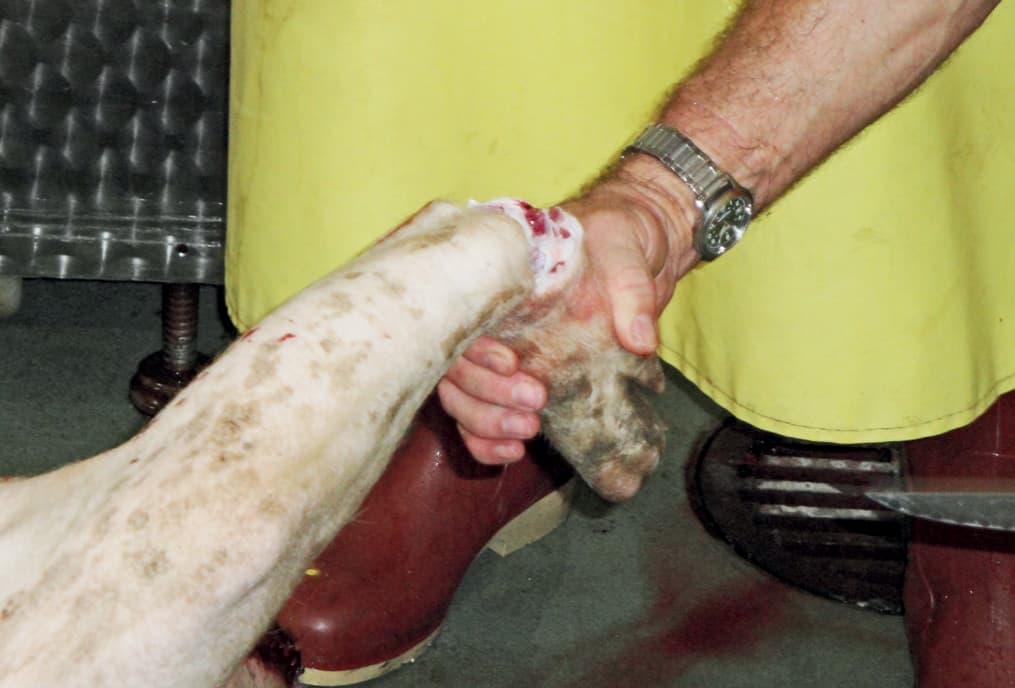
After making the cut, push down on the feet and crack the joint open. Then sever the skin with your knife to remove the feet.
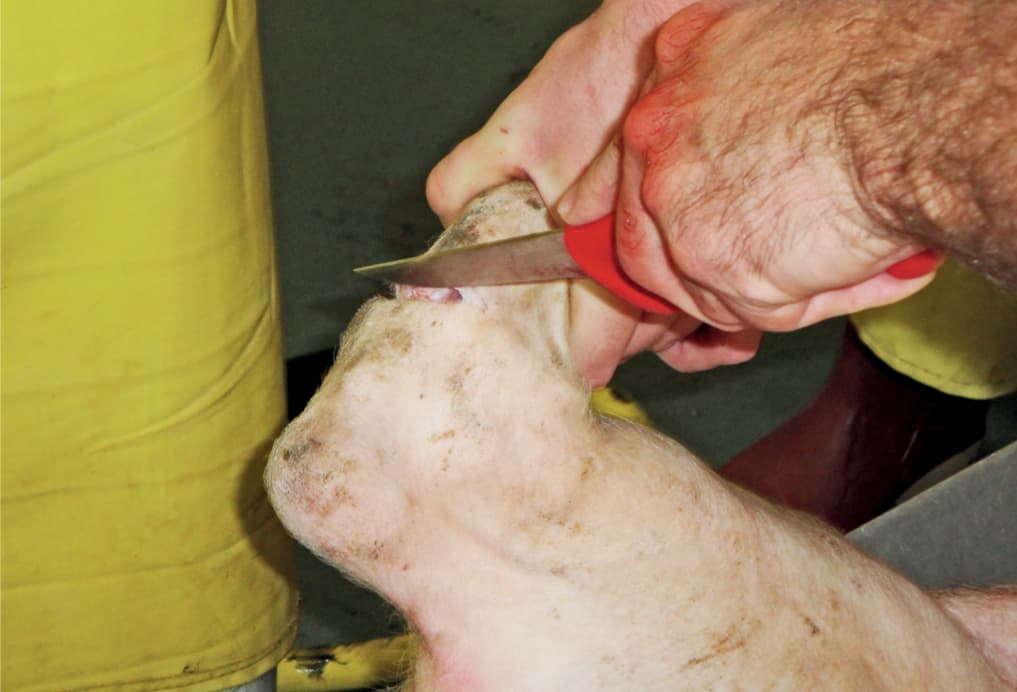
Make a deep cut on the hind leg joint just below the hock. Cutting at this spot will allow you to snap it open to separate the joint and then to sever the skin while keeping the tendon intact for lifting the carcass.
SKINNING
Removing the hide by skinning it takes off the outer layer without the need to use hot, boiling water for scalding or the extra effort of scraping off the hair.
Most people who home butcher have little need for the skin, which is often discarded. In the past, the skin was left on the hams as they were processed and cured, but with modern refrigeration this is not necessary. It will not add flavor, but it will protect the hams and bacon from drying out too quickly.
The easiest way to skin a pig is to lay the carcass on a table or V-shaped trolley or suspend it vertically at an appropriate work height. Skinning the carcass is like peeling an orange. You want to remove the outside without injuring the inside. As you begin to remove the skin, do not open up or cut into the abdomen, or cut into the muscles.
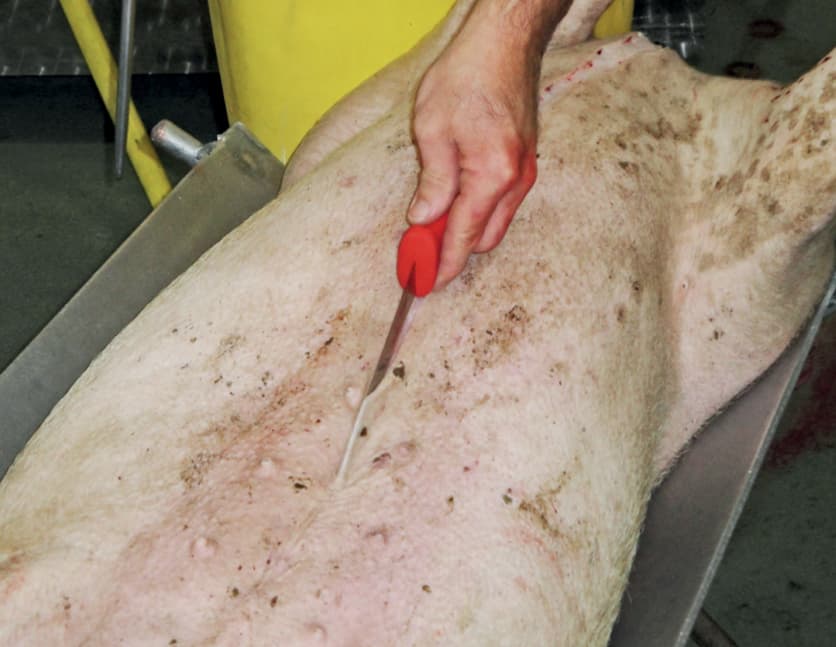
Then score a line down the center, from the chest to the pelvis, but don’t cut into the abdomen. This will allow you to peel away the skin while keeping the internal organs intact.
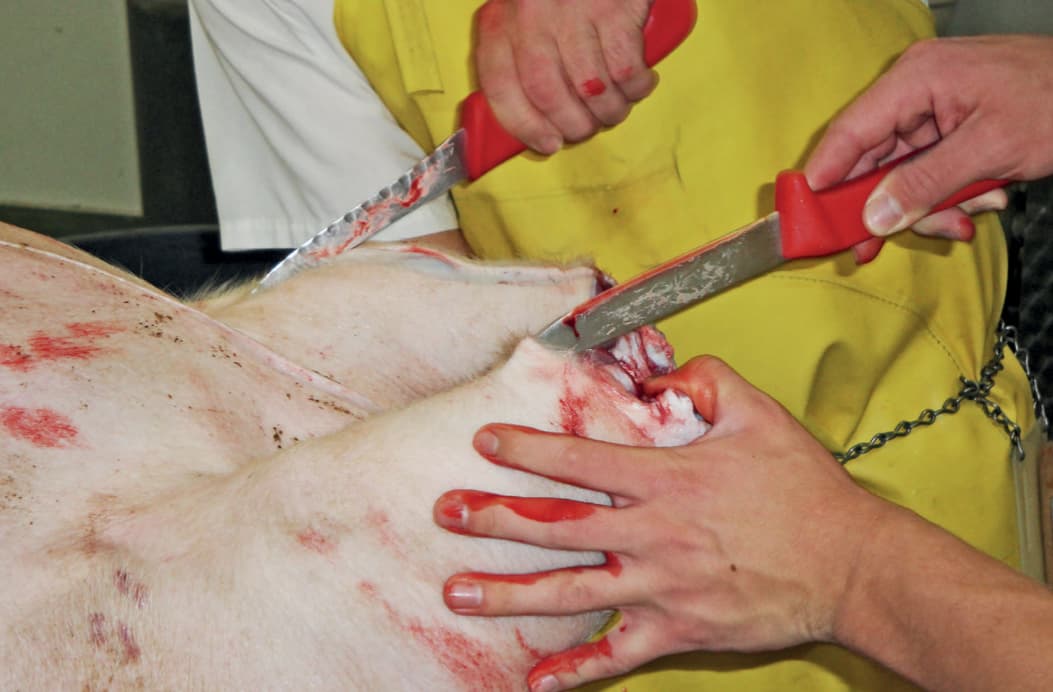
To begin skinning the carcass, lift the skin and slice down each front leg to the chest.
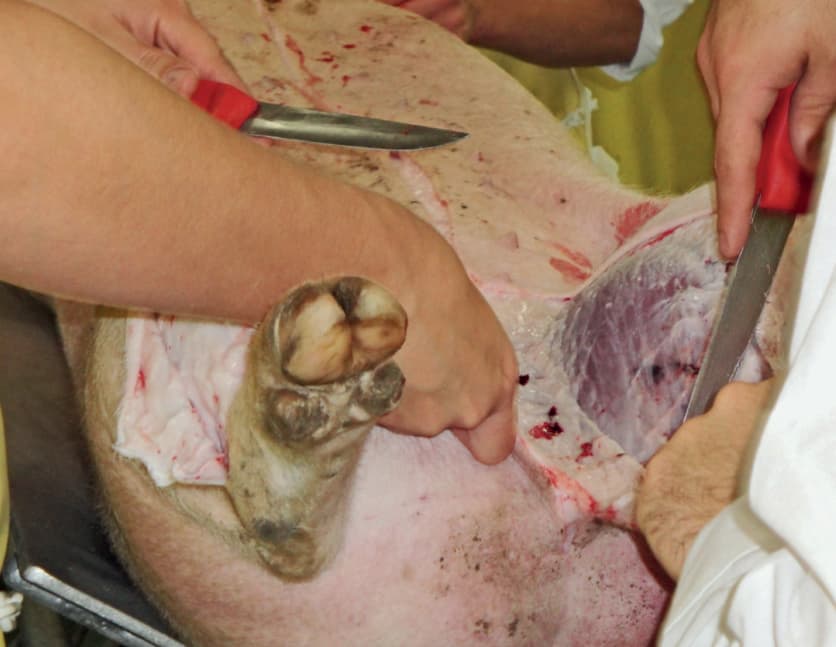
Make a slice on the inside of each rear leg to the center line cut of the belly. Begin to slice the skin as if you were peeling an orange.
Begin your first cuts at the rear ankles with a short skinning knife. Slice completely around them, but avoid cutting the tendons above the hocks. These tendons will be used shortly for helping to suspend the carcass. If they are cut through, you will need to find another means to hold the carcass in the air.
After your circling slices are done, make cuts down the inside center of each rear leg to a point below the pelvis, all the while avoiding cutting into the muscles. Do the same for the front legs and cut to a center point at the base of the chest. Score a line down the center of the belly with your knife, from the anus to the base of the chest, but do not cut through the abdominal wall.
Start the skinning at the chest and pull the skin away from the body with one hand while you slice the connection tissue with your other hand. The tension of pulling will help separate the skin from the body.
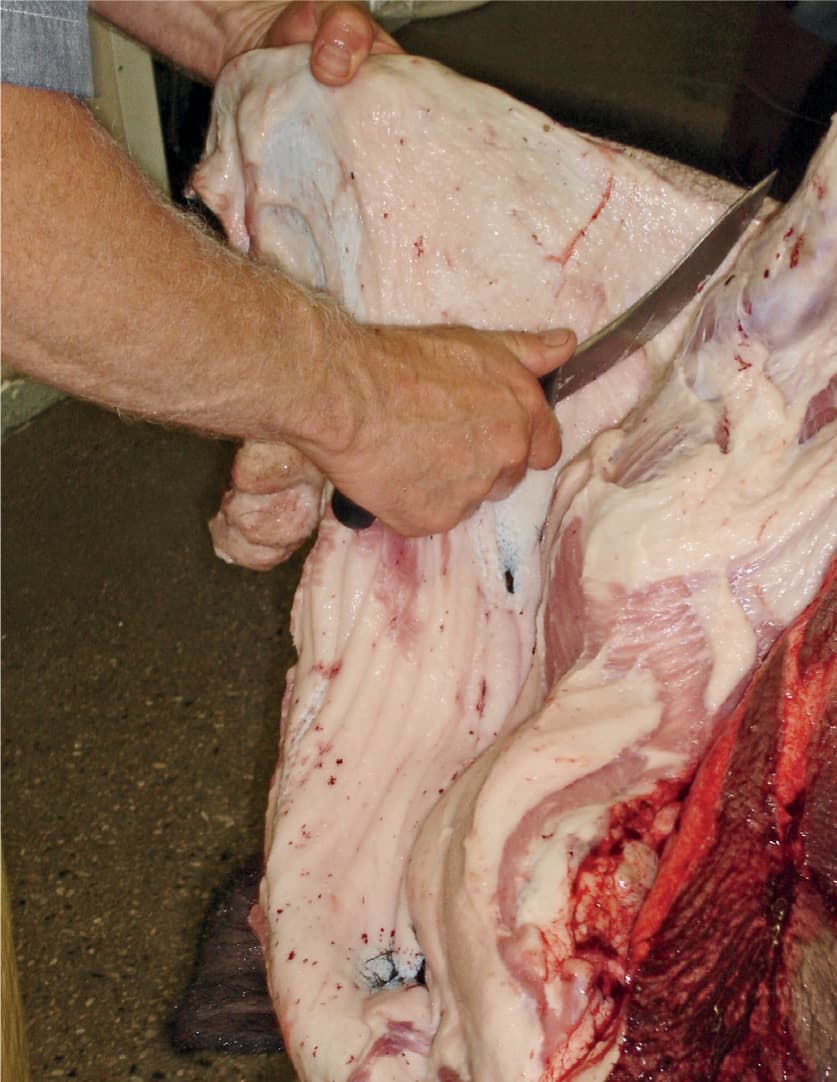
Continue skinning the sides by making slow, sweeping cuts, pulling the skin away as you slice. Avoid cutting into the muscles as it is better to leave a little more fat on the carcass than to slice into it.
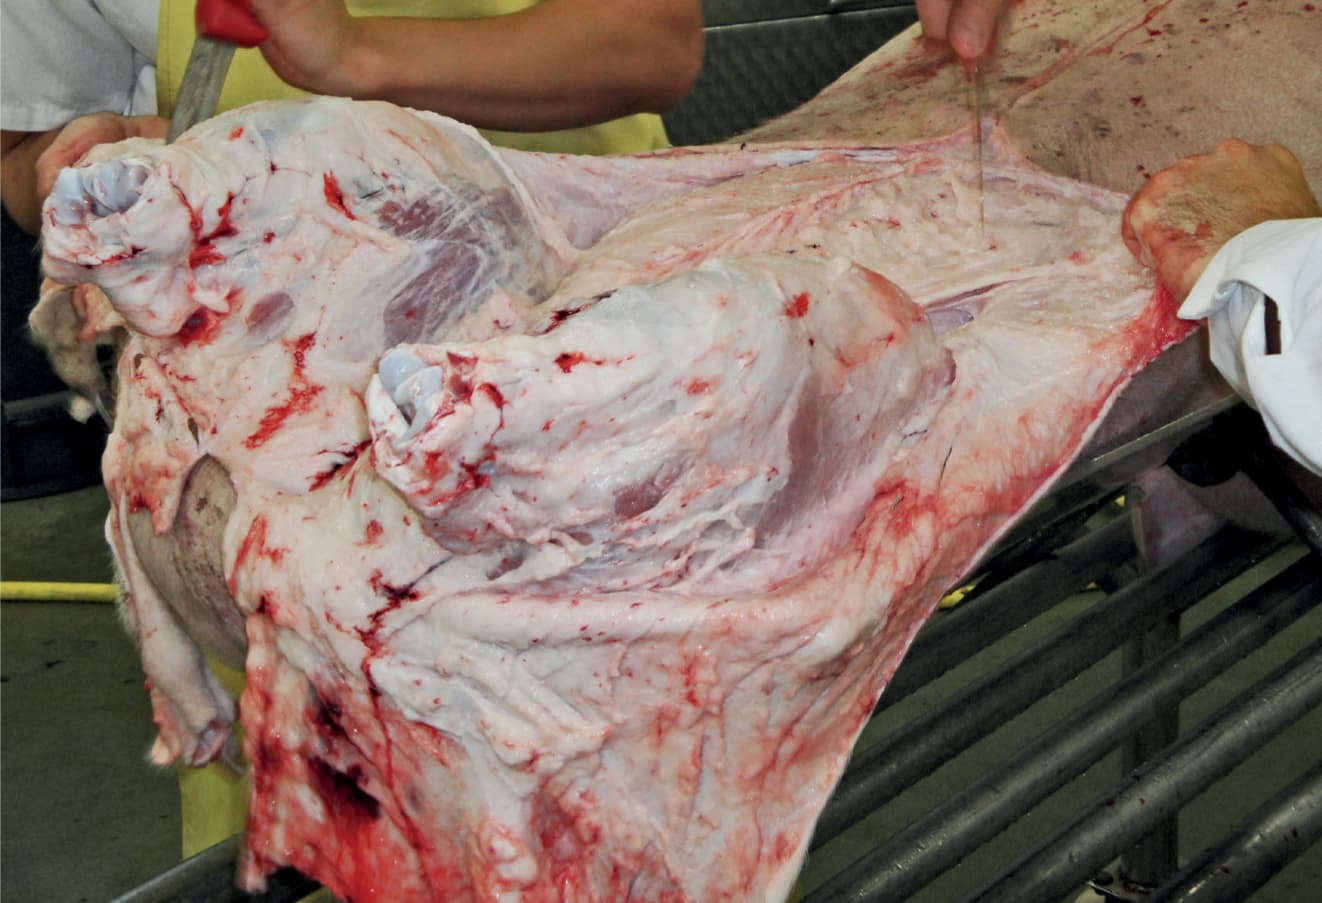
The skin can be removed from the head if it hasn’t already been cut off. Trim off any meat that may be attached and set it aside for sausage making.
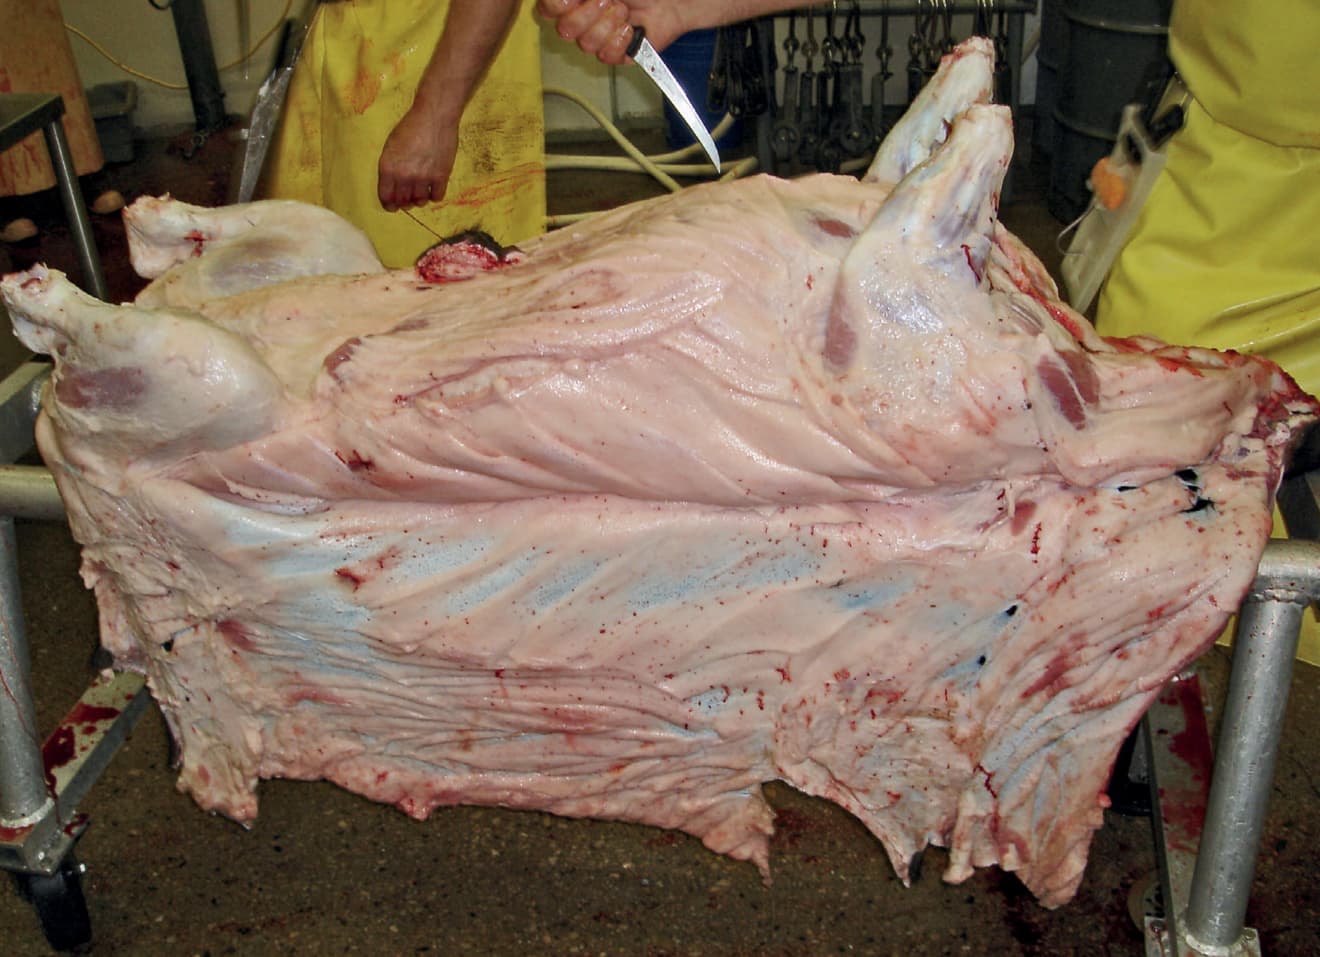
You can remove the skin entirely while it is on the table or raise the carcass and finish the skin removal while hanging.
Complete the skinning of the front and rear legs and then start on the belly. Turn the knife blade out, away from the abdomen, and lift the skin as you slice down the center line from one end to the other. Then make slow, sweeping motions between the skin and body to separate them. Do one side first and then the other. Continue until the entire skin is completely removed. It can then be set aside.
HANGING THE CARCASS
At this point, you will need to suspend the carcass vertically for several practical reasons:
• It will be easier to open the abdomen and eviscerate the carcass.
• It will allow residual blood to drain out.
• It will allow easier splitting of the carcass.
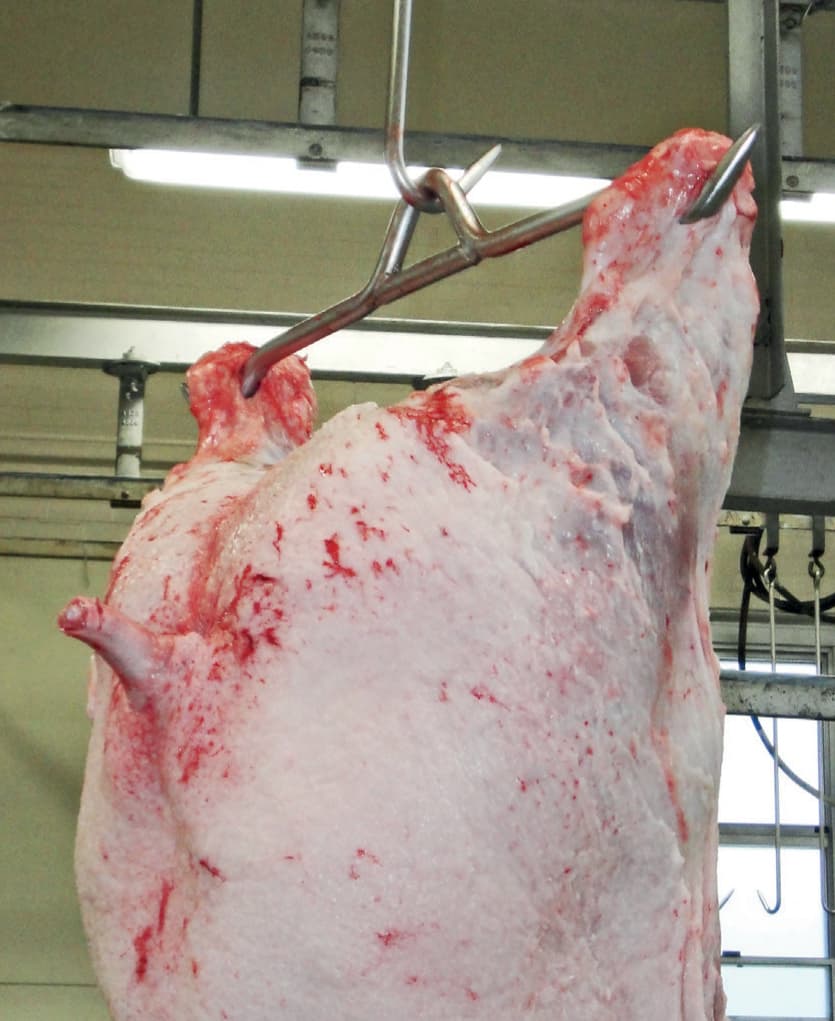
Lift the carcass by using a gambrel. Make cuts between the rear leg tendons and the bone and then slip the gambrel tips through each rear leg to lift it.
With the skin now removed, you can make a slit through the tissue surrounding the tendon and leg and push the gambrel end through it. After you do the same with the other leg, you are ready to lift the carcass. Be sure the legs are secure and can’t slip off the gambrel, causing the carcass to fall to the floor. Once the carcass is fully suspended, you are now ready to open up the body cavity.
Removing the internal organs is easier if the pig is suspended. You can use gravity to assist you in ways you can’t if it is lying flat on a table. Plus, it will help drain residual blood that did not initially escape from the sticking. Any residual blood will pool in the tissues if it remains flat on a table before cooling.
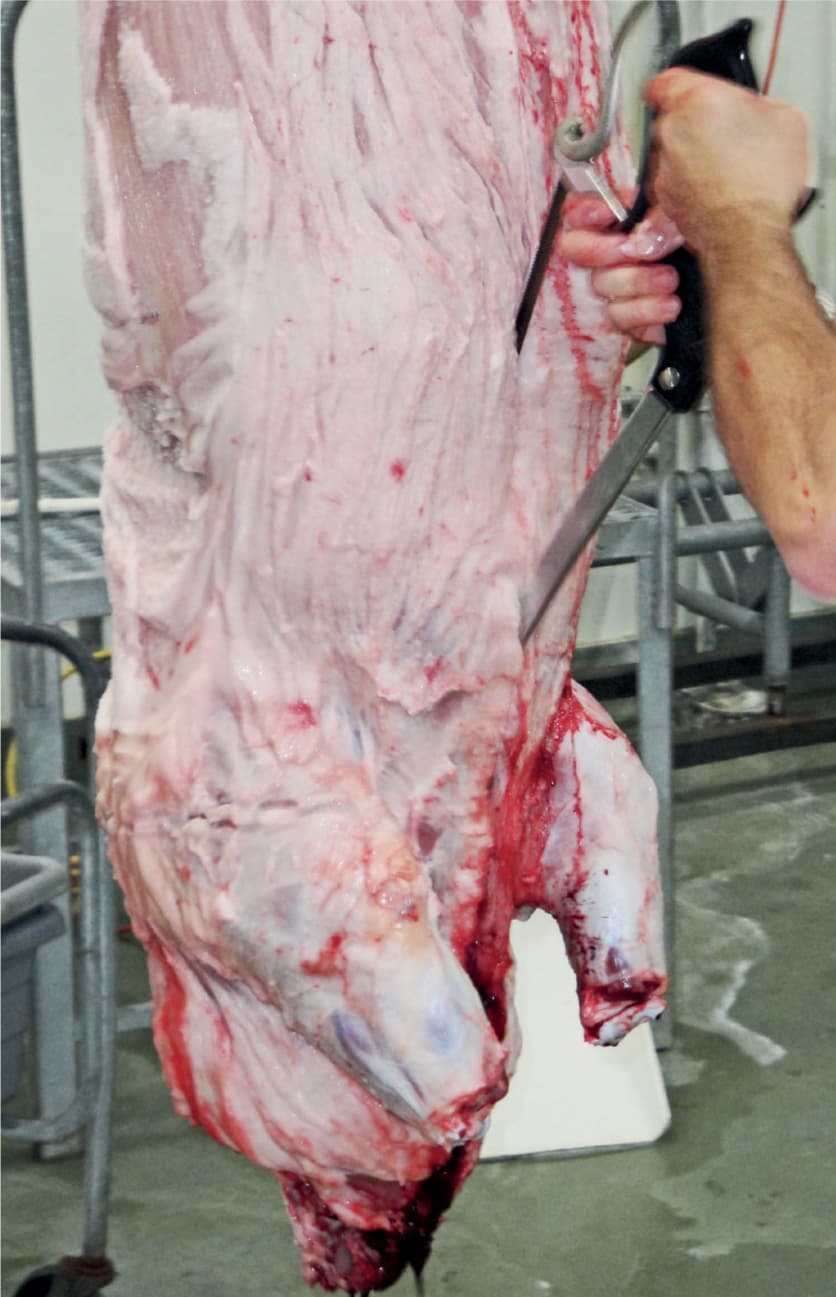
Open the chest by using the meat saw and cut through the breastbone but not into the abdominal cavity. This cut will allow blood to drain out that has been pooling while lying on the table.
HEAD FIRST
You need to remove the head first. This accomplishes two things: It gets it out of the way for working with the rest of the evisceration, and it aids in cooling down the carcass because heat will escape once it’s removed. And it will help with draining any residual blood pooling in the neck.
Begin removing the head by making a cut above the ears at the first joint of the backbone, and then across the back of the neck. As you cut through the windpipe and throat, the head will drop down, but don’t slice the head completely off just yet.
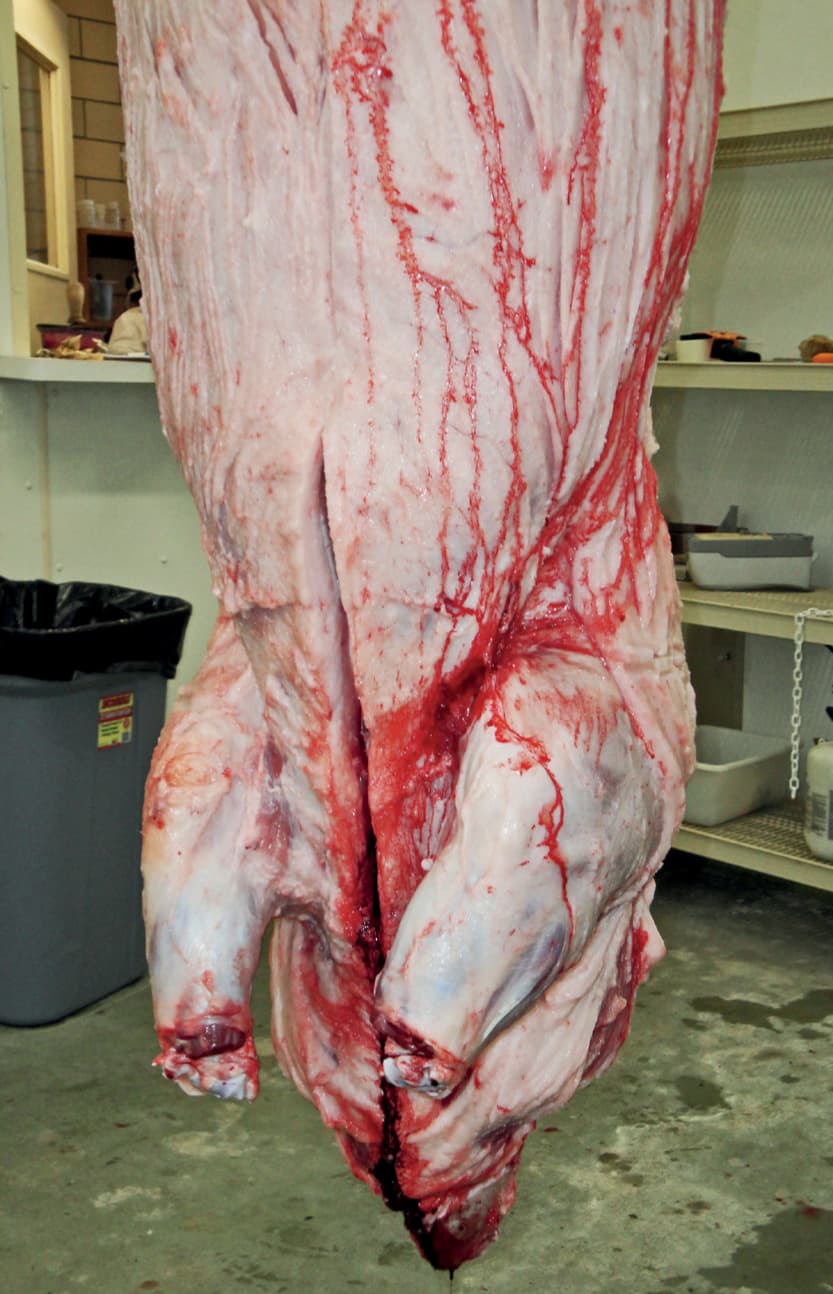
Your chest cut should look something like this after using the meat saw or a sturdy knife.
Pull down on the ears and continue your cut around the ears to the eyes and then toward the point of the jawbone, unless you want the head for roasting or headcheese. Then do not make this last cut.
The head will come free when you slice through the last part of the skin at the end of the jaw, although the skin of the jowls will still hold it. Slice through this skin and the head will be severed.
You should have a clean tarp or plastic covering on the floor even if it gets blood dripped on it. The head will be heavy and in an awkward position for you to catch after the skin is sliced through and no longer holding it. The head can weigh up to 20 pounds. Be careful of grabbing the head by its jaw as the teeth can be sharp. Once the head is completely loose, you can rinse it off and work with it later. Place it in an ice-filled tub if you have it available, and this will help cool it down.
CARCASS SPLITTING
The process of splitting the carcass in half begins by scoring a line down the center of the belly with your knife, but don’t cut into the belly wall. Start your line at a point between the hams and run the line down to the base of the chest.
You will want to split open the breastbone first. Do this by inserting the heel of your knife against the bone and cutting outward. You may have to work or wiggle the blade as you apply outward pressure, being careful not to let your blade slip. If your knife will not cut through the breastbone, you can use your meat saw.
Whether using a knife or saw, be careful not to cut past the upper portion of the breastbone and into the stomach, which, because the carcass is hanging, will have settled closer to it on the inside. Gravity will be pulling all of the internal organs toward the breastbone and first rib, and you do not want to cut the stomach open because this will release its gastric contents inside the body cavity. Opening the breastbone will allow pooled blood that has accumulated to drain out.
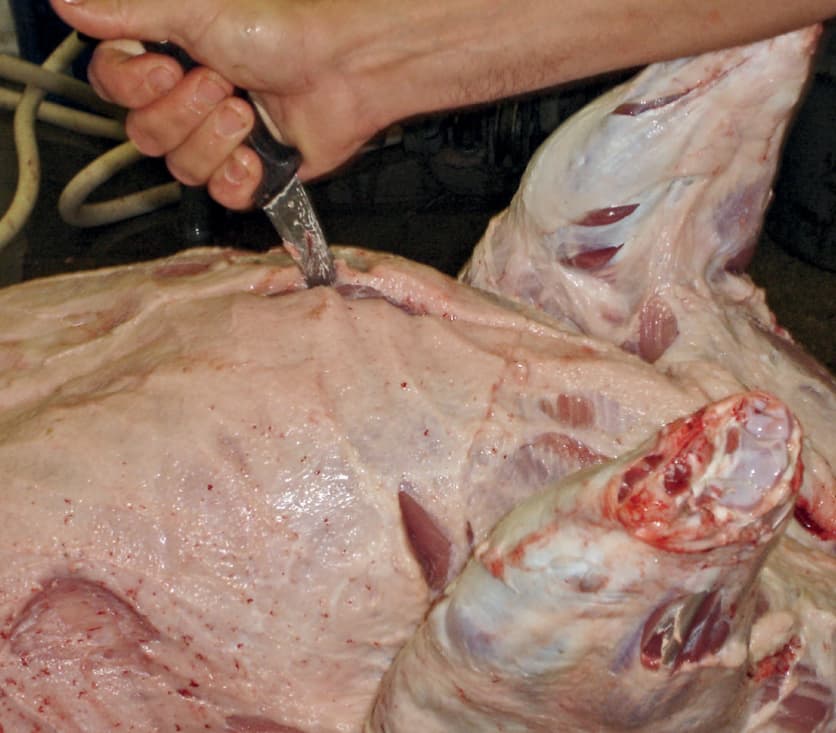
An alternative to opening the chest is to use a sturdy knife while the carcass is still on the table. Insert it just behind the breastbone and pull toward the neck to crack open the cavity. This will also allow the blood to drain after the carcass has been lifted.
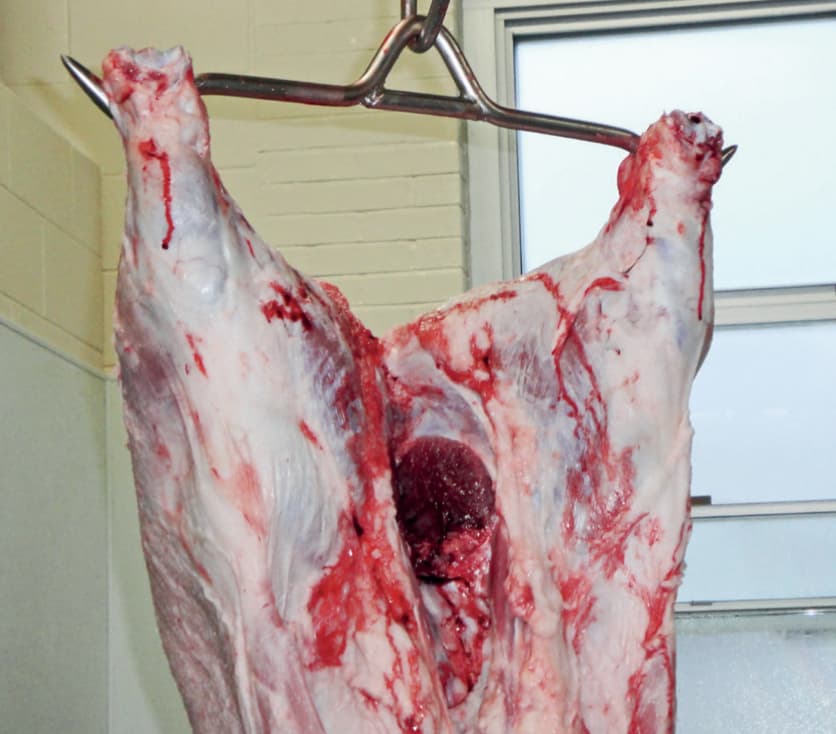
To open the abdomen, make a small cut in the soft cavity between the rear legs to gain access with your hand to the small intestine connecting to the anus.
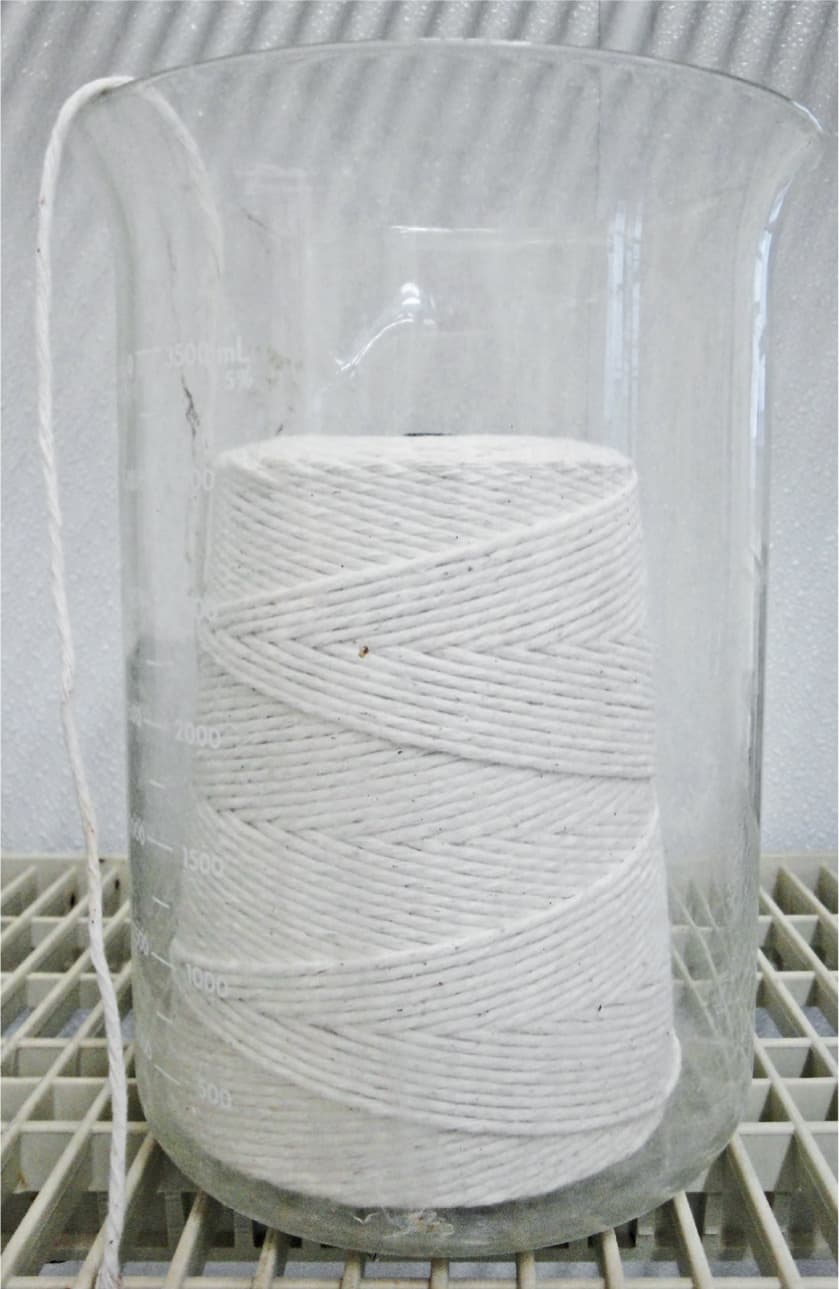
Use heavy string to tie off the small intestine tightly so that it will not slip off after the intestines are removed from the interior cavity.
You can now make an incision in the abdominal wall, near the top of the rear part of the carcass to begin the evisceration. Pull the skin outward with your fingers and make a 4-inch-long slit into the body wall. This will allow you access to the inside of the belly without cutting into the intestines. The intestines do not adhere to the abdomen, so they will not be near this cut. Since all the internal organs will be pulled downward, this cut will allow you to slide your hand into the abdomen along with your knife to cut all the way down without injuring the internal organs. But before doing this, make sure your hands, arms, and knife have been cleaned with soap and water.
There is a simple trick to enter the abdomen with your hand and knife. Pull the slit outward with your free hand. Grip the handle of the knife with the blade turned toward you and away from the internal organs. Basically you will be holding the knife backwards. The reason for this will become quickly apparent.
As you slowly slice downward, the heel of your knife blade should be right against the inside of the body and your pointed blade completely sticking outward toward you. Be careful that you have good footing and don’t slip while in this position. Holding the knife in this position will allow you to cut down the belly and away from the internal organs without nicking or puncturing them. As you slice down the belly, use the backside of your wrist and forearm, holding the knife, to push the internal organs back into the cavity to keep them away from the blade. It may feel awkward at first, but it will prove useful. You will experience more pressure against your knife hand the closer you get to the bottom because of the accumulation of all the internal parts at the bottom of the cavity.
As you slice down the belly and reach the split breastbone, the intestines will fall forward and downward. However, they will still be attached by muscle fiber and will not fall completely out. This evisceration method is easier and poses less risk to accidentally cutting into the stomach, organs, or intestines than drawing the knife upward to slice the belly open.
A clean tub should be placed under the carcass to catch the viscera as you pull the kidneys, heart, liver, and stomach toward the opening. At this point, the intestines are still suspended by the gut leading to the anus.
SPLIT THE AITCHBONE
You will want to split the aitchbone, or pelvic bone next, but before you do, take some heavy cotton cord or string and firmly tie shut the intestine end nearest the anus. This will keep any fecal material from falling out once you excise the anal muscle.
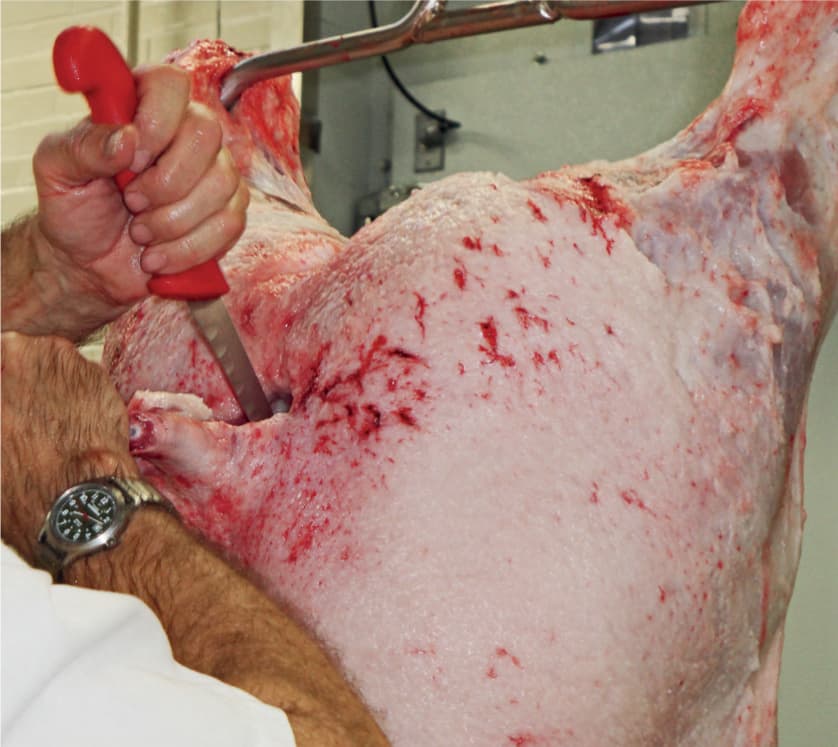
After tying off the intestine, make a circular cut around the anus muscle below the tail until it slips free of the pelvis.
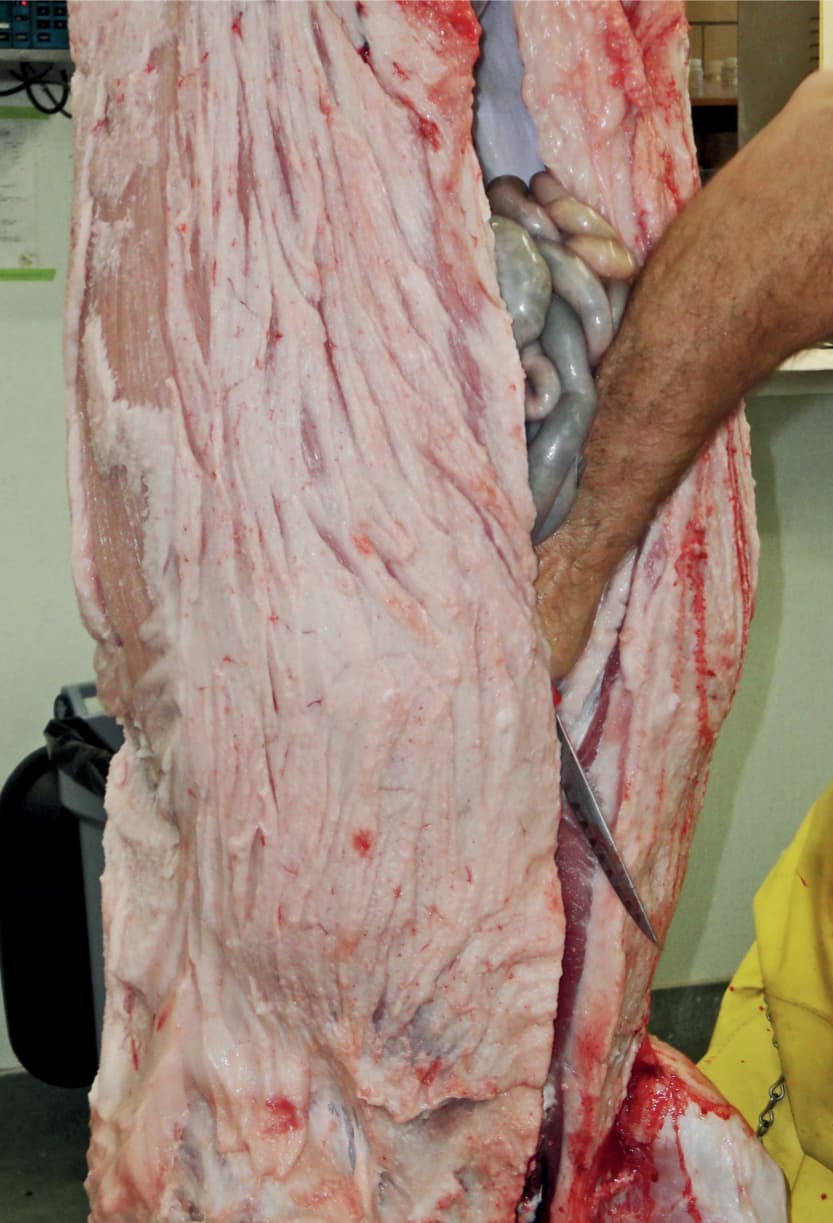
As you slice downward, the internal organs will spill outward but not completely as they will be held by the internal connective tissues.
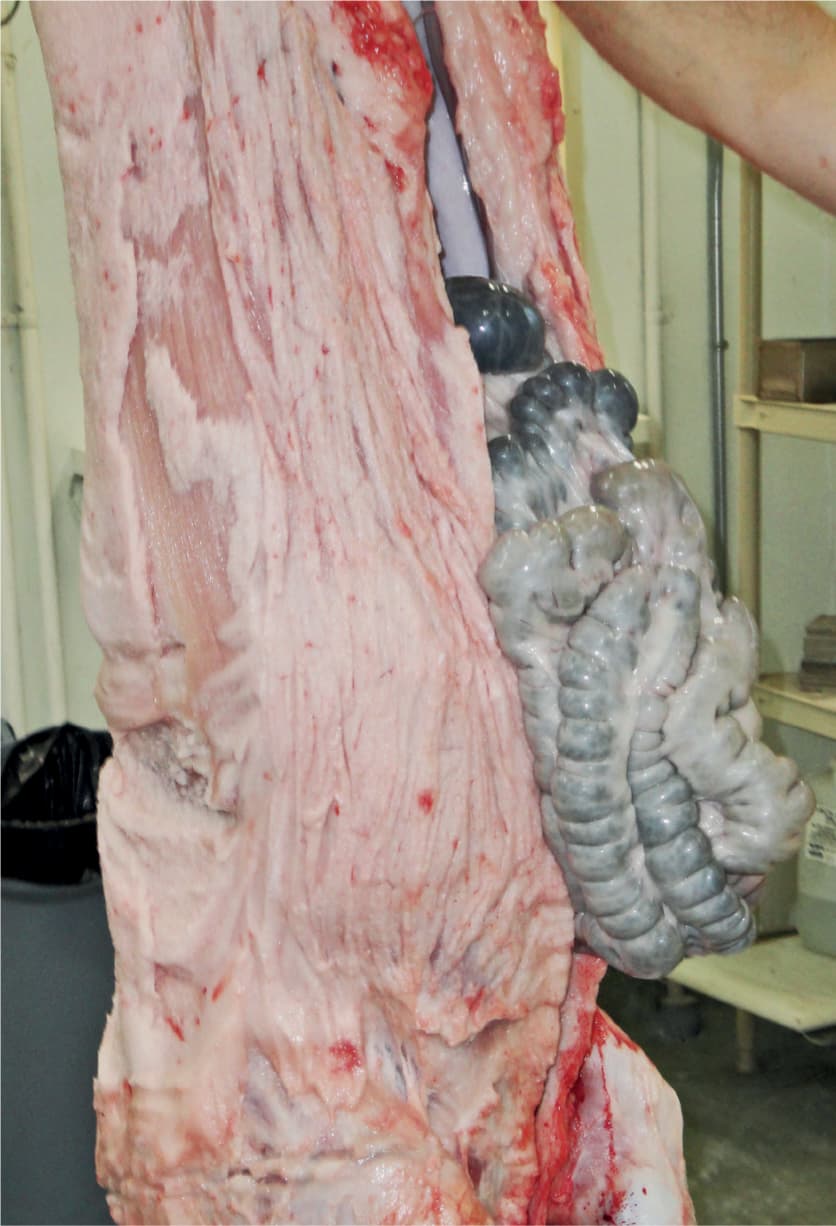
Turn the knife blade toward you and place the heel against the skin of the belly. Then slowly slice downward and push the intestine and internal organs back with your hand and forearm.
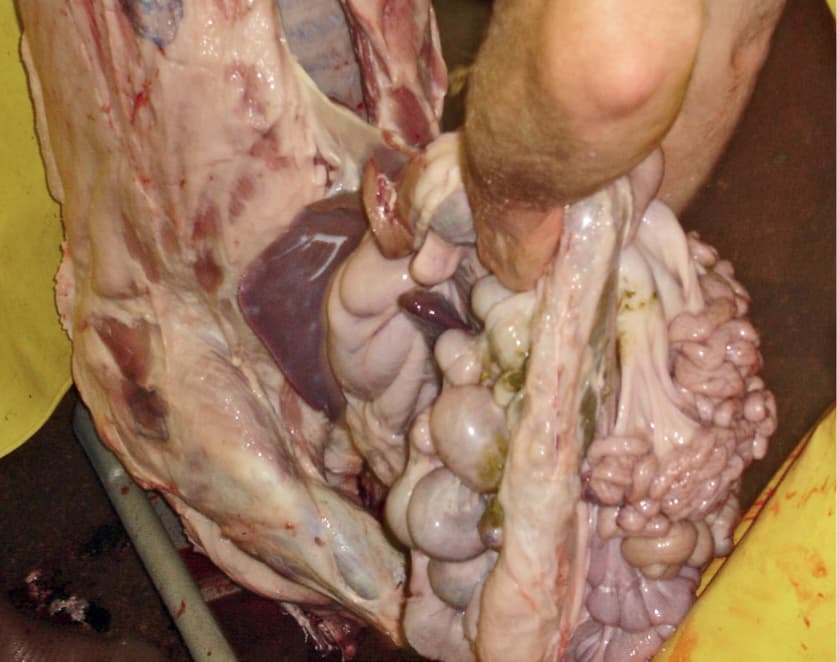
Once the kidneys and connective tissues are cut, the internal mass will then fall out. Hold firmly as you pull it into the tub below and cut the esophagus to fully remove it from the carcass.
You will need to split the aitchbone in half to separate the hips and make the cut down the spine easier to split the carcass.
Use your knife to cut through the skin and small muscles between the hams until you reach the aitchbone. You may be able to use the heel of a heavy knife to cut through or you may need to use a meat saw. If you use a knife, you may need to wiggle the blade to pass it through the joint, but be careful not to cut so far through the bone that it slips and slices into the anus.
Once the bone is split, use your knife and make a circular cut around the anus muscle until it is free from the bone. Once it is loose from the pelvis, it will be the last restraining hold on the internal organs, which will then collapse down toward your tub. This will happen very quickly once that last cut is made. The entire intestinal mass will slip out of the body cavity, and this is the reason it is so important to securely tie off the anal opening before cutting it loose.
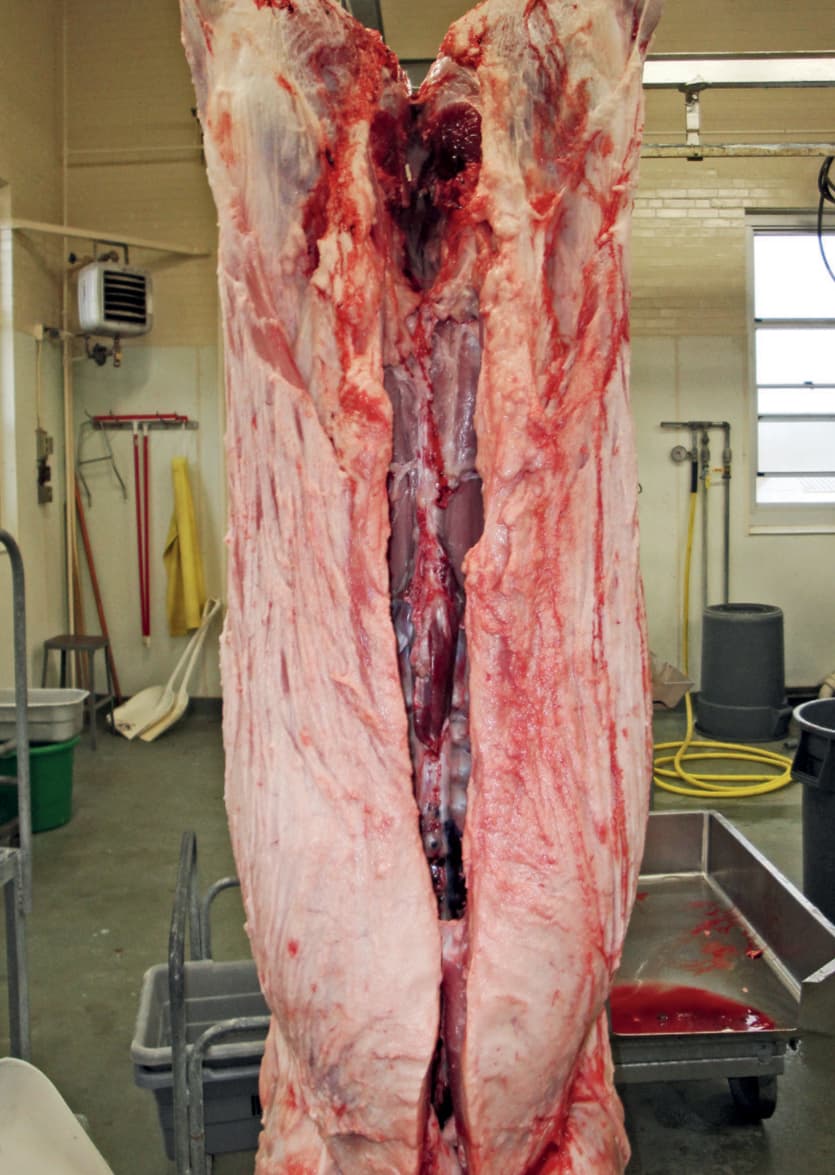
The carcass will be an empty cavity after all the internal organs and intestines are removed. It is now ready to be split in half.
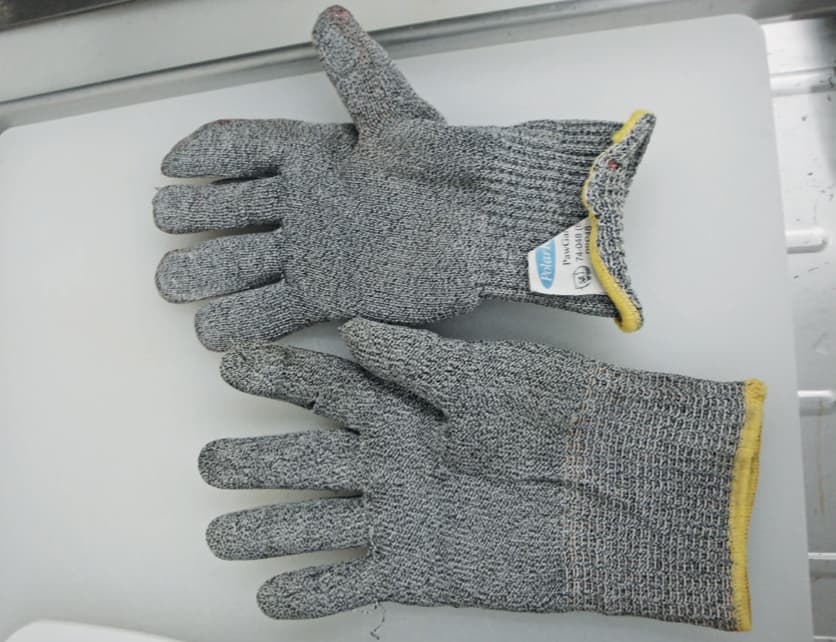
Use a heavy mesh butcher’s glove on your free hand to prevent accidental cuts. Always wash and disinfect the glove before and after use. They are reversible and can be used on either hand.
After the viscera drops, the diaphragm will now be exposed, and you will see the gullet that leads to the stomach. Tie it off with a heavy cotton cord or string, like you did the anus, and then sever it. The entire mass of viscera now should be free to drop into the tub.
Sharing the butchering tasks will make the work easier and more efficient. Once the viscera is removed, the person designated to work with it should place it all on a clean table to cut out the liver and wash it with clean, cold water. Trim out the gall bladder and remove the spleen. The stomach should be tied off at both ends and cut free. The intestines should be placed in a separate tub as they will need to be washed of all fecal matter and placed in a salt brine for use with sausage making.
At this point, the heart and lungs will still be inside the carcass cavity and lying in front of the diaphragm. Make an incision where the red muscle joins the connective tissue to expose the heart and lungs. These should be pulled downward and cut free from the backbone. Trim any fat off the heart and lungs and wash them with cold water.
Healthy internal organs will have bright colors and a firm texture. Examine all the organs for any abnormalities or lesions before using them. Place them all in clean ice water until you are ready to work with them. Slicing open these organs, except the intestines, will help remove heat and blood.
SPLIT THE BACKBONE
You are now ready to make the final split of the full carcass. Wash down the inside of the carcass cavity with clean, cold water before making any further cuts. This will rinse out any foreign matter and keep it from contaminating the meat once cut.
You can use a heavy blade or a hand or electric meat saw to divide the carcass into two pieces. Start at the top where you split open the aitchbone and slice down the center of the spine. Be sure to make a straight cut so you don’t damage the loins. Continue until you reach the bottom and separate the carcass into two halves. It is now ready for cooling or processing.
COOLING THE CARCASS
It is easier to trim and cut up a chilled carcass than a warm one. Cooling it quickly also minimizes bacterial growth and souring of the meat.
You will need a separate vat or tub large enough to submerge the two halves of the carcass completely, or two tubs and put one half in each. Since you have not cut into any muscle yet, the contamination risk is low. You are cooling the muscles down and need ice to do this or have access to a large refrigerated unit. You can use a freezer, but freezing the meat is different from chilling it. Unless you can change the settings to between 34º to 38ºF, this is not recommended. If, however, you can set the temperature between them, then you can use it as a refrigeration unit, if the carcass will fit completely inside it to close the lid. Or, if only one half will fit, the other can be placed in an ice bath. If ice is used, submerge the carcass for a minimum of twenty-four hours to ensure thorough chilling. You should monitor the bath and replenish the ice as it melts. It will draw out the heat from the muscles.
You should not cut up the carcass until all the tissue heat is gone. When it is thoroughly chilled, you are ready to deconstruct the carcass.
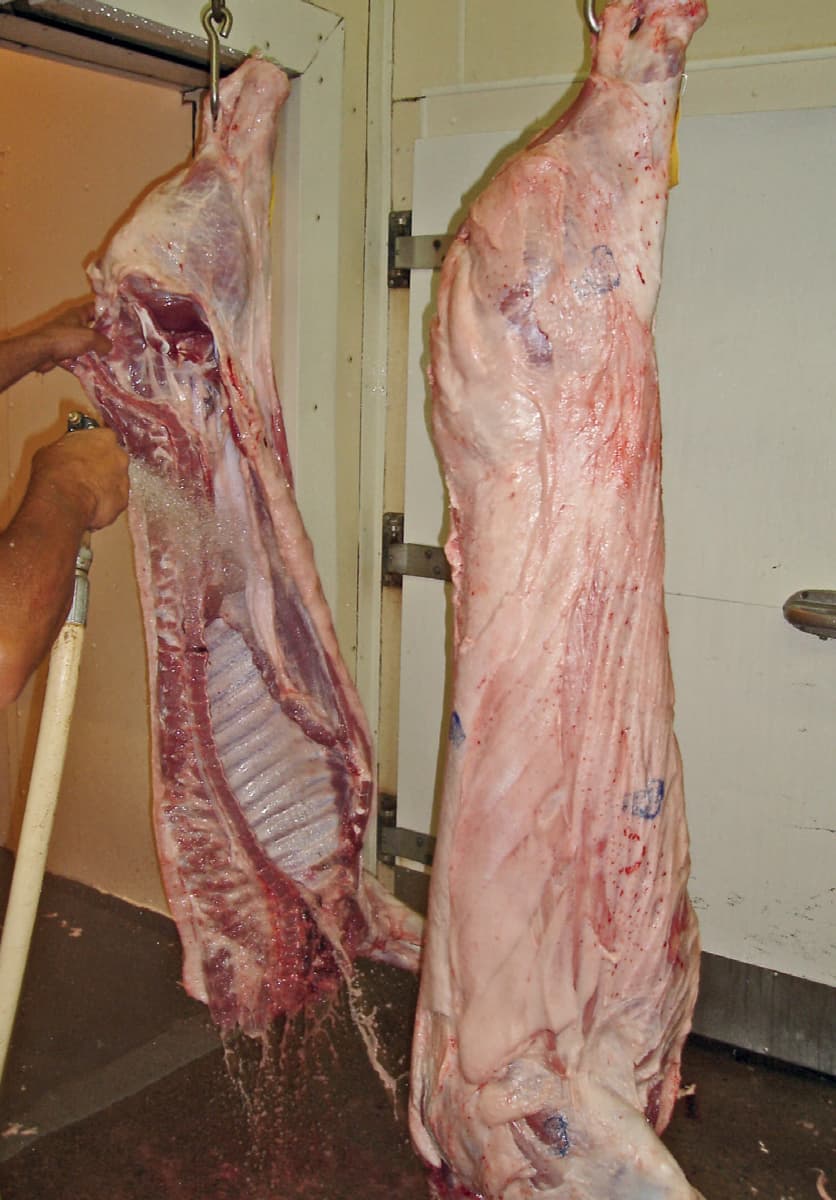
Use your meat saw to cut down the center of the spine to divide the carcass. Make a straight cut so that you don’t cut into the loin areas. After splitting it, rinse the carcass with clean water, inside and outside, to remove residual blood, bone dust, and any foreign matter. It is now ready to be cooled.