
“I don’t divide architecture, landscape, and gardening; to me they are one.”
— Luis Barragan, Mexican architect
Now that you have begun to lay the foundation of your greenhouse, the next course of action is to begin work on the greenhouse. There are plenty of different styles that you can make, and it really depends on the amount of space you have in your yard. You can either go big or small with your greenhouse, and it all depends on what you want and the space you have. There are several types of attached greenhouses that you can design for your yard. Here we will be going through the simplest form, which is the traditional lean-to that has a zipper door in it. You have built your foundations, whether they are wood, gravel, or concrete. At this point, we will begin to start attaching walls to the sill plates so that we can make your greenhouse. For the next few chapters, we will go over the various types of greenhouses that you can build on top of your foundation.
Why a Lean-To Greenhouse?
If you decide to build a lean-to greenhouse, you are making a good decision in many ways. By building this easily constructed greenhouse, you will be increasing the property value of your home. When there is a lean-to greenhouse attached to your home, the greenhouse actually becomes a usable living space on your property, and you can even add the lean-to to the total square footage of your home. This means that you attach the greenhouse to the side of your house. If you have a door from your house going into the greenhouse, it can count as a room for your home, thereby increasing the property value. In addition, lean-to greenhouses added to a home can improve the structural beauty of your home and even the design.
If you live on a small property and do not have much room for a large garden or large greenhouse, then a lean-to greenhouse is the perfect solution. A lean-to greenhouse can be set up on a property that has limited space.
It is also much easier to install a lean-to greenhouse because of where it is. When you set up a greenhouse elsewhere on your property, the ground may not be level. This means you have to alter the soil so that the ground is completely level for you, which makes it much easier for you to set up your walls and floor. With a lean-to greenhouse, you are using the ground around the house, in contrast to other greenhouses that separate away from the house. One of the walls of the greenhouse will literally be the wall of your home. Typically, this ground will already be level with the home and therefore you will not have to do much in order to alter the soil or the level of the ground, which makes things much easier for you.
|
Case Study: Greenhouse enthusiast |
|
|
Carol Van Klompenburg The Write Place, Owner |
|
|
Carol Van Klompenburg, owner of The Write Place, has been gardening on the side for years. “Our first greenhouse was a sun porch on the east side of our house. My husband and I built it because we wanted more indoor sunshine,” she said. “We had no south-facing windows on our house.” As she began to start flowers under grow lights in the basement, she realized that the sun porch would be a better location — combining grow lights and sunshine. So, she began placing tables along the south and east windows, and starting flowers. However, soon Van Klompenburg realized that for starting seeds, she needed to supplement with grow lights. After her first successful attempt at a greenhouse, the second greenhouse she purchased was a translucent pop-up plastic greenhouse. She said she purchased this for two reasons: “I wanted more space to start flowers and a friend offered to sell it to me at a good price. She had bought it several years earlier and had never used it,” said Van Klompenburg. Van Klompenburg liked the functionality of her plastic greenhouse; however, she and her husband — who is a recently retired mechanical engineer with the necessary construction skills — did not like the appearance of the plastic tent, and they knew it would not last forever. “We had seven sliding glass doors and a front door we had removed from our house,” she said. “We both like to reduce, reuse, and recycle and wanted to make use of the materials we had removed from our home and replaced with more energy efficient ones.” And although this second greenhouse attempt was not what she thought it would be, she said that it was her favorite one so far. “The pop-up tent is my favorite at the moment,” she said. “It is a separate space dedicated to plants and does not take over my living space in the spring.” |
|
|
Not only did Van Klompenburg make her home more energy efficient, but she loved the way the greenhouses helped extend the growing season, both in the spring and the fall. “By February, I am eager to start working with plants and starting indoors in the greenhouses makes that possible,” she said. She also loves her greenhouses because they enable her to have a May plant sale for other flower gardeners — and this sale is what funds her flower purchases for the new season. Although her greenhouse is not essential for her flower gardening, it is definitely beneficial for her and it is essential for starting plants early and for enabling her to sell plants and raise gardening funds. As Van Klompenburg’s greenhouse expertise expanded, and she discovered a pleasure in watching flowers grow, she made a few different discoveries along the way. “I discovered that I needed to supplement the light in the sun porch for starting seeds. Otherwise the seedlings were too spindly, not sturdy enough,” she said. She also discovered, when she owned her second greenhouse, that the pop-up tent needed to be well-tethered and secured. She said the first time she put it up, two sides collapsed due to strong wind. Another thing she discovered was that a high humidity greenhouse area was more prone to pests and disease, and it was important that she needed to be more vigilant than in her outdoor beds. |
|

Things to Consider for Your Project
When you are building a lean-to greenhouse, you have made a good choice especially if this is your first greenhouse project. The simplest type of greenhouse is the lean-to greenhouse and you can easily fit it into your backyard. Also, they are incredible easy for you to assemble. Of course, they are not foolproof to build, so there are some things that you will need to consider when you are putting together a lean-to greenhouse.
First, most lean-to greenhouses come with a back panel and this attaches to a wall of a house or an outbuilding. When you are building a lean-to greenhouse, it is very important that you build the greenhouse with a wall to rest against the wall of the house. There are two big reasons for this; heat loss and dampness. The heat from a home next to the greenhouse mixed with the heat from the wall of the greenhouse can actually cause dampness on the wall of the greenhouse. The humidity may therefore be higher than what you were expecting, which can cause problems for you and your plants.
Next, when you are putting together lean-to greenhouses, especially from a kit, make sure to read all the instructions and precautions. These instructions and precautions will typically cover the tools you need, how to safely use the tools, and how to put together the greenhouse. You also need to consider what type of material you are going to use for your lean-to greenhouse. You can typically choose between wood, vinyl, brick, and stone, with most people choosing wood, because it is the easiest to work with. Considering some protective coating is also very important. If you are using brick or stonework as the walls for your lean-to greenhouse, then having plastic over this will help keep mold from eating through the brick and stone when it is hot. In this case, it is highly recommended that you use something like silicone rubber, which you can get from a hardware store and you can use it to seal edges.
You need to think about what your surroundings are going to be like. If you live where there is plenty of pollution or rain, then you need to have a good wood construction for your greenhouse, as well as glass covering it. However, you can use fiberglass, which is much cheaper. Thankfully, wood is very cheap and it will not cost much to buy enough to build your entire greenhouse and then some.
Now, if you live somewhere that has plenty of sunny weather, you can use something like polyethylene, which is very cheap. If you can spend more than others can, then you may want to consider aluminum for your greenhouse. Because you are essentially building your greenhouse out of metal, it is going to cost several hundreds of dollars more, and that is something you should consider if you are going this route.
Ventilation is also very important. The greenhouse needs airflow going into it and with a lean-to greenhouse a window or a flap will be enough to provide you with enough ventilation.
Irrigation is not something you have to worry about with your lean-to greenhouse, because you probably are going to have the lean-to greenhouse attached to your house. This means you will have close access to water. In regards to heating, this is something to consider, especially if you are at northern latitudes. It is important to have a material that will help keep heat in your greenhouse because using a greenhouse can help extend your growing season by several weeks. Plastic sheeting that you can buy off the roll at hardware stores will be inexpensive, costing 50 cents to a dollar per foot typically.
Do not forget to make the lean-to greenhouse look good. It attaches to your home and, therefore, you should remember to make it look good. If you want to increase the value of your home with this greenhouse, find ways to make it look like an extension of the house, rather than something that serves as an eyesore.
The most common size for a lean-to greenhouse is typically 8’ x 12’. In addition, ensure that your roofing is not higher, or wider, than the roofing of your home. Your lean-to greenhouse needs to have windows, but you have to keep in mind where you are putting these windows. Putting a window on the top of the lean-to greenhouse is a good idea, but you do not want it to be too large. There will be weight on the roof when it snows or rains and you do not want the window to collapse because of that weight on the window.
There are some disadvantages to using a lean-to greenhouse. First, if you love to garden and you want to use your garden as much as possible, then a lean-to greenhouse is not always the best option because it is rather small. Lean-to greenhouses are smaller, because they are at a slant against the wall of your house or another building. This creates limited space because you can only have a wall that is so long, otherwise the angle will be too steep to allow you to work in the greenhouse.
With your lean-to greenhouse, there are some problems with the fact that your plants may not get all the sunlight they normally would in a garden, because the lean-to greenhouse is on one side of the house, causing the house to shade the greenhouse at times. This can cause the plants to discolor and they may not grow as large as they would outside.
The following sections of the book will explore different plans for your lean-to greenhouse. Choose the one that appeals to you the most and use those instructions to build your lean-to greenhouse.
Lean-To Greenhouse Plan No. 1
This first plan is designed for the gardener looking for a one of a kind styled greenhouse. As you will notice — once you begin reading the instructions — there are no actual measurements to follow as you begin to mark-off the area for your building. You will map out your own perimeter so as to create a lean-to greenhouse customized for you. This plan will give you more freedom when designing your structure.
1. Measure out the structure on the ground for the size that you want.
2. Trench out the perimeter you have created. This is where you are going to be putting down your foundation. You can put down a foundation of cement, wood, or just dirt. It is up to you how much money you may have for this endeavor.
3. Frame up your walls using two-by-twos. The best wood to use for this is typically spruce and cedar, but use what you can afford and ask at the hardware store what wood is best for your climate.
4. Screw in a two-by-two board that is as long as the width of the greenhouse against the wall. This serves as your vapor barrier discussed earlier.
5. Frame the front wall of your lean-to greenhouse. Remember, your front wall must be shorter than your back wall. If your back wall is about 8 feet high, then the front wall should only be 6 feet high. This will then allow water and snow to slide off the roof, thereby keeping moisture from pooling above your greenhouse and saving it from eventually collapsing.
6. Begin doing the vertical framing of your front wall by having the studs about 24 inches from each other. At the front wall, ensure that you leave a 30-inch space for the door.
7. At this point, you can begin framing the sides to the right height. Remember, you will have to cut each stud at an angle at its top. The reason for this is that the horizontal board on the top will be running at an angle from the higher back wall to the shorter front wall. To ensure things fit properly, you will need to cut the sidewalls to the right height and the right angle.
8. Once the wall studs are in, you can install the horizontal supports. These will run across the roof from side-to-side to provide extra strength. Have one stud run from the back wall to the front wall, in the middle of the greenhouse. This will give additional support to the other horizontal supports.
9. At this point, you will need to put up a wire mesh that measures half-an-inch by half-an-inch. Cut it to fit the roof and staple it into place. You are putting this on there to provide support for the polyethylene plastic that you are putting on your roof. Without the mesh resting on the support studs, you will find the plastic begins to sag and rip. It is very important to be as accurate as possible with your construction. If you start to cut too long or too short, it could result in your greenhouse looking shabby.
10. Staple the plastic down all three sides of the lean-to greenhouse and to the roof of the greenhouse. Do not staple against the wall of the house where the greenhouse rests. To create an air seal, you will need to overlap seams and staple these seams down.
11. Purchase a greenhouse zipper door from the hardware store and install it in the 30-inch space you created at the front of your greenhouse.
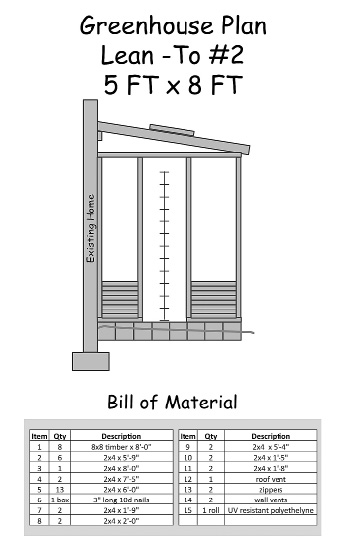
Lean-To Greenhouse Plan No. 2
Unlike plan No. 1, this plan will give you the exact measurements you need if you are someone who is not as confident in your ability to mark-off the area for your greenhouse. You will also notice that this plan is specifically for wood flooring inside your lean-to greenhouse
1. Mark out a 5 x 8 floor plan for the lean-to greenhouse.
2. Lay down a wood foundation by digging the foundation trench. Your sidewalls will be 5 feet long, and the back and front walls will be 8 feet long.
3. Lay down logs that measure 8 x 8. If you go parallel from the sidewalls, you will need eight-by-eights that are 5 feet long and you will need 12 of them. If you decide to go parallel to the back and front walls, then you will need eight-by-eights that are 8 feet long and you will need 7-1/2 in total. Naturally, it is much easier to go parallel, because you do not have to cut lengthwise.
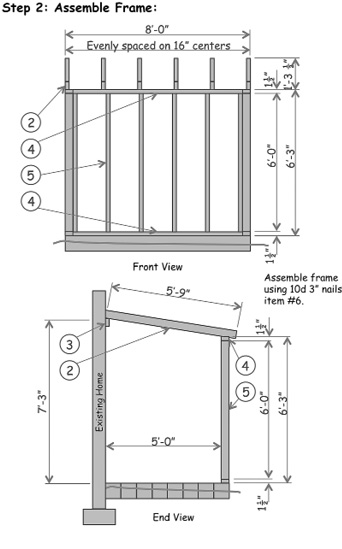
4. Once you have laid down the wood foundation, you can begin framing. You will want to use wood that is either 2 x 2 or 2 x 4. What you need to do is to use a level and draw a line from the soil to 7 feet up on the back wall. Put in a board along that line. Now, using a level, have another line drawn across the back wall. Put the board in along that line, as well as at the other side of the board.
5. Build the outside wall first. Cut a top and bottom plate for the wall that is 8 feet long. The boards will be marked and installed every 16 inches. Cut each stud to the proper 6 feet high.
6. Once you have built the outside wall, attach it to the foundation boards. Keep the wall up by propping up some boards against it. Using a level, check to ensure that the wall is straight. At this point, nail a rafter on each end of the wall to the board on the back wall. Then, put in the studs at the top every 16 inches.
7. Now that you have created the back and front walls, you can put in the sidewalls.
8. On one of the walls, probably the west, you will have an opening that will be 20 inches wide. This is where you are going to put the door. Nail the rest of the studs 16 inches apart.
9. The doorframe itself should be 19-1/2 inches wide and 5 feet, 11 inches high.
10. Nail in the studs for the other wall so that you can install both walls and attach them to the back and front walls.
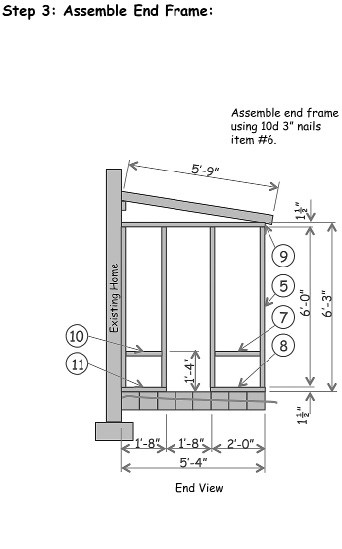
11. Now, you will install vent doors. These vents will be 14-1/2 x 12 inches. You will put two on the same wall as you have the door and one on the roof. Make sure that you frame in these vents about 1-foot off the ground. The roof vent is center. You can put in the vents using two hinges each and some vents you buy at the hardware store.
12. At this point, cover the greenhouse with plastic or fiberglass panels. You can use a staple gun to put the fiberglass down, and the panels can be installed using just nails.


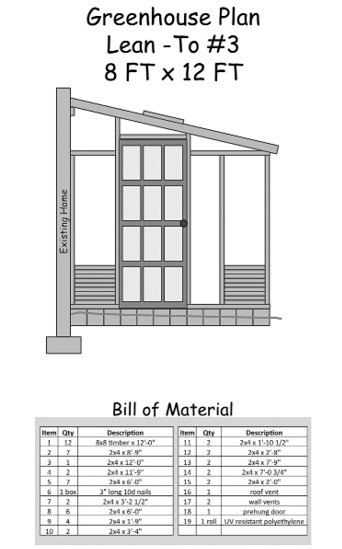
Lean-To Greenhouse Plan No. 3
This lean-to greenhouse is a few feet larger than the previous plans, but it still has the same relative design, in that the roof and front wall create a 90-degree angle. You will also notice that, unlike with the plan No. 2, you can use any type of material for the foundation.
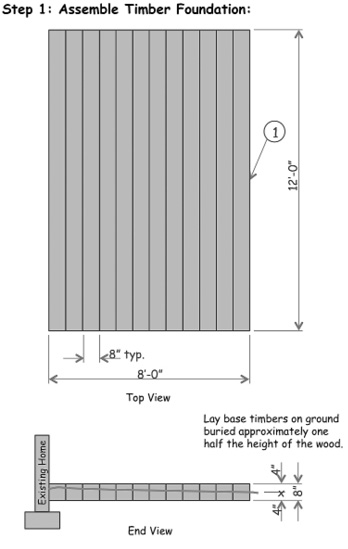
1. Mark out the perimeter of your lean-to greenhouse. This lean-to will be 8 x 12 feet. So, there will be 8-foot sidewalls and 8-foot back and front walls.
2. Use the large eight-by-eight timbers, dug to half their depth, to create a foundation that helps the greenhouse rest off the ground.
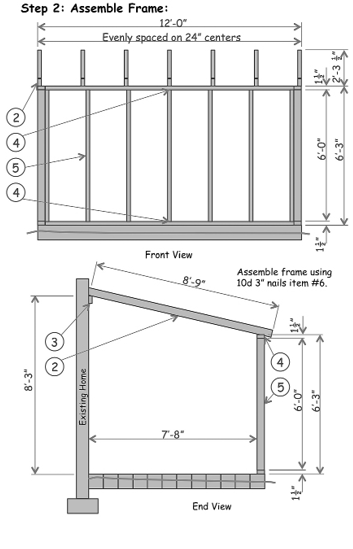
3. The back of the greenhouse will be 8 feet high and the front wall will be 6 feet high. You will need to install the ledger board, which is the board that serves as the top of the back wall. This will be 8 feet high and run horizontally 12 feet across the back wall.
4. Install the sideboards that will serve as the sides of the back wall and attach this to your sidewalls.
5. Frame out the front wall so that it is 12 feet across and perfectly parallel with your back wall. You should have your studs placed every 2 feet from one end to the other of the front wall. Make sure you keep space for vents. You will be installing vents between the four middle studs in the middle of the wall.
6. Once you have framed out the front wall of the greenhouse, you will need to attach it to the ledger board of the back wall. Have someone hold up the front wall while you run an 8-foot 3-inch board that runs down at an angle from the back wall to the front wall. Do this on both sides of the front wall. You should now install your front wall.
7. At this point, you will frame the top of the greenhouse. Frame with the two-by-fours every 2 feet along the top of the wall. Make sure that your roof rafters rest on top of the top board of your front wall. This will help ensure there is proper run off from the roof. Leave room for the four vents in between the four center studs at the back of the roof that are against the ledger board.
8. Once you have installed the boards that run from the back wall to the front wall, you will need to install the roof boards that run from the top side board on the one end to the other. These run parallel to the front and back walls, and you need to cut 2 feet each. You will place one 4 feet from the back wall and one 4 feet from the front wall. Therefore, you will only have two of these blocking studs in each section. Keep them all in line and run them from the one sidewall to the other.
9. At this point, you can begin working on the sidewalls. You will build these slightly differently than in the other plans. For the side with the door, you will put one stud 2 feet from the back wall and one 2 feet from the front wall. These two studs will only be 6 feet high. At the top of them, you will run a board that is 8 feet long from the back wall to the front wall.
10. At this point, you need to make sure you make room for the door. On the side of each stud (the sides that face the other stud), you will put another stud 8 inches in. In between those two studs that are now 8 inches apart, you put a small two-by-four horizontally in the middle. Do the same with the other stud. Now, in between these four studs, you will have your door space.
11. At this point, you will frame in the other wall. This one is easier to frame. Put 6-foot high studs in every 2 feet on this wall and attach them to both the top and bottom boards. Above the top board, install the two studs the same way you installed them on the other wall, 4 feet from the front and back walls and 4 feet from each other.
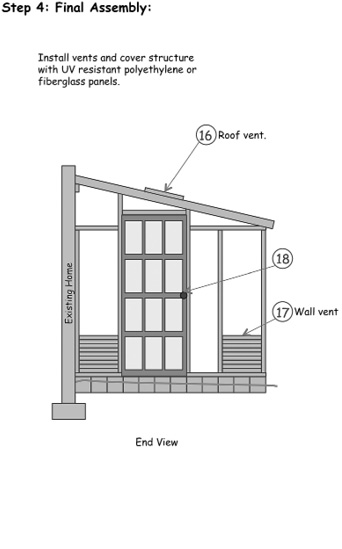
12. You need to install the covering now. You can just use plastic, but if you want it to look better, you can install rigid plastic or fiberglass. The plastic sheets should be directly next to each other but they should not overlap. As well, make sure that you drill holes into the wood where you will be hammering in the nails to secure the plastic.
13. On the roof, install the fiberglass sheets on the rafters using the same method that you used on the sides. However, on the sheets on the roof, you can overlap the sheets because you want to have a complete seal that will not allow water into the greenhouse. Also, make sure that the sheets hang 2 inches over the top of the edge of the roof.
14. Now all you have to do is install the door that you have purchased into the space where you allocated room for the door.
Lean-To Greenhouse Plan No. 4
This greenhouse is not like the others, which have a slanted roof and front wall that is at a 90-degree angle to the ground. Instead, this greenhouse has both a slanted roof and a slanted front wall, but is still a lean-to. This allows for a greater amount of light to come into the greenhouse, which is important in the winter.
1. Draw out a plan for an 8 x 12 greenhouse that has a foundation of wood or concrete, depending on your preference.
2. Install the bottom sills (boards) of the greenhouse by securing them into the concrete or into the large timber logs that serve as the bottom of your greenhouse.
3. Install the ledger board 8 feet above the ground against the house. This board should be 12 feet across. After you install this, install the sideboards that are 8 feet high and connected to the ledger board.
4. At this point, you will need to put together the front wall. The front wall will be 12 x 7 feet. Therefore, it will be 7 feet tall and 12 feet wide. Build the wall separately and have seven studs that are 2 feet apart. Each stud needs to attach to the bottom of the frame at a 60-degree angle so you get the proper angle to connect to the rest of the greenhouse. Make room for vents in between two of the studs. The vent will need one two-by-four about 4 feet above the bottom board to help create a brace.
5. Brace the wall up so that it rests at 60 degrees to get the most sunlight possible. At this point, attach a 6-foot, 1-3/4-inch board to the ledger board on each end, and then attach the front wall to this board.
6. The sidewalls will be relatively easy to build now. Run a board horizontally 6 feet above the ground from the back wall to the front wall. Then, attach studs in that leave room for the door on one side. Remember, you will have to cut room for the door on the wall. Also, leave room in the top corner of the sidewall for a vent.
7. At this point, you need to put in the rafters. Attach rafters to the front wall by the use of a bird’s mouth joint. Install rafters every 2 feet, just the same as the front wall’s studs. In fact, done right, everything should join together at the bird’s mouth joint where the rafters meet the top of the front wall and the studs of the front wall.
8. Next, once you have installed your door, you need to install the covering for the greenhouse. Cover the roof with shingled plywood. Leave room for vents on the top. On the front wall, install large windows, or secure clear plastic in place. On the sides, install acrylic panels or fiberglass, which allows sunlight to still come through.
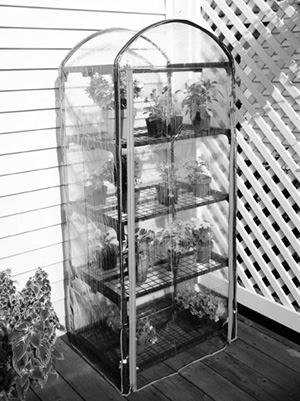
Four-tier mini greenhouse. Photo courtesy of Juliana America, LLC.
Mini Lean-To Greenhouses You Can Buy
If you just do not want to build a greenhouse, or you do not have room for a large one outside, you can try these different types of mini lean-to greenhouses instead. These types of greenhouses are not pre-built; they require assembly, so be sure you allot a day or two to complete your project.
• A four-tier mini greenhouse allows you to have your greenhouse nearly anywhere. You can put this on your deck because it essentially stands as a shelf, usually about 6 feet high and 2-1/2 feet wide. One of the great benefits of this mini lean-to greenhouse is that if you are growing a big plant, you can remove a shelf in order to give yourself some extra room. Another benefit is that it is small enough that you can move it indoors when the weather gets cold so you can keep growing food during the winter. Essentially, it will look like a shelving unit in a room that gets plenty of sunlight.
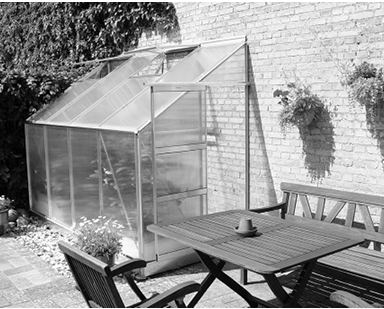
• A European style greenhouse is a small greenhouse that attaches to the side of your house. It includes a vent on the top and is typically about as wide as the coolers you will see inside of a convenience store. Usually these lean-tos will be about 4 feet wide in total and will leave you ample room to grow several plants of varying heights. The only problem here is that it is not small enough to move easily into your home when the weather gets cold.
• A carport lean-to greenhouse is a small lean-to that you can install easily from a kit. It measures about 10 feet long, 4 feet wide, and 7 feet high. Complete with polycarbonate panels and sliding doors, its aluminum frame makes it nice and light, but it is still too large to move into your home when it gets cold during the winter.
Carport lean-to greenhouse. Photo courtesy of Juliana America, LLC.
Simple Mini-Greenhouse
The simple mini-greenhouse is perfect if you do not have much room but you want to grow some vegetables that can grow in pots. Some of the best vegetables to grow in a mini-greenhouse include tomatoes, peas, beans, carrots, and onions. If you have a small backyard, the mini-greenhouse may be the perfect type of greenhouse for you.
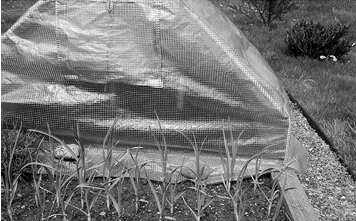
Here is an example of a mini greenhouse with fresh garlic growing in front.
The gardeners might chose this mini greenhouse kit if they only need enough room to grow fruits and vegetables for two.
A-Frame Greenhouse Plan No. 1
This plan will allow you to build a simple, modified A-frame greenhouse out of plastic PVC pipe. As Chapter 3 mentioned, PVC pipe is used for the construction of more small scale greenhouses. For this project, you will need the following materials.
• (16) 3-foot pieces of PVC pipe
• (8) 6-foot pieces of PVC pipe
• 8 straight PVC pipe fittings with three openings
• 8 corner PVC pipe fittings with three openings
• PVC cement
• Adhesive
• Plastic sheeting
1. Attach two 3-foot long PVC pipes together with one straight pipefitting. Secure the pipes together within the fitting using PVC cement.
2. Continue to repeat this process until you have created eight straight pipes that measure 6 feet long. These pipes will serve as the base and the top for your greenhouse frame.
3. Attach four of the 6-foot long pieces with the three opening corner fittings. Insert pipes into these openings and leave the third opening facing upwards.
4. Insert one 6-foot length of PVC pipe into the third opening on each corner and each straight fitting into the base of the greenhouse.
5. Put in the 6-foot lengths of pipe on top of the supports you have made using the rest of the corner fittings.
6. Cover up the portable greenhouse with plastic sheeting and use the adhesive to join it to the PVC pipe.
7. Cut an opening for the door for your greenhouse and glue the plastic base from one side of the slit to the corner.


Summary
If you are building a greenhouse on your property and you want to go with a simple plan, or you are limited for space, then building a lean-to greenhouse, may be your best options. These greenhouse shapes were in use for centuries and they work quite well. With the lean-to greenhouse, if placed in the right spot, you can have a lot of sunlight getting into the greenhouse. Using your house as a wall gives you a sturdy structure to build the greenhouse onto, and that makes it easier to build.