
“We learn from our gardens to deal with the most urgent question of the time: How much is enough?”
— Wendell Berry, American poet and writer
Your greenhouse is only as good as the items within it. You have plants in there, of course, but you need to have accessories within your greenhouse, because this will make the entire process of using your greenhouse much easier. Some of these items include benches, potting tables, shelving units, growing beds, and more.
Potting Benches
Your potting bench is a workbench for use with gardening tasks that includes transplanting seedlings and caring for plants. A basic potting bench will have a work surface that is at a height where you can stand and work on it, while also offering you an area to store potting soil, pots, and tools. Building a bench for your greenhouse is not the same as building a bench that you have inside your home. Your garden greenhouse benches will be exposed to water, soil, and sunlight and therefore must be capable of withstanding the elements without degrading too quickly. Wood like cedar is very popular, because it is hardy. Some gardeners choose to use metal for their benches but metal can corrode easily in the moist environment of a greenhouse.
Other gardeners will build potting benches that are small and can move easily. Some gardeners will also choose to attach the potting bench directly to the greenhouse itself. For those gardeners who go the extra mile, a dry sink for soil storage, a water drain, and a cold frame greenhouse box are also included on the bench.
Types of Potting Benches
Your potting bench is your workbench. This is where you do the tasks of the greenhouse and gardening. It makes things easier for you and it helps make your gardening much more efficient. It is the place to store things, make things, and nurture things. It is your greenhouse central station and if you love gardening, one of your favorite places to be. There are three main types of gardening benches to choose from:
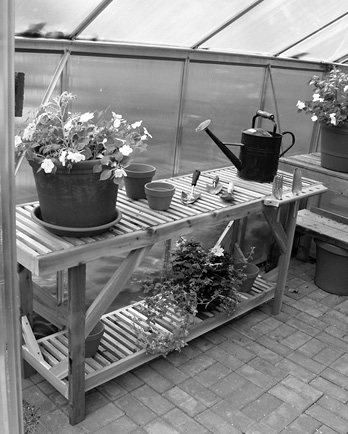
Cedar potting bench. Photo courtesy of Juliana America, LLC.
Wood potting bench
This is probably the easiest to make but, because of the amount of moisture in a greenhouse, as well as the dirt, it can be easy for your potting bench to break down if you do not treat it properly. When you use cedar, you are using a wood that is naturally resistant to decay and warping, and it is very cost-effective as well. One thing to keep in mind is fertilizer salts on the bench. This salt can get into the wood, which will cause the wood to leach out oils that can get into the soil and cause harm to the plants growing near the gardening bench. Traditionally, potting benches are made out of wood because of how easy it is to work with wood. If you are worried about salt eating the wood, if it is not treated and is not cedar, or you worry about decay and warping, then you should consider a hardier material like metal.
Metal potting bench
These benches stand up to much more than wood benches, but they do cost more and are harder to put together unless you have experience working with metal. The moisture in the air of the greenhouse can cause the metal potting bench to degrade faster as well. Metal potting benches are easy to clean, but they can be very heavy and difficult to move. Even though metal potting benches do decay in the humid air of a greenhouse, they will last longer than wood potting benches. They are a bit heavier to move around, and a bit more difficult to work with if you are building one, but they are highly durable.
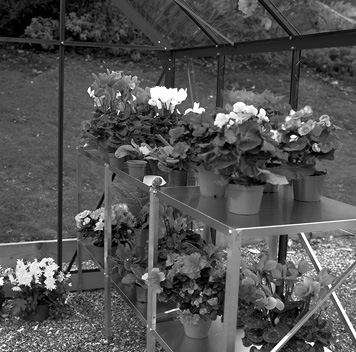
Metal potting bench. Photo courtesy of Juliana America, LLC.
Plastic potting bench
These benches are low-maintenance, portable, and lightweight. They are excellent choices if you have a bench near your plants, because they will not leach chemicals into the soil, nor will plastic benches react to fertilizer salts. The only problem is that plastic gardening benches are very susceptible to the elements, especially the sun. Over time, the sun will degrade the plastic of the potting bench, which will require you to replace it. Plastic potting benches are mass-produced so they are extremely cheap, often costing less than $75 on average. However, you will replace your plastic potting bench at a much faster rate (every three years) than you would wood or metal benches.
Potting Bench Plan No. 1
An experienced woodworker can finish this plan in a day, but if you are a beginner, allow yourself the weekend to complete this project. Also, be sure that you take safety measures when using the machinery needed to construct your potting bench. To build this potting bench, you will need the following tools:
• (3) 2 x 4s 12 feet long
• (5) 1 x 4s 8 feet long
• Assorted tools (Hammer, nails, saw, level)
1. Cut the following length of your two-by-fours:
a. Eight pieces 3 feet long
b. Three pieces 4 feet long
2. Cut all the one-by-fours into 42-inch lengths to create ten 3-1/2-foot long boards.
3. Put down two of the 3-foot boards you have made so that they are parallel to each other, and then lay one across the ends of these two boards. Make sure this cross beam is flush with the outside edges of the two other parallel boards, which will serves as the legs of the bench.
4. Nail the two boards to the two pieces of wood securely. Place the fourth board halfway down the length of the legs and nail it securely in as well.
5. Do this again to recreate the second set of legs and braces.
6. Nail one of the 4-foot long two-by-fours to the outside edge of one set of the legs. The legs need to be facing out with the braces facing in. Nail the other end of the 4-foot board to the other set of legs. With this set of legs, make sure the legs face out while the crossbar braces face in. Once you have done this and made sure everything is level so your potting service does not slant, you can attach the other 4-foot board to the other set of legs.
7. Place the last 4-foot board across the crossbars that are between the legs and nail it in place, connecting the two cross boards to add stability.
8. Lay down one of the 42-inch one-by-four boards across the top of your greenhouse bench. You will cover the entire top of the table with 10 boards that are spaced evenly apart with no more than one inch of space between each board. You have spaces so that the dirt can fall down to the ground, rather than staying on the top of the table. It also allows water to go down to the ground, instead of staying on the wood and rotting it. With these boards, one end will be flush with the top support, while the other end will go half a foot over the edge. This allows you to have an overhang that gives you some extra space.
9. Nail each board into place with two nails on each end. Keep everything aligned so that the top of your potting bench is not crooked.
Potting Bench Plan No. 2
For this, you will need the following along with your wrench, socket, drill, and screwdriver:
• (1) 4 x 8 feet 3/4 plywood
• 15 metal brackets
• 30 bolts 1-1/4 long
• 60 flat washers
1. Lay the plywood on a flat surface, measure 16 inches from one end, and draw a line across the sheet of plywood.
2. Cut along the line so that this piece of plywood will be 16 x 48 inches.
3. Make a diagonal line across this piece of plywood and cut along the line in a triangle. One side should measure 48 inches and the sides should measure 16 inches, making a 90-degree angle.
4. Measure 24 inches from the right along the 48-inch side and make a mark. With a square, draw a line from this mark across the pointed end of the plywood. This line will make a right angle to the 48-inch side of the board. If done right, the line will be four inches long. Make sure you do this to the other triangle piece so they are identical. These are your sidepieces.
5. Cut this line and remove the pointed end piece. Now, you should have a piece that measures 16 x 24 x 4 inches.
6. With the remaining large piece of wood, which measures 80 x 48 inches, measure from the long side to 16 inches, and draw a line from one end to the other. Cut along this line. This will give you a 16 x 80-inch piece and a 32 x 80-inch piece. This will be the bottom and back to the potting bench.
7. Take the 32 x 80-inch piece and stand it on its edge. The top of this piece, as it is now, will be the bottom of the bench. Make five marks on this piece to note where the brackets are going to go. Make sure that the brackets on the end are at least 1-1/2 inches away from the edge.
8. Mount the brackets along these marks you have made. Then, mount the back piece to the bottom piece.
9. Install the sidepieces now.
10. You have now created a legless potting bench. You can install legs if you want but many builders of this type of bench prefer it, because they can get it closer to their pile of potting soil as it is more portable.
11. You can move this anywhere you wish after you have put soil into it to use for potting. You can also put this bench on top of two sawhorses.
Remember, a potting bench can be something as simple as placing a big piece of plywood across two sawhorses. You do not have to get complicated with the potting bench if you do not want to.
Potting Bench Plan No. 3
With this greenhouse plan you will need to be more familiar with woodworking. This plan is for the experienced builder, as you will have to cut pieces of lumber into smaller pieces. For this potting bench you will first construct the sides of your bench, and you will need the following materials:
• (6) 2 x 4s 8 feet long
• (12) 1 x 4s 8 feet long
• (1) 8 x 4 sheet 1/4 plywood
1. The first thing you need to do is prepare the lumber by cutting it into the following pieces:
a. (4) 6-foot long 2 x 4s
b. (2) 34-inch long 2 x 4s
c. (4) 30-inch long 2 x 4s
d. (2) 14-inch long 2 x 4s
e. (12) 48-inch long 1 x 4s
2. You will build the sides of your bench first by laying out two 6-foot two-by-fours and one 34-inch two-by-four. Attach a 30-inch board across the bottom of one of the 6-foot boards and the 34-inch board with wood screws. Make sure the corners are square and even.
3. Put the second 6-foot board under the 30-inch board so there is an 8-inch opening between them. Attach the bottom of the 6-foot board.
4. Attach the second 30-inch board across the top of the 34-inch board to where it is the same distance up from the top of the bottom 30-inch board on the back 6-foot board. Attach the 30-inch board to the three boards with wood screws. Attach a third 30-inch board 1-foot below the top, between the two tallest 6-foot boards. Make sure it is the same distance from the top on both boards.
5. Lean one side up on its backboards against the wall, and nail one 48-inch one-by-four shelf piece to the top, middle, and bottom 30-inch boards. Attach the second side of the bench to these boards.
6. Stand up the potting bench and attach a Z brace of some scrap lumber along the back in order to give some brace. Add in bottom shelves by putting the one-by-fours in as bottom and middle shelves. Make sure to leave a 1/4-inch space so that water and dirt can drain through. Attach a top shelf with two more one-by-fours using two boards and sand it all down so the edges are flush.
7. Remove the brace and put a sheet of 1/4-inch plywood as a backer board for the bench. Attach the board to the backboards and sides.
Shelving
Shelves in your greenhouse are a great space saver. Along with having a potting bench, you can use shelves to hold your tools, supplies, and plants. With shelves, you can greatly maximize the overall space within your greenhouse. If space is limited in your greenhouse, having shelving in your greenhouse will help you plant more. You can buy shelves from any gardening shop, or you can custom make your own shelves completely to your needs.
Shelf Plan No. 1
For this you need concrete blocks, lumber, a saw, and a tape measure.
1. Measure out the interior sides of your greenhouse so that you can make a shelving unit that will fit within your greenhouse. If you have a classic A-frame greenhouse, or a hoop greenhouse, you will not be able to build as high as you would if you have a greenhouse with tall, straight sides.
2. Measure out the amount of wood you will need to make three tiers of shelves on the shelving unit and three shelving units in total. You should plan to construct your shelves so they have about 2 to 3 feet in width, and each shelf should have a bit of space between the shelving boards to allow for water and dirt runoff.
3. Your boards should be roughly 8 feet long and 4 to 8 inches wide, and be 2 inches thick. This will keep your shelves from warping when things are sitting on them.
4. With the concrete blocks, lay them on their face so that each block measures 2 feet long and 1-foot high. This will give you the most stability. Ensure you buy enough blocks to support three tiers of shelves on the ends and every 3 to 4 feet in the middle if the boards are too long.
5. Cut the boards to the required length that you want. You can also cut them down the middle to get more shelves.
6. Stack the blocks to the required height for the first shelf. Place the board that you made on top of the concrete blocks, then stack concrete blocks on top of the ends of the shelf. Continue to do so until you have created your two tiers. You should only stack about two blocks at once, so each space between the shelves will be about 2 feet.
Shelf Plan No. 2
To build this shelf unit, you will need the following supplies:
• (8) 2-inch diameter PVC pipes, 10 feet long
• (34) PVC tee connectors, 2-inch
• (4) PVC 90-degree elbow connectors, 2-inch
• PVC adhesive
1. Measure and mark each pipe to make the following:
a. Eight pieces of PVC that are 4 feet long (front and back of each shelf). Mark these as No. 1.
b. Ten pieces of PVC that are 21-1/16 inches for the shelf sides. Mark these as No. 2.
c. Eight pieces of PVC that measure 12-3/4 inches for the top two shelf dividers. Mark these as No. 3.
d. Eight pieces of PVC that measure 15-1/2 inches for the bottom shelf dividers. Mark these as No. 4.
e. Sixteen pieces of PVC pipe to measure 1-3/8 inches for the connectors. Mark these as No. 5.
2. Cut the pieces with a hacksaw.
3. The stem of the tee connectors should have the pieces labeled with No. 1 at each end. Ensure that each tee connector mirrors the other, because they are going to be positioned parallel to each other. Continue to do this process by gluing in eight of the No. 2 pieces into the tee connectors. Again, ensure these tee connectors on each pipe are parallel.
4. Put the No. 1 and No. 2 pieces on the floor so they are in the shape of the shelf tops. Place the long No. 1 pieces parallel to each other and the short No. 2 pieces at each end.
5. Turn the No. 1 tubes so that the tee connectors on each end are pointing up and down. Glue in the No. 5 connectors to the bottom of the T cross bar. Continue to do this for all the No. 1 pieces.
6. Connect the No. 1 pieces to the short No. 2 sidepieces and glue them together by gluing the No. 5 connectors to the top of the tee connectors attached to the No. 2 pieces.
7. Assemble the shelves by placing one rectangle piece on the ground and fitting the No. 4 divider pieces into the open side of the tee connector on each corner.
8. Fit a second rectangle over the No. 4 pieces that are sticking up from each corner of the bottom rectangle. Glue these together.
9. Glue the last No. 4 pieces into the tee connectors on each corner. Then glue the rectangle over the ends of the No. 4 pieces that are sticking up.
10. Assemble the shelves using the No. 3 pieces in place of No. 4 pieces.
11. Glue the last four No. 3 pieces onto the open tops of the tee connectors on each corner.
12. Glue an elbow connector to each end of the remaining No. 2 pieces. Twist the elbow connectors in order to ensure they are curving down and fit them with two No. 3 pieces at one end of the shelves. Continue to do this for the other ends of the shelves.
Shelf Plan No. 3
To make this shelving unit, you will need the following:
• Bookshelves
• Plastic sheets
• 2 hinges
• Lathes
1. Purchase a freestanding bookshelf that has no back to it. The open back and front is very important, because it will allow your plants to get the most sunlight.
2. Measure out the height and the width of your shelves so that you can make frames for the plastic sheeting that you will use on the sides of the shelves.
3. Use the lathes that are as wide as the edges of the bookcase to make the frame and then attach the lathes to each other with nails. Hold the frame up to your bookshelf and measure the frame to make sure it will fit within your shelves. Make a frame for the front and the back of your bookshelves.
4. Staple the sheeting to the frame. If you need to, add another lathe to the middle of the frame in order to help support the plastic sheet and keep it from sagging.
5. Attach the hinges to one side of the shelf. You will use this to attach one of the frames so you can create a door that will allow you to water the plants.
6. Attach the second frame to the other side of the shelves using screws or nails.
Raised Gardening Beds
Within your greenhouse, you may not have the garden within the ground, but instead on raised beds. Raised bed gardening is a form of gardening in which the soil is in a container that is 3 to 4 feet wide and can be any type of shape or length. The soil will be raised above the soil around it by about 6 inches to as much as 3 feet. The enclosing frame for the raised gardening beds can be made of many different types of material including concrete, rock, and wood.
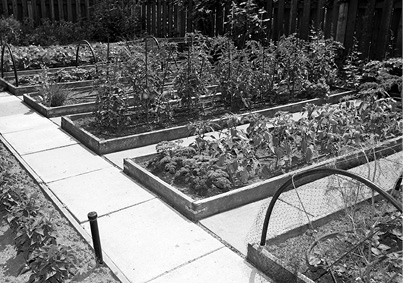
This family has multiple raised vegetable garden beds in their greenhouse.
Gardening beds are more productive and easier to maintain than traditional garden plots.
Within raised gardening, vegetable plants are often placed in patterns and are closer together than they would be in a typical row garden. This essentially helps to create a microclimate within the gardening bed, because the plants are spaced close enough together that they will barely be touching each other when full grown. Raised gardening beds are great if you practice square foot gardening, where you try to get the most out of the space you have, or companion planting, where you put plants together that help each other grow and ward off predators.
Advantages
There are several advantages to raised bed gardening. These advantages include:
• Raised beds will warm faster in the spring, which allows you to plant and work the soil sooner, thereby allowing your growing season to extend even further.
• The drainage of raised beds will be much better than in typical gardening.
• The soil in raised beds does not get compacted.
• Working the soil and the garden is much easier when you are able to stand and work in the garden than if you are crouched over trying to work within the garden. This helps prevent you from hurting your back, and it also means you can work the garden for longer periods without becoming tired or uncomfortable.
• It is easier to tailor the soil of your raised beds specifically towards the plants that you are planning to grow.
• It is easier to keep predators away from your plants if the plants are raised several feet off the ground.
• Raised gardening beds, once constructed, require much less maintenance than typical garden beds.
Disadvantages
• The timbers may need to be replaced eventually because of the weather. There is pre-treated timber that you can purchase; however, make sure that the chemicals used will not harm your prospective plants, vegetables, or fruits.
• Wall construction costs and time can be a major concern for gardeners looking for an aesthetically pleasing accent piece for their garden. Raised beds may not be the option for you, because this project requires both money and patience.
• Drainage can be a problem with raised beds; during the summer months water is not as plentiful and beds can dry out quicker. This can lead to stress on your plants, increased chance of disease because of weakened condition, and yield reduction.
• Some individuals find a problem with poor air circulation with some raised beds because plants are closer together. This normally is not a problem but poor air circulation can result in disease ridden species.
• Rotting can also occur in closer quarters if the roots are not allowed to dry properly.
• Moving your raised bed can certainly be done, but it is not recommended, as this could cost you time spent caring for your garden.
• Along the lines of decreased space in raised beds, plant sprawling can also be cause for concern if plants are given too much space. Vines can sometimes grow over beds and into walkways.
Putting Together Your Beds
If you are going to make a site for your raised beds and prepare them within your greenhouse, you need to do the following:
1. Select the area within your greenhouse where you are going to have the raised garden beds. Make sure that, if you are going to be putting in vegetables, herbs, and flowers that like the sun, you select an area of the greenhouse that will get at least eight hours of sun every day. You want your site to be level because this will make it much easier to build on.
2. Make sure that you have easy access to water and that there is enough room for you to work around the bed. It may be difficult to work the raised garden bed if one side is right against the greenhouse wall.
3. Now, you need to figure out the size and shape of your garden bed. If your garden bed is going to be only 6 inches high, then make sure that you can work the bed without having to step on any of the plants. If your garden bed is going to be 3 feet high, then make sure that you can reach all the areas of the garden bed from each side. You do not want to lean over the plants to access the middle of the garden bed, because you could damage plants that way.
4. Prep your site properly by ensuring that you have the right choice for the depth of the bed. If you are growing vegetables or herbs, then 6 inches to 1-foot deep is very important. You want to make sure your plants’ roots have enough space to grow, especially for deeper plants like potatoes.
5. Now you need to make the sides of the bed. Use cedar because it is rot resistant, or find a new composite lumber that resists rot. The best sizes are two-by-sixes because they are easy to work with. They are also perfect if you are going to have a bed that is only 6 inches deep. If you are going to have deeper beds, you will need wider boards, or you may have to go for plywood. If you use plywood, reinforce the plywood with two-by-twos or two-by-fours to ensure that the plywood will not break under the pressure of the dirt. Making butt joints on each corner can help strengthen the overall structure as well.
6. Once you have constructed the frame of your raised bed, make sure it is completely level on all sides. If the frame is not level, then the water may run off to one side, robbing plants of vital water and water logging other plants within your gardening bed. You may have to adjust things by removing or adding soil to make things level.
7. Fill up the frame with soil and compost. Mix in some manure, topsoil, and compost. Rake the soil and churn it up to allow oxygen to get in. At this point, you can begin planting seeds and preparing your gardening bed for growing your plants.
Every spring and fall, you will need to top dress new compost and manure on the bed, and churn it up to help keep nutrients in the soil. You will need to mulch the soil to maintain the amount of moisture in it and to keep weeds out. Yes, weeds can get in, but you will not get as many weeds as you would if the plants were growing on the ground rather than on raised beds.
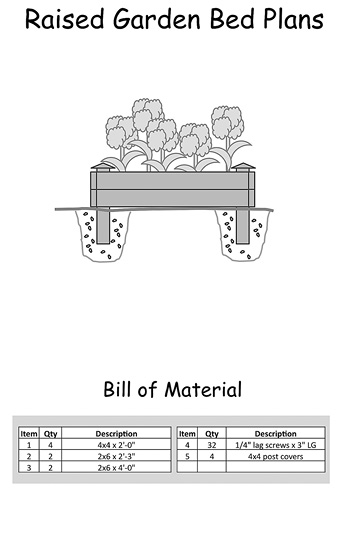
Constructing a Gardening Bed
Because making a gardening bed is universal, we have only one plan that you can customize to make several different types of beds that vary in size, materials, and shape.
1. Plan out the bed that you want to make based on the room in your greenhouse. Put these measurements together into a drawing so you know exactly how large your bed is going to be and how many beds you are going to put within the garden.
2. Choose a material for your raised bed. You can make the raised bed out of lumber, plastic, railroad ties, bricks, rocks, synthetic wood, and anything else that will hold dirt in. By far the easiest material to use is wood, because you can easily shape it to what you want. However, bricks or rocks may look the best and with some time and patience, you can make some nice gardening beds within your greenhouse.
3. Gather the following supplies:
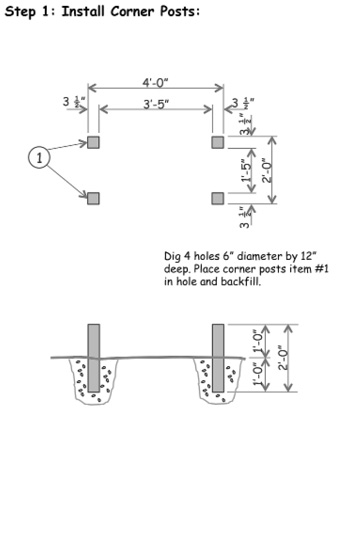
a. 4 x 4 posts cut to 24 inches in height for your corners
b. 2 x 12 plywood
c. Nails, hammer, compost, soil, seeds, shovel, rake
d. Plastic liner for weed barrier
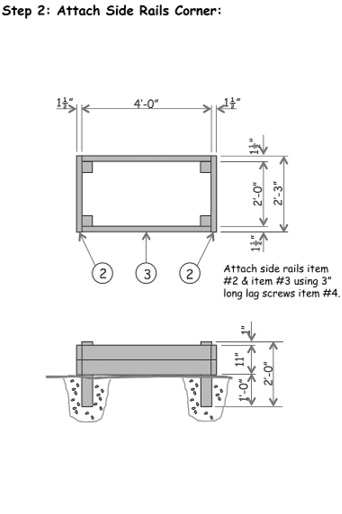
4. Connect the sides of your bed together to create the shape that you want. You can cut the plywood so you can have three, four, five, or six sides if you want to make the desired shape. Once you have done this, nail and screw into the posts that you have set up for the bed to add strength. If you only screw into the other pieces of plywood, your frame will not be anywhere near as strong as it would if you screwed into the posts.
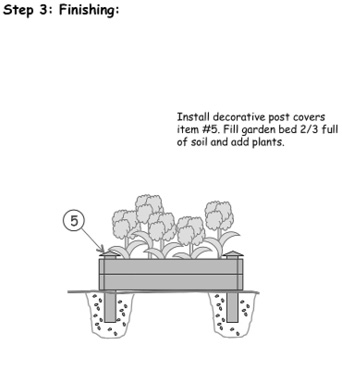
5. Cut out a piece of plastic so that it fits into the bottom of your raised bed.
6. Place the raised bed frame over top of the plastic you have put in the bottom.
7. Put soil and compost into your raised bed. You should have at least 2/3rd soil and 1/3rd compost. Then mix it up to help ensure that the compost is throughout the raised bed.
8. Mix in some dry organic fertilizers.
9. Begin planting!
Give your gardening bed a roof
To help ensure you get the maximum yield out of your raised bed garden within the greenhouse and to eliminate insects, do the following:
1. Put brackets in the side of your raised bed and slide PVC pipe into each one to create an arch. Each bracket should be about 3 feet from the other bracket.
2. Use spun fiber cloth and clip it to the arches. This helps to conserve moisture while keeping the insects out.
3. When the plants become too tall for the fiber, uncover the portions that need to be uncovered but continue to cover the smaller plants.
4. When things start to become too cold, even in the greenhouse, add some extra heating retention by switching from fabric to plastic.
5. When the temperature within the greenhouse is higher than 90 degrees, take the fabric and plastic off to keep the plants from overheating.
Summary
When you have the aforementioned accessories within your greenhouse, you make your entire gardening experience much more efficient. It is also about personalizing your construction project and making it something that represents your personality when you are inside the greenhouse. Although items such as potting benches and shelving are not necessary fixtures for your greenhouse, they can not only cause you to work more efficiently but also add an aesthetic touch.