PART 1
THE ELEMENTS
BEFORE anything else, the beginner must learn the name —or, rather, the two names—of each of the squares on the board and must practise recognising the squares by their names. This he will be able to do after he has studied the following diagram. (In diagrams the player of the White forces is always assumed to be seated at the lower end of the board, the player of the Black at the upper. The board is so placed that each player has a white square at his right-hand corner.)
The 64 squares form vertical files and horizontal ranks. In the English notation the files are called after the names of the pieces which at the beginning of the game occupy their end squares. Going from left to right in the following diagram —remember White is at the lower end, Black at the upper—we have the Queen’s Rook’s file, the Queen’s Knight’s, the Queen’s Bishop’s, the Queen’s, the King’s, the King’s Bishop’s, the King’s Knight’s and the King’s Rook’s. The ranks are numbered from 1 to 8, each player counting from his own end of the board. Thus Black’s eighth rank is White’s first, White’s eighth is Black’s first.
No. 1
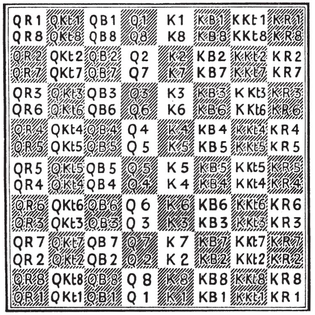
The beginner will find in diagram No. 1 the names of the squares. The upper symbols in each square show Black’s name for it, the lower White’s. The abbreviations used are: K for King’s, Q for Queen’s, R for Rook’s, B for Bishop’s and Kt for Knight’s.2
“Sq”—an abbreviation of “square”—is frequently used instead of 1.

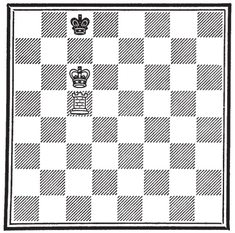
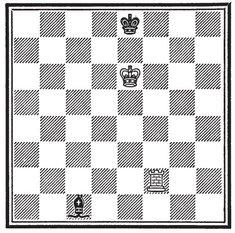
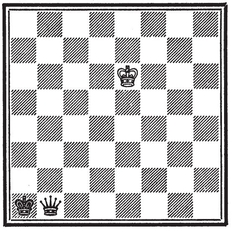
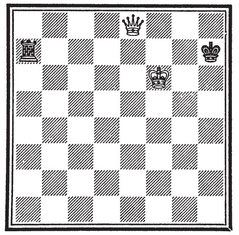
Please take the two Kings—since they are the most important pieces, they are the biggest—and put the White one at White’s KB6 and the Black at Black’s KKt1. Then take a White Rook—Rooks are the big round pieces that look like the towers of an old-time castle—and place it at White’s QKt1 (No. 2).
No. 2
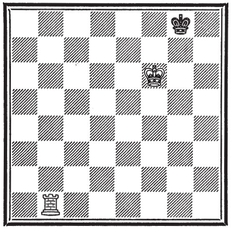
The Rook moves from QKt1 to QKt8, or in the usual notation 1. R – Kt8 (“ – ” signifies “to”). As you see, the Rook moves in a straight line. It can move along a file or a rank and, in each case, in either direction. Thus it could go from QKt1 to QR1, Q1, KKt1, KR1, etc. on the rank or to any of the squares between QKt1 and QKt8 on the file. To continue—1. R – Kt8. When the Rook has arrived at Kt8, it is attacking the Black King, which now stands in one of its lines of action. Such an attack on a King is described as a “check” (= “King”) and at such times the player making the attack calls “Check!” That is because an attack on the King, a check, must in all circumstances be attended to. In some way or other the King must escape from the check. But where can the King move? Since the King can move only one square at a time in any direction, only KB1, KR1, KB2, KKt2 and KR2 need be considered. He is not allowed to go to KB1 since there he would be just as much exposed to the Rook’s attack as at KKt1. At KR1 also he would still be in check. Can he go to KB2? A King must never go too near to another. At-KB2 he would be within striking distance of the opposing King. The King must never move to a square which is attacked by an opposing man since he would thus put himself into check. Therefore he may not go to KB2 nor, for the same reason, to KKt2. But what of KR2? That square is not attacked by any enemy man. He may—and must—move to KR2. Thus the two moves read 1. R – Kt8, ch, K – R2. (“Ch” is an abbreviation of “check”. )

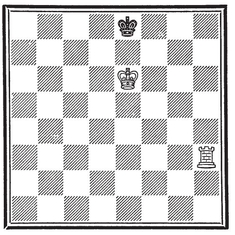
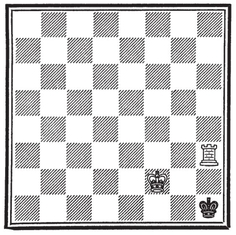
Now please put up the following position: the White King at White’s K6, the White Rook at White’s KR3, and the Black King at Black’s K1 (No. 3).
The Kings are now standing the least possible distance from one another—they may not go any closer. They are immediately opposite to each other, in Opposition, as we say. White moves 1. R – R8. Again the Rook is attacking the Black King, which is now in the Rook’s new line of action. Thus the Rook gives check: 1. R – R8, ch. How can the Black King get out of check now? He may not go to KB1 or Q1, for on either of those squares he would be as much in check as at K1. Also, he may not go to K2,KB2 or Q2, since he may not go too near to the enemy King. He cannot move any more, he cannot get out of check. Then he is “checkmated” and the game is finished—for the checkmating of a King is the object of the game. White has won. Accordingly the move is written: 1. R – R8, mate. (“Mate” is derived from a Persian word and means “dead”.)
No. 3

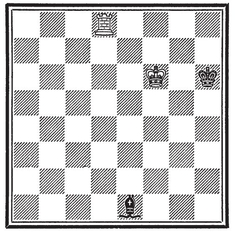
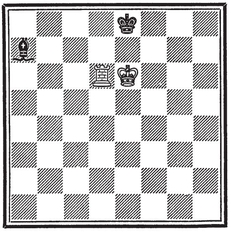
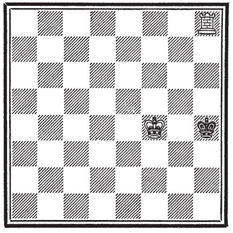
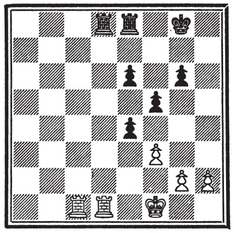
If in the last line of play a Black Bishop—the Bishops are those slim medium-sized pieces—were at Black’s QKt5, then mate could be delayed (No. 4). Black could cover the check—could escape from check—by playing (in reply to 1. R – R8, ch) his Bishop to KB1 where it interrupts the line of action of the Rook, is in its way. Just as the Rook moves in all directions along the ranks and files, so the Bishop moves in all directions along the diagonals. The moves now read: 1. R – R8, ch, B – KB1. But now the Rook can capture the Bishop which is in its line of action. In chess a man can capture an enemy man standing in its line of action, and this it does by removing the enemy man from the board —after which that man is out of the game—and occupying the square vacated by its victim. Let us suppose the Rook does capture the Bishop: 2. R × B, ch. (The “ × ” signifies “takes”.) But now, since the King can move one square in any direction, the Rook has come within moving and capturing distance of the King, who would simply recapture: 2.... K × R. The King at K1 guards the Bishop at KB1. Thus White would have gained nothing; only the two Kings would be left and the game would be undecided—a draw. Neither player would have won, neither would have lost.
No. 4
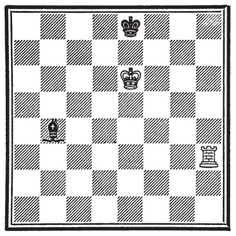
But, nevertheless, there is a way for White to capture and win the Bishop for nothing. He has only to think out what his opponent can do at the next move. Black may not move the Bishop otherwise his King would be in check. A player may not make a move that places his King in check. So the Bishop may not move, the Bishop is pinned. So, if it were Black’s turn to move, he could move only his King, and since moves to KB2, K2 and Q2 are prevented by White’s King, Black’s could go only to Q1. But this move would leave his Bishop unguarded, and it could safely be taken by the Rook. Actually, however, it is White’s turn to move. He makes a move which does not materially alter the position, viz. 2. R – Kt8. After that Black’s King must move to Q1: 2.... K – Q1, and now the Rook captures the Bishop: 3. R × B, or rather, 3. R × B, ch, for at KB8 the Rook is again attacking the King. There is only one possible move: 3.... K – B2. Now, with a Rook ahead, White must win—as we shall see later. A Rook can always force a mate against a lone King.
White’s 2nd move in the above play is, on the surface, quite motiveless. Actually, White has done nothing at all but waste time; he has formally fulfilled his obligation to move but merely in order to force his opponent to change the position. Such a move is called a “waiting move”. By means of it White has constrained his opponent to move, has placed him, as we say in Germany, in Zugzwang.3
White had, instead of the Rook move, another move (2. K – B6) by means of which, in just the same way, he would have forced Black’s King to relinquish his guard on the Bishop. In reply to that move, Black’s King would have had to move to Q1 or Q2 and then the Rook could have taken the Bishop.

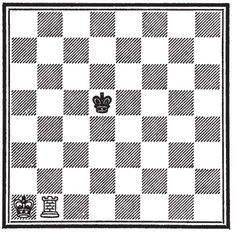
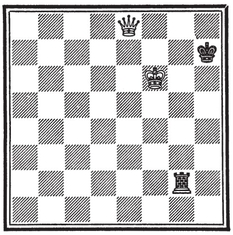
Let us take once again Position No. 2. After the moves considered there, 1. R – Kt8, ch, K – R2, White again makes a waiting move. He has many such at his disposal—for example, without materially altering the position, the Rook can go from Kt8 to QR8, QB8, Q8, K8 or KB8. Not, however, to KKt8 or KR8 for, if the Rook were played to either of those squares, Black’s King would capture it—White would have thrown his Rook away. But let us suppose that White makes one of the good waiting moves, 2. R – QR8 or QB8 or Q8 or K8 or KB8. Then Black has only one move. The King may not move to KKt1 or KR1 because on either of those squares he would be in the line of action of the Rook. He may not go to KKt2 or KKt3 because there he would be too near to the enemy King. Only KR3 is left him, therefore 2.... K – R3. Now the Kings are again in Opposition, always a very dangerous position for the defender since the one King robs the other of three squares. White’s Rook gives check at KR8—and not only check but mate since the three squares KKt2, KKt3 and KKt4 are closed to the Black King by the White and the squares KR2, KR3 and KR4 are attacked by the Rook. Therefore 3. R – R8, mate—the game is over, White has won.

The following play, very curious but extremely instructive for beginners, runs on similar lines:
Once again the Kings are in Opposition (No. 5); once again, therefore, mating continuations are possible. Curiously enough, White can start with whatever Rook move he pleases —he will always mate in three moves. Only he must always force the Black King back again into Opposition. For example, 1. R – KR5, K – Q1. Now White must prevent the escape of the King across the King’s file. This he manages quite easily by placing his Rook in that file: 2. R – K5. Now the King must return into Opposition: 2.... K – B1. There follows 3.R – K8, mate.
No. 5
Or, (after 1. R – KR5) 1.... K – Kt1. Now White by 2. R – QR5 forces the King back to B1; 2.... K – B1; 3. R – R8, mate.
Or 1. R – K5, K – Q1; 2. R – K1, K2, K3, K4 or K6, K – B1; 3. R – K8, mate.
Or 1. R – Q5, K – Kt1; 2. R – QR5, K – B1; 3. R – R8, mate.
Or 1. R – QKt5, K – Q1; 2. R – K5, etc.
Or 1. R – QR5, K – Kt1 (or 1.... K – Q1; 2. R – K5, etc.); 2. R – R1, R2, R3, R4 or R6, K – B1; 3. R – R8, mate.
Or 1. R – B1, B2, B3 or B4, K – Q1; 2. R – K1, K2, K3 or K4 respectively, K – B1; 3. R – K8, mate.
Or 1. R – B1, B2, B3 or B4, K – Kt1; 2. R – QR1, QR2, QR3 or QR4 respectively, K – B1; 3. R – R8, mate.
It will be good practice for the beginner to try all the possible first moves for the Rook that I have not mentioned and to bring about a mate according to the given scheme.

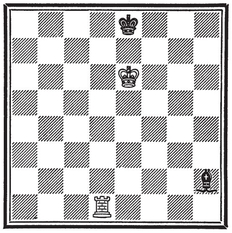
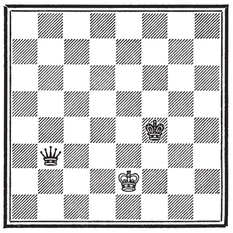
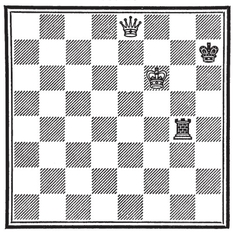
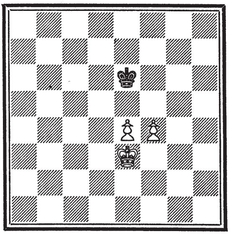
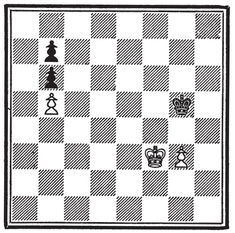
Suppose we change the position somewhat and introduce a Black Bishop (No. 6).
It is Black’s turn to move. White has just moved his King from B7 to B6. (It is not necessary to say from KB7 to KB6.) He now threatens R – R8, mate. (Again, it is not necessary to say R – KR8, mate). Black has now at his disposal a splendid move which prevents mate and at the same time destroys all White’s hopes of victory. It is 1.... B – R5, ch! (An exclamation mark denotes a very good move, a question mark a bad one.) After that move White cannot carry out his intention of mating his opponent. The check has precedence, the check must be attended to. Therefore the White King moves from B6 to either B7, K6, K5 or B5. Naturally, he cannot move to K7 for there he would be as much in check as at B6. After any one of these moves by the King the Bishop captures the Rook. The move of the King to B6 was, obviously, a glaring oversight which cost the Rook. White overlooked the check at R5 by the Bishop. Black, for his part, made full use of his opponent’s oversight. Admittedly, after 2.... B × R Black cannot win the game since a single Bishop cannot mate the opposing King. But at least he has saved the game, has made it a draw.
No. 6
No. 7

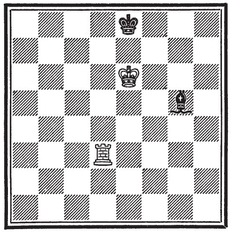
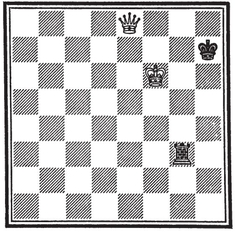
Between a Rook and a Bishop very interesting struggles are possible—for example, in positions Nos. 7 – 10 in which the essential feature is the Opposition of the Kings which (as we have already seen) makes mating continuations possible. In No. 7 White plays 1. R – KR1 and attacks the Bishop, that is to say, threatens to take it. The Bishop can now move to Kt6, B5, B2 or Kt1. If it moves to K4 or Q3, it is taken by the White King into whose sphere of action it has placed itself and, if, instead, to Kt8, then it may be taken by the Rook. If it moves to Kt6, B5, B2, Kt1, or Kt8 then the Rook gives at R8 the mate we have already met. If, instead of the Bishop, the Black King moves, then the Rook takes the Bishop and White wins through the advantage of being a Rook ahead.
Again, in this position (No. 8) White has at his disposal a very strong attacking move, viz. 1. R – KKt3! The Rook is attacking the Bishop. If the latter moves just anywhere, e.g. to Q7 or R5, then the Rook gives mate at Kt8. If, as is better, the Bishop moves to R3 or K2, then, in reply to 2. R – Kt8, ch, it can interpose at KB1 and cover the check. But now, as we have seen before, White by the waiting move 3. R – R8 (or by 3. K – B6) wins the Bishop and the game: 3.... K – Q1; 4. R × B, ch.
No. 8
No. 9
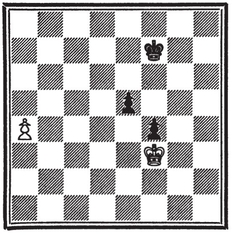
In position No. 9 White wins in a similar manner by 1. R – B2, attacking the Bishop and at the same time threatening mate by R – B8. Black’s best move is 1.... B – Kt4 so that in reply to 2. R – B8, ch he can interpose the Bishop at Q1. However, he loses it after a waiting move by the Rook to Kt8 or R8 or after 3. K – Q6 since the Black King must move and relinquish the guard on the Bishop, which is then taken.
No. 10

In position No. 10 the winning move is 1. R – R6. If the Bishop moves in the diagonal from R2 to Kt8 (except to Kt3, where the Rook takes it), then 2. R – R8, mate. If, however, the Bishop moves to Kt1, 1.... B – Kt1, then once again we get 2. R – R8. By this move the Bishop is attacked, the Rook threatens to take it. The Bishop cannot escape for, if it were to move, the Black King would be in check and that must not be. A player must not make a move which places his King in check. So the Bishop is pinned—and its King cannot protect it (as he could do, if at Q1, by playing to B1 or B2). The Bishop cannot be guarded, it is taken, and White wins since later on he forces a mate.

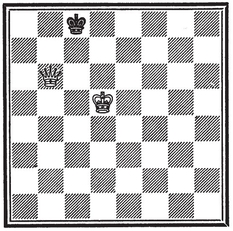
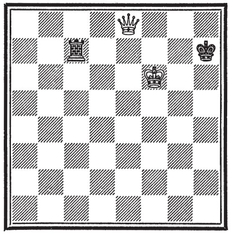
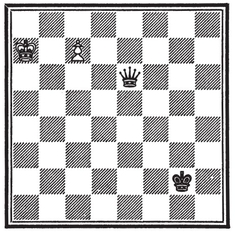
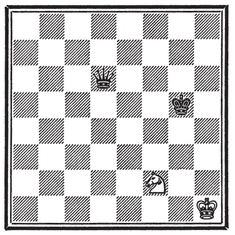
Please put the White King at White’s K2, the Black King at Black’s KB5 and the Black Queen—the Queens are the second largest pieces—at Black’s QKt6 (No. 11).
The Queen combines the moves of the Rook and the Bishop, she moves along ranks and files (like the Rook) or along diagonals (like the Bishop) and in each case for any number of squares. That is to say, she moves like the King, only for any number of squares. She is by far the strongest piece. To mate a lone King with her is not difficult. The King is forced to the edge and our King placed opposite to him. We have only to take care not to “stalemate” the enemy King. Stalemate is reached when a player whose King is not in check has no move of any piece open to him. The game is then a draw.
No. 11
In the above position mate is brought about in the following way: 1.... Q – B7, ch. This drives the King back to the first rank and almost opposite to the Black King. 2. K – B1, K – B6; 3. K – K1, Q – B8, mate, or 3. K – Kt1, Q – KKt7, mate. If 2. K – K1, then 2.... K – B6; 3. K – B1, Q – KB7, Kt8, B8 or Q8, mate.

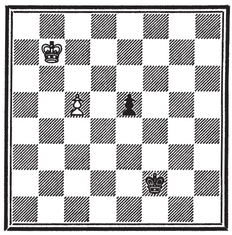
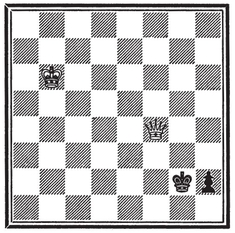
If in position No. 12 White moves his King to B6, Q6 or K6, then Black cannot move. The squares Kt1, Kt2, B2 and Q1 are closed to him by the Queen and the square Q2 by the King. Therefore, while his King is not in check, Black has no move. Accordingly, it is stalemate and the game is a draw. White must avoid this mistake and bring about the mate as follows: 1. Q – R7, K – Q1; 2. K – Q6. Always take up this so effective Opposition! The Black King can now move only to B1 or K1. In the first case he is mated by 3. Q – QB7 or R8 (the square Kt2 is taken from the King by the Queen), in the second by 3. Q – K7.

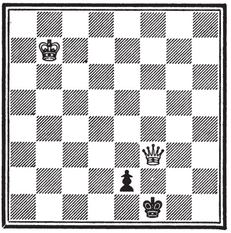
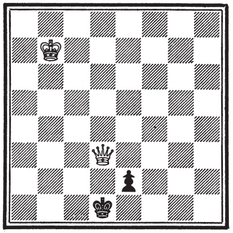
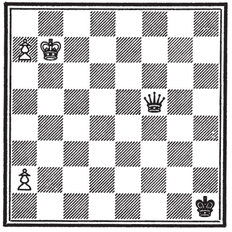
It is not difficult to bring about the mate of a lone King by Queen and King from any position, e.g. No. 13.
No. 12
No. 13
We gradually force the White King anywhere on the edge of the board. First, however, we must bring our own King up to him.
| 1. .... | K – Kt7 |
| 2. K – Q5 | K – B6 |
| 3. K – K5 | Q – KKt3 |
Thus we prevent the return of the King to the sixth rank. Q – QKt3, with the same object, is also quite good. We want to force the King to the first rank.4 No useless checks, however. Let us systematically and gradually take one rank after another from the King.
| 4. K – B4 | Q – R4 |
Thus we already take the fifth rank from him.
| 5. K – K4 | Q – KKt4 |
By this quiet move in conjunction with the next we capture the fourth rank.
| 6. K – B3 | Q – R5 |
| 7. K – K3 | Q – KKt5 |
Now the King must go to the second rank. The net is being drawn closer.
| 8. K – B2 | Q – R6 |
| 9. K – K2 | Q – Kt6 |
| 10. K – B1 |
Or 10. K – Q1, Q – B7; 11. K – B1, Q – B8, K8, Kt8 or QB7, mate.
| 10..... | Q – R7 |
Thus the King is forced right to the edge. (Not 10.... K – Q6? or K – Q7? on account of stalemate.)
| 11. K – K1 | Q – KKt7 |
| 12. K – Q1 | Q – B8 or Q7, mate. |
The mate could have been brought about in 9 moves, but the line of play given is the most systematic and consequently the simplest.

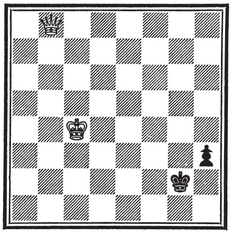
The mate with Rook and King against a lone King is very similar. We gradually force the King to the edge. The final position is something like the following (No. 14) or the position we have already met (No. 15):
No. 14
No. 15
The systematic mating process is as follows (No. 16):
No. 16
1. K – Kt2
Here, too, we first advance our King. Here he has to move much more than in the mate with the Queen.
| 1. .... | K – Q5 |
| 2. K – B2 | K – K5 |
| 3. R – Kt5 |
White takes the fifth rank from the King whom he wants to drive to the first.
| 3. .... | K – Q5 |
| 4. K – Kt3 |
Above all, no useless checks.
| 4. .... | K – K5 |
| 5. K – B3 | K – B5 |
| 6. K – Q3 | K – Kt5 |
| 7. K – K3 | K – Kt6! |
If 7.... K – R5, then White after 8. K – B3!, K – R6 has got the Opposition and plays 9. R – R5, mate.
8. R – Kt5, ch
When the Kings are in Opposition, a check is in place, for it drives the King a file or a rank—in this case a file—nearer to the edge.
| 8. .... | K – R5 |
Attacking the Rook—a point the beginner must not overlook.
| 9. K – B4 | K – R6 |
| 10. K – B3! | K – R7! |
If 10....K – R5, then 11. R – QR5, KB5 or K5, etc., K – R6; 12. R – R5, mate.
11. R – Kt8, Kt6 or Kt7
Not 11. R – Kt2, ch, K – R8; 12. K – B2 or Kt3 because of stalemate. On the other hand, the continuation 11. R – R5, ch, K – Kt8; 12. R – R8, R7 or R6, etc., K – B8; 13. R – R1, mate is just as quick as that following 11. R – Kt8, viz. :
| 11. .... | K – R8! |
If 11.... K – R6, then 12. R – R8, mate.
| 12. K – B2 | K – R7 |
| 13. R – R8, mate. |

The struggle between Queen and Rook is very attractive. Once the Rook is separated from its King it is lost, since the Queen checks and at the same time attacks the Rook. Thus there is a double attack. Occasionally this double attack occurs on the first move, as in example No. 17 :
1. Q – R5, ch. The Queen is attacking King and Rook. Since Black must get his King out of check, he has no other move than 1.... K – Kt1, upon which the Queen takes the Rook (2. Q × R, ch).
By 1. Q – Q7, ch also the Queen would attack both pieces and so capture the Rook, which, since White’s King and Queen are both attacking Black’s KKt2, cannot interpose there. The Queen would capture it and give mate.
No. 17

In example No. 18 also the double attack occurs at once:
By 1. Q – K4, ch White wins the Rook. To be sure, it can interpose at Kt3 and give check but the Queen, guarded by the King, takes it with check and, after K – R1, mates at Kt7.
No. 18
No. 19

In position No. 19 the capture is a difficult and longer problem but one which the beginner can now understand.
The play is:
1. Q – K4, ch
If the King moves to R1, then the double attack 2. Q – R4, ch follows and the Rook is lost. If the King moves to R3, then the same Queen move gives mate. Therefore, the King must move to Kt1.
| 1. .... | K – Kt1 |
| 2. Q – B4, ch! |
This check is decisive since 2.... K – B1? is followed by 3. Q – B8, mate. If, instead, the King moves on to the Rook’s file at R1 or R2, then the double attack 3. Q – R4, ch wins the Rook.

No. 20 is a very pretty piece of play:
| 1. Q – K4, ch | K – R1 or Kt1 |
Not K – R3 because of 2. Q – R4, mate.
| 2. Q – R8, ch | R – Kt1 |
If, instead, 2.... K – R2 (forced after 1.... K – Kt1), then the double attack 3. Q – R7, ch follows and White wins the Rook.
3. Q – KR1, mate.
A very surprising and beautiful mate. In endeavouring to escape, the Rook has taken from the King the flight-square Kt1.
No. 20

No. 21

In position No. 21 White must try to check at Q8.
| 1. Q – R5, ch | K – Kt1 |
| 2. Q – Q5, ch | K – R2! |
After 2.... K – R1 the double attack 3. Q – Q8, ch follows immediately. If, instead, 2....K – B1?, then the same Queen move gives mate.
| 3. Q – Q3, ch | K – Kt1 or R1 |
If 3.... K – R3, then 4. Q – R3 or Kt6, mate.
4. Q – Q8, ch, winning the Rook.

In position No. 22 White must aim at a check at his KKt1 or QKt8.
| 1. Q – K4, ch | K – Kt1 |
1.... K – R3 is out of the question on account of 2. Q – R4, R1 or Kt6, mate. If 1.... K – R1, then the desired check at KKt1 is brought about by 2. Q – R1, ch, K – Kt1!; 3. Q – Kt1, ch. If, however, after 2. Q – R1, ch, the Rook interposes (2.... R – R2? ), then by 3. Q – R8 White gives a beautiful mate, a companion to that in No. 20.
No. 22
| 2. Q – Q5, ch | K – R1 or R2 |
If 2.... K – B1?, then 3. Q – Q8, mate.
| 3. Q – R1, ch | K – Kt1 |
If 3.... R – R2, then 4. Q – R8, mate.
4. Q – Kt1, ch, winning the Rook.
From these very instructive lines of play we see clearly the great strength of the Queen.

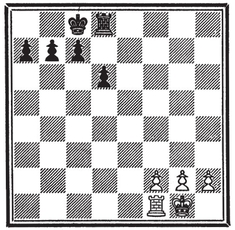
Now, please, put the White King at White’s K3, two White pawns—they are the smallest of the men 5 and each player has eight of them—at White’s K4 and KB4, and the Black King at Black’s K3. The pawns are the least valuable of the men, but, if any pawn reaches the last rank (i.e. its owner’s 8th rank), it is exchanged for any piece he likes—of the same colour —with the exception of the King. Thus each side could have two, three, or even more Queens, three or more Knights, etc. Naturally, the Queen, the strongest piece, is most frequently chosen. The pawn is then said to “queen”.
In position No. 23, where the pawns are united and only the enemy King stands in their path, they move forward with great ease. We have only to employ our King correctly in their support and up to the very end be careful to avoid stalemate.
The play is: 1. P – B5, ch (“P” stands for “pawn”). The pawns move one square at a time but only straight ahead. They cannot go backwards. They capture diagonally to either side, their range again being limited to one square. Thus after 1. P – B5 the Black King is in the line of action of the pawn which thus gives check.
No. 23
(From its original position in its owner’s second rank each pawn may move either one or two squares, whichever is desired. When making a capture, it is always restricted to one square.)
| 1. .... | K – K4 |
Naturally, the King seeks to hinder the advance of the pawns as much as possible. If 1.... K – B3, then 2. K – B4 could follow immediately and then the pawn at K4, the King’s pawn as it is called, could advance.
2. K – B3
The pawn at B5, the King’s Bishop’s pawn, cannot well move since the King would capture it.
| 2. .... | K – B3 |
K – Q5 would be bad, for then the pawn at B5 could not be prevented from advancing to and eventually reaching White’s eighth rank. The King would not be able to overtake it.
3. K – B4
Now the Black King has to move to Black’s second rank since the squares K3 and KKt3 are taken from him by the pawn at White’s B5.
| 3. .... | K – B2 |
| 4. P – K5 | K – K2 |
| 5. P – B6, ch | K – K3 |
| 6. K – K4 | K – B2 |
| 7. K – B5 | K – K1 |
| 8. P – K6 | K – B1 |
| 9. P – K7, ch | K – K1 |
In this position 10. K – K6? would be a terrible oversight, for Black’s King would be stalemated; he could not move to Q1 or B1 because of the pawn at White’s K7, could not capture that pawn, and similarly could not move to Q2 or B2. Thus, without his King being in check, Black could make no move; it would be stalemate and the game a draw.
| 10. K – Kt6! | K – Q2 |
| 11. K – B7 | K – Q3 |
| 12. P – K8 (Q) |
(This means that the pawn becomes a Queen.) White wins.

In position No. 24 the result depends upon which of the players has the turn to move. If it is White’s move, he wins since the Black King cannot hold up the White pawn: 1. P – R5 K – K3; 2. P – R6, K – Q3; 3. P – R7, K – B2; 4. P – R8 (Q).
No. 24
If, however, it is Black’s move, he must first proceed to capture the pawn, then advance against the King, and queen his pawns. In the meantime the White King can do nothing against him. If, after playing to K4, White’s King captures the pawn at Black’s K4 (his King’s pawn), then the other pawn (Black’s King’s Bishop’s pawn) goes irresistibly on to queen. The play is, therefore: 1.... K – K3; 2. P – R5. K – Q3 for Q2 or Q4); 3. P – R6, K – B3; 4. P – R7, K – Kt2; 5. K – K4, K × P; 6. K – B3 (it is obvious that after 6. K × P the other pawn has an uninterrupted path to the square where it becomes a Queen), K – Kt3; 7. K – K4, K – B4; 8. K – B3, K – Q5; 9. K – K2, P – K5; 10. K – Q2, P – K6, ch; 11. K – K2, K – K5; 12. K – K1, P – B6; 13. K – B1, P – K7, ch; 14. K – K1, K – Q6 (not K – K6? because of stalemate); 15. K – B2, K – Q7 and the pawn at K7 queens.
No. 25


In position No. 25 the forces are equal but White has the advantage since his King is well advanced and the Black Bishop can be prevented from playing any effective part.
| 1. B – K5, ch | K – Kt1 |
If 1.... B – Kt2?, the Bishop would be captured without Black being able to retake. Black would then be a Bishop to the bad and would lose.
2. P – B5
In reply to this Black has only a move of the pawn, for, if the Bishop moves to R3, it is captured by the King or, if to Kt2, by the Bishop. Admittedly, after that (2.... B – Kt2; 3. B × B) the Black King would be stalemated, for it could not move anywhere and would not be in check. But Black would not be stalemated since he could—and would have to—move the pawn. It is stalemate only when no piece at all on the one side can move, that side having the turn to move, and the King of that side not being in check.
| 2. .... | P – K3 |
| 3. P – B6! |
This is much stronger than capturing the pawn, for now White’s pawn can steadily advance.
| 3. .... | K – R1? |
| 4. P – B7, ch |
The pawn advances and at the same time unmasks the White Bishop, opens for it a line of attack, enables it to check. The Black King can no longer move to Kt1 since that square is taken from him by the pawn. The only move is 4.... B – Kt2, after which White can mate in several ways—(1) by 5. B × B, mate (the White Bishop is guarded by the King and cannot be captured), and (2) by 5. P – B8 (Q), mate (the Queen cannot be taken by the Bishop since the Black King would then be in check to White’s Bishop—and this placing one’s King in check is not permissible). Instead of a Queen, White could choose a Rook and still give mate: 5. P – B8 (R), mate.
But the move 3.... K – R1 is faulty. Instead of this, the Bishop can—and must—move, e.g. 3.... B – K2. If White takes the Bishop, Black is stalemated. For the King cannot move to B1 because the White pawn guards that square, nor to R1 because of the White Bishop. Nor can the pawn move. But White need not capture the Bishop. A much stronger line is: 4. P – B7, ch, K – B1 (the pawn is guarded by the King, therefore cannot be taken); 5. B – Kt7, mate. The Black King cannot move to K1 since the pawn takes that square from it, the square K2 is occupied by Black’s own Bishop, while the White Bishop is guarded by its King and therefore cannot be taken.
But on his third move Black can play the Bishop to B4, Kt5 or R6. (If it goes to Q3, White’s Bishop can take it, but, even better, White can play 4. P – B7, ch, K – B1; 5. B × B, mate.) If 3.... B – B4, Kt5 or R6, then 4. P – B7, ch, K – B1; 5. B – Kt7, ch, K – K2 (the only move), and now the pawn, guarded by the Bishop, can queen; 6. P – B8 (Q), ch, and White wins quite easily.
Black can, instead, play 3.... B – Kt2. If White takes the Bishop, 4. P × B?, then Black is stalemated. But, instead, White plays 4. P – B7, ch, K – B1 (if 4.... K – R1, we again get either 5. B × B, mate, 5. P – B8 (Q), mate, or 5. P – B8 (R), mate); 5. B – Q6, mate. Obviously, White can also win by 5. B × B, ch but, naturally, to mate at once is more precise. Finally, we must consider (after 1. B – K5, ch, K – Kt1; 2. P – B5, P – K3; 3. P – B6) the move 3.... B – R3. White could simply take the Bishop and would then win. More precise, however (as after 3.... B – Q3), is 4. P – B7, ch, K – B1; 5. B – Q6, mate.

In position No. 26 White has the right idea—to obtain a “passed” pawn. Thus we describe a pawn which has no opposing pawn in front of it, either in the file in which it stands or in either of the adjacent files, and which, therefore, has the best possible chance of becoming a Queen. White wants to play P – B3 and P – Kt4. He does this: 1. P – B3, P – B5!; 2. P – Kt4. Black replies by capturing the pawn in the Knight’s file and placing his own at White’s QKt3. This is the taking “en passant” (i.e. in passing) as it is called. 2.... P × P, e.p. (“e.p.” stands for “en passant”). The pawn which was at Kt2, in playing in one move to Kt4, has passed over the square Kt3 which is in the line of action of Black’s pawn at B5.
No. 26
No. 27
The Black pawn can capture the White just as if the latter had moved only one square, i.e. to Kt3. However, this capture, if made, must be made immediately, i.e. Black cannot make another move and then at a subsequent turn to play capture the pawn en passant.
White has not thought of this capture and as a punishment for his forgetfulness loses the game since Black’s passed pawn at Kt6 queens in two moves. White’s idea is correct but his execution of it faulty. The plan of creating a passed pawn must be carried out in the following way: 1. P – Kt3, 2. P – B3 and 3. P – Kt4.

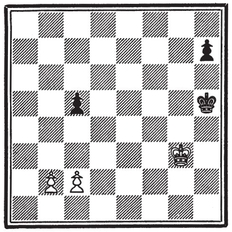
In No. 27 the forces are equal but Black is suffering under a disadvantage. His pawns are “doubled”. Thus we describe two pawns of the same colour standing in the same file.
Three such pawns we call “trebled” pawns. Here we can clearly see the disadvantage of doubled pawns. They can be held up by a single opposing pawn. This would not be the case if the pawn at QKt3 were at QB2. Then Black by playing P – B3 (or, provided it were a good move, P – B4) could obtain a passed pawn. As matters are, however, White is virtually a pawn (the one at his Kt3) to the good and on this he is able to base a winning plan. He plays to win the doubled pawns and then queen his Queen’s Knight’s pawn. In the meantime Black is occupied in capturing the pawn at Kt3 and thus he is unable to defeat White’s plan. The play is:
| 1. K – K4 | K – Kt5 |
| 2. K – Q5 | K × P |
| 3. K – Q6 |
Naturally, the King cannot move to B5 or B6.
| 3. .... | K – B5 |
| 4. K – B7 | K – K4 |
| 5. K × either P | K – Q3 |
| 6. K × P | K – Q2 |
| 7. K – R7 |
The White King now commands the squares Kt6, Kt7 and Kt8 which the pawn has to occupy, and so makes its journey quite safe.
| 7. .... | K – B2 |
| 8. P – Kt6, ch | K – B1 |
| 9. P – Kt7, ch, followed by 10. P – Kt8 (Q). | |
If, in reply to 1. K – K4, Black plays 1.... K – B3, then 2. K – Q5, K – K2. In this way the Black King has shut the White off from the pawns. But he is now drawn off by the advance of the passed pawn: 3. P – Kt4 (K – K5 also is good), K – Q2; 4. P – Kt5, K – K2; 5. P – Kt6, K – B3 (if 5....K – Q2, then 6. P – Kt7 and the pawn queens); 6. K – Q6, K × P; 7. K – B7, K – B3; 8. K × either P, K – K2; 9. K × P, K – Q1; 10. K – R7 and the pawn queens without hindrance.

In position No. 28 neither pawn can be prevented from queening.
| 1. P – Kt6 | P – R6 |
| 2. P – Kt7 | P – R7 |
| 3. P – Kt8(Q) | P – R8(Q) |
Usually the ending Queen v. Queen results in a draw, but here White has at his disposal a move which at once decides the game in his favour:
| 4. Q – R8, ch! | K – anywhere |
| 5. Q × Q, and White wins. | |
No. 28

No. 29

In position No. 29 each player, naturally, is playing to push on his pawn and change it into a Queen.
| 1. P – B6 | P – K5 |
| 2. P – B7 | P – K6 |
| 3. P – B8 (Q) | P – K7 |
Black is a move too late. Naturally, White must not grant his opponent a moment’s respite in which to push the pawn home. The following is the very interesting winning plan. By a succession of checks and by attacks on the pawn White seeks to drive the Black King in front of it, i.e. to K8. Then—and only then—has White time to move his King towards the scene of action. After many repetitions of this manoeuvre, the White King can at length play a decisive part. The ideal position for which White must all the time be aiming is either No. 30 or No. 31.
In these positions, in order not to relinquish his guard on the pawn, the King must move in front of it, i.e. to K8.
After the White pawn has queened (in No. 29) the game proceeds as follows:
4. Q – KB5, ch
White could, instead, continue with 4. Q – B2, for after that move the pawn would be prevented from going forward by the fact that, if it did so, the King would be in check. The pawn would be pinned.
| 4. .... | K – Kt7 |
| 5. Q – K4 or Kt4, ch | K – B7 |
No. 30
No. 31
Naturally, the King must move so that he guards the pawn.
| 6. Q – B4, ch | K – Kt7 |
| 7. Q – K3! |
Don’t always check! This direct attack on the pawn is very effective and leads immediately to one of the ideal positions.
| 7. .... | K – B8 |
| 8. Q – B3, ch | K – K8 |
Thus the first stage is accomplished. Now the White King can approach.
| 9. K – B6 | K – Q7! |
K – Q8 would be bad, for the pawn, being then pinned, would be unable to advance and so White’s King could at once make another move.
10. Q – B2
There is no need always to check. A move which pins the pawn is just as effective.
| 10. .... | K – Q8 |
K – Q6 would be bad, for White would occupy the queening square by Q – K1! and then, after bringing up the King, would win easily. Now, after 10.... K – Q8, White has again to aim at one of the ideal positions.
| 11. Q – Q4, ch | K – B7 |
| 12. Q – K3! | K – Q8 |
| 13. Q – Q3, ch | K – K8 |
Now, again, White’s King can move.
| 14. K – Q5 | K – B7 |
K – B8 would be faulty, as the pawn would be pinned (cf. move 9).
| 15. Q – Q2 | K – B8 |
| 16. Q – B4, ch | K – Kt7 |
| 17. Q – K3! | K – B8 |
| 18. Q – B3, ch | K – K8 |
| 19. K – K4 |
Now the White King is near enough to co-operate.
| 19. .... | K – Q7 |
| 20. Q – Q3, ch | K – K8 |
| 21. K – B3 |
Now the pawn is doubly attacked and will be captured. The play proceeds:
| 21. .... | K – B8 |
| 22. Q × P, ch | K – Kt8 |
| 23. Q – Kt2, mate. |

If the advanced pawn is on either of the Bishops’ or Rooks’ files, then the result is quite different.
In No. 32, if it were Black’s move, he would occupy the queening square by Q – Bl! and win. But suppose, instead, it is White’s turn to play.
| 1. K – Kt8 | Q – Kt3, ch |
The ideal position has been reached.
| 2.K – R8 | Q × P |
White is stalemated and the game a draw.

Similarly, if the pawn is on one of the Rooks’ files, as in position No. 33:
No. 32
No. 33
| 1. Q – Kt4, ch | K – B7 |
| 2. Q – R3 | K – Kt8 |
| 3. Q – Kt3, ch |
The ideal position.
| 3. .... | K – R8 |
| 4. K – B5 |
Black is stalemated.

If, however, the weaker side has a pawn, this prevents stalemate, and the Queen often wins.
In No. 34 the play is:
| 1. .... | Q – Kt4, ch |
| 2. K – B7 | Q – R3 |
| 3. K – Kt8 | Q – Kt3, ch |
The ideal position.
| 4. K – R8 | Q – B2! |
| 5. P – R4 | Q – B1, mate. |
Here the Queen can give mate on her own since White’s King is deprived of the square R7 by White’s own pawn. Usually, to give mate the Queen needs the aid of the King or of some other man on her own side.

If the pawn is on the sixth rank, the win with the Queen is quite simple.
Naturally, in position No. 35 White must allow his opponent no time for the move P – R7. By continually checking with the Queen he must bring her nearer and nearer to the opposing King until she is in a position to make the decisive move, which —by analogy with the play in the previous examples—can be none other than Q – Kt4, ch.
No. 34
No. 35
| 1. Q – Kt8, ch | K – B7 |
| 2. Q – B7, ch | K – Kt7 |
| 3. Q – Kt6, ch | K – B7 |
| 4. Q – B5, ch | K – Kt7 |
| 5. Q – Kt4, ch | K – R7 |
Now White makes a waiting move.
6. K – Q3
Now the Black King has to move to R8-Zugzwang (see p. 5) —and give up guarding the pawn—which then is captured.
| 6. .... | K – R8 |
| 7. Q × P, ch | K – Kt8 |
And now Caution! White can let victory slip out of his grasp at the eleventh hour. If he moves K – K2 or K – K3?, Black is stalemated. The right line of play is:
| 8. K – Q2 | K – B7 |
| 9. Q – Kt4 |
Q – R2, ch, would be bad since it would let the Black King escape into the open (K – B6, etc.).
| 9. .... | K – B8 |
| 10. K – K3 | K – K8 |
| 11: Q – Ktl or K2, mate. |

Of all the pieces the Knight has the most complicated move. (The Knight is the piece with the horse’s head.) The Knight moves:
either two squares forward and one sideways
or  one forward and two sideways
or two backward and one sideways
or one backward and two sideways.
Diagram No. 36 shows the squares to which a Knight can move from Black’s K5. It jumps over the intervening squares and pieces en route.
No. 36
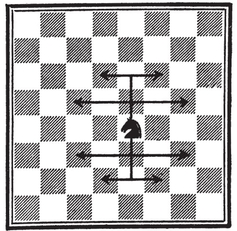
You should practise industriously all the possible Knight moves over the entire board.

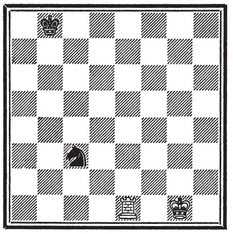
Startling double attacks are the Knight’s speciality. In position No. 37 Black has a Queen against a Knight—the Queen is worth as much as two Rooks or three minor pieces (the name we give to Bishops and Knights)—and yet, if it is White’s turn to move, he can save the game.
The Knight moves from B2 to K4. In this way he attacks the King and checks (one forward and two sideways). At the same time, however, he is attacking the Queen (two forward and one sideways). The King must save himself—and the Queen is lost.

In position No. 38 White plays 1.R – QB1, attacking the Knight. Black answers with 1.... Kt – K7, ch, attacking King and Rook at the same time (one forward and two sideways), and so wins the Rook. White has made a frightful blunder of which Black has taken advantage.
No. 37
No. 38

Already, in position No. 25, we have had an example of “discovered” check. This is a check given not by the piece that is moved but by another which is unmasked by that move.
But the piece moved may also give check and then we have a case of “double” check.
In position No. 39, if White’s Rook moves, it will unmask an attack on the King by the Bishop at White’s QKt2. Now the Rook can so move that it too will attack the King, i.e. to KR3 or B8. In each case White gives a double check. In reply to a double check, the King attacked has always to move. The double attack cannot be warded off by the interposition of a man or by a capture. If the Bishop alone were giving check, the Knight could take it or the Rook could interpose at KKt2. If the Rook alone were giving check, either at KR3 or B8, Black’s Bishop could take it. Against a double attack on the King neither capture nor interposition avails since by each of those methods only one attack would be parried, one check ended. Only a move by the King, if such be possible, parries both attacks.
No. 39
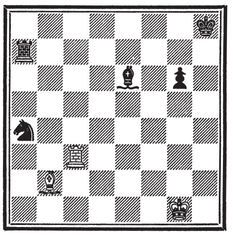
In reply to 1. R – R3, ch?, Black must play 1.... K – Ktl; in reply to the further check 2. R – R8, ch, the King has still a way of escape via B2.
On the other hand, after 1. R – B8, ch!, K – R2, White can continue the attack with 2. R – R8, ch,—and that move gives mate, since the square KKt3 is occupied by the Black pawn. If the pawn were at KR2, instead of at KKt3, then 1. R – B8 would mate at once. This demonstrates how dangerous a double check may be.

In No. 40 White is a Rook and two pawns to the bad. However, he saves himself by giving a “perpetual” check: 1. Q – BS, ch, K – R2; 2. Q – B7, ch, K – R1; 3. Q – B8, ch, etc. Since Black cannot escape from this perpetual check, the game must be abandoned as a draw.
No. 40

No. 41

In No. 41 White plays 1. R × R and naturally Black replies with 1.... R × R. Such a reciprocal taking of men of equal value is called an exchange.6 Similarly, 2. P × P, P × P.

The beginner must play through these examples over and over again until he has firmly established in his mind the elements of the game. Only then should he proceed further.

A SHORT SUMMARY OF THE ELEMENTS
The chess-board is a square containing 64 smaller squares, alternately white and black. On this board the 32 men are set out, 16 white and 16 black. They represent two armies that are to engage in battle. The board is so placed that each player has a white square at his right-hand corner.
Each army consists of eight pieces 2 or officers and eight pawns. The pieces on each side are a King, a Queen, two Rooks, two Bishops and two Knights. The pieces on each side are set out in the first row and the pawns in the second, as in diagram No. 42.
No. 42
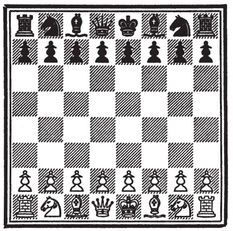
The Kings stand opposite to each other and so do the Queens. The White King is on a black square, the Black King on a white; the White Queen is on a white square, the Black Queen on a black. The pieces on the King’s side are called the King’s Bishop, King’s Knight and King’s Rook; those on the Queen’s side Queen’s Bishop, Queen’s Knight and Queen’s Rook. The pawns are named after the pieces which stand behind them, e.g. King’s pawn, Queen’s pawn (these two pawns in each army are frequently spoken of as centre pawns), King’s Bishop’s pawn, King’s Knight’s pawn, etc. When a pawn makes a capture, it changes its file and its name, e.g. White’s King’s Rook’s pawn after making a capture would become a King’s Knight’s pawn. If there is already a White pawn in the King’s Knight’s file, then the two pawns have to be distinguished by writing down in brackets the squares on which they are standing, e.g. P(Kt2) or P(Kt3).
Each side moves in turn, White playing first.
The pieces may move in their various ways either forward or backward until they come to a square occupied by a man of either side. They cannot jump over it—the exception of the Knight has already been mentioned—nor, if the man is of their own colour, can they occupy that square. They can take an opposing piece or pawn which stands in their line of action by removing it from the board and assuming its place. Only the King cannot be taken. The Rook moves along the files or ranks, the Bishop along the diagonals. One Bishop of each side moves on the white squares, the other on the black. The Queen moves along ranks, files or diagonals. The King moves like the Queen but only one square at a time. The Knight moves two squares forward and one sideways or one forward and two sideways, and backward in the same way. The King may not move to a square where it is attacked by an enemy man. The pawn moves only in a forward direction, one square at a time. It cannot go backward. From its original position each pawn can, if so desired, move two squares. The pawn captures diagonally, to right or to left, within a range of one square. If a pawn by making an initial move of two squares comes alongside of an enemy pawn—which thus could have taken it if it had advanced only one square—then it can be taken as if it had advanced only that one square (taking en passant). This, if done, must be done at once. If a pawn has advanced as far as the eighth rank, then it is exchanged for any piece of the same colour with the exception of the King. Thus each side could have two, three, or even more Queens, three or more Knights, etc.
If a man so moves that an opposing man stands in its line of attack, the latter is said to be attacked. If this man attacked is the King, then the attacking man is said to give check—and it is customary to say “check”. The player whose King is in check must in all circumstances and at once do something to ward off this attack. He may either (1) take the attacking man, (2) interrupt its line of action by interposing one of his own men, or (3) move the King out of check. If a check is from a Knight or pawn, interposition is impossible. (A check may also be given by opening a previously closed line of action of a piece. This is the “discovered” check. The man moved may itself also give check, then we get a “double” check. In reply to a double check the King attacked always has to move.) If the King can in no way be got out of check, he is checkmated and his side has lost the game. However, most games are not played right up to mate but given up (resigned) when one player realises that his opponent has too great a superiority in force or sees from other considerations that a lost game is inevitable. If, without his King being in check, a player on his turn to move cannot move anything, then he is stalemated and the game is drawn. A game is also drawn if there are not enough pieces available to force a mate or if the two players bring about the same position three times.7 A special case of this last is the perpetual check. Further, the game is drawn if one player, having a sufficient superiority in force to bring about a win (e.g. Bishop and Knight against a King) cannot bring about the mate in 50 moves (50 by each player), the counting of which has been demanded by his opponent. Indeed, either player can claim a draw if in the course of any 50consecutive moves (50 by each player), the counting of which he has previously demanded, neither a man is taken nor a pawn moved. The count begins again after each capture or each pawn move. Finally, often a game is abandoned as a draw at the suggestion of one of the players who sees that a win for either side is improbable.
CASTLING
Once in each game each player may make a combined movement with the King and one Rook. The object of this movement is to bring the Rook into play and the King into a position of safety. This is “castling”. The two pieces must be on their original squares. Castling is effected by moving the King two squares towards the Rook and then moving the Rook over the King and placing it on the adjacent square in the rank. Castling may be carried out on the King’s or the Queen’s side. Castling on the King’s side is designated by Castles (KR) and on the Queen’s side by Castles (QR). [Castles (KR) is sometimes written as O – O, Castles (QR) as O – O – O.]
In the following position White has castled on the King’s side and Black on the Queen’s (No. 43).
Castling is permissible only under the following conditions:
(1) There must be nothing between the King and the Rook.
(2) Neither of these pieces must previously have moved.
(3) The King must not at the moment be in check nor, in castling, may he pass over or finish up on a square attacked by one of the enemy men.
In this position (No. 44) neither White nor Black may castle.
No. 43
No. 44
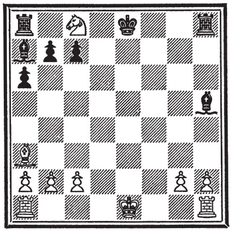
White may not castle on the King’s side since the King would thus move into check from the Bishop at Black’s QR2. He may not castle on the Queen’s side for the King would pass over his Q1 which is attacked by the Bishop at Black’s KR4. Black may not castle on the King’s side for the King would pass over his KB1 which is attacked by the Bishop at White’s QR3. He cannot castle on the Queen’s side since there is a piece between the King and the Queen’s Rook.

A FEW COMMON CHESS TERMS
Sacrifice: The placing of a piece where you know it can be taken because you hope to gain some advantage thereby.
Doubled pawns: Two pawns of the same colour in the same file.
Trebled pawns: Three pawns of the same colour in the same file.
Isolated pawn: We call a pawn “isolated” when there is no pawn of the same colour in either of the adjacent files. In contrast to this, we have, of course:
United pawns: Pawns of the same colour in adjacent files and in contact with each other.
Backward pawn: A pawn which has remained behind the pawns in adjacent files.
Passed pawn: A pawn which on its way to the eighth rank has no opposing pawn in front of it in either the file in which it stands or the adjacent files.
To guard: So to move a man that it can retake an opposing man in the event of the latter making a capture. If the men so captured are of equal value, this process of capture and recapture is called “exchanging”.
Opposition: The position of the Kings when they are the shortest possible distance from one another.
A fork: The attack of a pawn or Knight on two men at once.
Minor pieces: The Bishop and Knight, in contrast to the Queen and Rook. These latter are the Major pieces.
Gambit: The word (from the Italian “Dare il gambetta”—to thrust out a leg) is the name given to an Opening in which a man—generally a pawn—is sacrificed.
Tempo:8 A move in the sense of time, the time value of a move.
Zugzwang: Disagreeable obligation to move—since by so doing the position is weakened.
The Exchange: (see next paragraph).

THE RELATIVE VALUES OF THE MEN
The Queen is worth as much as two Rooks or three minor pieces. The Rook is more valuable than a minor piece. The difference in value we call “the Exchange”. Thus when exchanging one of our minor pieces for a Rook, we are said to win the Exchange. Two minor pieces are more valuable than a Rook.
Knight and Bishop are of the same value. Each is worth roughly 3 pawns.
This table of values is set out only for beginners and not very advanced players. It will be modified later on in the book.

ABBREVIATIONS
K = King (or King’s), Q = Queen (or Queen’s), R = Rook (or Rook’s), B = Bishop (or Bishop’s), Kt = Knight (or Knight’s), P = pawn.
“ – ” signifies “to”, “×” signifies “takes”, “ch” signifies “check” and “e.p.” signifies “en passant”.
O – O is sometimes used for Castles (KR), O – O – O for Castles (QR).
! indicates a good, ? a bad (or inferior) move.

THE NOTATION
The beginner will by now be familiar with the notation employed to describe the moves. There are, however, some points which need mention.
Occasionally, to avoid ambiguity in recording a move, certain additions have to be made. These are best explained by the use of examples. Let us suppose that either of a player’s Rooks can move to his K1 and that his Queen’s Rook does so. If it is clear from the position that it is the Queen’s Rook, the move would be recorded as QR – K1. But now suppose the Rooks are at Q8 and Q2 and either can move to Q4. If it is not clear which is the Queen’s and which the King’s Rook—it probably will not be—then the Rook which moves is indicated by the insertion in brackets after the “R” of the name of the square from which it moved, e.g. R(Q8) – Q4. Similarly, Kt(B4) – Q3, R(KKt7) – QB7, etc. In the same way let us suppose that a White Rook could take either of two pawns standing at White’s K7 and K4. If it takes the first, the move is recorded as R × P(K7); if the second, R × P(K4). The description in brackets, whether of the man moved or the man captured, is always given from the point of view of the player making the move.
On the other hand, the description of a move can sometimes be simplified. Suppose a player has a Knight at his QKt3 and pawns at his QKt2 and KKt2. If he moves the latter to KKt4, it is unnecessary, in recording the move, to specify P – KKt4 since P – QKt4 is impossible. Therefore P – Kt4 is sufficient. Similarly, suppose that either Kt – KKt5 or Kt – QKt5 can be played and the first move gives check. If the second move is made, it is unnecessary to describe it as Kt – QKt5. Kt – Kt5 is sufficient, the absence of the “ch” showing that the move is not to KKt5.9

THE MOST IMPORTANT LAWS OF THE GAME
In the first game between two players the right to move first is decided by lot, afterwards it alternates. The player to move first takes the White men. If a player touches a man, he must, if possible, move it. If a player desires merely to adjust the position of a man, he must first say “J’adoube” (I adjust). If the same position occurs three times in a game, with the same player’s turn to move, he may, but before making a move, claim a draw. Also, if in an end-game a player cannot bring about a mate inside 50 moves (50 by each player), the game is drawn, but his opponent must have demanded the count at the beginning of that end-game (or phase of the end-game). Further, either player has the right to abandon a game as drawn if in the course of any 50 consecutive moves (50 by each player) no man has been taken and no pawn moved. He must, however, have demanded this earlier. If a player makes a move not permitted by the rules of the game or if he touches either an enemy man which cannot be taken or one of his own which cannot be moved, then until recently there was a rule that as a penalty he must move his King (but not castle). If the King could not move, then the touching of the man entailed no penalty. This rule was altered a few years ago—and rightly so. Now the illegal move must be retracted and the man touched must, whenever possible, be moved (if his own) or captured (if his opponent’s). If, however, he can neither move his own man nor capture his opponent’s, there is no penalty—only the illegal move must be retracted. If in a tournament a player whose turn it is to move at the adjournment, in recording the move he intends to make, writes down an illegal, illegible or ambiguous move, then the game is counted as a loss for him.
