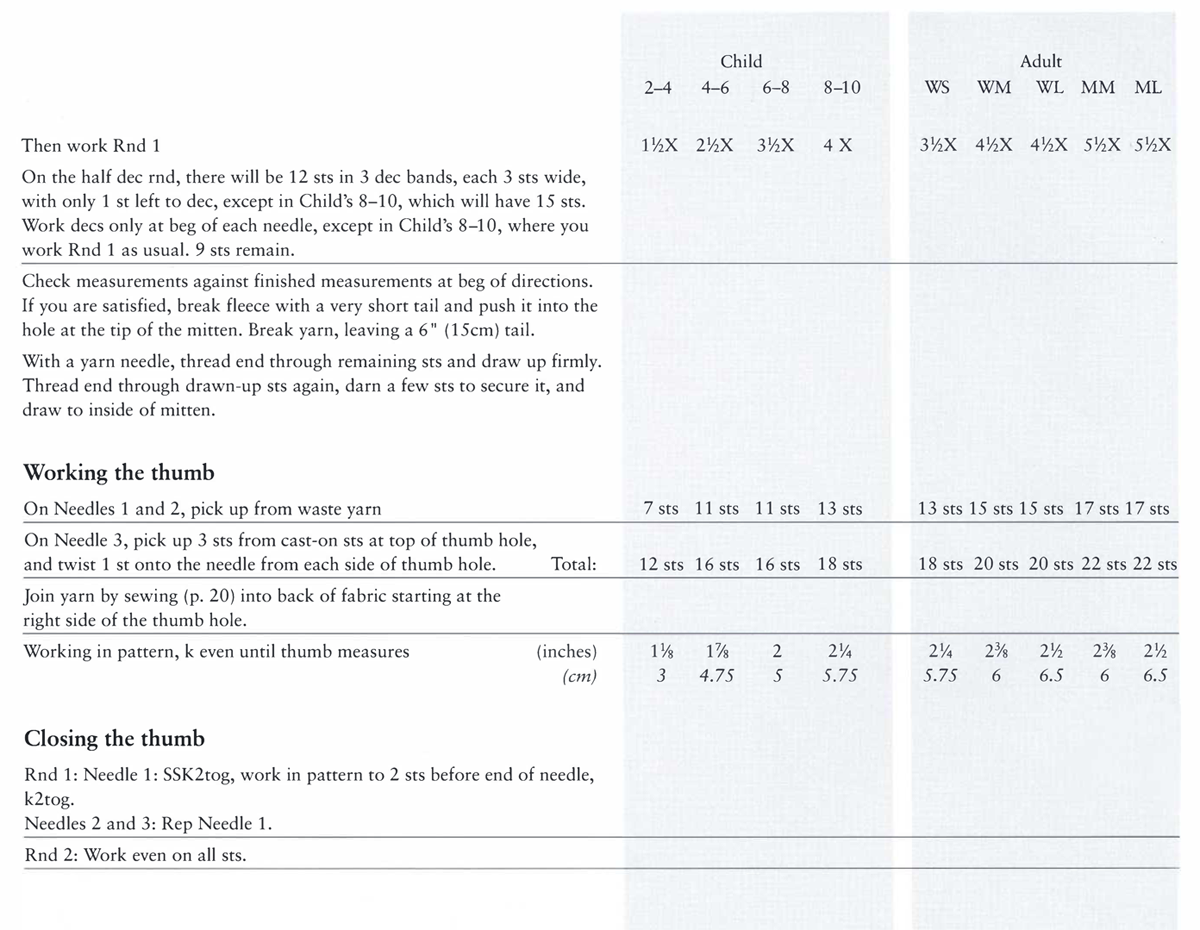
I had spread my mittens under a tree at the Norlands Living History Center Heritage Days Festival to excite interest and conversation and to show off the marvelous warmth and good looks of old-time Maine mittens. But the reception at Norlands—near Livermore, Maine—was different from the reception at other places, where people exclaim at the mittens’ thickness or remember the patterns of their childhoods. In the Norlands area, people still knit traditional mittens, and the response is always, “Oh, I know someone who knits mittens like that.”
At Norlands I met Beulah Moore, who found my collection of mittens incomplete. “Don’t you have any double-rolled mittens?” she asked, after looking them over. Double-rolled mittens? I’d never heard of them.
Double-Rolled Mittens are knit in one color with a narrow roll of unspun fleece carried behind the work, caught up between sts, just as one weaves in long floats of yarn in double-knitting (p. 18). Mrs. Moore showed me how to carry the fleece so that the knitting progresses rapidly, flipping the little bit of fleece over and under the knitting strand with each stitch.
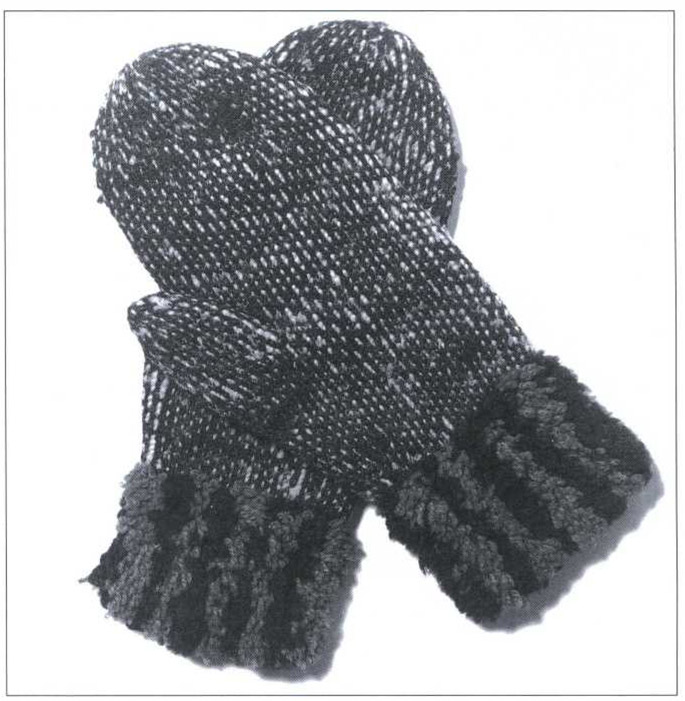
She was unwilling to make me a pair right then, but she did teach me the technique. I was able to play with what she had shown me, so when I saw my first real pair of Double-Rolled Mittens in the Maine State Museum, I knew immediately what they were. With Curator Paul Rivard’s permission, Mrs. Hattie Stover Brown’s mittens are shown here in a black-and-white photo. They were knit in a somewhat finer yarn than I have used, at a tension of seven sts per inch.
I had just decided that this technique was truly extinct when I met Edna Mower of Merrimack, New Hampshire, who told me she still knits double-rolled mittens and socks. “I can’t imagine why it should be extinct,” she told me. “It’s really a simple procedure.”
Mrs. Mower grew up on a farm in Sevogle, New Brunswick, seventeen miles upriver from New Castle, in a large family that combined French, Irish, Scottish, and English traditions. Her father was the ranger for the region. Her mother was a schoolteacher.
Double-Rolled Mittens with shagged cuffs made by Hattie Stover Brown.
COURTESY OF MAINE STATE MUSEUM
“We learned to do everything,” Mrs. Mower remembers. “You learned to milk cows and churn butter and knit and crochet and hoe the garden and clean the barns and everything else.” She grew up making several well-known double-knit patterns that her family taught her, but she learned to make Double-Rolled Mittens from a neighbor.
“I remember learning it very well. I probably was about twelve. I watched an elderly woman in the neighborhood making them. I watched her, and she said, ‘Wouldn’t you like to learn to do these too?’ I said yes. She said, ‘Well, it’s a very simple procedure. I card the rolls myself with a pair of cards, then I pull it out very, very thin, you know, and long.’ And she said, ‘Fine. I’ll give you a handful, a great handful, of the wool you put on the inside, and you try it yourself and see how you do.’
“I knit them for my father first, and he showed them around, and everyone seemed to want them.”
Mrs. Mower soon thought of a way to simplify the process: “I’d watched this woman taking these pieces of wool and pulling them and knitting and stopping every little while to make a dozen or so rolls, and I thought, ‘It’s silly to stop and pull these apart when you can do the same thing with pencil roving.’”
Pencil roving is the carded fiber that forms the plies of machine spun yarns, a long strip of carded but unspun wool that is very thin and light. Some people spin it; others knit it without spinning. Some women who work at Briggs & Little in New Brunswick knit short bits of pencil roving into Newfoundland-style Fleece-Stuffed Mittens (described on p. 54).
Both women who showed me the double-rolled technique have used the over-and-under, weaving-in method that produces something of a thick lattice of unspun wool on the inside of the mitten and reverses the twist of fleece with every stitch. This reversal is visible on the outside as well if you look closely.
On Mrs. Brown’s mittens in the Maine State Museum, however, the twists are all in the same direction, and the lining looks as if each loop between sts were wrapped with a twist of fleece. The twists of fleece lie close, side by side, each fitting neatly against the next and those above and below. To get this effect, you must throw the yarn with your right forefinger as you knit, flipping the fleece over the yarn after every stitch. You cannot use a continuous strand, as it would reverse twist hopelessly around the long end of the yarn; you must use a short bit, as Mrs. Brown must have, as Mrs. Moore said one must, and as Mrs. Mower’s neighbor did.
My private theory is that the one-way twist with short bits of fleece is the ancestor of the other, and that when clever knitting methods—two-handed stranding and Continental left-handed knitting—came into vogue, not many knitters figured out how to adapt the old technique to their new way of knitting, and double-rolled knitting fell into disuse and nearly disappeared. A pity, as the mittens are soft and thick and strong.
When Mrs. Moore first told me about making these mittens, she said to use Size 1 or Size 0 needles, but I (1) disbelieved and (2) decided there were better things to do with my time than knitting mittens on Size 0 needles. I assumed that anything knit on such tiny needles must have a tension of about 11 (or more) sts to the inch, which in this case turned out to be a wrong assumption. In fact, the twist of fleece forces the sts apart slightly, so that one must use tiny needles to get even a fairly loose tension of, say, 6 sts to the inch.
There’s no way to keep the fleece from showing through here and there on the outside, and in fact, this is part of the mitten’s charm. The slightly raggy look is folksy, like gray ragg socks, and tells the world you know a better way of keeping warm.
The shag cuff is a touch hard to pass up. Easy to apply, it looks smashing, as well as old-fashioned in a very nice way, like the fur blankets in the film Doctor Zhivago.
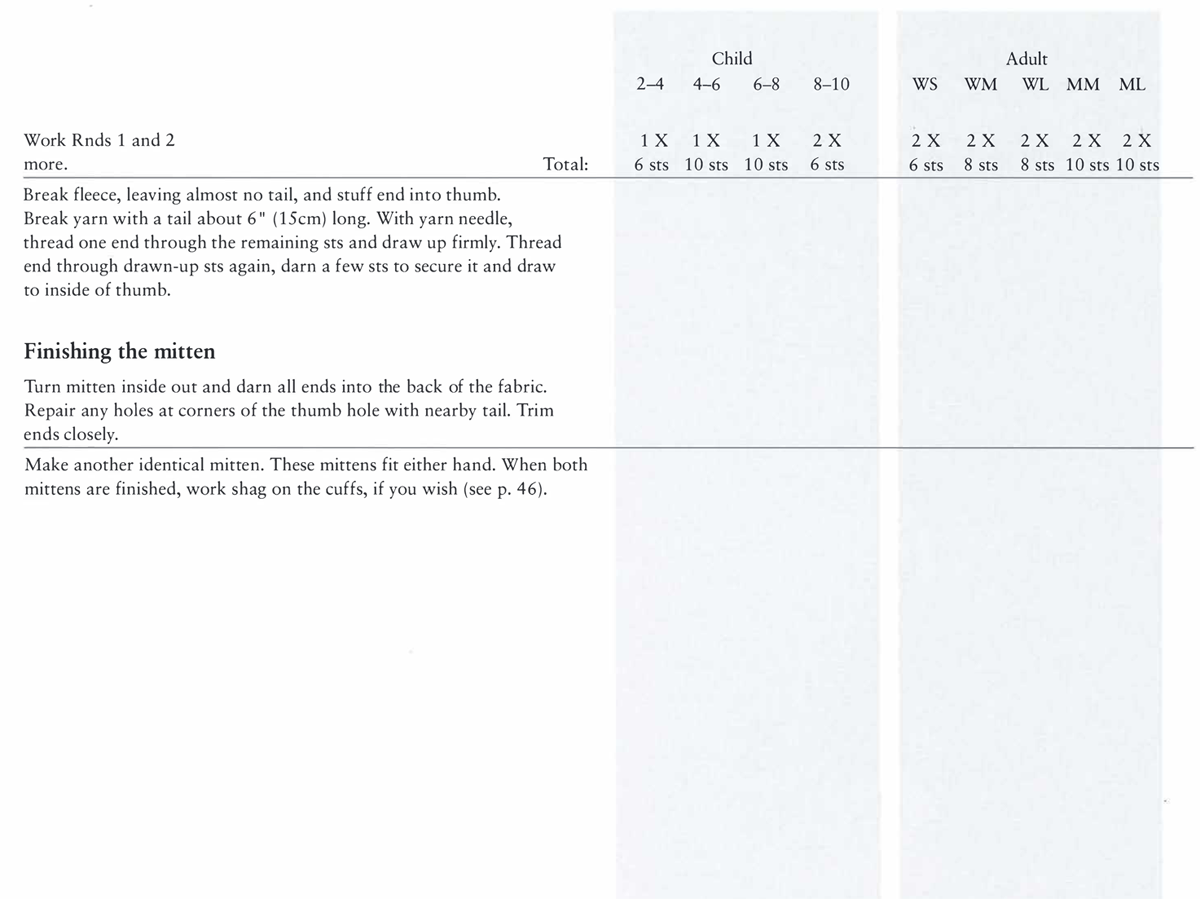
Although Edna Mower knitted double-rolled mittens and socks until shortly before her death, Beulah Moore hadn’t knit a pair in forty-one years when I met her. If you knit a pair, you will be helping to revive a nearly vanished craft, like making Clovis knife blades or writing in hieroglyphs. They are special.
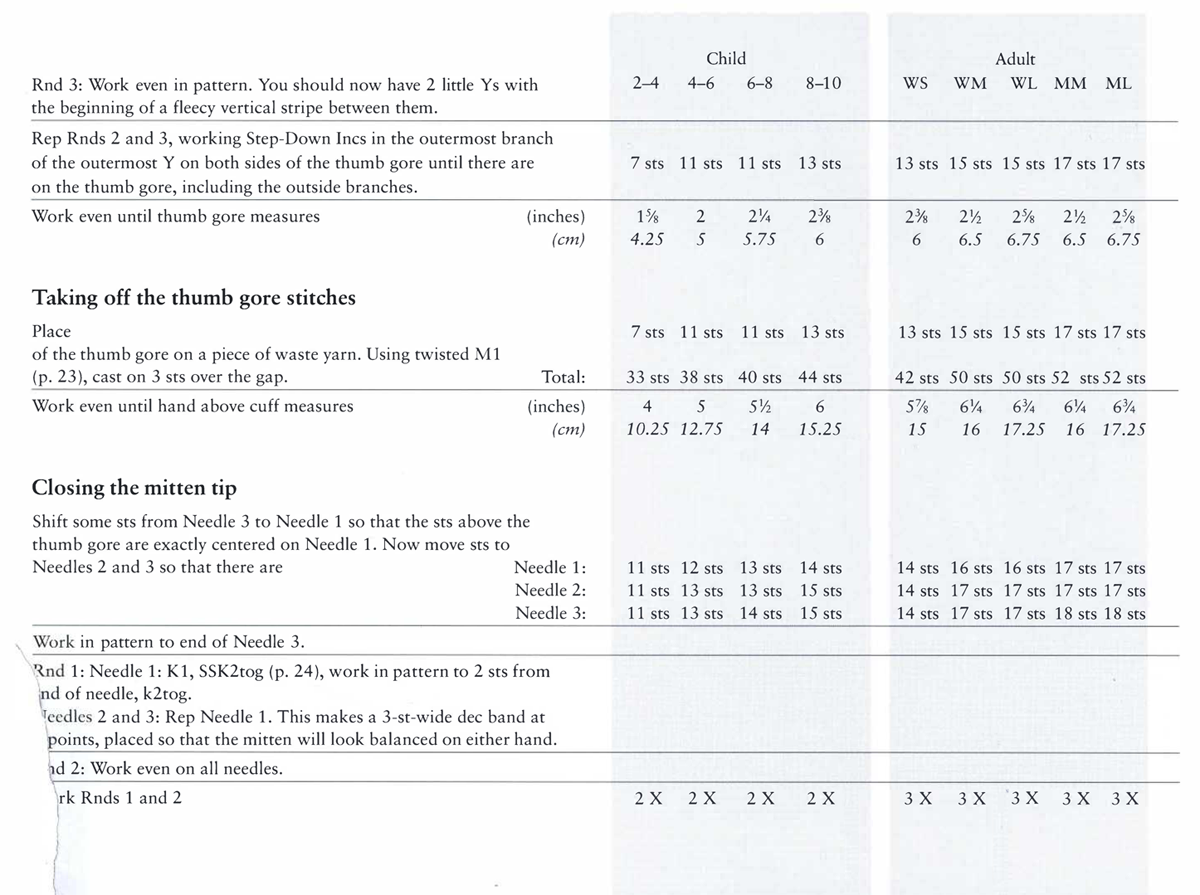
Measurements—inches and centimeters
| Child Sizes | Adult Sizes | ||||||||||||||||
| 2–4 | 4–6 | 6–8 | 8–10 | WS | WM | WL | MM | ML | |||||||||
| Hand length | 4½ | 5½ | 6 | 6½ | 6½ | 7 | 7½ | 7 | 7½ | ||||||||
| 11.5 | 14 | 15.25 | 16.5 | 16.5 | 18 | 19 | 18 | 19 | |||||||||
| Hand circumference, incl. tip of thumb | 6 | 7 | 7¼ | 8 | 7½ | 9 | 9 | 9½ | 9½ | ||||||||
| 15.25 | 18 | 18.5 | 20.25 | 19 | 23 | 23 | 24 | 24 | |||||||||
| Mitten hand length | 4¾ | 6 | 6½ | 7 | 7 | 7½ | 8 | 7½ | 8 | ||||||||
| 12 | 15.25 | 16.5 | 18 | 18 | 19 | 20.25 | 19 | 20.25 | |||||||||
| Mitten thumb (⅓ hand) | 1⅝ | 2 | 2¼ | 2⅜ | 2⅜ | 2½ | 2⅝ | 2½ | 2⅝ | ||||||||
| 4.25 | 5 | 5.75 | 6 | 6 | 6.5 | 6.75 | 6.5 | 6.75 | |||||||||
| Mitten width | 3 | 3½ | 3½ | 3¾ | 4½ | 4¾ | 4¾ | 4¾ | 4¾ | ||||||||
| 7.5 | 9 | 9 | 9.5 | 11.5 | 12 | 12 | 12 | 12 | |||||||||
Knitting yarn. This mitten breaks my rule of using only wool yarns for mittens. Edna Mower knitted her mittens with synthetic yarn, which she felt was easier on the knitting hands than wool and lasted longer without wearing out or shrinking. She “double-rolled”—lined—her mittens with wool, the only fiber that came in contact with the skin. If you want to do this, go for it with my blessing. I use medium or DK weight wool yarns for this pattern.
Fiber for the lining. The lining is the most distinctive part of this mitten. Ideally, it should be wool or another animal fiber, for maximum warmth and water absorption. One can use loose fleece, lengths of split 1-inch roving, or pencil roving for the rolled lining. I confess that for my first double-rolled mitten, I had neither. Instead, I picked apart Bartlettyarns Fisherman’s Bulky, a heavy Lopi-type yarn, and recarded it, so that too is a possibility.
Mrs. Moore recommended loose fleece rather than unspun carded yarn or products like Icelandic Lopi yarn. This is only necessary if you are using the first method, flipping the fleece continually in the same direction around the yarn. As every action has an equal and opposite reaction, after a round of flipping, a long, fragile, unspun wisp of fleece will be thoroughly spun—around the working yarn. By using little bits of loose fleece, no more than 8 ” long, one can flip easier and the end will go along for the ride without ensnaring the working yarn.
To use washed, loose fleece right from the sheep, you will need hand carders, those 4-by-8-inch rectangular tools spinners use that look like giant cat combs. If you don’t know a spinner or a place where you can buy carders, write or call Halcyon Yarn or another spinning tools supplier (see Sources, p. 215). Or, use two cat combs, available in the pet department of your supermarket.
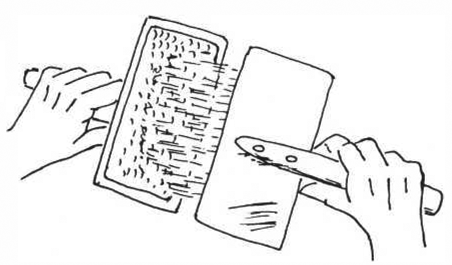
Card a handful of fleece.
Follow the drawings: Card a handful of fleece until the fibers are lined up in the direction of the action. Then pick off a piece about a half inch (1.25cm) wide, pull it out about 8 ” (20cm) long and rub it briefly between your palms to make it long and rounded with the fibers still parallel. Make quite a few of these if you’re taking your knitting with you somewhere. They can be kept safely in a plastic bag and are easier to carry along than the carders.
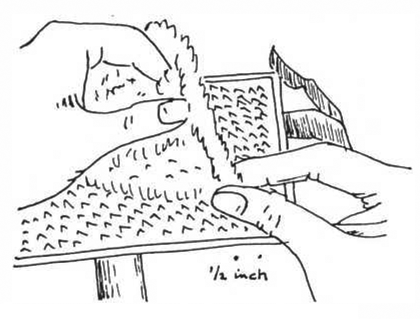
Pick a strip about ½ inch (1 cm) wide off the hand carder.
To use roving instead of fleece. Roving is carded, unspun wool, ready to spin into yarn by machine or by hand. Pencil roving is about the diameter of a pencil, thus the name, and wound into big, flat, 4 oz or 100g wheels, sometimes called “cheeses” because of their shape. It is the raw material of machine-spun yarn and is generally available at spinning mills and sometimes at yarn shops (see Sources, p. 215).
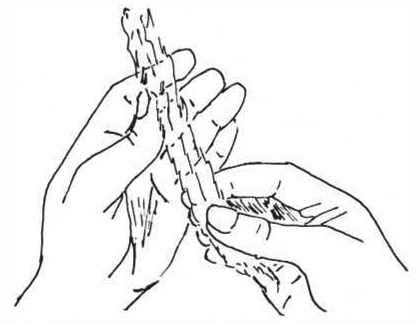
Pull it out smooth, about 8 inches (20cm) long.
Roll it lightly between your hands.
One-inch (2.5cm) roving is wider than pencil roving and comes wound into huge balls for handspinners and felters. It is usually sold by the ounce at fine yarn stores (Sources, p. 215).
Because they are organized by winding, both types of roving are more convenient to deal with than loose fleece. If you blanch at buying 4 ounces or 100 grams of something you need only 20 grams of, consider that you can also use roving to make Stuffed Mittens (p. 54), you can spin it into yarn, or, lacking a spinning wheel, you can knit pairs of pencil ravings without further processing, and split and knit one-inch roving as well.
To prepare one-inch roving, break off a chunk about 3 inches (7.5cm) long. Split it lengthwise into 4 equal parts and stretch each to about 8 inches (20cm) long. Roll each briefly between your palms to make a long, round snake.
To prepare pencil roving. This can be used without further processing, in short lengths for the one-way wrapping method of double-rolled knitting, or in a continuous strand for the over-and-under method.
To line your mittens with other things. When you have gotten the hang of double-rolled knitting, it may occur to you, as it did to me, that you can attach almost anything to the back of your knitting with this technology, from dryer lint and dust balls from under the bed to yarn scraps, string, rabbit fur, milkweed silk, or musk ox wool. They will all show through on the front of your work and look intriguing. Play with it.
Yarn To knit a pair of mittens with medium weight wool yarn, you will need about:
| Child Sizes | Adult Sizes | ||||||||||
| 2–4 | 4–6 | 6–8 | 8–10 | WS | WM | WL | MM | ML | |||
| MC | (oz) | 1½ | 1¾ | 2¼ | 2½ | 3 | 3½ | 3½ | 4 | 4 | |
| (g) | 40 | 50 | 60 | 70 | 80 | 100 | 100 | 110 | 110 | ||
| CC [for shag on cuff] | (oz) | ¼ | ¼ | ¼ | ¼ | ½ | ½ | ½ | ½ | ½ | |
| (g) | 4 | 5 | 6 | 7 | 8 | 10 | 10 | 11 | 11 | ||
| Fleece or roving | (oz) | ½ | ½ | ¾ | ¾ | ¾ | 1 | 1 | 1¼ | 1¼ | |
| (g) | 10 | 12.5 | 15 | 18 | 20 | 25 | 25 | 30 | 30 | ||
Equipment 1 set No. 2 (2.75mm, Can. Size 11) double-pointed needles, or size you need to knit in pattern at correct tension
• 6 ” (15cm) length of contrasting waste yarn • blunt yarn needle
• pencil or ballpoint pen as a spacer for the optional shag
Tension 5½ sts = 1 ” or 2.5cm
ABBREVIATIONS beg: beginning • CC: contrast color • dec(s): decrease(s) • inc(s): increase(s) • k: knit • k2tog: knit 2 together • MI: make I stitch • MIL: make I stitch left • MIR: make I stitch right • MC: main color • p: purl • rep: repeat • rnd(s): round(s) • SSK2tog: slip, slip, knit 2 sts together • st(s): stitch(es) • twisted MI: twisted make I cast-on
The term double-rolled knitting probably comes from the fact that this technique creates a lined mitten that is doubly thick. The “rolled” part refers to the thin rolls of fleece, not to any rolling action of the knitting process itself.
The pattern comprises one st and the space between it and the next st. It’s worked either by (1) flipping a thin, short roll of unspun fleece over the yarn between sts, always in the same direction so that, inside the mitten, the fleece appears to twine around the yarn; or (2) by knitting sts alternately over and under a strand of pencil roving or unspun fleece in every st in every rnd to create a soft lining that looks like a yarn latticework over a fleece background.
Because the fleece shows through as contrasting vertical stripes on the outside of the mitten, the Step-Down Increase (p. 21) is used to emphasize the vertical lines, making the actual stitches branch off from the base of the thumb gore in Ys.
To start each new bit of fleece or roving:
1. Lay the fleece across the yarn, close to the stitch just knitted, holding the long end down with the left index finger.
2. Knit around it, anchoring the fleece.
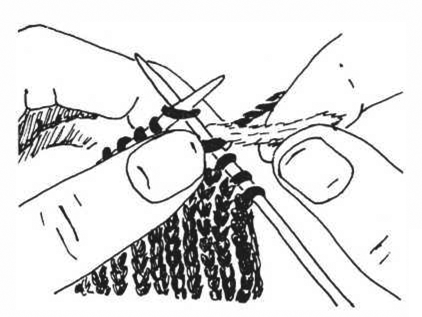
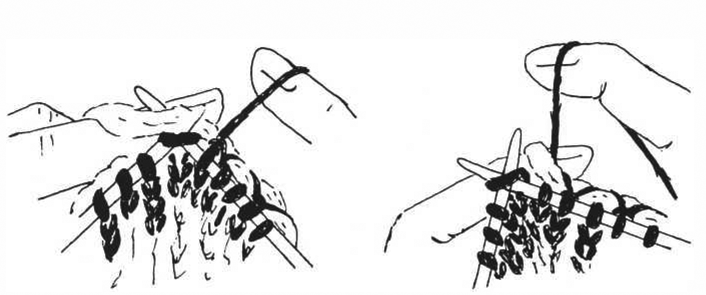
If you knit holding the yarn in your right hand, you’re in luck. This is one of a few knitting techniques developed by right-hand knitters. Study the instructional drawings at right and you should do fine. The result will be the old-style, short-piece double-rolled knitting of Mrs. Brown’s mittens, which twines consistently in the same direction.
1. Flip the long end toward you, under the yarn, then over it and away. Hold it in place behind the work with the left index finger
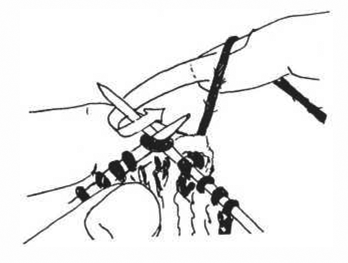
2. Knit around the fleece.
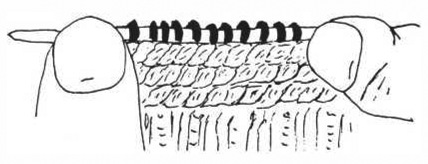
3. Repeated with each stitch, this process produces a lining with this appearance, like the double rolled mittens made by Hattie Stover Brown, which are now at the Maine State Museum.
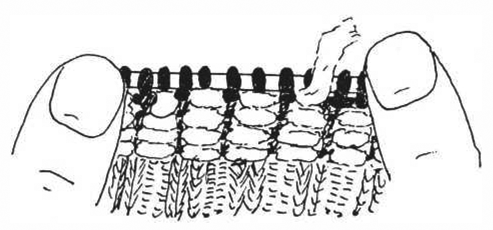
If you would rather knit over and under, using a continuous strand, refer to the drawings on p. 41 instead.
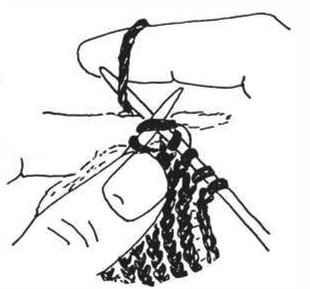
If you knit by picking the yarn off your left index finger, this pattern is possible but not easy. I haven’t found any way to do double-rolled knitting quickly or easily while picking the yarn off my left index finger. Continental knitting seems designed to keep things from getting twisted. You must alternate going over and under the fleece, as shown below. This will not give the same density as Mrs. Brown’s technique, but has the advantage of allowing you to use a continuous strand.
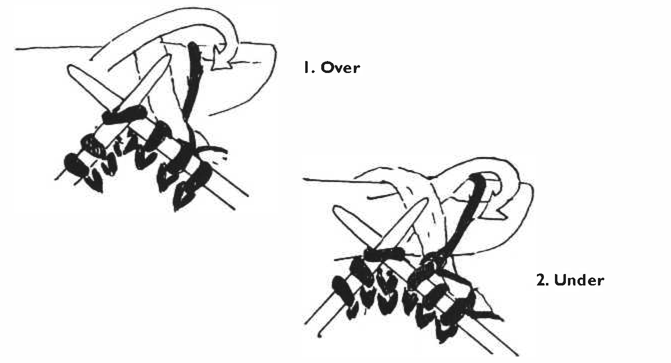
In left-hand (Continental) knitting, hold the yarn on tip of left index finger, the fleece closer to the knuckle. Knit one stitch as usual, and go under the fleece to pick up the next stitch.
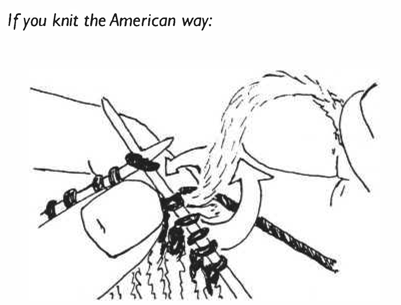
If you knit with both hands, à la Norwegian stranding, you will find the over-and-under method of double-rolled knitting quick and very easy. Follow the drawings at right.
You can use a continuous strand, but you needn’t. You will not get the dense coverage of the first method, but you will still have a very warm, wonderful, lined mitten.
I have watched Edna Mower use the over-and-under technique and, with a quick movement of her left index finger, pinch little bunches or mini-loops of fleece against the fabric with every second stitch, probably on the knit-over-the-fleece step. I have yet to master that, but it thickens the lining considerably.
In stranding, anchor the end as in right-hand knitting, then carry the fleece on your left index finger, just as you would carry a CC strand ahead in color knitting, but never knit it! Carry the working yarn on your right index finger.
Knit one stitch under the fleece by lifting the fleece above one or both needles while knitting with the yarn as usual. Knit the next stitch over the fleece by lowering the fleece under the needle and knitting.
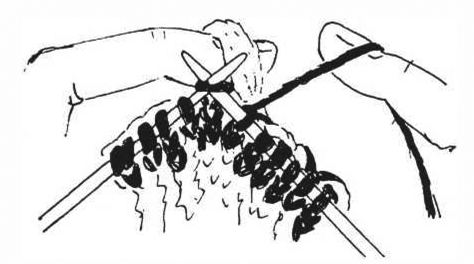
This is the look of over-and-under double-rolled knitting—not as closely covered as the old short-piece double-rolled knitting but still much warmer than ordinary mittens. Both Edna Mower and Beulah Moore used this technique.
Surprisingly, the shagged cuff is worked in ordinary k2, p1 ribbing. After the mitten is completed, the shag is applied to the two loops in the center of the knit ribs. The method is described at the end of the directions.
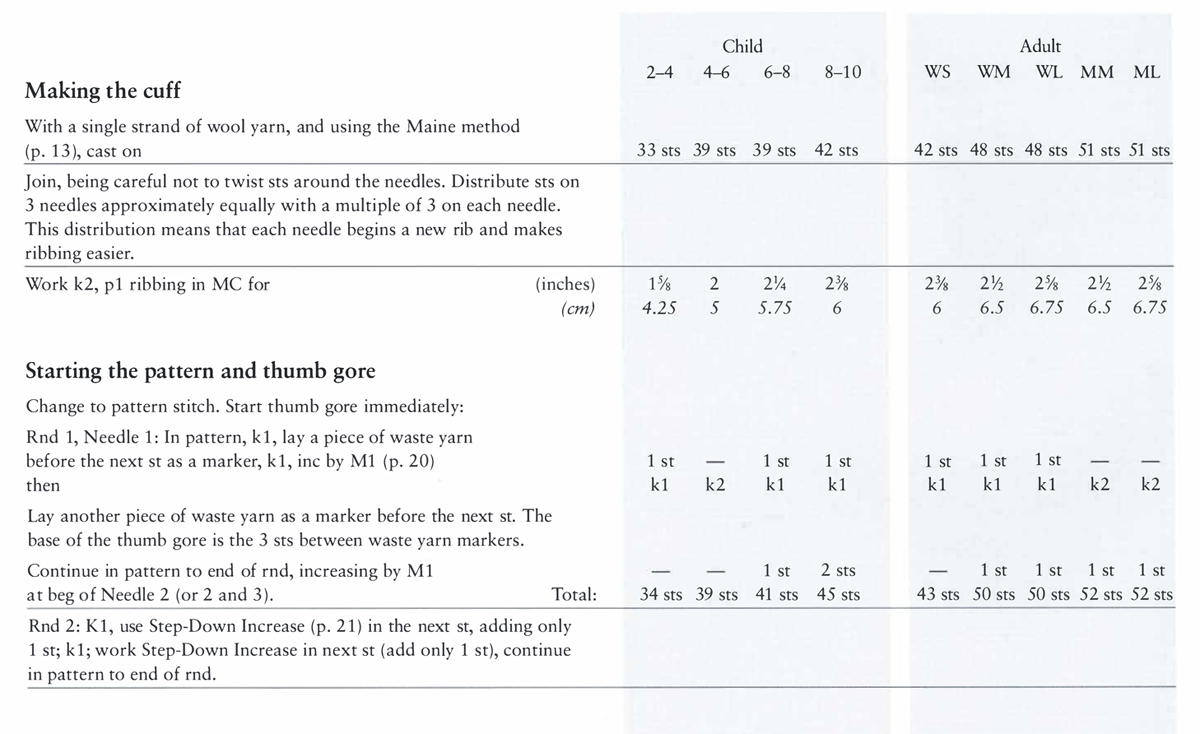
Shag is applied to ordinary knitting by stitching it into the fabric in an overhand stitch around a spacer like a pencil or a knitting needle. The shag I’ve seen has not been knotted or even anchored by anything but the tension of the knitting and the spread of the cut ends of the yarn. It is an act of faith to cut such shag and expect it to stay in place, but neither of the examples I saw at the Maine State Museum had any bare patches, although one had been well used and the other was designed for work in the woods.
Thread a yarn needle with a double strand of medium weight yarn—the same yarn you knitted with is fine. You will stitch along the center of a knit rib, through the two inward facing loops of two knit sts. (If you hold the mitten cuff down, these 2 loops appear as an inverted V in the middle of the rib.) This puts the short, stubby bits of shag in the position of least tension, so they’re not pulled loose by stretching the cuff in ordinary use.
Lay a pencil or ballpoint pen along the rib and stitch over and over around it; going through 2 half-sts, one inverted V, each time. When you reach the base of the hand, stop, and remove the pencil. Don’t clip the shag open until you’ve done all the knit ribs this way: the clipped ends tend to get caught in the working yarn.
Alternate MC and CC from rib to rib or make the bottom half one color and the top half another. If you want vertical stripes to come out even, there must be an even number of ribs. If there is not, start the alternation on the palm and work around. You will have two stripes the same color on the palm side of the wrist—making your folk mitten look even more old-timey. Alternatively, shag both knit sts of one rib only to make an even number of stripes.

Shagging the cuff
When you’re all finished, pull out the pencil for the last time, slip scissors through the lines of loops, and clip them open. They will fluff out to the sides to form a thick fur. Steam the cuff lightly over the nozzle of a boiling teapot or over a pan of boiling water to encourage the ends to fluff apart and fill the entire cuff area, then carefully shear any ends that stick out.