I wanted to bring Maine folk mittens to the Washburn-Norlands Annual Heritage Days, to show them to people, but the person I called there told me it wasn’t necessary. “We have our own kind of mittens up here—and a man who hooks them,” she said.
Wild horses couldn’t have kept me away.
He was in his seventies and sat at a card table, talking across a display of his mittens and a couple of those reels mounted with baby food jars that some people think are a convenient way to store nails or spices.
He was making a mitten, quickly, deftly, using a funny little hook that was sharp and flattened on the end but otherwise resembled a crochet hook. I watched. The mittens on the table were clearly synthetic (“Wool wears out too fast,” he told me later, smiling. “This is warmer than wool.”), but were they thick! and solid!
When he finished that mitten, the second, he opened a little notebook and wrote “257” under “256.” It was his 257th pair that year, he said. It was June.
I asked him to show me how, but he said I needed a cuff first. He himself had a boxful of paired cuffs ready to work on, behind the table. I hurried back to my display to knit a cuff.
Albert Miller comes from central Maine and was for years a schoolteacher in one-room schoolhouses, accustomed to applying discipline firmly where it was needed. He learned to make “hooked” mittens from his mother, who brought the little-known technique with her when she emigrated from Poland. He’d been making them off and on as a hobby for 70 years, and until recently had kept the method a secret. In the last five or six years, however, he changed his mind and decided it would be better to teach people the technique—which he thought his mother had invented—in hopes that it would be carried on.
Albert had a set of instructions printed up and began making more hooks. He had more cuffs knitted by neighbor women. “You can’t do this with a crochet hook,” his son Lowell told me, and he’s right. I’ve tried.
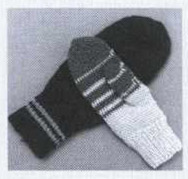
Mitten hooked on a dowel by Albert Miller (back). Hooked mitten in two colors made by the author (front).
At one workshop at the Livermore Falls Senior Citizens Center, he expected two or three people to show up. No fewer than 63 men and women came to learn to make Albert’s wonderful mittens, and Albert managed to teach them all. One man completed his first mitten before he left that evening.
For years, one could get a set of instructions and a handmade hook by sending him a dollar-fifty. “I have to charge that,” he explained, “because it takes time to make them.”
Albert Miller died in the winter of 1984–85, but Lowell, who can also hook mittens, though he is less busy at it, gave me permission to share the technique in this book. “He would have wanted it that way,” Lowell assured me.
Yarn Albert’s mittens were worked in a sturdy, medium weight acrylic yarn, called “Knitting Worsted, 100% Virgin Acrylic,” on the package. He vowed that wool neither held up as well nor was as warm. Although I don’t agree with him about the warmth, there are many people in central Maine who wouldn’t use anything but synthetic yarn for these mittens. It’s up to you. I use Bartlettyarns Homespun, a medium weight wool yarn tending to heavy—about half again as thick as Albert’s acrylic, but loftier.
| For a pair you will need, MC | (oz) | 3 | 4 | 4 | 5 | 5 |
| (g) | 85.5 | 114 | 114 | 142.5 | 142.5 |
| CC (for cuffs) | (oz) | ½ | ¾ | ¾ | 1 | 1 |
| (g) | 14.25 | 21.5 | 21.5 | 28.5 | 28.5 |
Equipment The dowel hook (see below) • 1 set Size 4 (3.5mm, Can. Size 9) double-pointed needles, or size you need to work k1, p1 ribbing at correct tension • blunt-tipped yarn needle • 1 medium size safety pin and 1 smaller (but not tiny) safety pin
Tension 6.5 sts = 1” or 2.5cm in k1, p1 ribbing 6 sts = 1” or 2.5 cm in slip-st crochet worked through the front of the st only
ABBREVIATIONS beg: beginning • CC: contrast color • dec(s): decrease(s) • inc(s): increase(s) • k: knit • k2tog: knit 2 together • MI: make 1 stitch • MIL: make 1 stitch left • MIR: make 1 stitch right • MC: main color • p: purl • rep: repeat • rnd(s): round(s) • SSK2tog: slip, slip, knit 2 sts together • st(s): stitch(es) • twisted MI: twisted make 1 cast-on
Measurements—inches and centimeters
| Child | Adult | ||||||
| 8–10 | WM | WL | MM | ML | |||
| Hand length | (inches) | 6½ | 7 | 7½ | 7 | 7½ | |
| (cm) | 16.5 | 18 | 19 | 18 | 19 | ||
| Hand circumference, incl. tip of thumb | (inches) | 8 | 9 | 9 | 9½ | 9½ | |
| (cm) | 20 | 23 | 23 | 24 | 24 | ||
| Mitten hand length | (inches) | 7 | 7½ | 8 | 7½ | 8 | |
| (cm) | 18 | 19 | 20 | 19 | 20 | ||
| Length of mitten thumb | (inches) | 2⅜ | 2½ | 2⅝ | 2½ | 2⅝ | |
| (cm) | 6 | 6.25 | 6.75 | 6.5 | 6.75 | ||
| Mitten width | 4 | 4½ | 4½ | 4¾ | 4¾ | ||
| 10.25 | 11.5 | 11.5 | 12 | 12 | |||
The sizes of Albert’s mittens were less precise than those for the other mittens in this book. Roughly they were Small (about child size 8–10), Medium (woman’s medium), and Large (about man’s large). I have finessed them a little to bring them into line with the sizing in this book.
The hook has been the problem with these mittens. Albert is gone, and two wooden knitting needle companies who offered to make the hooks have also expired. If you are interested in making these superior mittens, you will need the correct tool. As these hooks are no longer available (anywhere, apparently), put a dollar-fifty’s worth of time in and make one yourself—or get someone else to make one for you.
Albert’s hooks are made from birch dowels, ¼”, ⁵/₁₆”, or ⅜”, in diameter (6, 8, or 9.5mm), cut in 5½” (14cm) lengths. This is filed or sanded to a 1¼” -long (3.25cm-long) flat taper on one end, with the taper on both sides. The point is sharp and very flat compared to a crochet hook (see top and side views in lower half of diagram below).
I found an alternative hook in Ingebjørg Gravjord’s work on Norwegian mittens, Votten i norsk tradisjon. She gives bone or metal as the material of choice for the hook, including the handle of an old silver spoon. Because these materials are already quite flat, she makes no note of the need for flatness, but emphasizes the shape: the old Norwegian hooks are all long triangles, rounded at the back end and tapering to a narrow hook (top version in diagram below). The taper is to force the stitch apart horizontally, loosening up the very tight mesh slightly. The flatness and the tinyness of the hook itself makes it possible to wiggle into a very tight spot—the front loop of a firm slip stitch. The Swedish name for this technique is “pota,” or “to poke,” which is what you will be doing.
Poking Hooks
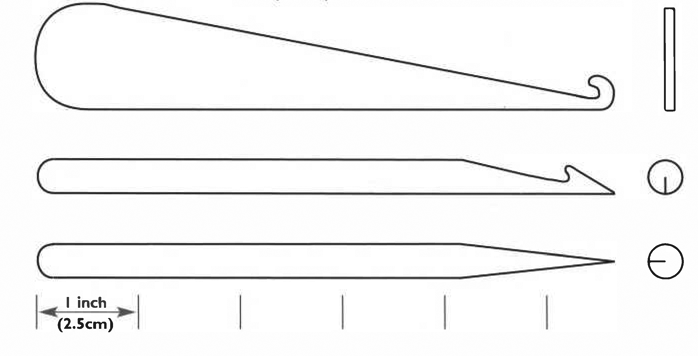
Two styles of hook. Top: Made from flat piece of wood, bone, or metal, Bottom: Made from a dowel.
Experiment with different crochet hooks to get an idea of the size you need before you start cutting up your grandmother’s silver spoons. A tongue-depressor-sized piece of hardwood from the hobby store might substitute for bone or metal anyhow.
I find that making Albert’s hooks is pleasant and goes quickly. If making your own hook seems too daunting, I will make you one. Ten dollars will cover shipping and my costs. (I’m not as dedicated as Albert.) Write me c/o this publisher, and be sure to tell me the size dowel you want—diameter ¼”, ⁵/₆”, or ⅜”.
Make your own dowel hook. You will have a tool you will like a great deal because you made it yourself. Or, you may establish a new relationship with the person who agrees to do this for you. Study the drawing at left as you carve and abrade the material into shape.
To make one of Albert Miller’s dowel hooks, you will need:
a dowel, diameter ¼”, ⁵/₆”, or ⅜” (6, 8, or 9.5mm)
¼ sheet coarse sandpaper
¼ sheet medium grit sandpaper
¼ sheet fine grit sandpaper
sharp knife
medium-cut half-round wood file
ruler
pinch of solid wax (beeswax, Johnson’s or Butcher’s floor wax, or other)
I have found that sandpaper on a flat surface is the most easily controlled abrading tool for flat planes on small objects. If you are good at whittling or prefer to use a file, don’t let me deter you.
1. Don’t cut the dowel until you have a satisfactory tip. Place coarse sandpaper on a work surface and rub one side of the tip at an angle comparable to the point of a sharpened pencil until the wood is removed up to the center of the dowel. Repeat on the opposite side, so that you have a fine, squared edge at the end of the dowel. Smooth with medium grit sandpaper.
2. Turn the dowel exactly 90 degrees and rub one of the edges at a slightly wider angle (about 45°) until you get a sharp point at the far edge of the dowel. Smooth with medium-grade sandpaper.
3. Now the cutting part: Lay the dowel with the last angle cut up. About ⅜” (9.6mm) from the point, use your well-sharpened knife to cut down toward the table, angling your cut just slightly toward the pointed end. (This is meant to be a hook.) Cut no more than halfway through the remaining wood.
4. Carefully and controlledly, cut or shave from the top of the 45° taper toward the cut, stopping in the nick of time at your cut. Cut only as deep as the bottom of the cut in Step 3. Use medium-grade sandpaper or a wood file to trim and slightly round the inside of the hook.
5. Saw or cut the dowel 5½” (14cm) from the point. Round the back end with coarse sandpaper or a wood file.
6. Smooth the entire surface with fine sandpaper, rounding sharp points just a little. Rub with a dab of wax. Nice, eh?
If you destroy the hook or the handle at any point, cut off the damaged part and start over. You should have plenty of length to work with.
(You can also use the sandpaper method to make your own knitting needles from dowels. Check the diameters on a knitting needle gauge. Wooden needles are ideal for teaching small children to knit.)
Called Special Hooked Mittens by Albert Miller, these are known in rural Sweden as potad (poked) mittens, referring to the technique by which they are made. Everyone everywhere who makes them objects to their being called “crocheted mittens.” This may be because they are much denser than most crocheted fabric, which one expects to be full of little holes. These mittens have no little holes anywhere and, done in steel wool, could probably repel machine gun bullets.
The mittens are worked in a crocheted (yes) slip-stitch through the front loop of each st in the preceding rnd. To make the work easy (or even possible), you must have the kind of sharp, flattened, and tapered needle that Albert Miller’s mother used, and you must push the needle deeply into each new loop as it is formed. This push regulates the tension and makes a loop the needle can get into in the next rnd.
Because you work continually in the front loop of the sts, the fabric has an enormous penchant to curl outward, which you prevent by continuing doggedly upward, decreasing, and finally fastening the whole thing together at the tip. You will find that the finished mitten still wants to curl outward, and may have strange bends and leanings in the fabric. Forcing the fabric to vertical makes the mitten very dense, as rnd after rnd of the back side is pushed tight against the preceding rnd and the rnd above it.
To increase, slip st twice into the same loop of the preceding rnd.
To decrease, poke the needle through two sts from the preceding rnd, make a slip st, pulling it to the usual tension.
Design possibilities: Alternating colors in one- to three-rnd stripes creates an interesting effect. A textured design, even a motif, can be created by hooking into the back of single sts every second rnd or by hooking into the back of single rnds. This leaves the front loop on the outside surface. Both techniques are used in European potning.
The cuff is knitted on four needles in ordinary ribbing, then bound off. Albert had friends knit cuffs for him, as he was not interested in knitting.
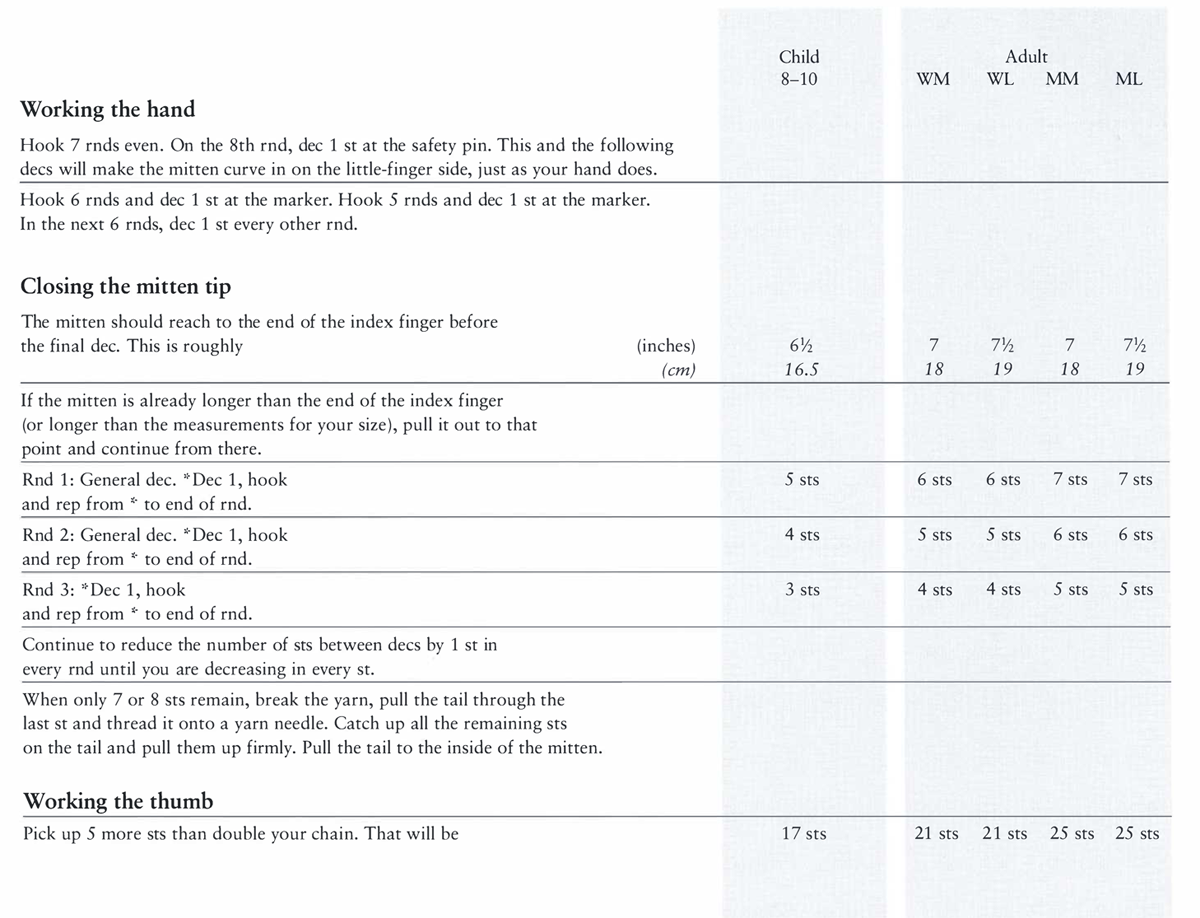
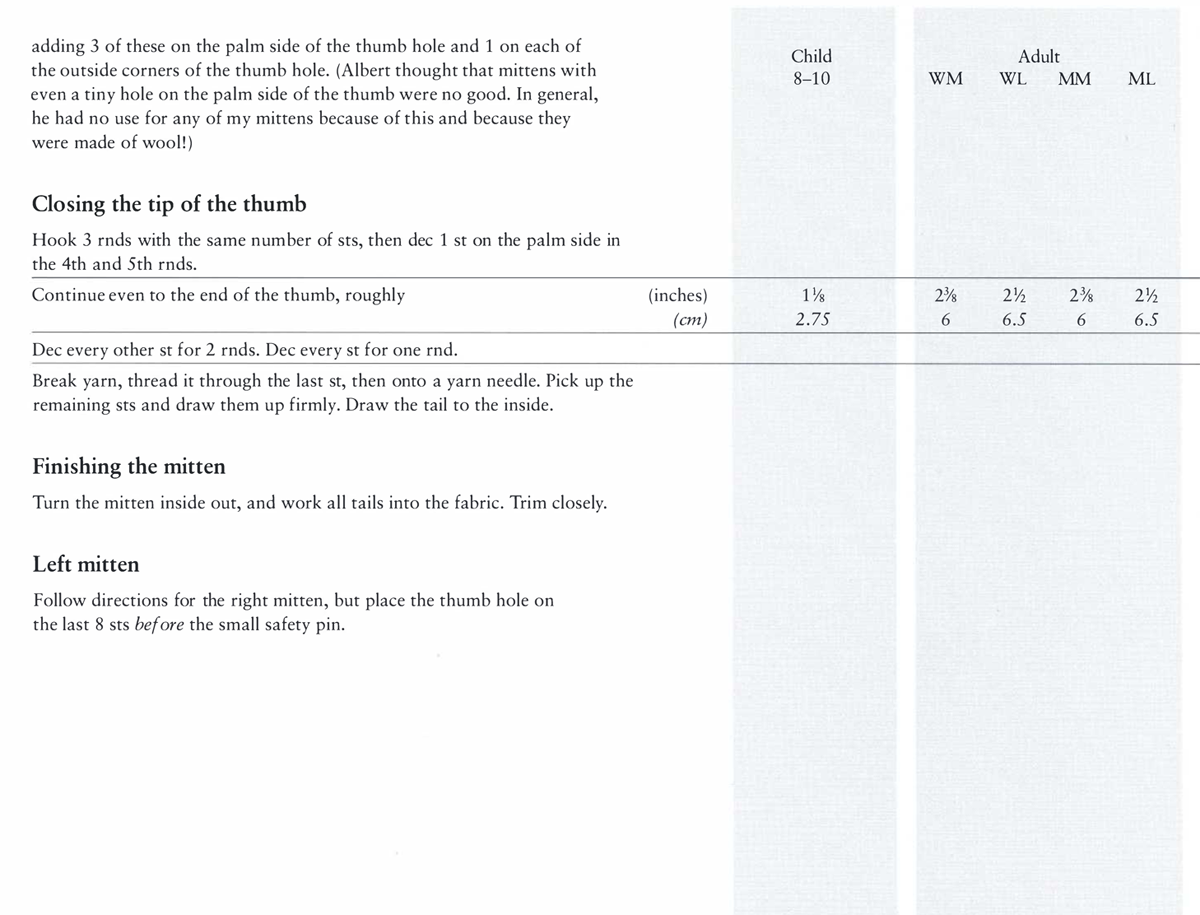
Last aside: Albert Miller demonstrated his method of making mittens to many groups in his last years and sold hooks he made of birch dowels with a typewritten set of directions. These directions are reproduced here with only such additions as he made when teaching in person. I’ve added directions for a basic ribbed cuff; Albert’s directions commence with the hand.