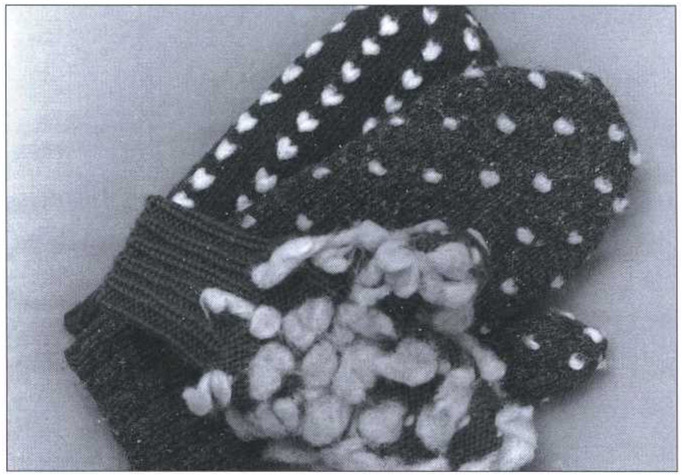
Fleece-Stuffed Mittens, also called thrummed (or drummed) mittens, come from Labrador and northern Newfoundland, but they belong to the same tradition as Maine Fishermen’s Wet Mittens. They are often knit large and shrunk to size, and they appear to be made according to the same set of directions, except that twists of unspun fleece are knit into the fabric every few stitches every few rounds in a distinct pattern. The ends of the bits of fleece, fluffing to the inside, are thick and woolly and mat into an almost continuous lining with wear, imitating the lining formed by fur on the inside of skin mittens.
They are beautiful mittens. Like Fishermen’s Wet Mittens, they are knit of oily natural yarn, often in natural sheep’s colors. In dark brown and white fleece, they seem to show large flakes of snow falling softly against the night.
The pattern is no newcomer in Canada. Hazel McNeill, of Belleville, Ontario, wrote me that her mother and grandmother knit these mittens for their men, who used them both as a general outdoor mitten for dogsled travel and as a wet mitten for hauling nets in winter. She dates the pattern tentatively to the early 1800s.
In the areas where these mittens are used, icebergs float in the sea in August, and fishermen use a light wet mitten through the summer. Stuffed mittens are a logical extension of the wet-mitten concept.
The word thrummed, or drummed, refers to the warp ends left over on the loom after a piece of weaving is completed—thrums. (Newfoundland dialect often pronounces th as d.) These may have once been knitted into mittens and hats as additional insulation. Them Days, an interview magazine about Labrador’s past, speaks of stuffed or “thrummed mitts” as children’s mittens.
In North America today, only fleece or ravings are used in these mittens. In Sweden they are stuffed with short loops of heavy yarn, wrapped around the finger and locked around the stitch (100 Landskapsvottar, Stockholm, 1 982). They’re called “mittens with batting” in Sweden, indicating that they too were once stuffed with fleece.

Two kinds of Fleece-stuffed Mittens
Fleece-Stuffed Mittens have only a tenuous place in Maine folk knitting. In 1980, I had heard of only one Maine woman who knitted them. I had never met her or learned her name, and she was unwilling to discuss the mittens with my informant (Pat Zamore, in Brunswick), other than to say that they had come down in her family. She did, however, make me a pair, and they are the basis of this pattern.
Since I first learned of stuffed mittens, I’ve found that northern knitters seem to like them and like to knit them. Sheep farmers appreciate them as a use for unspun fleece—always in excess on sheep farms. And everyone seems to have a way to make them better. These directions pass on techniques I learned from Judith McGrath in Happy Valley, Labrador, and are the original directions presented in Fox & Geese & Fences (Down East Books, 1983).
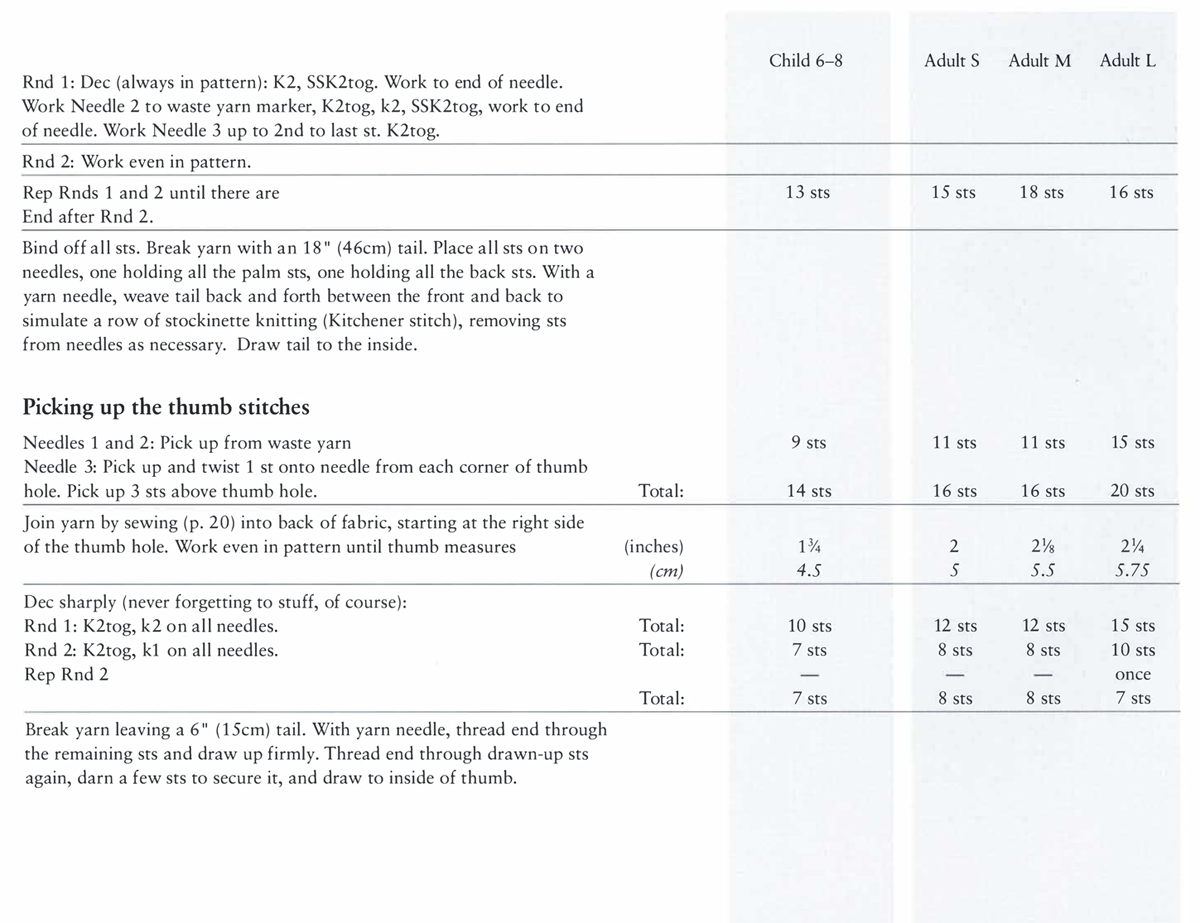
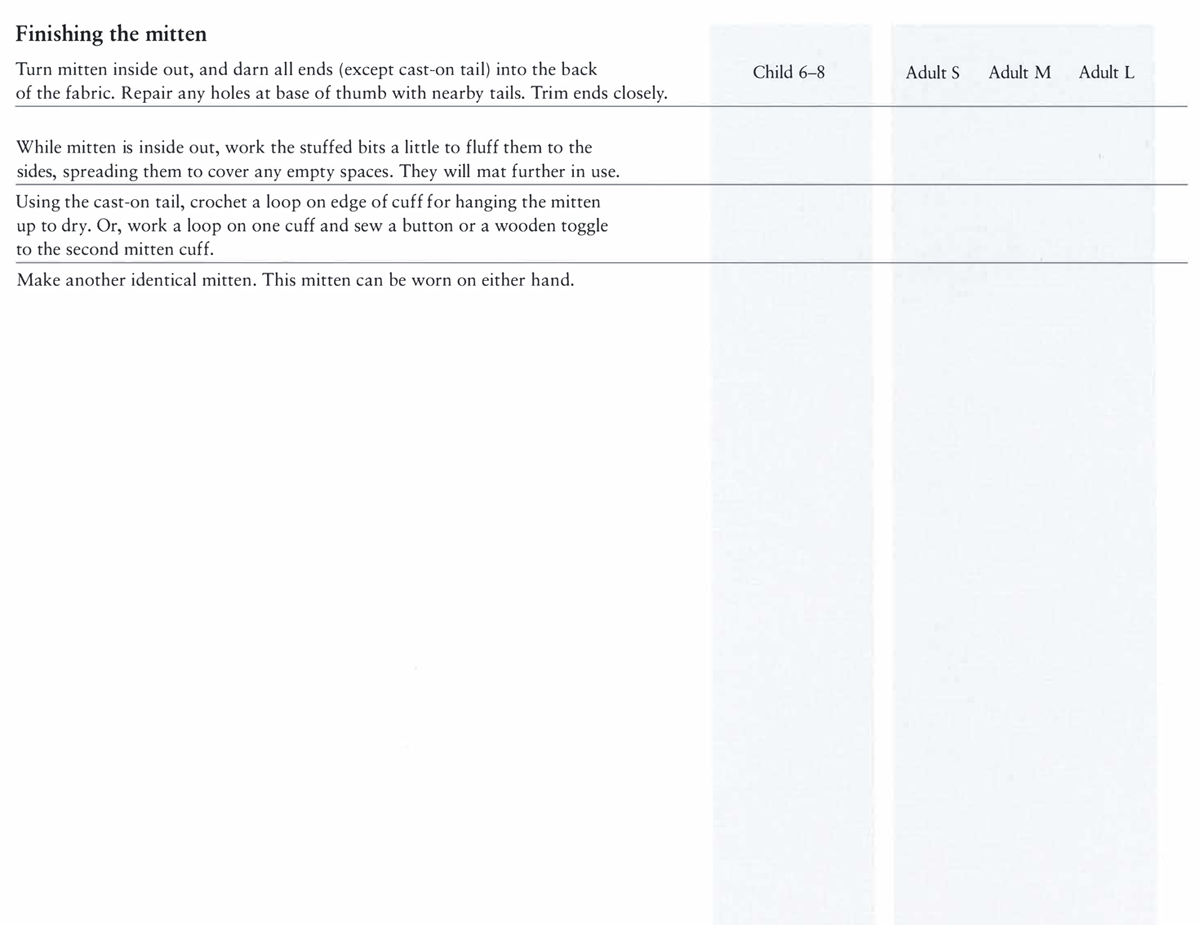
Like other mittens in this book, Fleece-Stuffed Mittens call for techniques you may find nowhere else in the world. Read all the directions carefully and study the pictures. Stuffed mittens aren’t hard to knit once you’ve made the first pair—a little tedious, perhaps, but not difficult.
Yarn Bartlettyarns 2-ply Fisherman Yarn or other medium weight natural wool yarn • loose fleece, pencil ravings, or 1-inch ravings
For a pair, you will need yarn,
| (oz) | 3 | 4 | 5 | 6 |
| (g) | 85.75 | 114 | 142.5 | 171 |
stuffing, about
| (oz) | ½ | ¾ | 1 | 1¼ |
| (g) | 14.3 | 21.5 | 29 | 36 |
Equipment 1 set Size 5 (3.75mm, Can. Size 9) double-pointed needles, or size you need to knit stockinette at the correct tension • 1 set Size 3 (3.25mm, Can. Size 10) double-pointed needles for ribbed cuff • 6" (15cm) length of contrasting waste yarn • Blunt-tipped yarn needle
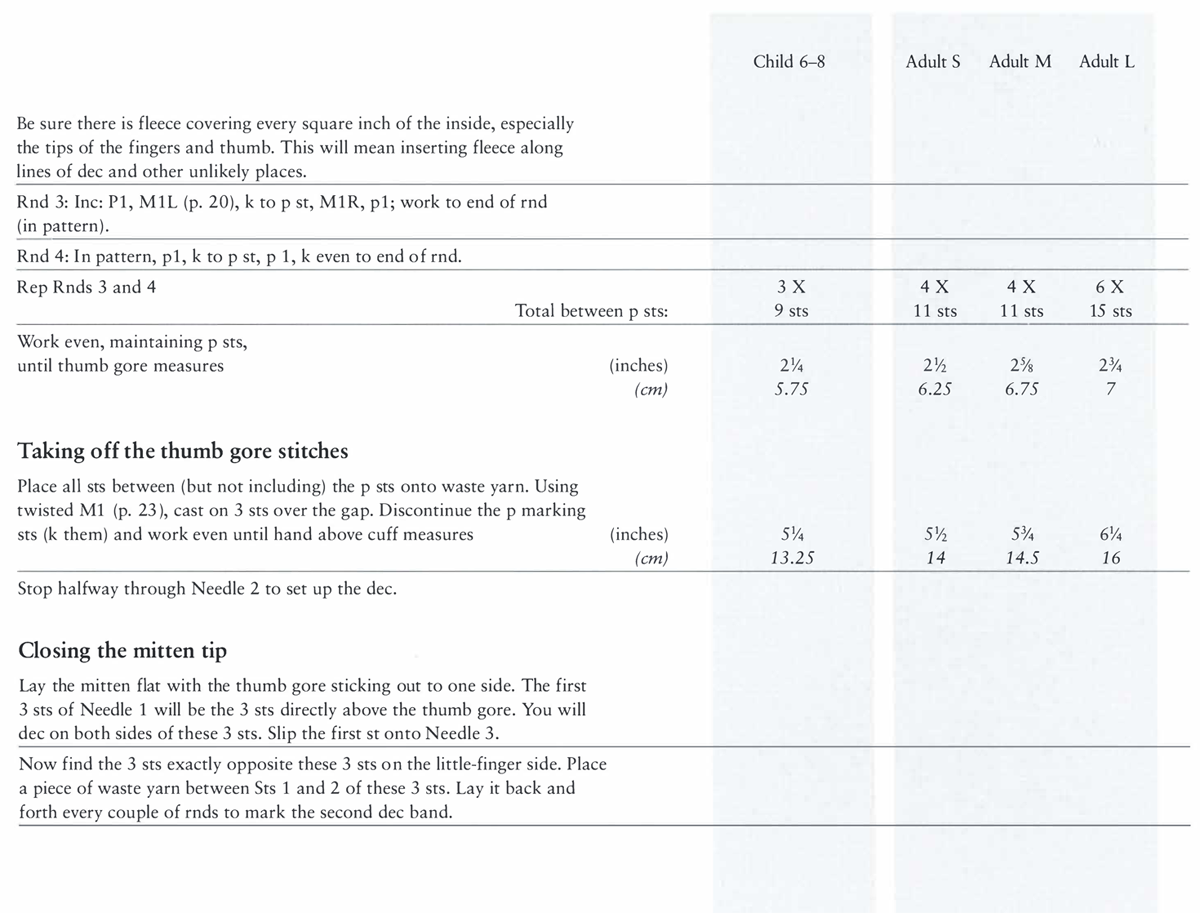
Tension 4½ sts = 1" (2.5cm) measured across rnd with fleece
ABBREVIATIONS beg: beginning • CC: contrast color • dec(s): decrease (s) • inc(s): increase (s) • k: knit • k2tog: knit 2 together • MI: make I stitch • MIL: make I stitch left • MIR: make I stitch right • MC: main color • p: purl • rep: repeat • rnd(s): round(s) • SSK2tog: slip, slip, knit 2 sts together • st(s): stitch(es) • twisted MI: twisted make I east-on
Measurements—inches and centimeters
| Child 6–8 | Adult S | Adult M | Adult L | ||
| Hand length | 6 | 6½ | 7 | 7½ | |
| 15.25 | 16.5 | 18 | 19 | ||
| Hand circumference, incl. tip of thumb | 7 | 8 | 9 | 10 | |
| 18 | 20.25 | 23 | 25.5 | ||
| Mitten hand length* | 6¾ | 7¼ | 7¾ | 8¼ | |
| 17.25 | 18.5 | 19.75 | 21 | ||
| Mitten thumb (⅓, hand) | 2¼ | 2½ | 2⅝ | 2¾ | |
| 5.75 | 6.5 | 6.75 | 7 | ||
| Mitten width* | 3¾ | 4½ | 4½ | 5¼ | |
| 9.5 | 10.75 | 11.5 | 13.25 | ||
*These measurements allow an additional quarter inch (6mm) in length and an additional half-inch (1.3cm) in circumference to accommodate the stuffing.
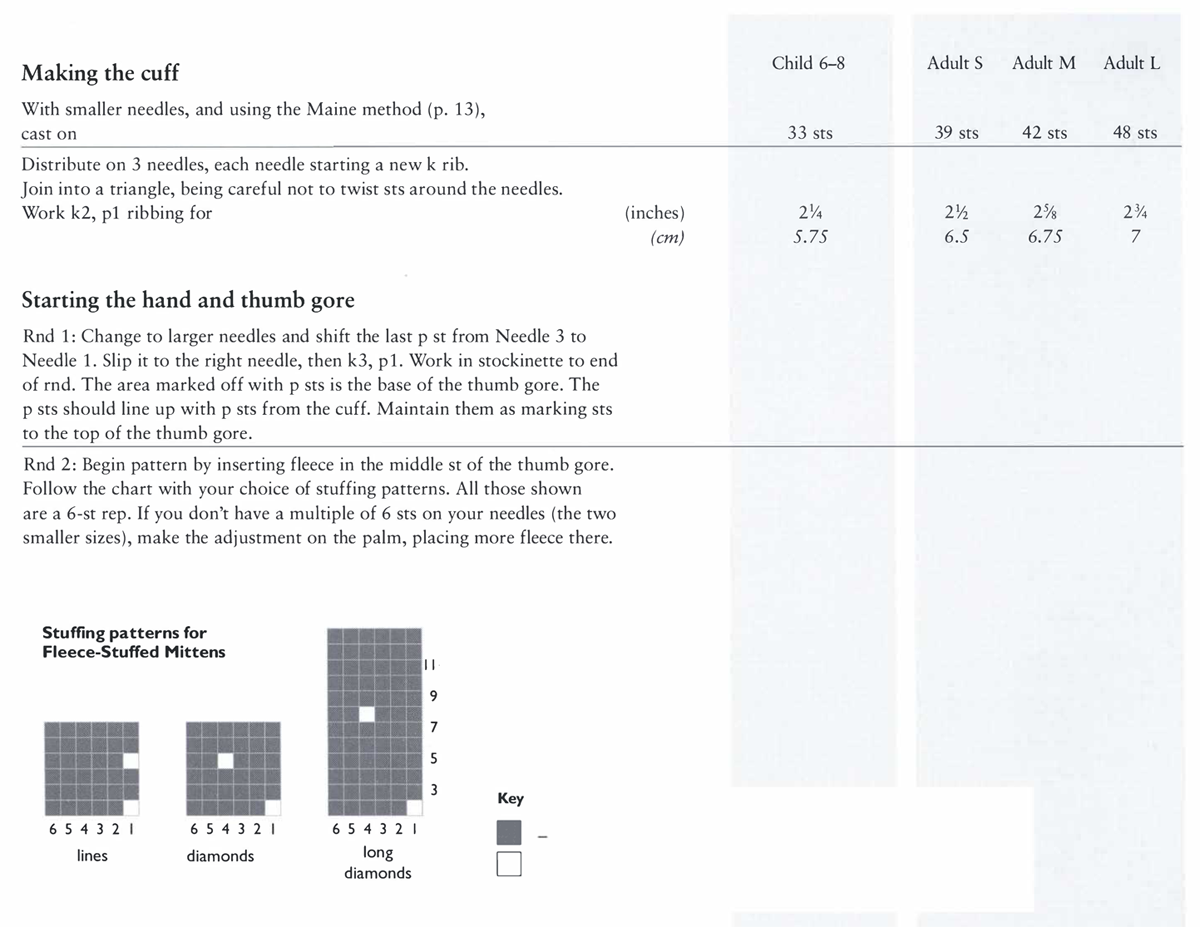
A folded bit of fleece is knit into the fabric along with the yarn in a regular pattern. Fleece sts can be arranged to form vertical lines (on the left in the photograph opposite) or short or long diamonds (on right in photograph). The Long Diamonds pattern was taken from a mitten knitted by an unidentified knitter in Kennebunk, Maine, which has a warmer climate than Newfoundland, where a closer stuffing pattern is used.
Note: When stuffing mittens for children, particularly when stuffing the thumb, be careful not to make the stuffing so big that there is no room inside for the child’s hand. After the mitten is completed, force your fingers into the mitten and the thumb and mash down the fleece to make room for the child’s hand. Warmth, not gangrene, is the goal.
To prepare the bits of stuffing from 1-inch roving, follow the photo sequence at right.
To work with sheep’s fleece, which can be used “in the grease” (unwashed) or washed, card a small handful and lift half-inchwide (1.25cm) lengthwise strips off the carder. Fluff, roll, and fold, as in the photo sequence.
To prepare pencil roving, cut 3" (7.5cm) lengths. Use in pairs, with the ends loose.
Make enough bits of stuffing for at least one rnd—6 to 8, depending on the size mitten you’re making—and store them in a plastic sandwich bag to keep them neat if you’re taking them with you somewhere.
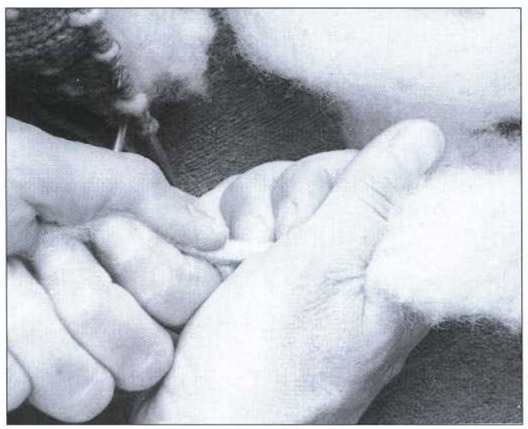
I. Pull off a 5-inch (12.75cm) length of 1-inch (2.5cm) roving.
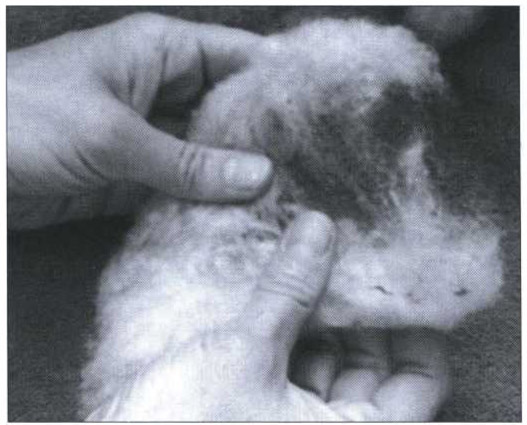
2. Split this in half lengthwise, then split the halves in half.
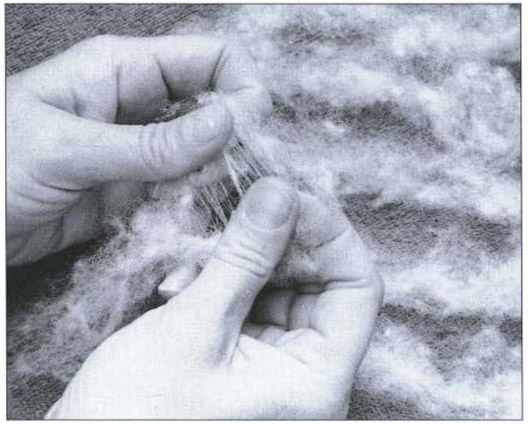
3. Finally, split the quarters in half lengthwise, ending with 8 very wispy 5- to 6-inch (12.75 to 15.25cm)-long pieces.
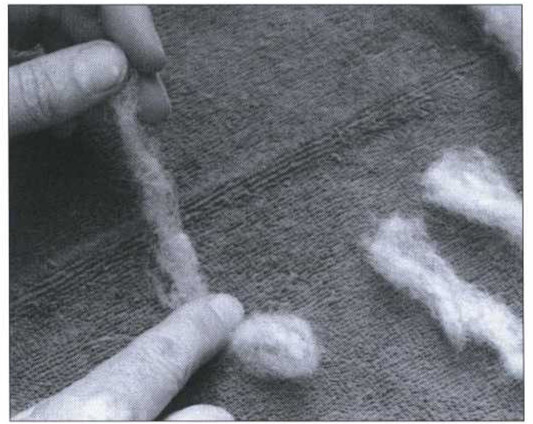
4. Roll each piece slightly between the palms, then fold the ends over the center. Give each piece a little twist in the middle.
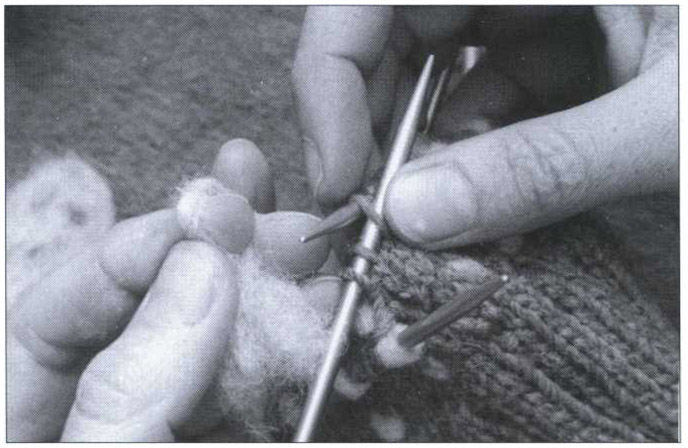
Wrap twisted bit of fleece over index finger with ends down.
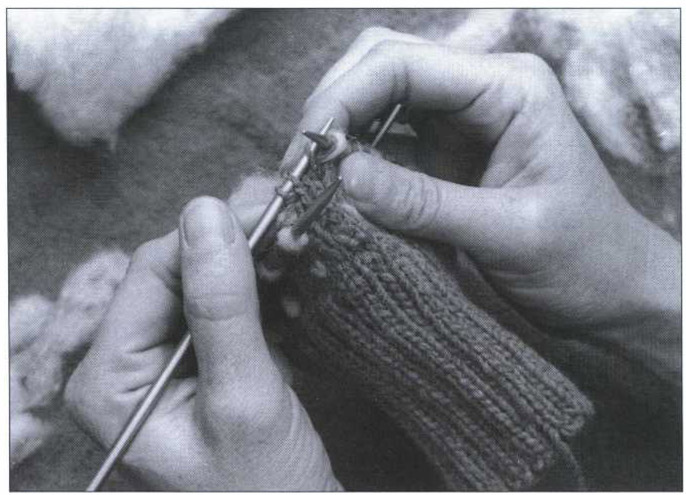
To produce a little fleece blob on the knit side: Insert right needle into next stitch. Lay the twisted bit of fleece over the right needle with ends to the inside of the mitten, then wrap yarn as usual, knitting both fleece and yarn in the same stitch.
Two methods of knitting in the bits of fleece are used in Maine and Newfoundland/Labrador. The first method (bottom photo in left column) produces a little blob of fleece on the outside of the mitten. The second method (photo below) produces a little heart-shaped fleece stitch on the outside of the mitten. There is no danger of the fleece bits falling out.
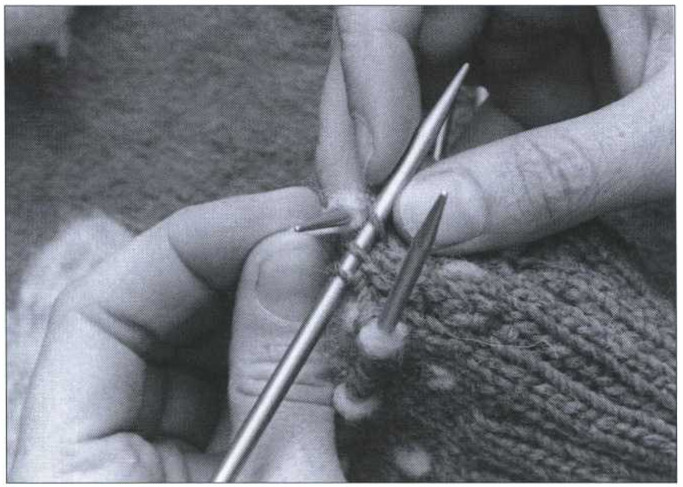
To produce a little fleecy heart on the knit side: Insert the right needle into the next stitch. Lay the twisted bit of fleece over the right needle with ends to the inside of the mitten. Knit the fleece as if it were the working yarn. Knit the next stitch with yarn, bringing the yarn behind the fleece stitch to lock it in. In the next round, work both fleece sts and yarn sts with yarn. At the end of the round, go back and give each fleece stitch a little downward tug by its beard to settle it in place.
