Striped Mittens

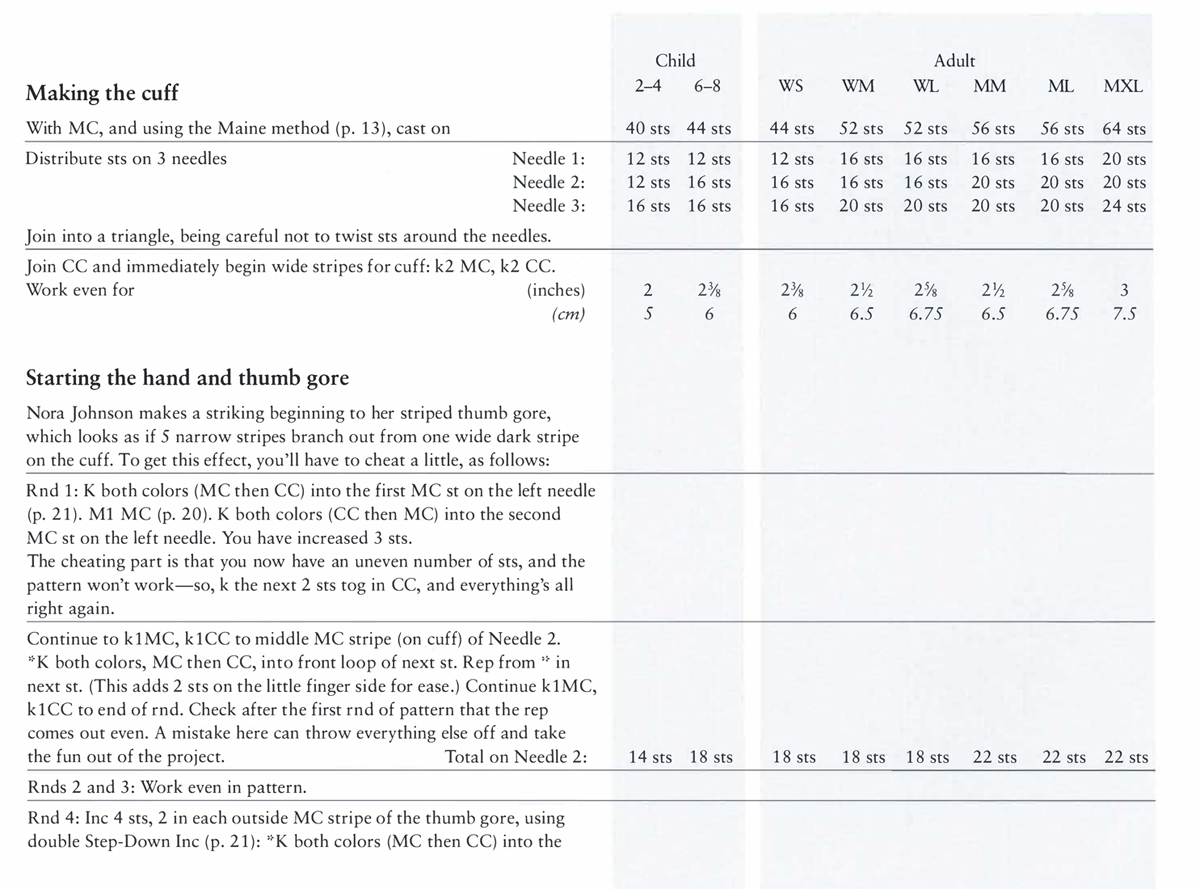
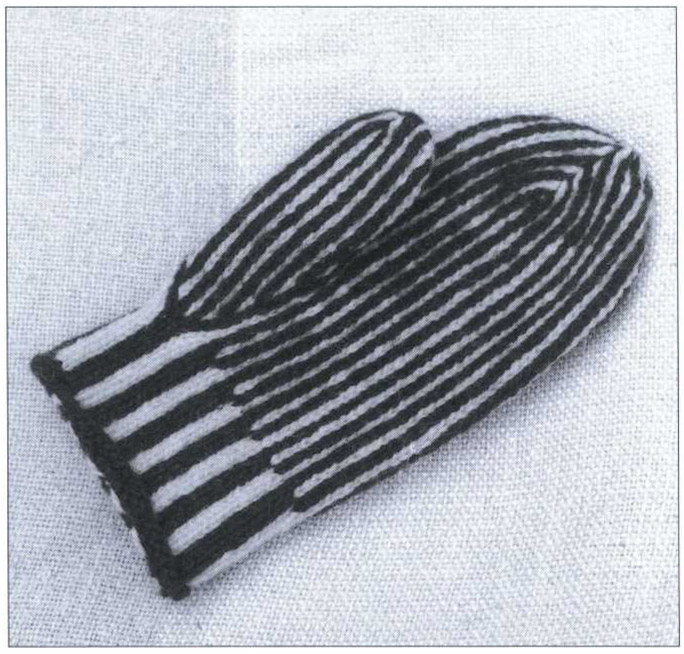
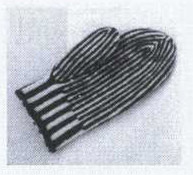
One of the first Maine double-knit mittens I ever saw was a Striped Mitten, but the pattern is less popular than either the Fox and Geese pattern or the Salt and Pepper pattern. I don’t know why.

To the careful knitter, the sharp lines of this pattern are its best asset, because they emphasize perfection and yield a fine mitten with enough fashion pizzazz to be at home in London or Boston.

The pattern itself, a simple one-one alternation of two colors, pulls the mitten fabric up into fine ridges, making it appear that one color has been knit above the other. They are traditionally knit with a dark color “on top”—that is, carried ahead—and a very bright, warm color showing through from beneath.

This pattern was shown to me by Nora Johnson of Five Islands, who learned it as a girl in the Farmington area. It was until recently also knit by Elma Farwell of the Dromore area of Phippsburg. I once thought it was unknown outside of Maine, but have since seen it, exactly like this mitten, in a collection of traditional mittens from Gotland, Sweden, where it is called the Pole Pattern (The Swedish Mitten Book, Lark, 1984). I have seen similar mittens from other parts of Sweden, where the color carried ahead is changed once or twice in the length of the mitten so that first the dark color, then the light color, then the dark again, rise to the surface, creating the effect of waves of color. A blue and white striped mitten in the color photos shows this effect. If you want to try it, allow at least 10 rnds between changes.

image

Striped Mitten from Maine

Striped Mittens

Yarn Medium (worsted) weight yarn in two colors, either contrasting or close. Striped mittens were traditionally knitted in black or navy and white, but more recently are made with a dark MC carried ahead (p. 16) and a glowingly bright “under color.” The samples were knitted in Bartlettyarns 2-ply Fisherman yarn (white) and Rangeley (red or blue) yarn. For one pair you will need

image
MC (oz) 1 2 2 3
(g) 28.5 42.75 50 57 57 71.25 71.25 85.5
CC (oz) 1 2 2 3
(g) 28.5 42.75 50 57 57 71.25 71.25 85.5

Equipment 1 set Size 5 (3.75mm, Can. Size 9) double-pointed needles, or size you need to knit in Stripes pattern at correct tension • 6 ” (15cm) length of contrasting waste yarn • Blunt-tipped yarn needle

Tension 6¾ sts and 5½ rnds = 1 ” (2.5cm) in narrow Stripes pattern.

ABBREVIATIONS beg: beginning • CC: contrast color • dec(s): decrease(s) • inc(s): increase(s) • k: knit • k2tog: knit 2 together • MI: make 1 stitch • MIL: make 1 stitch left • MIR: make 1 stitch right • MC: main color • p: purl • rep: repeat • rnd(s): round(s) • SSK2tog: slip, slip, knit 2 sts together • st(s): stitch(es) • twisted MI: twisted make 1 cast-on

Measurements—inches and centimeters

Child Sizes Adult Sizes
4–6 8–10 WS WM WL MM ML XL
Hand length 7 7
14 16.5 16.5 18 19 18 19 21.5
Hand circumference, (incl. tip of thumb) 7 8 9 9 10
18 20.25 19 23 23 24.25 24.25 25.5
Mitten hand length 6 7 7 8 8 9
15.25 18 18 19 20.25 19 20.25 23
Mitten thumb (⅓ hand) 2 2⅜ 2⅜ 2⅝ 2⅝ 3
5 6 6 6.5 6.75 6.5 6.75 7.5
Mitten width 4 5
9 10.25 9.5 11.5 11.5 12 12 12.75

Note: Although these directions as originally published included Size 2–4 for small children, I find the resulting mitten is really too rigid for toddlers and babies. See Baby Foxes and Goslings section for traditional mittens in soft yarns and small sizes.

Pattern

A multiple of 2 sts and 1 rnd, this vertically striped pattern is a simple one-one alternation of two colors worked on an even number of sts. It wraps perfectly around the hand with no obvious break.

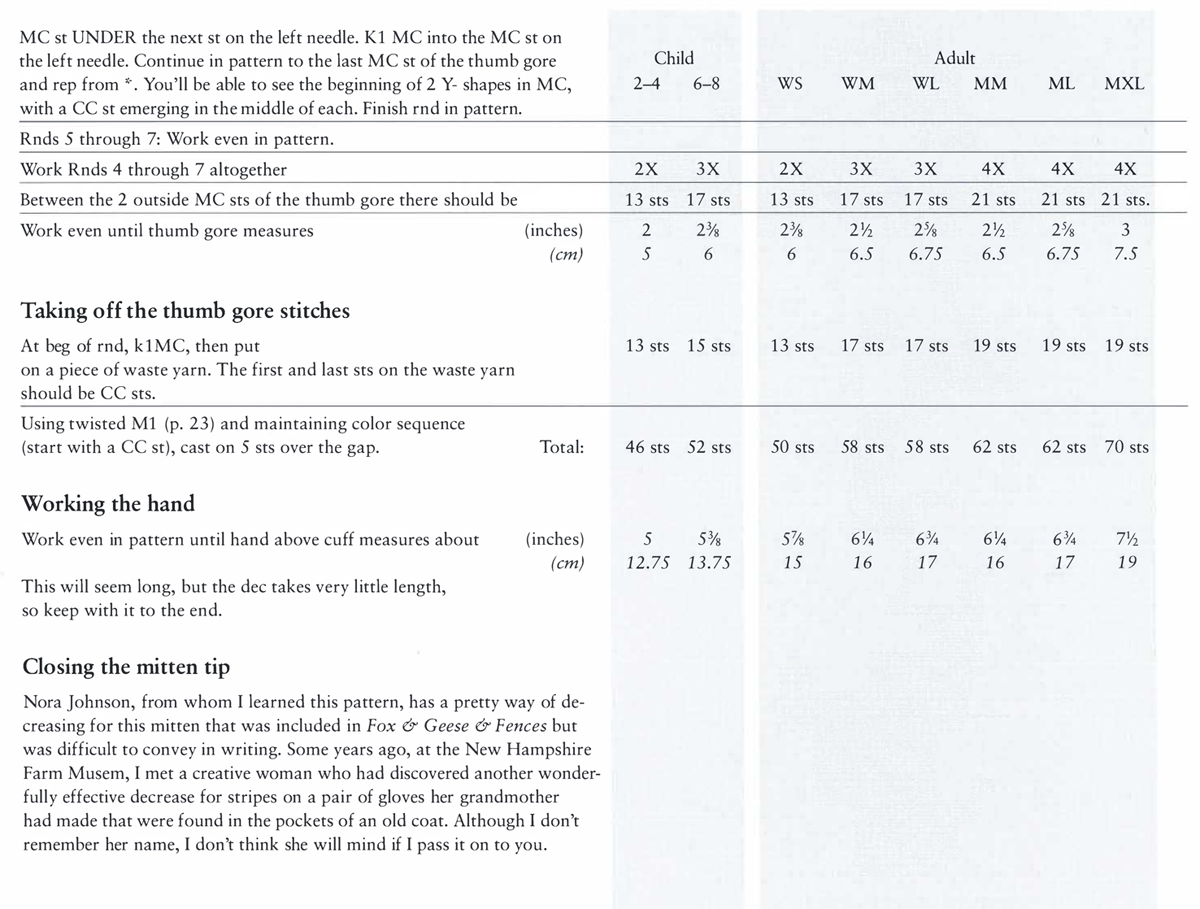
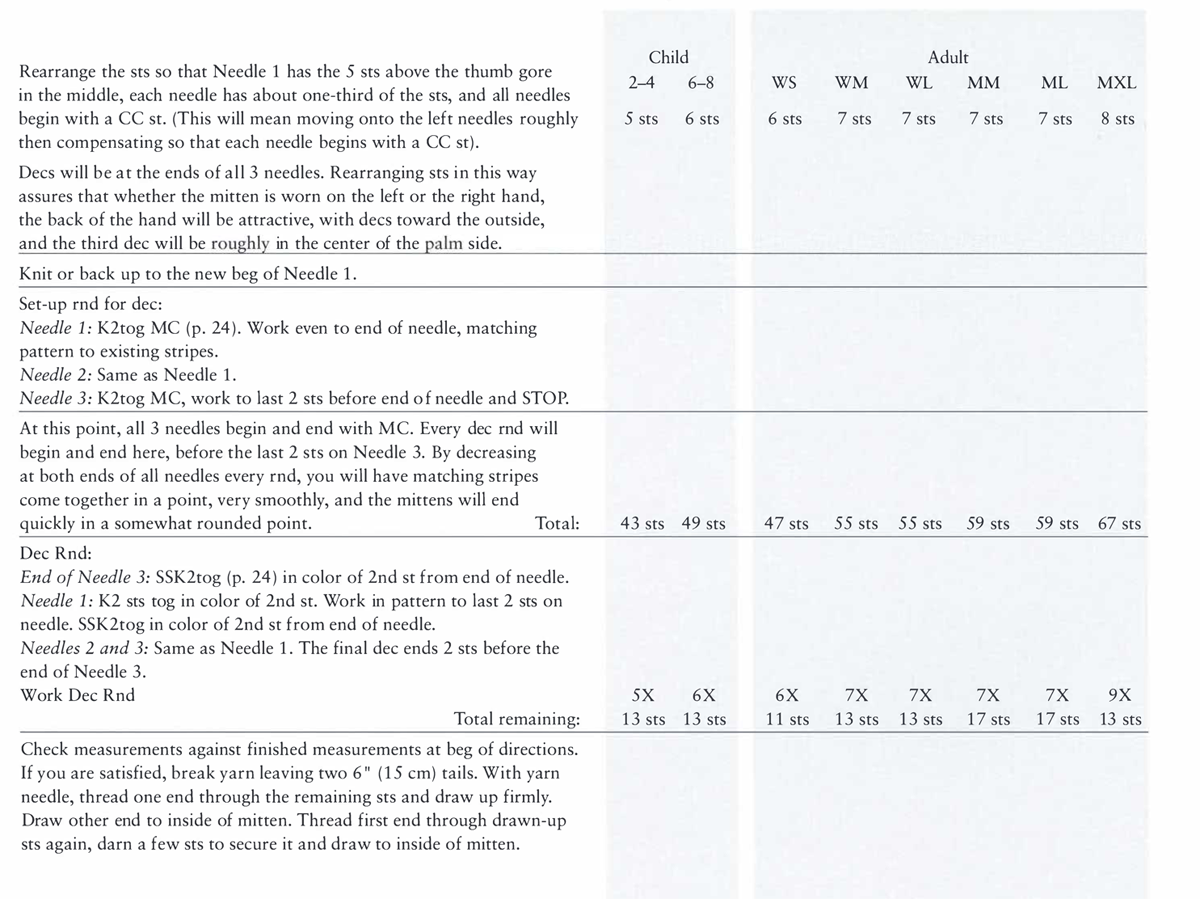
Wide stripes on the cuff split apart into narrow stripes on the hand and thumb. An unusual method of increasing keeps the stripes continuous through incs on the thumb gore. At the tip of the thumb and the hand, the stripes meet neatly at three dec points.

Stripes Pattern cuff hand Striped Mittens Thumb Gore, First Two Increases Key MC–main color CC–contrast color pattern repeat Step-down increases K both colors into 1 st Make 1 st Step-down inc into dark stitch thumb gore cuff

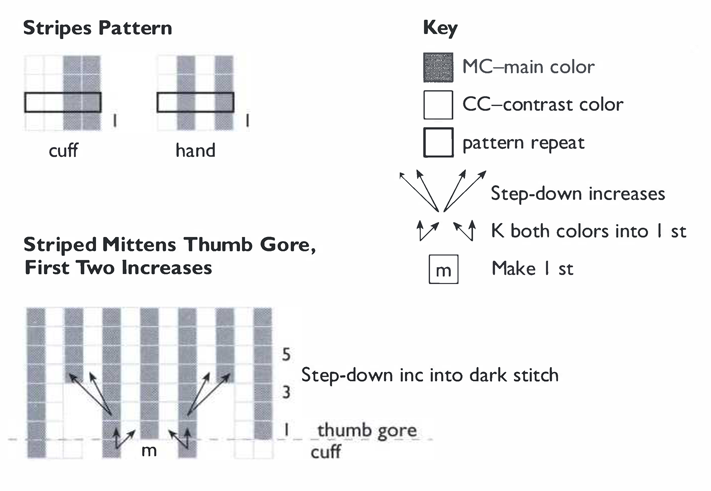
The stripes of the thumb gore branch from one MC rib of the cuff in a treelike pattern—the kind of detail that intrigues traditional knitters and keeps handwork precious and impossible to reproduce by machines.

This pattern can be knitted flat, but add one additional st each side for a seam and purl every other row. Check that you are still carrying MC ahead even when you purl. CC will seem to dominate on the p side of the work.

Knitted densely with MC carried ahead throughout (p. 16), the Stripes pattern pulls up the fabric of the knitting and, in the narrow stripe, causes the MC to stand up in ridges, like corduroy. The effect is not obvious until you have knitted several rnds. Failure to carry MC ahead shows prominently, so take care.

Off the Cuff

The 4-st, 1-rnd stockinette pattern of the cuff is unique to Maine and Gotland, Sweden. A similar pattern is knit in Shetland, but the off color is purled, and the result is called “corrugated ribbing.” In Maine, the cuff is frequently used with other simple color patterns.

Although MC is also carried ahead on the cuff and the fabric is pulled up widthwise by the vertically aligned color changes, the MC doesn’t dominate here as much as in the narrow stripe on the hand. However, there is still enough pull-up effect to make the cuff snug and warm on the wrist.

Child Adult Making the cuff 2–4 6–8 WS WM WL MM ML MXL With MC, and using the Maine method (p. 13), cast on 40 sts 44 sts 44 sts 52 sts 52 sts 56 sts 56 sts 64 sts Distribute sts on 3 needles Needle 1: 12 sts 12 sts 12 sts 16 sts 16 sts 16 sts 16 sts 20 sts Needle 2: 12 sts 16 sts 16 sts 16 sts 16 sts 20 sts 20 sts 20 sts Needle 3: 16 sts 16 sts 16 sts 20 sts 20 sts 20 sts 20 sts 24 sts Join into a triangle, being careful not to twist sts around the needles. Join CC and immediately begin wide stripes for cuff: k2 MC, k2 CC. Work even for (inches) 2 2⅜ 2⅜ 2½ 2⅝ 2½ 2⅝ 3 (cm) 5 6 6 6.5 6.75 6.5 6.75 7.5 Starting the hand and thumb gore Nora Johnson makes a striking beginning to her striped thumb gore, which looks as if 5 narrow stripes branch out from one wide dark stripe on the cuff. To get this effect, you’ll have to cheat a little, as follows: Rnd 1: K both colors (MC then CC) into the first MC st on the left needle (p. 21). M1 MC (p. 20). K both colors (CC then MC) into the second MC st on the left needle. You have increased 3 sts. The cheating part is that you now have an uneven number of sts, and the pattern won’t work—so, k the next 2 sts tog in CC, and everything’s all right again. Continue to k1MC, k1CC to middle MC stripe (on cuff) of Needle 2. *K both colors, MC then CC, into front loop of next st. Rep from * in next st. (This adds 2 sts on the little finger side for ease.) Continue k1MC, k1CC to end of rnd. Check after the first rnd of pattern that the rep comes out even. A mistake here can throw everything else off and take the fun out of the project. Total on Needle 2: 14 sts 18 sts 18 sts 18 sts 18 sts 22 sts 22 sts 22 sts Rnds 2 and 3: Work even in pattern. Rnd 4: Inc 4 sts, 2 in each outside MC stripe of the thumb gore, using double Step-Down Inc (p. 21): *K both colors (MC then CC) into the
MC st UNDER the next st on the left needle. K1 MC into the MC st on the left needle. Continue in pattern to the last MC st of the thumb gore and rep from *. You’ll be able to see the beginning of 2 Y- shapes in MC, with a CC st emerging in the middle of each. Finish rnd in pattern. Rnds 5 through 7: Work even in pattern. Work Rnds 4 through 7 altogether Between the 2 outside MC sts of the thumb gore there should be Work even until thumb gore measures Taking off the thumb gore stitches At beg of rnd, k1MC, then put on a piece of waste yarn. The first and last sts on the waste yarn should be CC sts. Using twisted M1 (p. 23) and maintaining color sequence (start with a CC st), cast on 5 sts over the gap. Working the hand Work even in pattern until hand above cuff measures about This will seem long, but the dec takes very little length, so keep with it to the end. Closing the mitten tip (inches) (cm) Total: (inches) (cm) Nora Johnson, from whom I learned this pattern, has a pretty way of decreasing for this mitten that was included in Fox & Geese & Fences but was difficult to convey in writing. Some years ago, at the New Hampshire Farm Musem, I met a creative woman who had discovered another wonderfully effective decrease for stripes on a pair of gloves her grandmother had made that were found in the pockets of an old coat. Although I don’t remember her name, I don’t think she will mind if I pass it on to you. Child 2–4 2X 13 sts 2 5 13 sts 46 sts 5 12.75 6–8 3X 17 sts 2⅜ 6 15 sts 52 sts 5⅜ 13.75 WS 2X 13 sts 2⅜ 6 13 sts 50 sts 5⅞ 15 WM 3X 17 sts 2½ 6.5 17 sts 58 sts 6¼ 16 Adult WL 3X 17 sts 2⅝ 6.75 17 sts 58 sts 6¾ 17 MM 4X 21 sts 2½ 6.5 19 sts 62 sts 6¼ 16 ML 4X 21 sts 2⅝ 6.75 19 sts 62 sts 6¾ 17 MXL 4X 21 sts. 3 7.5 19 sts 70 sts 7½ 19
Child Adult Rearrange the sts so that Needle 1 has the 5 sts above the thumb gore 2–4 6–8 WS WM WL MM ML MXL in the middle, each needle has about one-third of the sts, and all needles begin with a CC st. (This will mean moving onto the left needles roughly 5 sts 6 sts 6 sts 7 sts 7 sts 7 sts 7 sts 8 sts then compensating so that each needle begins with a CC st). Decs will beat the ends of all 3 needles. Rearranging sts in this way assures that whether the mitten is worn on the left or the right hand, the back of the hand will be attractive, with decs toward the outside, and the third dec will be roughly in the center of the palm side. Knit or back up to the new beg of Needle 1. Set-up rnd for dec: Needle 1: K2tog MC (p. 24). Work even to end of needle, matching pattern to existing stripes. Needle 2: Same as Needle 1. Needle 3: K2tog MC, work to last 2 sts before end of needle and STOP. At this point, all 3 needles begin and end with MC. Every dec rnd will begin and end here, before the last 2 sts on Needle 3. By decreasing at both ends of all needles every rnd, you will have matching stripes come together in a point, very smoothly, and the mittens will end quickly in a somewhat rounded point. Total: 43 sts 49 sts 47 sts 55 sts 55 sts 59 sts 59 sts 67 sts Dec Rnd: End of Needle 3: SSK2tog (p. 24) in color of 2nd st from end of needle. Needle 1: K2 sts tog in color of 2nd st. Work in pattern to last 2 sts on needle. SSK2tog in color of 2nd st from end of needle. Needles 2 and 3: Same as Needle 1. The final dec ends 2 sts before the end of Needle 3. Work Dec Rnd 5X 6X 6X 7X 7X 7X 7X 9X Total remaining: 13 sts 13 sts 11 sts 13 sts 13 sts 17 sts 17 sts 13 sts Check measurements against finished measurements at beg of directions. If you are satisfied, break yarn leaving two 6 ” (15 cm) tails. With yarn needle, thread one end through the remaining sts and draw up firmly. Draw other end to inside of mitten. Thread first end through drawn-up sts again, darn a few sts to secure it and draw to inside of mitten.
Working the thumb Join MC and CC by sewing (p. 20), starting at right side of thumb hole. Needles 1 and 2: Pick up from waste yarn From corners of thumb hole, pick up and twist onto needle a total of Needle 3: Pick up 5 sts from top of thumb hole. Total: Starting with Needle 1 at the right corner of thumb hole, k in pattern, matching colors to continue the stripes uninterrupted from both the thumb gore and the palm. Work even until thumb is (inches) Closing the tip of the thumb Divide sts roughly evenly on 3 needles, each needle beginning with a CC st. Follow Set-up for Dec and Dec Rnd directions for hand. Work Rnds 4–7 Remaining on 3 needles: Check measurements against finished measurements at beg of directions before breaking yarn. (cm) If you are satisfied, break yarn leaving two 6 ” (15cm) tails. With yarn needle, thread one end through the remaining sts and draw up firmly. Draw other end to inside of the thumb. Thread first end through drawn-up sts again, darn a few sts to secure it, and draw to inside of thumb. Finishing the mitten Turn mitten inside out and darn all ends into the back of the fabric. Repair any holes at corners of the thumb hole with nearby tails. On this mitten, you can hide the tails completely by sliding them under floats of the opposite color, moving vertically up or down the mitten. Trim ends closely. Make another identical mitten. This mitten can be worn on either hand. Child 2–4 6–8 13 sts 15 sts 2 sts 2 sts 20 sts 22 sts 1½ 3.75 1¾ 4.5 1X 2X 11 sts 7 sts Adult WS 13 sts 2 sts 20 sts 1⅝ 4.2 1X 11 sts WM 17 sts 2 sts 24 sts 2 5 2X 9 sts WL 17 sts 2 sts 24 sts 2⅛ 5.5 2X 9 sts MM 19 sts 2 sts 26 sts 2 5 3 X 5 sts ML MXL 19 sts 19 sts 2 sts 4 sts 26 sts 28 sts 2⅛ 5.5 1⅞ 4.75 3X 3X 5 sts 7 sts