Sawtooth Mittens

I first saw this pattern in a 1908 Priscilla Knitting Book published in Boston. It looked so in tune with Maine double-knit patterns that I took it for one.

I later learned that Sawtooth is knit throughout Nova Scotia and New Brunswick even today. My Maine informant, Nora Johnson, said her mother used to knit the pattern in the Farmington area, and a traditional craft writer in New Hampshire, Barbara Rogers, knows a woman who knits only this pattern, which she learned in her family.

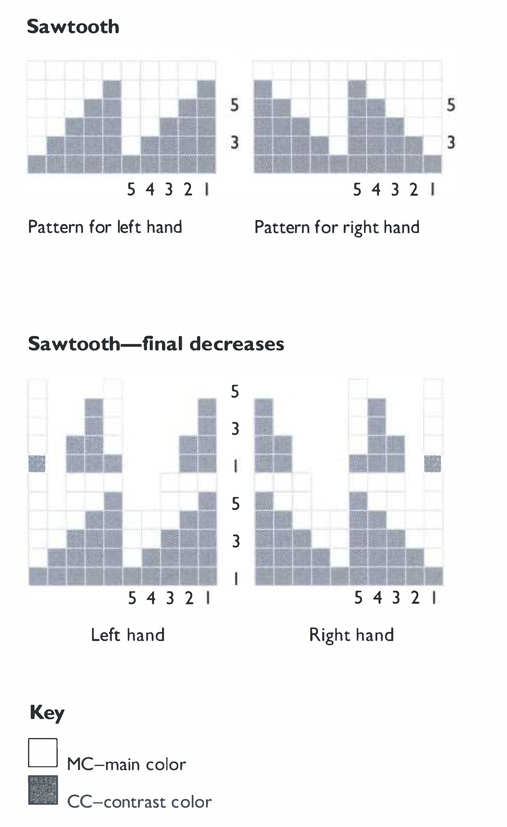
The “teeth” of the Sawtooth pattern can be made in various sizes, from a multiple of five sts in width down to three sts in width for baby mittens. It’s also fun to dec at the tip of the fingers and thumb by reducing the size of the sawteeth.

A vertical Sawtooth pattern is knitted on mittens in Quebec, where it is called fleché, or fletching, like the feathers on an arrow.

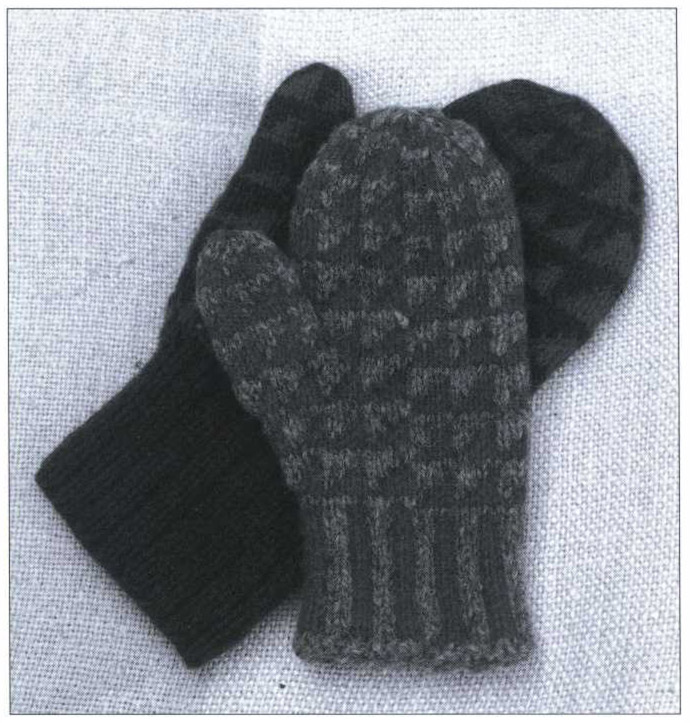
The traditional colors for this mitten in New England are bright red and gray. Every example I’ve seen by traditional knitters, even the 1908 picture, has been in these colors.

My pattern is loosely based on the Priscilla Knitting Book pattern and on examples lent by Janetta Dexter and the Nova Scotia Museum. Although the Priscilla Knitting Book version has a striped thumb, certain technicalities of the pattern make it easier to maintain the sawtooth throughout.

image

Sawtooth Mittens with ribbed cuff (underneath). Note the decorative circular decrease. Sawtooth Mittens with snug striped Maine cuff (on top).

Sawtooth Mittens

Yarn Bartlettyarns 2-ply Fisherman yarn or other medium weight wool yarn.

For a pair with a Maine snug cuff, you will need:

MC and CC, each

(oz) 2⅜ 2⅜ 3
(g) 50 67.75 67.75 71.25 71.25 85.5

For a pair with a ribbed cuff, you will need:

MC (including the cuff)

(oz) 2 3 3 3⅛ 3⅛
(g) 57 85.5 85.5 89 89 107
CC (oz)
(g) 42.75 50 50 50 50 64

Equipment 1 set Size 3 (3.25mm, Can. Size 10) double-pointed needles, or size you need to knit in pattern at correct tension • 1 set Size 1 (2.25mm, Can. Size 13) double-pointed needles for optional ribbed cuff • 6" (15cm) length of contrasting waste yarn • Blunt-tipped yarn needle

image

Tension 6½ sts and 6¼ rnds = 1" (2.5cm) in pattern

ABBREVIATIONS beg: beginning • CC: contrast color • dec(s): decrease(s) • inc(s): increase(s) • k: knit • k2tog: knit 2 together • MI: make I stitch • MIL: make I stitch left • MIR: make I stitch right • MC: main color • p: purl • rep: repeat • rnd(s): round(s) • SSK2tog: slip, slip, knit 2 sts together • st(s): stitch(es) • twisted MI: twisted make I cast-on

Measurements—inches and centimeters

Child Adult
8–10 WM WL MM ML XL
Hand length 7 7
16.5 18 19 18 19 21.5
Hand circumference, incl. tip of thumb 8 9 9 10
20.25 23 23 24.25 24.25 25.5
Mitten hand length 7 8 8 9
18 19 20.25 19 20.25 23
Mitten thumb (⅓ hand) 2⅜ 2⅝ 2⅝ 3
6 6.5 6.75 6.5 6.75 7.5
Mitten width 4 4⅜ 4⅜ 4⅝ 4⅝ 5
10.25 11.25 11.25 11.75 11.75 12.75

As with any mitten in which the width is limited by the number of sts in the pattern rep, Sawtooth, with a 5-stitch rep, may be slightly narrower or wider than the standard measurements. The Adult Medium and Large sizes will fit closely, but not uncomfortably.

Pattern

Although the appearance of the pattern is of perfectly square blocks sliced diagonally, the block is actually 6 rnds and 5 sts, with two rnds worked in solid colors. This can be knitted flat with double­pointed needles. All incs are in Rnd 2 of the chart.

Some knitters like to reverse the slant of the sawteeth for the left mitten—perhaps to show that the mittens are handmade. If you don’t, you can knit two left or two rights, because the pattern wraps perfectly around the hand and the decs are made around the entire hand. You will find people, kids or adults, do wear them on either hand anyhow.

Off the Cuff

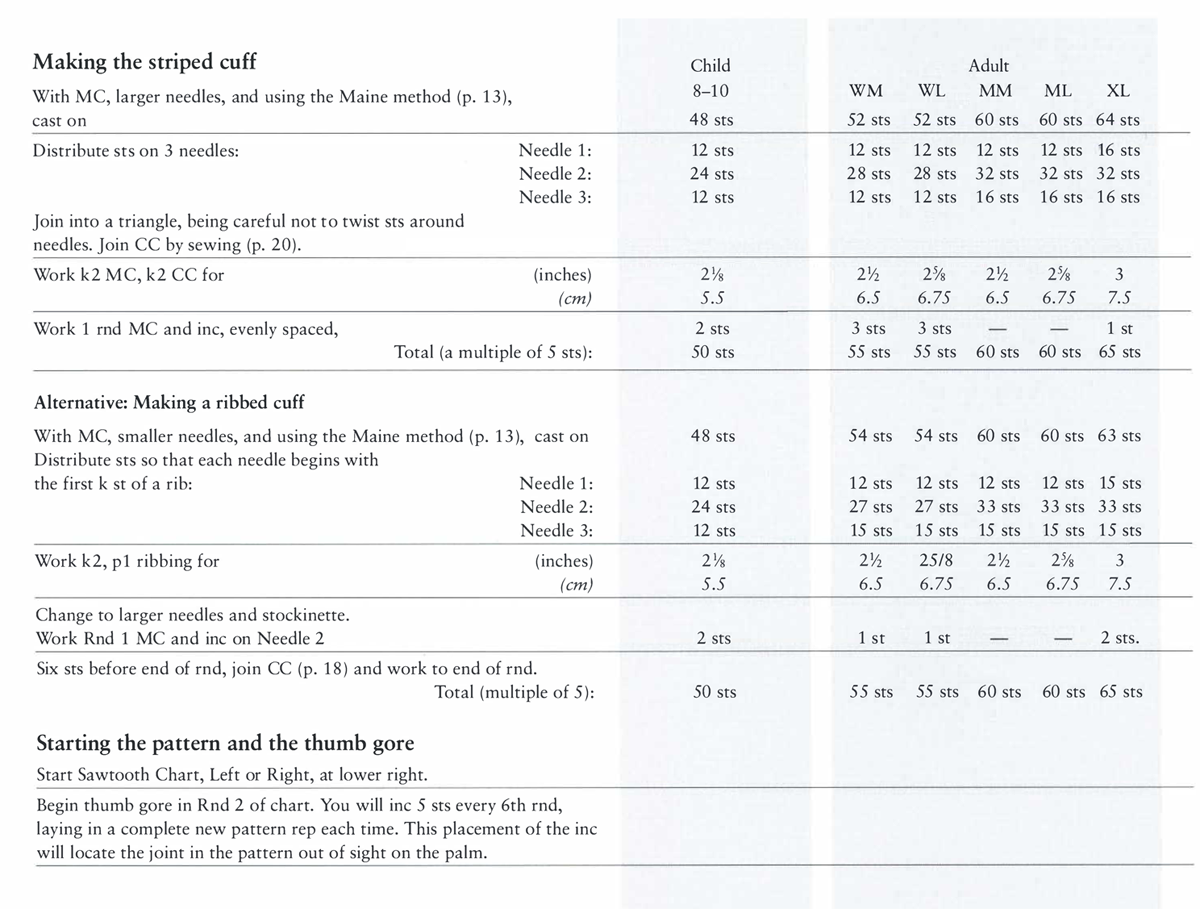
I’ve provided directions for a traditional Maine snug cuff with 2-st-wide vertical stripes in stockinette and for a stretchier ribbed cuff in one color.

Sawtooth 5 4 3 2 1 5 4 3 2 1 Pattern for left hand Pattern for right hand Sawtooth—final decreases 5 4 3 2 1 5 4 3 2 1 Left hand Right hand Key MC-main color CC-contrast color
Making the striped cuff With MC, larger needles, and using the Maine method (p. 13), cast on Distribute sts on 3 needles: Needle 1: Needle 2: Needle 3: Join into a triangle, being careful not to twist sts around needles. Join CC by sewing (p. 20). Work k2 MC, k2 CC for (inches) (cm) Work 1 rnd MC and inc, evenly spaced, Total (a multiple of 5 sts): Alternative: Making a ribbed cuff With MC, smaller needles, and using the Maine method (p. 13), cast on Distribute sts so that each needle begins with the first k st of a rib: Needle 1: Needle 2: Needle 3: Work k2, p 1 ribbing for (inches) (cm) Change to larger needles and stockinette. Work Rnd 1 MC and inc on Needle 2 Six sts before end of rnd, join CC (p. 18) and work to end of rnd. Total (multiple of 5): Starting the pattern and the thumb gore Start Sawtooth Chart, Left or Right, at lower right. Begin thumb gore in Rnd 2 of chart. You will inc 5 sts every 6th rnd, laying in a complete new pattern rep each time. This placement of the inc will locate the joint in the pattern out of sight on the palm. Child 8–10 48 sts 12 sts 24 sts 12 sts 2⅛ 5.5 2 sts 50 sts 48 sts 12 sts 24 sts 12 sts 2⅛ 5.5 2 sts 50 sts WM 52 sts 12 sts 28 sts 12 sts 2½ 6.5 3 sts 55 sts 54 sts 12 sts 27 sts 15 sts 2½ 6.5 1 st 5 5 sts WL 52 sts 12 sts 28 sts 12 sts 2⅝ 6.75 3 sts 55 sts 54 sts 12 sts 27 sts 15 sts 25/8 6.75 1 st 55 sts Adult MM 60 sts 12 sts 32 sts 16 sts 2½ 6.5 60 sts 60 sts 12 sts 33 sts 15 sts 2½ 6.5 — 60 sts ML 60 sts 12 sts 32 sts 16 sts 2⅝ 6.75 — 60 sts 60 sts 12 sts 33 sts 15 sts 2⅝ 6.75 — 60 sts XL 64 sts 16 sts 32 sts 16 sts 3 7.5 1 st 65 sts 63 sts 15 sts 33 sts 15 sts 3 7.5 2 sts. 65 sts
Mark sides of thumb gore with short pieces of waste yarn, as it’s easy to lose track in the radial symmetry of Sawtooth. Every couple of rnds, Child Adult lay the waste yarn back or forth between the same two sts to have a 8–10 WM WL MM ML XL moving marker that you will be in no danger of knitting. Right mitten : Work Rnd 2 of chart to 2 blocks before end of rnd. In next 5 sts, inc 5 sts above 5 sts: Place marker, k both strands (MC then CC) into the front of St 1, M1CC (p. 20), k1CC into St 2. K both strands (CC then MC) into St 3, M1CC, k1 CC into St 4, M1CC, k1CC into St 5. You have just completed two blocks of pattern above 5 sts and should be about to work St 1 of Line 2 of the chart. Lay a second piece of waste yarn here and knit even in pattern to end of rnd. Left mitten: (The beg of the rnd marks this side of the thumb gore.) K1CC into St 1, M1CC, k1CC into St 2, k both colors (CC then MC) into St 3, M1CC; k1CC into St 4, M1CC, k both colors (CC then MC) into St 5. You have just completed two blocks of pattern above 5 sts and are about to work St 1 of the second block of Line 2 on the chart. Lay a second piece of waste yarn here and knit even in pattern. Both mittens: Inc in this way a total of 3 X 4 X 4 X 4 X 4 X 5 X Each time, place the inc toward the center of the thumb gore. The second inc will be slightly off center toward the beginning of the thumb gore. The third can be placed dead center, the fourth again will be slightly offset, but the offset in both cases will not be obvious. Total between waste-yarn markers: 20 sts 25 sts 25 sts 25 sts 25 sts 30 sts Work even in pattern until thumb gore measures (inches) 2⅛ 2⅜ 2½ 23/8 2½ 2⅞ (cm) 5.5 6 6.5 6 6.5 7.25 Complete band of pattern. Taking off the thumb gore stitches Pattern Rnd 1: Before knitting the thumb gore sts, remove waste yarn markers and put onto the waste yarn the center pattern reps, that is: 15 sts 20 sts 20 sts 20 sts 20 sts 25 sts
Child Adult With twisted M1 (p. 23), cast on 5 sts in CC over the gap. 8–10 WM WL MM ML XL Finish the rnd. Total: 55 sts 60 sts 60 sts 65 sts 65 sts 70 sts Work even in pattern until hand above cuff measures (inches) 5 5½ 6 5½ 6 7 (cm) 12.75 14 15.25 14 15.25 18 or 2” (5cm) less than the desired final length. Finish band of pattern and work Rnd 1 of next band—OR, go back one or two rnds to be at the end of Rnd 1, whichever is closer. Closing the mitten tip You will begin decreasing by k2tog 5 times next in 5 adjacent st pairs to eliminate one or more whole blocks of pattern at once. When it comes down to the last two bands of decs, you will use a technically and artistically sweet final dec devised by Nora Johnson particularly for this mitten. The result is a mitten or thumb tip that looks like a little MC flower or pinwheel. Cute! Initial dec: Pattern Line 2: Dec by k2tog in pattern 5 times, starting at the beg of a block in the middle of needle(s) 2 2 2 2 & 3 2 & 3 All Total remaining: 50 sts 55 sts 55 sts 55 sts 55 sts 55 sts Complete Lines 2 through 4 of pattern band. Final dec: Follow Final Dec chart, choosing right or left according to the slant of the sawteeth on your mitten. After Rnd 5, there will be 40 sts 44 sts 44 sts 44 sts 44 sts 44 sts After second Rnd 1, there will be 30 sts 33 sts 33 sts 33 sts 33 sts 33 sts After second Rnd 3, there will be 20 sts 22 sts 22 sts 22 sts 22 sts 22 sts After second Rnd 5, there will be 10 sts 11 sts 11 sts 11 sts 11 sts 11 sts Check measurements against finished measurements at beg of directions. If you are satisfied, break yarn leaving two 6” (15cm) tails. With yarn needle, thread one end through the remaining sts and draw up firmly. Draw other end to inside of the thumb. Thread end through drawn-up sts again, darn a few sts to secure it, and draw it to inside of thumb.
Working the thumb On Needle 1, pick up 5 sts from top of thumb hole. On Needles 2 and 3, pick up from waste yarn On the same 2 needles, pick up and twist 1 st onto needles from each corner of thumb hole. Total: Work even in pattern until, measuring from the base of thumb by the palm, the thumb measures (inches) (cm) Finish band of pattern or rip back to Rnd 1 of pattern, whichever is closer. (Remember that it’s better for the thumb to be a tad too long than a tad too short!) Closing the tip of the thumb Work Final Dec chart for left or right mitten, omitting first Lines 5 and 6 in chart. After Rnd 1, there will be After Rnd 3, there will be After Rnd 5, there will be Check measurements against finished measurements at beg of directions. If they satisfy you, break yarn leaving a 6” (15cm) tail. With yarn needle, thread one end through the remaining sts and draw up firmly. Draw other end to inside of the thumb. Thread first end through drawn-up sts again, darn a few sts to secure it, and draw to inside of thumb. Finishing the mitten Turn mitten inside out and darn all ends into the back of the fabric. Repair possible holes at corners of the thumb hole with nearby tails. Trim ends closely. This mitten is a right- or a left-handed mitten. Knit another, being careful that it is for the opposite hand. Practically speaking, however, this mitten can be worn on either hand. Child 8–10 15 sts 22 sts 1⅝ 4.25 16 sts 12 sts 8 sts Adult WM WL MM ML XL 20 sts 20 sts 20 sts 20 sts 25 sts 27 sts 27 sts 27 sts 27 sts 32 sts 1¾ 1⅞ 1¾ 1⅞ 2¼ 4.5 4.75 4.5 4.75 5.75 20 sts 20 sts 20 sts 20 sts 24 sts 15 sts 15 sts 15 sts 15 sts 18 sts 10 sts 10 sts 10 sts 10 sts 12 sts