Flying Geese Gloves

Anyone who lives along the flight routes of the wild geese knows the thrill of hearing their honking in the fall and the early spring as they pass overhead in long V-formations. Besides knitting patterns, there are quilt patterns, Pueblo Indian pottery designs, and Navaho rug designs named Flying Geese, reflecting the empathy that we earthbound feel for the large birds in their cooperative flights north and south. — Robin Hansen

This pattern was shown to me by Mrs. Murdock Hollingsworth, of Truro, Nova Scotia, in 1974. She told me that it was traditionally used for gloves, with four bands of pattern on the back of the hand and carried up to the ends of the fingers. A fifth band is carried the length of the thumb.

image

To make Flying Geese Mittens, substitute the charted Flying Geese pattern on the Labrador Diamonds Mittens (p. 157).You may wish to adapt the Labrador Diamonds thumb pattern to show the Flying Geese design, as on the Flying Geese Gloves.

With the medium­weight yarn ordinarily used for double knitting in Nova Scotia, this made much too large a glove. I could reproduce it only by using a very fine yarn (Lady Galt Kroy) and Canadian Number 14 (US Size 0) needles. I have so far knit them only in one width, although the length of the fingers can easily be adjusted. One way to widen the pattern would be to add more stitches between pattern elements: rather than a single-stitch white line separating the “geese” (column 1 on the chart), knit two one-stitch lines of white separated by a single-stitch dark line.

image

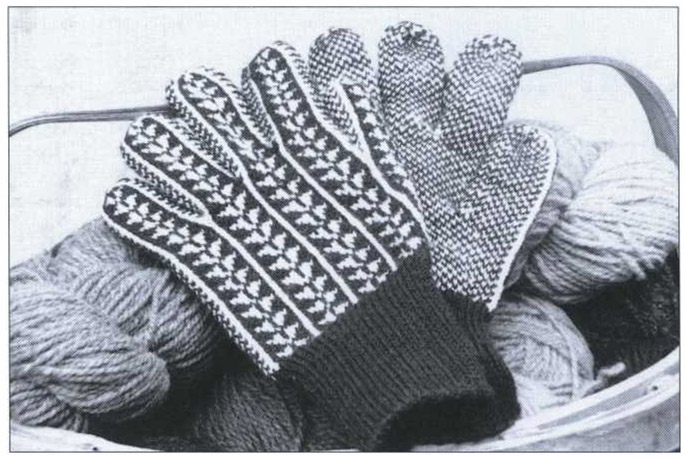
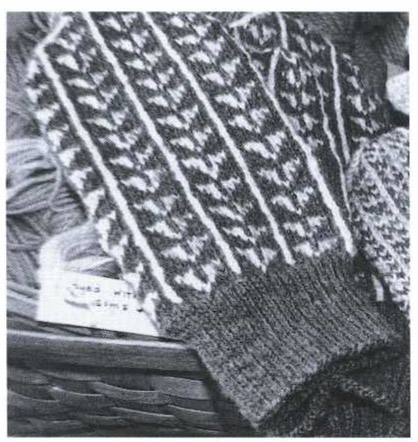
Flying Geese Gloves, knitted by Janetta Dexter based on oral descriptions

This glove pattern is certainly not for beginners, but a careful, experienced knitter can create a masterpiece.

The pattern itself is simple to knit and can be used with coarser, worsted (medium) weight yarn for mittens or hunter’s mitts, with three bands of pattern each on the back and the palm.

I usually use white or light gray for the geese against a navy blue, black, or dark gray background. —Janetta Dexter

Flying Geese Gloves

Yarn: 2 oz (60g) each of 2 colors fingering or sport weight yarn. The samples were made in Lady Galt Kroy by Paton and Baldwin. Another elegant yarn for this project would be Rauma Finullgarn, but any wool sport- or fingering-weight yarn will work.

Equipment 1 set Size 2 (2.75mm, Can. size 12) double-pointed needles, or size you need to knit in pattern at correct tension • 1 set Size 0 (2mm, Can. Size 14) double-pointed needles for the ribbed cuff • 6" (15cm) length of contrasting waste yarn • Blunt-tipped yarn needle

Tension 9 sts = 1" (2.5cm). Check your tension for this project before you start by knitting a little tubular swatch, or check it after you’ve knitted about an inch in pattern. But be sure to check it, and don’t cheat, or your Flying Geese Gloves won’t be what they should be—a masterpiece of needlecraft. It’s easier to rip out an inch than to fall into despondency when the first glove comes out too large or too small.

Flying Geese Thumb Gore Increase Chart 17 15 13 11 9 7 5 3 1 Flying Geese Chart 10 9 8 7 6 5 4 3 2 1 Diving Geese Chart 10 9 8 7 6 5 4 3 2 1 Key MC–main color CC–contrast color

Measurements—inches and centimeters

Man’s M Man’s L
Hand length 7
17.75 19
Hand circumference, incl. tip of thumb
24 24
Mitten hand length 8
19 20.25
Mitten thumb (⅓ hand) 2⅝
6.5 6.75
Mitten width
12 12

Patterns

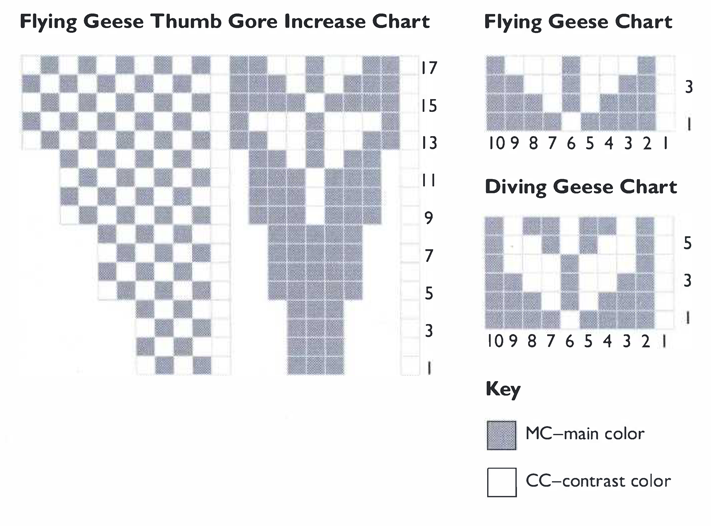
Flying Geese (or its variant, Diving Geese) on the back of the hand and the thumb gore. Salt and Pepper on the palms. Both variants of the Flying Geese pattern are a multiple of 10 sts plus 1. (Because the geese are knitted only on the back of the gloves, you must add one more contrasting st in each rnd to finish the design.) Flying Geese has a 4-rnd rep; Diving Geese, a 6-rnd rep.

Salt and Pepper, used for the palm side of the gloves, is a multiple of 2 stitches and 2 rnds. In Atlantic Canada, Salt and Pepper is used as a filling pattern where a large pattern is difficult to fit into a space.

Ideally, carry MC ahead (p. 16) in Salt and Pepper, CC ahead in the Flying Geese pattern. This is difficult to remember, but will make the proper color stand out in each pattern.

ABBREVIATIONS beg: beginning • CC: contrast color • dec(s): decrease(s) • inc(s): increase(s) • k: knit • k2tog: knit 2 together • MI: make I stitch • MIL: make I stitch left • MIR: make I stitch right • MC: main color • p: purl • rep: repeat • rnd(s): round(s) • SSK2tog: slip, slip, knit 2 sts together • st(s): stitch(es) • twisted MI: twisted make I cast-on

Making the cuff With MC, larger needles, and using the Maine method (p. 13), cast on 72 sts, 24 sts to a needle. Join into a triangle, being careful not to twist sts around the needles. Knit off onto smaller needles using a k2, p1 ribbing. Continue ribbing for 3” (7.5cm). Change to larger needles and stockinette stitch and work 1 rnd in MC, increasing 4 sts on each needle by M1 (p. 20) between knit sts of the ribbing. Six sts before end of Needle 3, join CC (p. 18) and complete needle in MC. Total: Starting the patterns and thumb gore The thumb gore of this glove is unique in that it has two portions, a back portion matching the Flying Geese pattern on the back of the hand and a palm portion matching the Salt and Pepper pattern on the palm of the hand. This begins in the very first rnd of pattern. Right glove: The first 8 sts on Needle 1 form the beginning of the thumb gore. Needle 1: K3 MC, k 1 CC. Work 4 sts Salt and Pepper. Place marker. Continue Salt and Pepper to end of needle. Needle 2: Place a marker between Sts 14 and 15. Work Salt and Pepper up to the marker, slip the marker and begin Flying (or Diving) Geese pattern with a CC st. Follow chart, starting at lower right. Repeat Flying Geese to end of needle. Needle 3: Continue Flying Geese pattern, ending with k1 CC st at end of needle. Transfer this last CC st to Needle 1. Work 3 more rnds even in pattern. Left glove: The last 8 sts on Needle 3 form the beginning of the thumb gore. Needle 1: Begin working Flying Geese (or Diving Geese) pattern. Needle 2: Continue Flying Geese pattern to the middle of the needle, ending the fourth block of pattern with the extra CC stitch. Work the remaining sts on this needle in Salt and Pepper pattern. Needle 3: Work Salt and Pepper pattern up to 8th st from end of needle. Place a marker and continue to work Salt and Pepper pattern for 4 more sts. (This is the palm side of the base of the thumb gore.) Now knit the base of the back of the thumb gore: K1 CC, k3 MC. The last CC st needed to close the Flying Geese portion of the thumb gore is located at the beg of Needle 1. Knit it and transfer it to Needle 3. Work 3 more rnds even in patterns. Man’s M Man’s L 84 sts 84 sts
Increasing on the thumb gore is a little tricky, as Salt and Pepper and the Flying Geese patterns have different methods of increasing. You will inc 2 sts in each portion of the thumb gore in each inc rnd. Inc Rnd: Flying Geese portion: Work 1 CC st, M1L (p. 20) in MC, knit MC to CC st, M1R, k1 CC. Salt and Pepper portion: between the marker and the Flying Geese portion, k both colors, in correct pattern order (p. 21), into a MC st then into a CC st. This can be anywhere within the Salt and Pepper part of the thumb gore. When you have increased in both portions of the thumb gore, you will have 4 more sts (total 13 sts) between marker and end of rnd. Follow the inc chart, adding the goose pattern as shown starting at the second inc. You will inc a total of 3 times. There will be 21 sts between the marker and the end of the needle. Work even in patterns until hand above cuff measures Taking off the thumb gore stitches (inches) (cm) Work next rnd in pattern, but before knitting them, put the 21 thumb gusset sts on a piece of waste yarn for the thumb. Using twisted M1 (p. 23), cast on 9 sts over the gap. Work even until hand above cuff measures Take off stitches for the fingers Take off sts for the little finger: Work up to 11 sts before the center of the second needle. (inches) (cm) Place 22 sts—11 Salt and Pepper, 11 Flying Geese—on a piece of waste yarn for the little finger. Cast on 6 sts over the gap in pattern(s) and k 2 rnds in pattern. Take off sts for the ring finger: K up to 12 sts from the center of the second needle: Place 24 sts on a string for the ring finger. Cast on 6 sts in patterns(s) between fingers and work 1 rnd. Take off sts for the middle finger: K up to 13 sts from center of Needle 2 and put 26 sts on a piece of waste yarn for the middle finger. Cast on 6 sts over the gap. Man’s M 2¼ 5.75 3¾ 9.5 Man’s L 2½ 6.4 4 10.25
Work index finger: Arrange remaining 30 sts on 3 needles, with all Flying Geese sts on Man’s M Man’s L Needle 1. Work index finger with one Flying Geese block on the back and the remainder in Salt and Pepper. Be careful that the 2 white lines continue unbroken from the back of the hand. Work even until finger measures (inches) 2¾ ¼% (cm) 7 8.25 Decrease for all fingers and the thumb At the beg of each needle, SSK2 tog in pattern (p. 24), work in pattern to 2 sts from end of needle, k2 tog in pattern (p. 24). This leans the decreases away from the “seams” but maintains the white line on each side of the Flying Geese pattern. Do this every needle, every rnd, until 6 sts remain. Break yarn and use a yarn needle to pull up these 6 sts on both strands. Work middle finger: Join both yarns by sewing (p. 20) into back of fabric near the base of the index finger. Pick up 6 sts along lower edge of index finger, being careful not to leave holes in the corners. Place these and the stitches from the waste yarn on 3 needles. Total 32 sts. K middle finger like index finger, until it is (inches) 3 3½ (cm) 7.5 9 Finish like the index finger. Work ring finger and little finger the same way, picking up all sts from the waste yarn and 6 sts from the base of the preceding finger. Work ring finger for (inches) 2¾ 3¼ (cm) 7 8.25 then dec, close, and finish. Work little finger for (inches) 2½ 2¾ (cm) 6.4 7 then dec, close, and finish.
Working the thumb Join yarn by sewing into back of fabric starting at the right side of the thumb hole. With Needle 1, pick up 11 sts at corners and the top of thumb hole. Put the 21 sts from the waste yarn on the other 2 needles. Work even in patterns until thumb measures Check measurements against finished measurements at beg of directions before breaking yarn. If you are satisfied, break yarn leaving a 6” (15cm) tail. With a yarn needle, thread one end through the remaining sts and draw up firmly. Draw other end to inside of thumb and each finger. Thread first end through drawn-up sts again, darn a few sts to secure end and draw end to inside of thumb and each finger. Finishing the glove (inches) (cm) Turn glove inside out and darn all ends into the back of the fabric. Repair possible holes at corners of the thumb hole and between fingers with nearby tails. Trim ends closely. This glove is a right- or a left-handed glove. Knit another, being very careful that it is for the opposite hand! Man’s M 2½ 6.5 Man’s L 2¾ 7