A French-Canadian Toque to Match Your Mittens

The pattern on this cap is on the turned-up edge, which is worked in stockinette. While this could mean you will have to purl either the entire cuff or the entire crown of the toque, it doesn’t. You will turn the work inside out at the top of the cuff and reverse direction, so that you are knitting on the other side of your work.

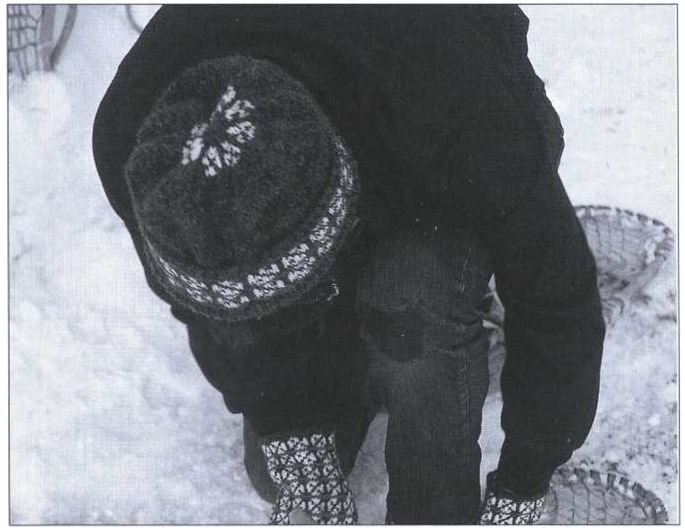
You can work the crown in plain stockinette, you can cover the crown with a tiny pattern like Salt and Pepper or Stripes, or you can rep the pattern used on the turn-up in a little pinwheel of pattern just before the last decs, as in the Fox and Geese version photographed.

image

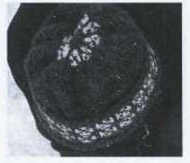
Toque with three-color Fox and Geese pattern on turned-up edge. The center of the Fox and Geese pattern has been repeated at the top, minus the third color.

image

Yarn This cap is knitted in medium weight yarn. We have used Bartlettyarns 2-ply Fisherman, Rauma Istra, and McAusland’s 2-ply Medium with equal success, but you can use any medium weight wool or synthetic yarn that knits in pattern to the correct tension.

MC (oz) 2 3
(g) 57 64 64 85.5
CC (oz) 1 2
(g) 28.5 35.5 42.75 57

Equipment 1 set (5) Size 8 (5 mm, Can. size 6) 10 ” (25.5cm) long, double-pointed needles, or size you need to knit in pattern at correct tension • 1 set (5) Size 5(3.75mm, Can. Size 9) 10 ” (25.5cm) long, double-pointed needles for ribbing • blunt tipped yarn needle

Tension 5½ sts = 1 ” (2.5cm) in pattern. Note: The knitting tension is looser on caps than on mittens. Soft and fluffy is good, as there is no need for densely knitted, durable caps unless you spend a lot of time standing on your head outdoors in winter. The difference in tension does not affect the appearance of the color patterns much.

Pay special attention to your tension if you use Stripes or Checkerboard, as the fabric has a tendency to pull up in ridges (thus increasing the tension) in these patterns. Check it after about 10 rnds of pattern. Or, make a test swatch ahead of time: Cast on 24 sts in the yarn and needles of your choice and knit circularly for 3–4 ” (7.5–10.25cm). Measure sts-per-inch at several points. If you have more sts per inch than called for, move to a larger size. needle. If you have fewer sts than called for, use a smaller size needle. I generally find that I gain or lose about a half st per inch per American needle size.

ABBREVIATIONS beg: beginning • CC: contrast color • dec(s): decrease(s) • inc(s): increase(s) • k: knit • k2tog: knit 2 together • MI: make 1 stitch • MIL: make 1 stitch left • MIR: make 1 stitch right • MC: main color • p: purl • rep: repeat • rnd(s): round(s) • SSK2tog: slip, slip, knit 2 sts together • st(s): stitch(es) • twisted MI: twisted make 1 cast-on

Measurements—inches and centimeters

Child Sizes Adult Sizes
S M M L
Around the head 16 18 20 22
40.75 45.75 50.75 56
Width of hat 8 9 10 11
20.25 22.75 25.5 28
Height from turn-up to tip of cap* 7 8
17.75 19 20.25 21.5

*For the height above the turn-up, measure from earlobe to earlobe and divide by 2. When measuring the cap itself, flatten the curve of the cap outward to measure the full height. To find the head measurement (the circumference), measure around the head about where the band of a hat (baseball cap, cowboy hat) would rest.

Pattern

The turned-up edge is worked in a charted pattern—your choice from those in this book. To wrap a pattern around a cap—or a mitten—the total number of sts must be a multiple of the pattern rep. You may have to add or subtract up to 4 sts to fit the pattern in correctly. Go whichever way (more or fewer sts) is the least. If there is a question of making the hat too large or too small by more than an inch, consider using a different color pattern from the mittens, but the same colors. Color can make dissimilar patterns look fine together!

The crown of the toque is worked in plain stockinette in MC. Alternatively, work the crown in Salt and Pepper or narrow Stripes, using the dec methods for those patterns. OR, put a little pinwheel of pattern at the top of the crown. Fox and Geese or Sawtooth work well.

If knitting flat, p every second row of the color pattern and read the chart from left to right on p rows. Add one more stitch to each end for the seam. (Fox and Geese and Compass do not work well in flat knitting.)

Making the band With MC, smaller needles, and using the Maine method (p. 13), cast on on 4 needles, distributing sts more or less evenly. Each needle should have an even number of sts, beginning with a k st and ending with a p st. Join, being careful not to twist sts around the needles. Work k1, p1 ribbing for 4 rnds. You will be changing to larger needles and stockinette for the patterned portion, but there is figuring to do first. Starting the pattern Note: The number of sts on your needles—90, 102, 108, or 120—is divisible by 2, 3, and 6, which means that any pattern with a rep of those numbers can be knitted on the cap without adding or subtracting sts. Stripes, Salt and Pepper, Chipman’s Check, Checkerboard, Fox and Geese, and Mrs. Martin’s Waves #2 fall into this category. For other patterns, you will first have to adjust the number of sts: To work a 4-st rep (Checkerboard, Fleur-de-lis) To work a 5-st rep (Sawtooth) To work a 7-st rep (Maplewood, Mrs. Martin’s Diamonds, Mrs. Martin’s Waves #1) To work an 8-st rep (Compass, Flying Geese, Double Irish Chain, Labrador Diamonds) To work a 10-st rep (Flying Geese, Diving Geese) Change to larger needles and stockinette. Work 1 rnd in MC, adding sts by M1 (p. 20) or decreasing by k2tog (p. 24), evenly distributed, if necessary to make your chosen color pattern come out even. Check after the first rnd that the rep comes out even. A mistake here can throw everything else off and take the fun out of the project. Child S 90 sts +2 sts +1 sts +6 sts — M 102 sts ‒2 sts +3 sts +3 sts +2 sts ‒2 sts M 108 sts +2 sts +4 sts +4 sts +2 sts Adult L 120 sts — — +6 sts — —
Note: Check after 10 rnds to be sure your tension is correct, and rip back if your tension is off by more than a half stitch per inch. If you are knitting a large cap, with 120 sts at 5½ sts = 1 inch (the correct tension for this pattern), the cap will measure 22 ” (56cm) around when you are finished. If you knit 1 st per inch more tightly, at 6½ sts = 1 inch (2.5cm), the same cap will measure only 18½” (47cm)—about the size for a ten-year-old! Work even in pattern for 12–16 rnds, whatever works for your charted pattern. Break CC. K 1 rnd MC, weaving in CC tail in the first six sts (p. 18) and dec exactly the number of sts you added to make the pattern fit, spacing the decs evenly around. Total: Change to smaller needles, and in MC, work k1, p1 ribbing for 9 rnds. Working the crown Now, turn your knitting inside out. You will knit the crown from this side, knitting into the last stitch you just purled and continuing in that direction—in other words, knitting on the former back side of your work. This will leave a little hole at the break of the rnd, which you can repair later if it troubles you. If you want a color pattern on the crown, join CC in the last 6 sts of the rnd. Work even in MC or your chosen pattern for Closing the top of the cap (inches) (cm) You have several choices for repeating your selected pattern as you decrease for the top of the cap. If working in MC only or in a simple 2-st pattern, use this dec for an effective spiral finish: Rnd 1: *K 10 sts, K2tog, and rep from * to end of rnd. Rnds 2 and 3: Work even. Child S 90 sts 4 10.25 M 102 sts 4¼ 10.75 Asult M 108 sts 4¼ 11.5 L 120 sts 4½ 11.5
Rnd 4: *K 9 sts, K2tog. Rep from * to end of rnd. Rnds 5 and 6: Work even. Rnd 7: *K 8 sts, K2tog. Rep from * to end of rnd. Rnds 8 and 9: Work even. Rnd 10: *K 7 sts, K2tog. Rep from * to end of rnd. Rnd 11: Work even. Rep Rnds 10 and 11, but k 1 st fewer in each unit of Rnd 10 until you reach k1, K2tog. Then work k1, K2tog every rnd until about 32 sts remain. Alternative treatment for an all-MC crown: Reflect the pattern on the brim in the dec sts at the very top, when there are just enough sts between dec points to allow a pattern rep plus 2 or 3 sts between. This works best with block patterns like Fox and Geese, Maplewood, or one of the Diamonds patterns. Continue the dec rnds as above, decreasing only between blocks of pattern. Alternative if you have used Sawtooth pattern on the brim: Start Sawtooth on the work-even rnd when the next dec rnd will be k3, K2tog. Use Nora Johnson’s pinwheel dec (p. 105). Alternative if you have covered the crown with an allover pattern: Use the dec for that pattern from the mitten directions. Be creative. Finishing the cap Turn up the brim and, ideally, try the toque on the recipient at this point, or check measurements against finished measurements at beg of directions. If you—and the mitten recipient—are satisfied, break yarn(s) leaving 6 ” (15cm) tail(s). With yarn needle, thread one end through the remaining sts and draw up firmly. Draw other end to inside of cap. Thread first end through drawn up sts again, darn a few sts to secure it, and draw to inside of cap. Turn the cap inside out and darn all ends into the back of fabric. Trim ends closely. Child S M Adult M L