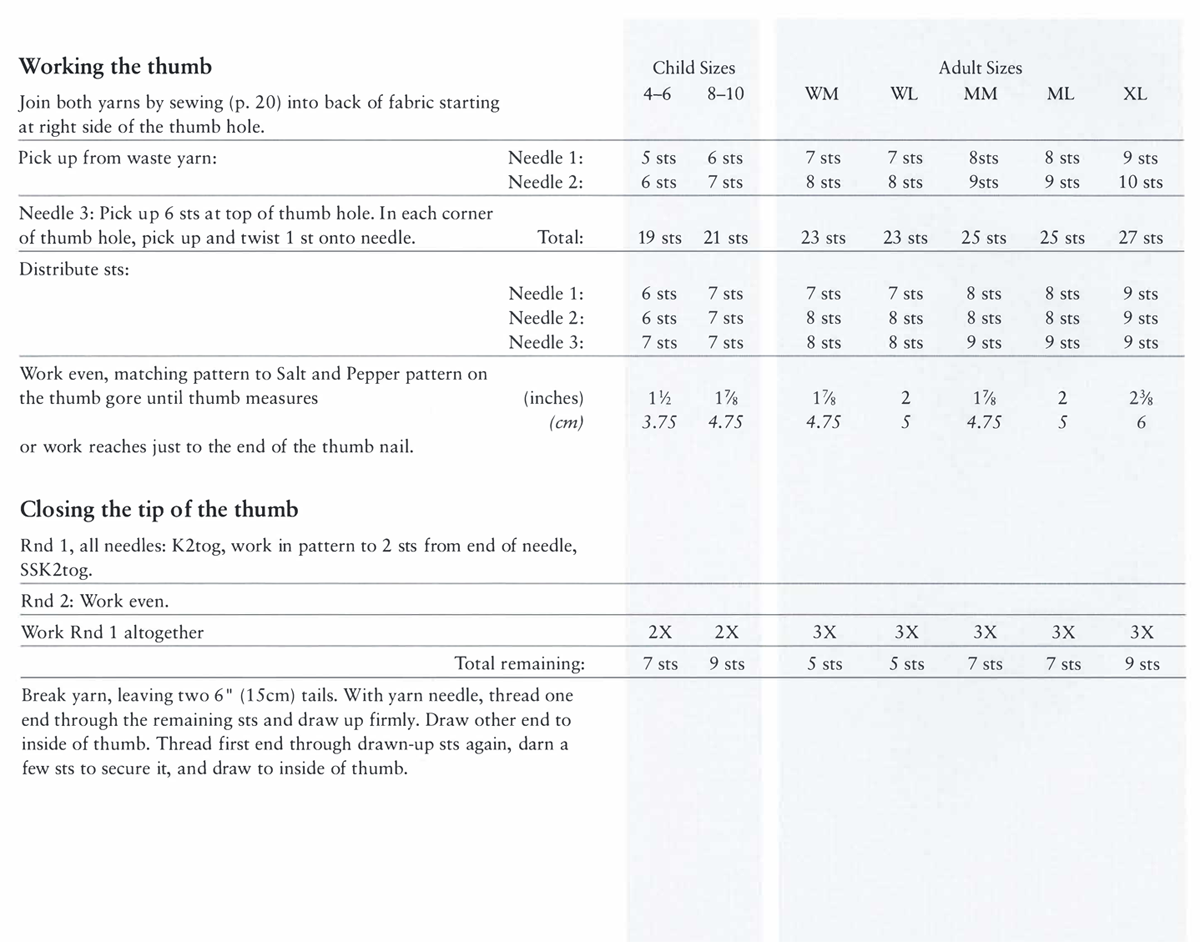
Labrador Diamonds Mittens

This design was taken from a child’s mitt knitted in the Saint Anthony’s area of Newfoundland, but all the families I met in Happy Valley, Labrador, had similar mittens, so the name is not far off base.

Usually the design is knitted only to the base of the fingers, with a modified Salt and Pepper pattern from there to the tip of the mitten. On this mitten, I’ve carried the design all the way up the fingers because it looks smashing that way. I hope that’s an adequate excuse for changing someone’s traditional design slightly.

Since learning this pattern, I saw in Ann Feitelson’s The Art of Fair Isle Knitting (Interweave, 1996) that similarly shaped mittens have been handed down in families on the Shetland mainland, “made by households for their own use, for wear and warmth, and not for sale.” On the Shetland mittens, the back pattern was carried all the way to the fingertips.

Double Irish Chain (p. 181), also an 8-st pattern, can be substituted for Labrador Diamonds on this mitten without any other changes. If you wish to substitute any of the 7-st patterns from the other Newfoundland-Labrador patterns (e.g., one of the Diamond Checks on p. 167), adjust the number of sts on the back of the mitten by taking sts from the palm on the little-finger side.

The decs are worked on both edges and in every rnd.

image

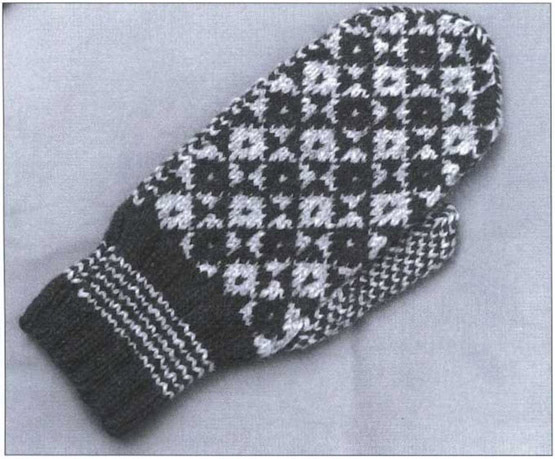
Labrador Diamonds Mittens with an outlined thumb gore and Salt and Pepper pattern on palm and thumb

Labrador Diamonds Mittens

Yarn For a lightweight mitten, use Briggs & Little 2/12, McAusland’s 2-ply Fine, or other DK or medium weight yarn. For a heavier mitten with the same tension, I use Bartlettyarns 2-ply Fisherman or Rangeley. Briggs & Little 2/8 also works well. For 1 pair you will need about

MC (oz) 2 3
(g) 57 64 71.25 71.25 78.5 78.5 85.5
CC (oz) 2
(g) 42.75 57 64 64 64 64 78.5

Equipment 1 set Size 4 (3.5mm, Can. Size 9) double-pointed needles, or size you need to knit in Salt and Pepper pattern at correct tension • 12 ” (30cm) length of contrasting waste yarn • Blunt-tipped yarn needle

Tension 6½ sts and 7 rnds = 1 ” (2.5cm) in Salt and Pepper pattern
image

ABBREVIATIONS beg: beginning • CC: contrast color • dec(s): decrease(s) • inc(s): increase(s) • k: knit • k2tog: knit 2 together • MI: make 1 stitch • MIL: make 1 stitch left • MIR: make 1 stitch right • MC: main color • p: purl • rep: repeat • rnd(s): round(s) • SSK2tog: slip, slip, knit 2 sts together • st(s): stitch(es) • twisted MI: twisted make 1 cast-on

Measurements—inches and centimeters

Child Sizes Adult Sizes
4–6 8–10 WM WL MM ML XL
Length of hand 7 7
14 16.5 17.75 19 17.75 19 21.5
Hand circumference, incl. tip of thumb 7 8 9 9 10
17.75 20.25 22.75 22.75 24 24 25.5
Length of mitten hand 6 7 8 8 9
15.25 17.75 19 20.25 19 20.25 22.75
Mitten thumb (⅓ hand) 2 2⅜ 2⅝ 2⅝ 3
5 6 6.5 6.75 6.5 6.75 7.5
Mitten width 4 5
9 10.25 11.5 11.5 12 12 12.75

Pattern

Newfoundland/Labrador mittens have a distinct front and back and are right or left mittens. Because it’s desirable to have the pattern on the back very flat with no sign of needle changes, I have followed Harriet Pardy Martin’s suggestion to put all the back sts on Needle 1 and the palm sts on Needles 2 and 3. The end of the rnd will fall on a pattern change at the edge of the hand, and there is no obvious joint at the end of the rnd. Give the two yarns a half twist together at the beginning of Needles 1 and 2 to emphasize the turn to the other side of the mitt. Carry the darker color ahead at all times (p. 16).

Use Salt and Pepper pattern for the palm and the thumb, but you are free to use either Labrador Diamonds or Double Irish Chain charts (p. 180) or any other 8-st + 1 rep without changes. I have provided adjustments in the directions to use the 7-st Diamond or Waves charts (under “Mrs. Martin’s Finger Mitts,” p. 167) for the back of the mitten. (It’s all right if the pattern on the back of the hand runs over slightly at the little finger edge of the hand but it should be knitted on Needle 1 only.)

Labrador Diamonds Chart 8 7 6 5 4 3 2 1 Labrador Diamonds Thumb increase (This number of incs is for Medium sizes) Left mitt Right mitt End here Right mitt Left mitt Start here Key MC–main color CC–contrast color one pattern repeat

Although many Newfoundland and Labrador mitts have only as much large pattern as would normally be found on the back of a glove, with the whole finger area in Salt and Pepper, I have continued the pattern to the fingertip. You are, of course, free to knit the finger area in Salt and Pepper. Some knitters find a four-by-four square of diamonds more balanced and appealing than a pattern covering the entire back of the mitten.

Off the Cuff

The cuff is worked in k3, p1 ribbing, a traditional ribbing for Newfoundland and Labrador. It is worked on the same size needles as the rest of the mitt, with sts added at the base of the hand to accommodate the different tensions of ribbing and stockinette.

The striped pattern on this cuff is typical but not universal. Optionally, knit the cuff plain or use another of the Newfoundland striping patterns. Cuffs on Newfoundland/Labrador mittens fit closely. I have loosened them up a little for ease in taking them on and off.
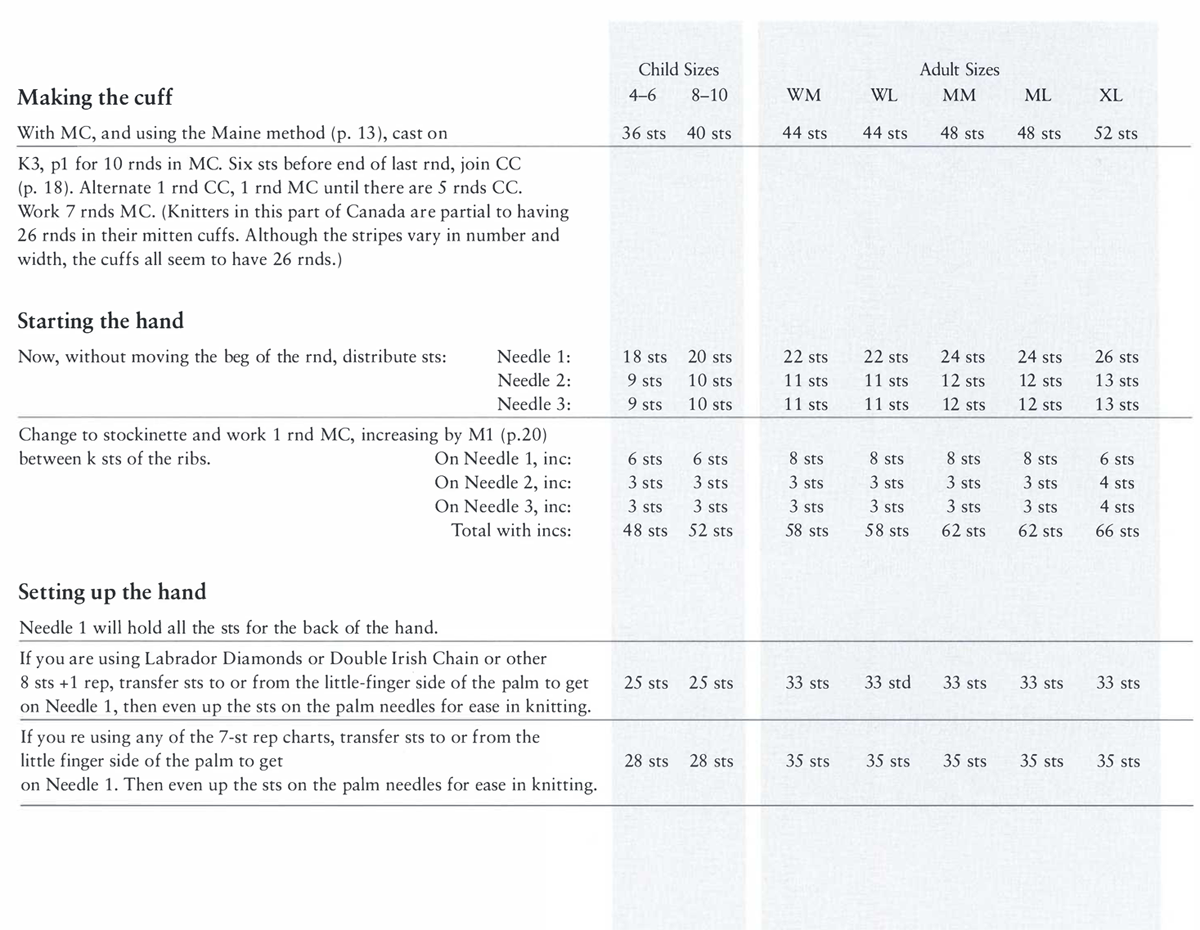
Making the cuff 4–6 8–10 With MC, and using the Maine method (p. 13), cast on 36 sts 40 sts K3, p1 for 10 rnds in MC. Six sts before end of last rnd, join CC (p. 18). Alternate 1 rnd CC, 1 rnd MC until there are 5 rnds CC. Work 7 rnds MC. (Knitters in this part of Canada are partial to having 26 rnds in their mitten cuffs. Although the stripes vary in number and width, the cuffs all seem to have 26 rnds.) Starting the hand Now, without moving the beg of the rnd, distribute sts: Needle 1: 18 sts 20 sts Needle 2: 9 sts 10 sts Needle 3: 9 sts 10 sts Change to stockinette and work 1 rnd MC, increasing by M1 (p.20) between k sts of the ribs. On Needle 1, inc: 6 sts 6 sts On Needle 2, inc: 3 sts 3 sts On Needle 3, inc: 3 sts 3 sts Total with incs: 48 sts 52 sts Setting up the hand Needle 1 will hold all the sts for the back of the hand. If you are using Labrador Diamonds or Double Irish Chain or other 8 sts +1 rep, transfer sts to or from the little-finger. side of the palm to get 25 sts 25 sts on Needle 1, then even up the sts on the palm needles for ease in knitting. If you re using any of the 7-st rep charts, transfer sts to or from the little finger side of the palm to get 28 sts 28 sts on Needle 1. Then even up the sts on the palm needles for ease in knitting. Adult Sizes WM WL MM 44 sts 44 sts 48 sts 22 sts 22 sts 24 sts 11 sts 11 sts 12 sts 11 sts 11 sts 12 sts 8 sts 8 sts 8 sts 3 sts 3 sts 3 sts 3 sts 3 sts 3 sts 58 sts 5 8 sts 62 sts 33 sts 33 std 33 sts 35 sts 35 sts 35 sts ML 48 sts 24 sts 12 sts 12 sts 8 sts 3 sts 3 sts 62 sts 33 sts 35 sts XL 52 sts 26 sts 13 sts 13 sts 6 sts 4 sts 4 sts 66 sts 33 sts 35 sts
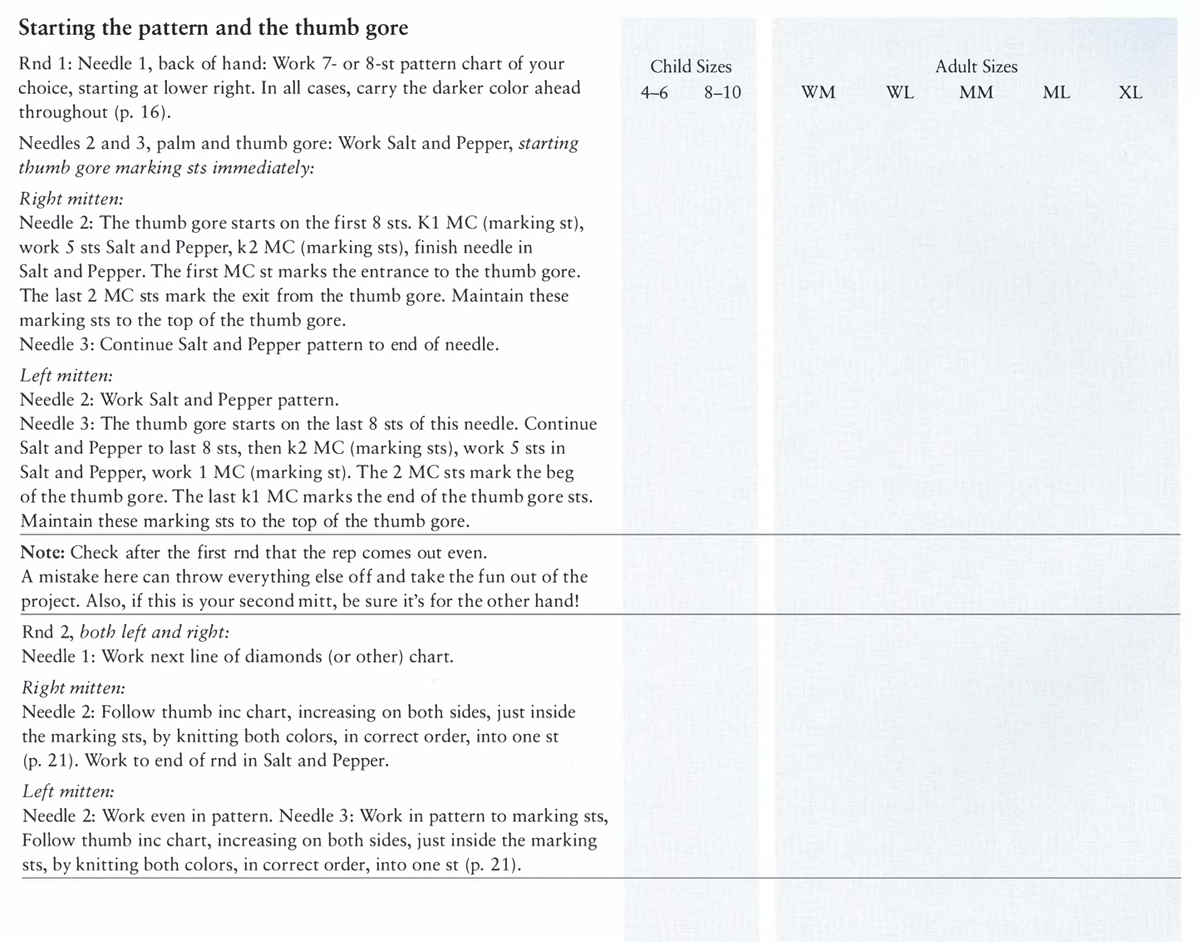
Starting the pattern and the thumb gore Rnd 1: Needle 1, back of hand: Work 7- or 8-st pattern chart of your choice, starting at lower right. In all cases, carry the darker color ahead throughout (p. 16). Needles 2 and 3, palm and thumb gore: Work Salt and Pepper, starting thumb gore marking sts immediately: Right mitten: Needle 2: The thumb gore starts on the first 8 sts. K1 MC (marking st), work 5 sts Salt and Pepper, k2 MC (marking sts), finish needle in Salt and Pepper. The first MC st marks the entrance to the thumb gore. The last 2 MC sts mark the exit from the thumb gore. Maintain these marking sts to the top of the thumb gore. Needle 3: Continue Salt and Pepper pattern to end of needle. Left mitten: Needle 2: Work Salt and Pepper pattern. Needle 3: The thumb gore starts on the last 8 sts of this needle. Continue Salt and Pepper to last 8 sts, then k2 MC (marking sts), work 5 sts in Salt and Pepper, work 1 MC (marking st). The 2 MC sts mark the beg of the thumb gore. The last k1 MC marks the end of the thumb gore sts. Maintain these marking sts to the top of the thumb gore. Note: Check after the first rnd that the rep comes out even. A mistake here can throw everything else off and take the fun out of the project. Also, if this is your second mitt, be sure it’s for the other hand! Rnd 2, both left and right: Needle 1: Work next line of diamonds (or other) chart. Right mitten: Needle 2: Follow thumb inc chart, increasing on both sides, just inside the marking sts, by knitting both colors, in correct order, into one st (p. 21). Work to end of rnd in Salt and Pepper. Left mitten: Needle 2: Work even in pattern. Needle 3: Work in pattern to marking sts, Follow thumb inc chart, increasing on both sides, just inside the marking sts, by knitting both colors, in correct order, into one st (p. 21). Child Sizes 4–6 8–10 WM Adult Sizes WL MM ML XL
Continue to work Diamonds (or other) chart on Needle 1 and to inc 2 sts in thumb gore every rnd until there are within the two MC marking lines. Work even in pattern until thumb gore measures (inches) (cm) Taking off the thumb gore stitches Place all the thumb gore sts between (but not including) the marking lines onto waste yarn. Using twisted M1 (p. 23), cast on 5 sts in pattern over the gap. Discontinue the two marking lines, working them into the Salt and Pepper pattern. Total is again: Work even until mitt above cuff measures (inches) (cm) Closing the mitten tip Dec every other rnd once, then every rnd: Needle 1: K2tog (p. 24), work in pattern to 2 sts from end of needle, SSK2tog (p. 24). Needle 2: K2tog, work in pattern to end of needle. Needle 3: Work in pattern to 2 sts from end of needle, SSK2tog. Repeat every rnd until there remain: Check measurements against finished measurements at beg of directions before breaking yarn. If you are satisfied, break yarn leaving two 6 ” (15cm) tails. With yarn needle, thread one end through the remaining sts and draw up firmly. Draw other end to inside of mitten. Thread first end through drawn-up sts again, darn a few sts to secure and draw it to inside of mitten. Child Sizes 4–6 8–10 11 sts 13 sts 2 2⅜ 5 6 48 sts 52 sts 4¾ 5¾ 12 14.5 12 sts 12 sts Adult Sizes WM WL MM ML XL 15 sts 15 sts 17 sts 17 sts 19 sts 2½ 2⅝ 2½ 2⅝ 3 6.5 6.75 6.5 6.75 7.5 58 sts 58 sts 62 sts 62 sts 66 sts 6 6½ 6 6½ 7⅛ 15.25 16.5 15.25 16.5 18 14 sts 14 sts 14 sts 14 sts 14 sts
Working the thumb Join both yarns by sewing (p. 20) into back of fabric starting at right side of the thumb hole. Pick up from waste yarn: Needle 1: Needle 2: Needle 3: Pick up 6 sts at top of thumb hole. In each corner of thumb hole, pick up and twist 1 st onto needle. Total: Distribute sts: Needle 1: Needle 2: Needle 3: Work even, matching pattern to Salt and Pepper pattern on the thumb gore until thumb measures (inches) (cm) or work reaches just to the end of the thumb nail. Closing the tip of the thumb Rnd 1, all needles: K2tog, work in pattern to 2 sts from end of needle, SSK2tog. Rnd 2: Work even. Work Rnd 1 altogether Total remaining: Break yarn, leaving two 6 ” (15cm) tails. With yarn needle, thread one end through the remaining sts and draw up firmly. Draw other end to inside of thumb. Thread first end through drawn-up sts again, darn a few sts to secure it, and draw to inside of thumb. Child Sizes 4–6 5 sts 6 sts 19 sts 6 sts 6 sts 7 sts 1½ 3.75 2X 7 sts 8–10 6 sts 7 sts 21 sts 7 sts 7 sts 7 sts 1⅞ 4.75 2X 9 sts Adult Sizes WM WL MM ML XL 7 sts 7 sts 8sts 8 sts 9 sts 8 sts 8 sts 9sts 9 sts 10 sts 23 sts 23 sts 25 sts 25 sts 27 sts 7 sts 7 sts 8 sts 8 sts 9 sts 8 sts 8 sts 8 sts 8 sts 9 sts 8 sts 8 sts 9 sts 9 sts 9 sts 1⅞ 2 1⅞ 2 2⅜ 4.75 5 4.75 5 6 3X 3X 3X 3X 3X 5 sts 5 sts 7 sts 7 sts 9 sts
Finishing the mitten Turn mitten inside out and darn all ends into the back of the fabric. Repair possible holes at corners of the thumb hole with nearby tails. Trim ends closely. This mitten is a right- or a left-handed mitten. Make another, being careful that it is for the opposite hand! Child Sizes 4–6 8–10 WM Adult Sizes WL MM ML XL
image

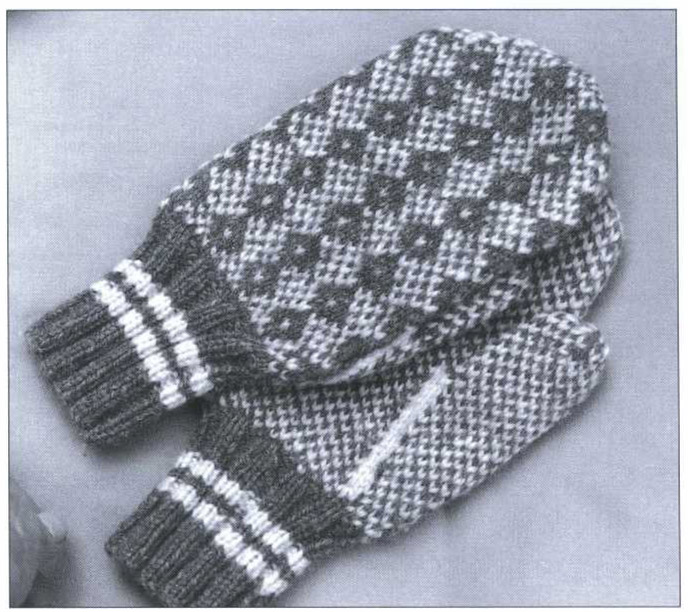
Labrador Diamonds Mittens with the Diamond Check #1 pattern from from Mrs. Martin’s Finger Mitts (p. 167) on the back

This pattern was first published in Needlecraft for Today, 1985.