
Big Waves Mitten (left) copied from a mitten in the pattern bag of Phyllis Montague in Northwest River, Labrador.
Waves are a recurring theme in Newfoundland and Labrador mittens, and all the waves are pointed. Two smaller Waves patterns are included in the charts on p. 167. Another Waves pattern is presented here with all the peculiarities of traditional knitting. This pattern, as is, makes only a man’s large mitten, but was so spectacular that I couldn’t leave it out.
Phyllis Montague, of Northwest River, Labrador, had this mitten in a bag of patterns her mother (from St. Anthony’s, Newfoundland) had made her, which also included a Caribou design and one I call Shining Star (at right in photo). This Waves Mitten was huge but grand. I photographed it and reconstructed the knitting by counting stitches in the photograph. Mrs. Montague herself didn’t knit many of these. She felt that mittens with caribou sold more readily.
Big Waves has many long floats between color changes, which necessitate catching up the other color behind the work, a process that invariably causes some lumps. If you don’t want to catch up the other color and can keep the floats fairly relaxed, you could make a pair, then wash them in cool water, scrubbing and rubbing them to encourage the loops to adhere to the inside surface. But you would have to exercise care in putting them on until they became somewhat matted together.
If you are inventive and like this pattern, maybe you can figure out how to make it smaller—either by using a finer yarn and needles, or by cutting down the design itself. A fingering yarn at 9 sts = 1 inch (2.5cm) will bring it down to a woman’s Medium without altering the pattern.
Yarn MC 3 oz (light color) medium-weight yarn • CC 3 oz (dark color) medium-weight yarn. I used Bartlettyarns 2-ply Fisherman Yarn, which is a little lighter than Briggs & Little 2/8, and a little heavier than commercial medium weight yarns.
Equipment 1 set Size 3 (3.25mm, Can. Size 10) double-pointed needles, or size you need to knit in Fleur-de-lis pattern at correct tension • 6 ” (15cm) length of contrasting waste yarn • Blunt-tipped yarn needle
Tension 7 sts and 7½ rnds = 1 ” (2.5cm) in pattern
Measurements—inches and centimeters
| XL only | |
| Hand Length | 8½ (21.5) |
| Hand circumference, including tip of thumb | 10 (25.5) |
| Mitten hand length | 9 (22.75) |
| Mitten thumb (⅓ hand) | 3 (7.5) |
| Mitten width | 5 (12.75) |
ABBREVIATIONS beg: beginning • CC: contrast color • dec(s): decrease(s) • inc(s): increase(s) • k: knit • k2tog: knit 2 together • MI: make 1 stitch • MIL: make 1 stitch left • MIR: make 1 stitch right • MC: main color • p: purl • rep: repeat • rnd(s): round(s) • SSK2tog: slip, slip, knit 2 sts together • st(s): stitch(es) • twisted MI: twisted make 1 cast-on
In order to knit the same tension in Big Waves pattern, do not weave in the unused strand on floats of only 4 sts. The knitting may be a little ridgey, but not in a bad way. You can steam the mitten lightly with an iron and a damp cloth afterward.
Do be sure to weave in the second strand (p. 18) behind your work when color changes are more than 4 sts apart.
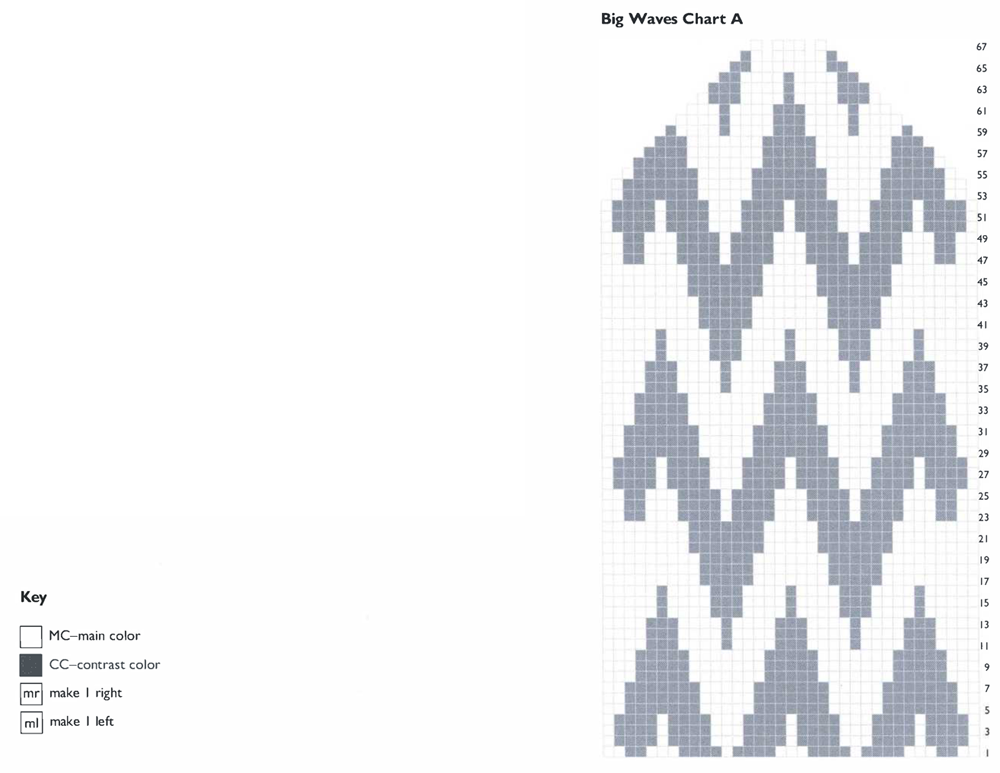
Follow the charts on pps. 176–77 exactly. Fleur-de-lis (the palm-side pattern) is a multiple of 4 sts and 6 rnds. Big Waves is a multiple of 12 sts and 24 rnds. Carry the darker color ahead throughout.
The cuff is a traditional Newfoundland/Labrador k3, p1 ribbing. Occasionally, one sees mittens from this region with k4, p1 cuffs, which almost cease to have any elastic function at all. It is also traditional to use one size needle for both stockinette and ribbing and to inc at the top of the cuff to accommodate the difference in tension.
With MC, and using the Maine method (p. 13), cast on 44 sts. Join, being careful not to twist sts. Distribute sts: Needle 1—16 sts; Needle 2—12 sts; Needle 3—16 sts.
K3, p1 for 26 rnds.
Note: Carry CC (the darker color) ahead (p. 16). Check after the first rnd of pattern that the rep comes out even. A mistake here can throw everything else off and take the fun out of the project.
Work 1 rnd plain stockinette, adding 2 sts between the 3 k sts of every rib by M1 (p. 20) or by knitting into the loop between sts. Total 66 sts. Arrange sts: Needle 1—35 sts; Needle 2—17 sts; Needle 3—14 sts. Needle 1 will be the back of the hand; Needles 2 and 3 will be the palm. The beg/end of the rnd will be between Needles 3 and 1.
Begin Chart A at lower right on Needle 1 (the back), move to palm Chart B and insert the thumb gore Chart C in the hole of Chart B.
Note: Palm Chart B shows the right mitten. For the left mitten, read Chart B from bottom left to right (while knitting from right to left, of course).
Right mitten: The first 5 sts of Needle 2 form the base of the thumb gore, including an outline (in Chart B) of a single CC marking st on each side.
Left mitten: The last 5 sts of Needle 3 form the base of the thumb gore, including an outline (in Chart B) of a single CC marking st on each side.
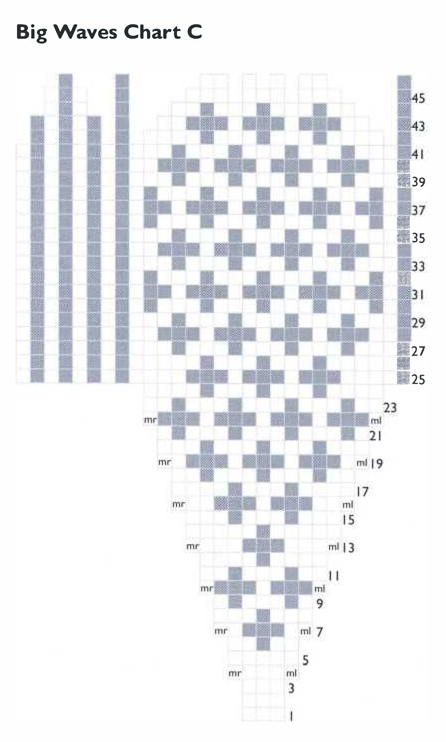
Both mittens: Every third rnd, inc within the 2 CC marking lines: K1CC; M1L (p. 20) MC; work up to second CC marking st; M1R, (p. 21) MC. See Chart C for a visual representation of this. In Rnd 6, begin color pattern on thumb gore, following Chart C.
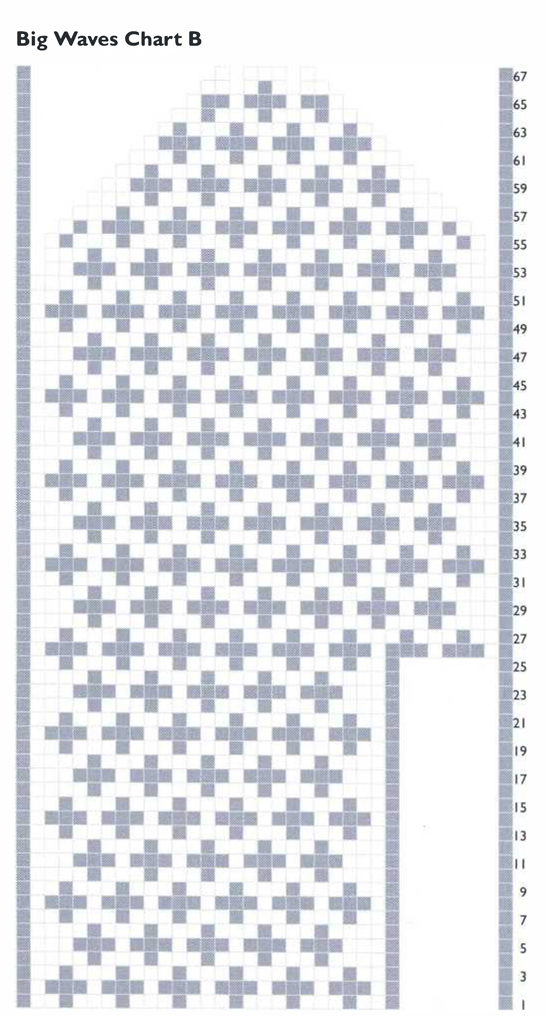
Right mitten: Work Chart B from right to left.
Left mitten: Work Chart B from left to right.
When there are 17 sts between (but not including) the CC marking sts, work even in pattern until thumb gore above cuff measures 3 ” (7.5cm).
Put 17 thumb gore sts on waste yarn.
Using twisted M1 (p. 23), cast on 7 sts in pattern over the gap. Discontinue marking sts on palm (include them in the palm pattern), but not on index finger edge. Total: 70 sts.
Following charts, work even until pattern above cuff measures 7⅜ ” (18.75cm).
Needle 1: SSK2tog MC (p. 24). Work in pattern to last 2 sts of needle, k2tog MC (p. 24).
Needles 2 and 3: K1 CC, SSK2tog MC; work in pattern to last 3 sts of Needle 3, k2tog MC, k1 CC.
This creates a 3-st dec strip along both edges of the mitten (1 MC, 1 CC, 1 MC). Maintain this strip to the tip of the mitten.
Dec this way every second rnd once, then every rnd. Where a 2-st dec is shown on the chart, k2tog twice in the MC areas on both sides, both front and back, in every rnd while continuing to dec on the edges as before.
Check measurements against finished measurements at beg of directions. If you are satisfied, break yarn leaving a 6 ” (15cm) tail. With yarn needle, thread one end through the remaining sts and draw up firmly.
Draw other end to inside of mitten. Thread first end through drawn-up sts again, darn a few sts to secure and draw it to inside of mitten.
Needles 1 and 2: Pick up 17 sts from waste yarn.
Needle 3: Pick up 7 sts at top of thumb hole.
Pick up and twist 2 sts onto needle in each corner of thumb hole in the CC marking sts. Total: 28 sts.
Join both yarns by sewing (p. 20) into back of fabric starting at the right side of the thumb hole.
Needles 1 and 2: Continue Fleur-de-lis pattern from thumb gore following Chart C.
Needle 3: Alternate CC and MC, continuing the CC marking sts up the sides of the thumb and working 1-st-wide vertical stripes on the inside of the thumb.
Work even in patterns until thumb measures 2½ ” (6.5cm).
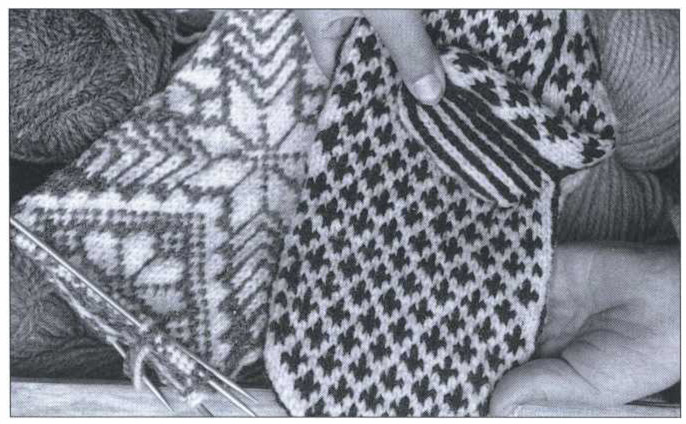
Mrs. Montague striped the palm side of the thumb on all her mittens to give them greater durability. She laughed when she saw a Maine striped mitten. “She knitted it all like a thumb,” she said.
Following Chart C, dec as on hand until 10 sts remain.
Break yarn, leaving a 6 ” (15cm) tail. With yarn needle, thread one end through the remaining sts and draw up firmly. Draw other end to inside of thumb. Thread first end through drawn-up sts again, darn a few sts to secure and draw it to inside of thumb.
Turn mitten inside out and darn all ends into the back of the fabric. Repair any holes at corners of the thumb hole with nearby tails. Trim ends closely.
This mitten is a right- or a left-handed mitten. Make another, being careful that it is for the opposite hand!