Baby Foxes and Goslings

image

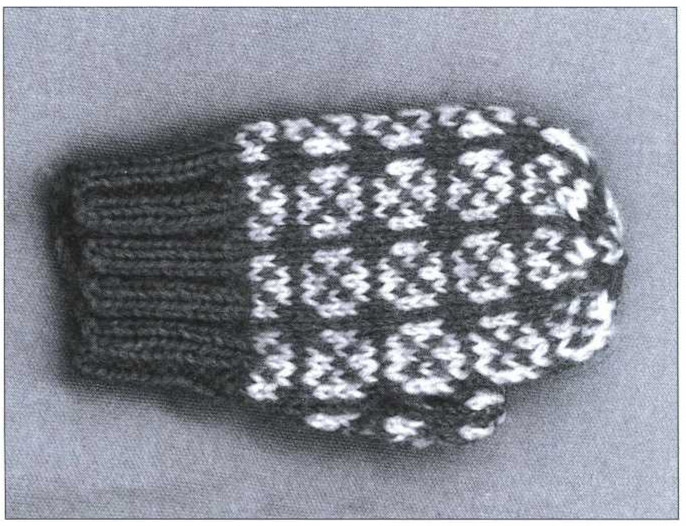
Baby Foxes and Goslings Mitten in two colors

Yarn Brunswick Yarns Pomfret, used for mitten in the photo, no longer exists, but we have had good luck with Jaggerspun ²/₈, Halcyon Yarn’s Victorian, and Raumagarn Hifa. Any sport weight yarn that knits to correct tension will work. Baby yarn or fingering is usually too fine. It is fine to use Superwash™ treated wool for babies, although it is not quite as warm when wet.

• MC (dark) ¾ oz or 21.5g sport weight yarn, preferably wool

• CC (light) ½ oz or 14.25g sport weight yarn, preferably wool

Equipment 1 set Size 2 (2.75mm, Can. Size 12) double-pointed needles, or size you need to knit in pattern at correct tension • 1 set Size 1 (2.25mm, Can. Size 13) double-pointed needles for ribbing • 6” (15 cm) length of contrasting waste yarn • Blunt-tipped yarn needle

Tension 9 sts and 9½ rnds = 1” (2.5 cm) in pattern

ABBREVIATIONS beg: beginning • CC: contrast color • dec(s): decrease(s) • inc(s): increase(s) • k: knit • k2tog: knit 2 together • MI: make I stitch • MIL: make I stitch left • MIR: make I stitch right • MC: main color • p: purl • rep: repeat • rnd(s): round(s) • SSK2tog: slip, slip, knit 2 sts together • st(s): stitch (es) • twisted MI: twisted make I cast-on

Measurementsinches and centimeters

6–12 mos 2 years 3 years 4 years
Hand length 3 4⅛
7.5 9 9.5 10.5
Hand circumference, incl. tip of thumb 5 6
11.5 12.75 14 15.25
Mitten hand length 4
8.25 9 10.25 10.75
Mitten thumb (⅓ mitten hand 1⅛ 1⅜
3 3.25 3.5 3.75
Mitten width 3
5.75 6.5 7 7.5

Pattern

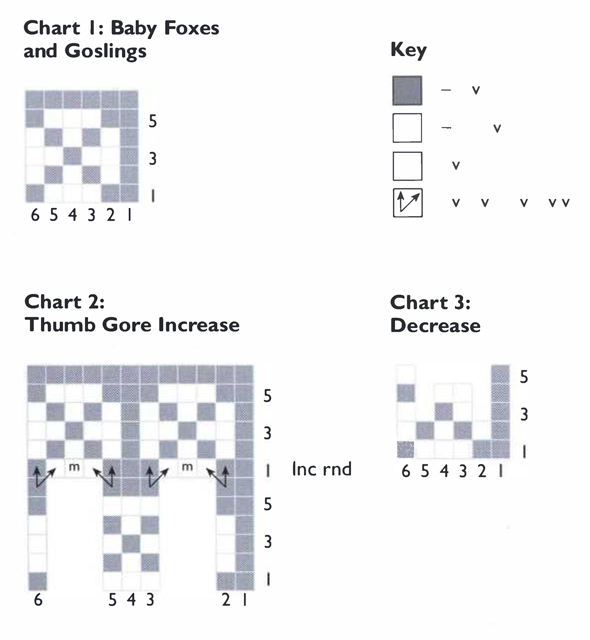
Fox and Geese is a multiple of 6 sts and 6 rnds and, because of the single-color rnd, is not easily knitted flat. These mittens are knit circularly and, unlike the adult version, without a third color for the horizontal lines.

Incs and decs are made in the first pattern rnd only, with an inc of 6 sts—one pattern rep—at once. Challenging, but then there’s only one inc rnd.

Chart I: Baby Foxes and Goslings Chart 2: Thumb Gore Increase Key Chart 3: Decrease

Off the Cuff

A simple k2, p2 ribbing in one color works well for these small mittens.

Making the cuff With MC, smaller needles, and using the Maine method (p. 13), cast on Distribute sts: Needle 1: Needle 2: Needle 3: Join into a triangle, being careful not to twist sts around the needles. K2, p2 in MC for Change to larger needles and stockinette. K1 rnd MC, inc on Needle 2 (inches) (cm) Total (a multiple of 6): Six sts from end of rnd, join CC (p. 18). Finish rnd in MC. Starting the pattern and the thumb gore Note: Carry MC (dark color) ahead throughout (p. 16). Check after the first rnd that the rep comes out even. A mistake here can throw everything else off and take the fun out of the project. Start Chart 1 at lower right on and work chart through Line 6. Start thumb gore, beginning with Line 1 of next pattern band (marked “Inc rnd” on Chart 2). Note: Practically speaking, the mitten can be worn on either hand, and you can make two right or two left mittens, as you please, but directions follow for individual left and right mittens, too. This traditional arrangement places the “seam” between rnds in the center of the palm. Right mitten: K in pattern up to St 1 of next-to-last pattern block on Needle 3. Left mitten: K in pattern to St 1 of second pattern block on Needle 1. Both mittens: Inc. K1 MC into St 1; k both colors (p. 21) into St 2—first 6–12 mos 40 sts 12 sts 16 sts 12 sts 1¼ 3.25 2 sts 42 sts Line 3 2 yrs 48 sts 16 sts 16 sts 16 sts 1¼ 3.25 48 sts Line 1 3 yrs 52 sts 16 sts 20 sts 16 sts 1⅜ 3.5 2 sts 54 sts Line 1 4 yrs 60 sts 20 sts 20 sts 20 sts 1½ 3.75 60 sts Line 1
MC then CC; M1 CC (p. 20); k both colors into St 3—first CC then MC; k1 MC into St 4; k both colors into St 5—first MC then CC; M1 CC; k both colors into St 6—first CC then MC. You are now 6–12 mos 2 yrs 3 yrs 4 yrs ready to k St 1 of the next pattern block. You have increased 6 sts in the space of 5 sts. A miracle. This is the only thumb gore inc in this mitten. Total: 48 sts 54 sts 60 sts 66 sts· Work 5 more rnds, completing Chart 2 to end of Line 6. Taking off the thumb gore stitches Right mitten: Work in pattern to 12 sts before end of Needle 3. Put next 11 sts on a piece of waste yarn. Using twisted M1 (p. 23), cast on 5 sts in pattern over the gap, k 1. Left mitten: K1, put next 11 sts on a piece of waste yarn. Using twisted M1 (p. 23), cast on 5 sts in pattern over the gap, work Line 1 to end of rnd. Total: 42 sts 48 sts 54 sts 60 sts Both mittens: Work even in pattern until hand above cuff measures (inches) 2¾ 3¼ 3¾ 3¾ (cm) 7 8.25 9.5 9.5 ending with Line 6 of chart completed. Closing the mitten tip Note: Decs are within each block of pattern. Chart 3 shows this graphically. You will dec by k2tog (p. 24) and SSK2tog (p. 24). Rnd 1: Dec: Work Line 1 of chart, but as you do so, *k2tog, k1; rep from * to end of rnd. Total: 28 sts 32 sts 36 sts 40 sts Rnd 2: Work even. *K1 MC, k1 CC; rep from * to end of rnd. Rnd 3: Dec: *SSK2tog MC, K1 CC; rep from * to end of rnd. Total: 19 sts 21 sts 24 sts 27 sts Rnd 4: Work even. *K2 MC, K2 CC; rep from * to end of rnd. Rnd 5: Dec: *SSK2tog MC, K2tog CC; rep from * to end of rnd. Total: 13 sts 16 sts 16 sts 19 sts Check measurements against finished measurements at beg of directions before breaking yarn. If you’re satisfied, break yarn,
leaving 6” (15cm) tails. With a yarn needle, thread one end through the remaining sts and draw up firmly. Draw other ends to inside of mitten. Thread first end through drawn-up sts once more, darn a few sts to secure end and draw end to inside of mitten. Working the thumb The thumb has the same girth in all four sizes. On Needles 1 and 2, pick up 11 sts from waste yarn. On Needle 3, pick up 5 sts from top of thumb hole and 1 st in each corner of thumb hole. 18 sts total. Work even until thumb gore and thumb together measure Closing the tip of the thumb (inches) (cm) Dec sharply: Rnd 1: *K2tog, k1 alternating MC and CC, rep from * to end of rnd. Rnd 2: *K2tog, alternating CC and MC (avoiding the appearance of stripes), rep from * to end of rnd. Total remaining: 6 sts. Check measurements against finished measurements at beg of directions before breaking yarn. If you’re satisfied, break yarn leaving a 6” (15 cm) tail. With a yarn needle, thread one end through the remaining sts and draw up firmly. Draw other end to inside of thumb. Thread first end through drawn-up sts once more, darn a few sts to secure it and draw to inside of thumb. Finishing the mitten Turn mitten inside out and darn all ends into the back of the fabric. Repair possible holes at corners of the thumb hole with nearby tails. Trim ends closely. Make another mitten for the opposite hand. 6–12 mos 2⅛ 5.5 2 yrs 2⅜ 6 3 yrs 2⅝ 6.75 4 yrs 2⅞ 7.25