Wee Checkerboard Mittens

Here is a favorite Canadian mitten rendered in small sizes. The checkerboard pattern pulls up widthwise in thick corrugated ridges that make it puffy, thick, and warm. The ridges, surprisingly, also make it soft and flexible. Look at the finished mitten: Because of the pull-up, the center of every two-stitch pair is all that shows clearly. It almost looks as if the mitten were knitted from the tip of the fingers down. But it isn’t.

image

Wee Checkerboard Mittens in two sizes

Yarn I used Jaggerspun 3/8 Heather Yarn for the mittens in the photographs, but any soft sport weight yarn that knits to the correct tension will be fine. • MC: 1 oz (28.5g) sport weight yarn, preferably wool • CC: ¾ oz (21.5g) sport weight yarn, preferably wool

Equipment 1 set Size 3 (3.25mm, Can. Size 10) double-pointed needles, or size you need to knit in pattern at correct tension • 1 set Size 1 (2.25mm, Can. Size 13) double-pointed needles for ribbed cuff • 6 ” (15cm) contrasting waste yarn • Small blunt-tipped yarn needle

Tension 9 sts and 8 rnds = 1 ” (2.5cm) in pattern

ABBREVIATIONS beg: beginning • CC: contrast color • dec(s): decrease(s) • inc(s): increase(s) • k: knit • k2tog: knit 2 together • MI: make 1 stitch • MIL: make 1 stitch left • MIR: make 1 stitch right • MC: main color • p: purl • rep: repeat • rnd(s): round(s) • SSK2tog: slip, slip, knit 2 sts together • st(s): stitch(es) • twisted MI: twisted make 1 cast-on

Measurements—inches and centimeters

6–12 mos 2 years 3 years 4 years
Hand length 3
7.5 9 9.5 10.75
Hand circumference, incl. tip of thumb 5 5⅝ 6
11.5 12.75 14.25 15.25
Length of mitten hand 3⅝ 4
8.25 9.25 10.25 11.5
Length of finished mitten thumb 1⅜
3.25 3.25 3.5 3.75
Finished mitten width 3
5.75 6.5 7 7.5

Pattern

Checkerboard is a multiple of 4 sts and 4 rnds. It has a strong tendency to pull up widthwise, which is not a fault, as it makes the knit thicker and more insulating as well as delightfully soft. Because of this trait, I used needles one size larger than for the other double-knit baby mittens to knit at about the same tension.

Wee Checkerboard Chart 3 1 4 3 2 1 Key MC-main color CC-contrast color place marker Knit both colors into I stitch Wee Checkerboard Thumb Gore Increase Chart 9 7 Inc rnd 5 (no inc) 3 Inc rnd 1 6 5 4 3 2 1

Off the Cuff

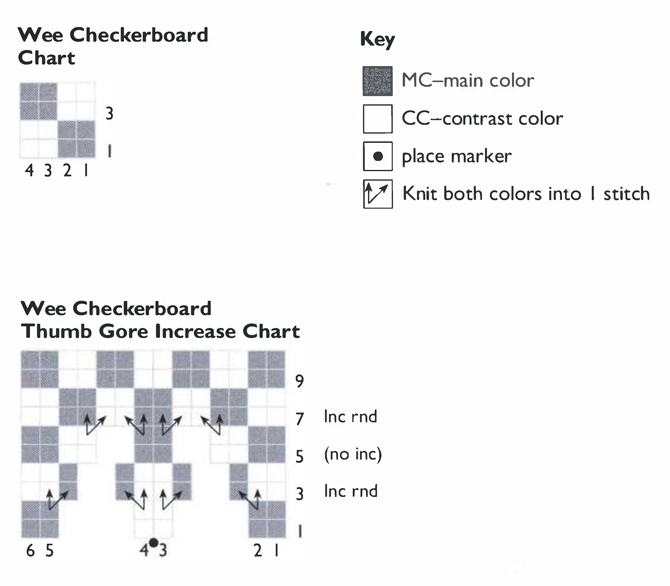
The cuff is a simple k2, p2 ribbing without stripes.

Making the cuff With MC, 3 smaller needles, and using the Maine method (p. 13), cast on Join into a triangle, being careful not to twist sts around the needles. Work k2, p2 ribbing for Change to larger needles and stockinette. Work 1 rnd in MC. S ix sts before end of rnd, join CC (p. 18). Starting the hand and thumb gore (inches) (cm) Start pattern at lower right corner of chart and rep to end of rnd. Note: Check after the first rnd of pattern that the rep comes out even. A mistake here can throw everything else off and take the fun out of the project. Work 2 rnds in pattern. Place a piece of contrasting waste yarn as a marker between Sts 3 and 4 on Needle 1. The thumb gore incs will branch out on both sides of this marker, 4 incs close together every fourth rnd, starting with Rnd 3. See the Thumb Gore Increase Chart for a visual representation. Rnd 3: Work in pattern up to 2 sts before marker, a MC st; inc 4 sts in the next 4 sts by knitting both colors into one st (p. 21), being careful to keep the colors in the correct order, as shown in the inc chart. Work the next st in CC and continue to end of rnd in pattern. Rnds 4 through 6: Work even in pattern. Rnd 7: Work in pattern up to 2 sts before marker, a CC st. Inc 4 sts in the next 4 sts by knitting both colors into one st, being careful to keep the colors in the correct order—the colors will be reversed from Rnd 3. Work the next st in MC and continue to end of rnd in pattern. Rnds 8 through 10: Work even in pattern. Rnd 11: Rep Rnd 3 (first inc rnd). Total added in all 3 inc rnds: 12 sts. 6–12 mos 44 sts 1½ 3.75 2 yrs 3 yrs 4 yrs 48 sts 52 sts 56 sts. 1¾ 2 2¼ 4.5 5 5.75
Rnd 15, two largest sizes only: Rep Rnd 7 (second inc rnd). Total 6–12 mos added in all 4 inc rnds: 16 sts. Rnd 15, two smallest sizes: Work even. Total: 56 sts Work even in pattern until work above cuff measures (inches) 1¼ (cm) 3.25 Taking off the thumb gore stitches K1, place on waste yarn the next 15 sts Using twisted M1 (p. 23), cast on 3 sts in pattern over the gap. Total: 44 sts Work even until pattern above cuff measures (inches) 2¾ (cm) 7 Closing the mitten tip Check that there are about the same number of sts on all 3 needles. If not, even them out, but don’t move the first and last sts of the rnd. On this fairly narrow mitten, the fit works best if the dec area is brief, producing a short, rounded tip. The decs are thus 6 to a rnd, every rnd, with a final 9- or 10-st dec. You will combine k2tog (p. 24) with SSK2tog (p. 24) in order to maintain the pattern. Dec: K2tog in pattern, working to 2 sts from end of needle, SSK2tog in pattern. Note: The pattern of the dec sts is the pattern on the needle you are knitting from. It’s easy to be tempted to continue the pattern on, for example, the last or first st on the needle. Rep this dec on all needles, every rnd 6 X Total remaining: 8 sts 2 yrs 60 sts 1¼ 3.25 15 sts 48 sts 3⅛ 8 6 X 12 sts 3 yrs 68 sts 1⅜ 3.5 19 sts 52 sts 3½ 9 7 X 10 sts 4 yrs 72 sts 1½ 3.75 19 sts 56 sts 3¾ 9.5 8 X 8 sts
Break yarn, leaving a 6 ” (15cm) tail. With yarn needle, thread one end through the remaining sts and draw up firmly. Draw other end to inside of mitten. Thread first end through drawn-up sts again, darn a few sts to secure it and draw to inside of mitten. Working the thumb Join both yarns by sewing (p. 20) into back of fabric starting at the right side of the thumb hole. Needles 1 and 2: Pick up from waste yarn Needle 3: Pick up 3 sts over the thumb hole. Pick up and twist 1 st onto needle from each corner of thumb hole. Total: Work even until thumb and thumb gore (from top of cuff) measure Closing the tip of the thumb Dec as on hand: In pattern, k2tog, work to 2 sts from end of needle, SSK2tog. Do this on all needles, every rnd (inches) (cm) Remaining on 3 needles: Break yarns, leaving 6 ” (15cm) tails. With yarn needle, thread one end through the remaining sts and draw up firmly. Draw other end to inside of thumb. Thread first end through drawn-up sts again, darn a few sts to secure it, and draw end to inside of thumb. Finishing the mitten Turn mitten inside out and darn all ends into the back of the fabric. Repair any holes at corners of the thumb hole with nearby tails. Thread the cast-on tail over and under along the p side of a k rib. Trim ends closely. Make another identical mitten. This mitten can be worn on either hand. 6–12 mos 15 sts 20 sts 1⅞ 4.75 2 X 8 sts 2 yrs 15 sts 20 sts 2 5 2 X 8 sts 3 yrs 19 sts 24 sts 2⅛ 5.5 3 X 6 sts 4 yrs 19 sts. 24 sts 2½ 6.5 3 X 6 sts