The most general instructions I can give you are to ask you to read the instructions and follow them. These are old patterns that have been around for generations, and all the different ways of doing things here have a reason behind them. If you don’t do it right, you’ll probably do it wrong, waste your time and materials, and wonder what happened. So do read and study the charts and drawings carefully.
These patterns include many odd ways of doing things, which are usually only learned by sitting next to someone and watching. To simulate that immediacy, we’ve made picture series for some of the harder-to-explain ideas. Others, including some tricky increases, are charted. Don’t let the charts frighten you. They’re just another way of getting across an idea, another way of drawing. Study them closely and read the instructions that accompany them, and you’ll see that they’re usually easier to understand than the text.
Unusual techniques that apply to only one pattern are presented with that pattern.
It’s said that after taking over a village from the Germans in World War II, the Allied military came across a knitting pattern written in pencil on lined paper and, thinking it was an encoded battle plan, sent it to their cryptographers, who spent hours trying to decipher it before a WAC leaned over the shoulder of one man and enlightened him.
In any handcraft—sewing, knitting, or building a dinghy—reading the entire instructions BEFORE you start is a good idea. Read the general instructions, which apply to all the mittens in this book, and read the specific directions for your project. When there are abbreviations—rampant in knitting—find out what they mean and try out any new techniques before you start. The abbreviations are keyed at the bottom of the first page of each pattern.
The more done in preparation, to a point, the better the resulting project will turn out. I don’t mean you should procrastinate indefinitely, but rather that when you do start you should follow the Scout motto: “Be prepared!”
The charts are set up with one square equaling one stitch, with different colors represented by different shades of gray. Each set of charts has a key detailing symbols used in that chart.
Empty spaces (no squares at all): Charts of increases at the thumb gore and decreases at the tips of mittens typically show spaces between stitches. This is where stitches have been eaten up by the decrease or will appear in the increase. Knit directly from the last stitch on the right to the stitch on the left side of the space as if there were no space.
The thumb gore is never worked separately. Following the textual directions, you will see that you knit directly from the hand to the thumb gore to the next stitch of the hand.
Sizes are pretty clearly defined at the beginning of each set of directions and are standard throughout the book. They are also named—Child’s 4 to 6, for example. These names are only guidelines. Large children can wear adult-sized mittens, and small-handed men can wear women’s and children’s sizes, and so forth. I am comfortable in a man’s medium (and I’m not a man).
More important than the name of the size is that mittens and hands have proportions that generally hold true for all hands. To determine which size to use, check the measurements of the hand you are knitting for—if you can—and compare with the measurements in the directions. If you can’t get measurements of the actual hand, working from the names of the sizes is a good second best.
The thumb is key to the length of the mitten or glove. It is one-third the length of the hand. While it’s hard to measure the length of the thumb—the inside or the outside? to which part of the knuckle?—it’s easy to measure the length of the hand and divide by 3.
Measure from the tip of the middle finger to the crease at the base of the hand. I add half an inch to this measurement for ease and to allow for a little shrinkage. Write down this number and the results of dividing it by 3.
If this entire formula is followed, the mitten or glove will be ⁴/₃ the hand length, with the thumb hole exactly in the middle of the length.
Another proportion, useful for gloves, is that the little finger separates from the hand at about half the length of the hand, and the index finger takes off ¼” to ⅓” (6 to 8mm) after that.
The measurement around the hand, taken just above the knuckles and including the tip of the thumb is the other important measurement you need to determine size, or to launch out on your own design. Including the thumb tip in this measurement provides ease that adjusts with the size of the hand. (Small hands have small thumbs. Skinny hands have skinny thumbs.)
This measurement—say, 9½ inches (24cm)—will be the number you multiply by the number of stitches per inch to find out how many stitches you need to cast on.
The circumference of the thumb (not the thumb gore) will be 40% of the measurement around the hand. Translate the fractional inches around the hand to decimals (½ = .5; ⅛ = .125; and so forth) and multiply by .4, then multiply the result by the number of stitches per inch to find out how many stitches you will need around the thumb.
With these two measurements—length and girth—you can make a mitten for anyone in the world using any technique you choose.
Standard Sizes — inches and (centimeters)*
| Child Sizes | ||||||||
| 2–4 | 4–6 | 6–8 | 8–10 | |||||
| Hand Measurements: | ||||||||
| Hand Length | 4½ (11.5) | 5½ (14) | 6 (15.25) | 6½ (16.5) | ||||
| Thumb (⅓ hand) | 1½ (3.75) | 1⅞ (4.75) | 2 (5) | 2⅛ (5.5) | ||||
|
Hand Circumference (incl. thumb tip) |
6 (15.25) | 7 (17.75) | 7¼ (18.5) | 8 (20.25) | ||||
| Finished Mitten: | ||||||||
| Hand Length | 4¾ (12) | 6 (15.25) | 6½ (16.5) | 7 (17.75) | ||||
| Thumb Length | 1⅝ (4.13) | 1⅞ (4.75) | 2 (5) | 2⅜ (6) | ||||
| Width | 3 (7.5) | 3½ (9) | 3⅝ (9.25) | 4 (10.25) | ||||
| Adult Sizes | ||||||||||||
| WS | WM | MM | WL | ML | XL | |||||||
| Hand Measurements: | ||||||||||||
| Hand Length | 6½ (16.5) | 7 (17.75) | 7 (17.75) | 7 (19) | 7½ (19) | 8½ (21.5) | ||||||
| Thumb (⅓ hand) | 2¼ (5.75) | 2⅜ (6) | 2⅜ (6) | 2½ (6.25) | 2½ (6.25) | 2⅞ (7.25) | ||||||
|
Hand Circumference (incl. thumb tip) |
7½ (19) | 9 (22.75) | 9½ (24) | 9 (22.75) | 9½ (24) | 10 (25.5) | ||||||
| Finished Mitten: | ||||||||||||
| Hand Length | 7 (17.75) | 7½ (19) | 7½ (19) | 8 (20.25) | 8 (20.25) | 9 (22.75) | ||||||
| Thumb Length | 2⅜ (6) | 2½ (6.25) | 2½ (6.25) | 2⅝ (6.75) | 2⅝ (6.75) | 3 (7.5) | ||||||
| Width | 3¾ (9.5) | 4½ (11.5) | 4¾ (12) | 4½ (11.5) | 4¾ (12) | 5 (12.75) | ||||||
*English measurements to nearest ⅛”; metric conversions rounded to nearest .25cm.
Directions for some mittens may vary slightly from these standard measurements to accommodate pattern repeats. This is noted in the specific pattern.
All the mittens in this book are knitted in the traditional way—circularly on four double-pointed needles, three to hold the stitches and a fourth to knit onto. While it is possible to knit some of these mittens flat, doing so is more difficult and the results less pleasing than when the mitten is knit in the round.
Knitting needles come in different sizes that, along with the yarn thickness, determine the size of each stitch and of the entire piece of knitting.
It is important to use the correct size needle and the correct size yarn if you wish to get the finished-mitten sizes given in the directions. Don’t guess about needle or yarn size! Metal needle gauges are available at all yarn stores, usually with an attached short ruler. Buy one and use it.
If you are a new knitter without an abundant supply of different sizes of needles, ask the store owner whether you can return the needles in their original packaging if they are not quite the right size. You may find that you knit more loosely or more tightly than the tension given in the directions. (See “Tension,” page 15.)
Most of the mittens and caps here are made with worsted weight (medium weight) wool yarns. Some are made with sport weight yarn, and one pair of gloves is made with fingering weight wool yarn.
Because we’re doing a lot of border-hopping in this book, I’ve used both Canadian and American yarns. I’ve also tried to use wool from small mills in Canada and New England, as these yarns were most often used in traditional New England and Canadian knitting. Even today, many families with sheep take their fleeces to a mill in their state or province to be exchanged for spun yarn, and the mills rely on these family shipments to supply them.
You can use other yarns, wool or synthetic, that work well with the tensions given. If your project requires shrinking, though, DO NOT use Superwash™-treated sheep’s wool or a synthetic.
On the subject of whether to knit in wool or synthetic yarn, I repeat a story told before:
In the first snowfall one winter, our children burst out of the house in whatever winter clothes they could find—last year’s jackets, unmatched boot socks and mittens, and caps too big or too small. Christmas had not yet arrived with the new supplies.
About ten minutes later, my seven-year-old was back inside, in tears. “My hand is so cold!” he wept, shaking it splashily.
On that hand, he was wearing a mitten made of a synthetic yarn. It was soaked like a wet mop, it was heavy, and it was freezing cold.
The other hand, which emerged from its mitten rosy and steamy warm (I’m not exaggerating), was wearing a wool, double-knit mitten, like the ones you’ll find in this book. The mitten was covered with caked-on wet snow. But it was warm inside.
Some knitters tell me wool is harsh to knit with. If you think so, choose a softer wool. Not all wool is scratchy. If ordering by mail, ask about softness. If you’re buying in a store, touch the yarn to your lips. Scratchy will show.
Other women who love synthetics tell me you can throw the synthetic mittens in the washer, launder them, then throw them in the dryer. I haven’t yet figured out why this should be an important feature for anything but a baby mitten. Winter is often over before mittens get washed in our house. If it’s an issue with you, there are many Superwash™ treated wools on the market that can stand being laundered without shrinking. (Again, don’t use Superwash™ treated wools for any project intended to be shrunk!)
Of course, wool does shrink. One project here calls for washing the yarn in the skein in hot soapy water and rinsing it in cold before knitting it, thus preshrinking it.
Shrinking is part of the wool’s natural defense against cold and wet, and actually improves a garment’s weather resistance. Fishermen’s mittens, a tight, single-knit mitten once worn by seamen all along the North Atlantic coast, are meant to be fulled and shrunk both before wearing and while in use. They are knit inches too long and quite wide. Most of the mittens here are about one-half inch longer than the hand, allowing a little for shrinkage but also a little ease.
See page 215 for sources of yarn and fleece used for the mittens in this book.
Every knitter has a favorite way of casting on stitches at the beginning of a project. If you can knit, you probably know how to cast on as well. However, I offer an old-fashioned cast-on shown to me by Nora Johnson, a traditional knitter from Five Islands, Maine, because it gives a firm, slightly elastic, and strong edge. This so-called Maine method of casting on is useful for any mittens (sweaters and socks, too), but it’s essential for mittens with stockinette cuffs to help keep their edges from curling.
The Maine method is a long-tail cast-on with an extra half-twist that makes a little bead on the knit side, just below the loops of the new stitches. It’s a little more time-consuming than many other cast-ons but its even, elastic, strong edge and fine appearance are worth a few minutes more.
Over the years of teaching knitting workshops from Texas to Surrey, England, I’ve come across a few people who consistently use this cast-on, which they always have learned from a grandmother or older relative. It is a standard cast-on for the archaic twined knitting (tvåändssticking) technique in the mountains of Norway and Sweden.
To cast on ten stitches using the Maine method, measure off yarn twice the length of your hand and start at that point. This should allow you about 10 sts and a tail roughly as long as your hand. Since your hand and mine are not the same size, see how this works on your own knitting and find a measure on your body that works for you for 10 stitches. With a little math, you can then determine how long a tail you’ll need to cast on the stitches for any piece of knitting.
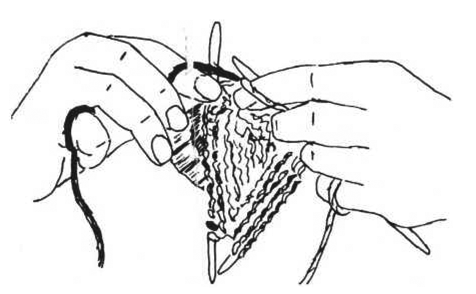
Follow the drawings, which are worth at least a thousand words.
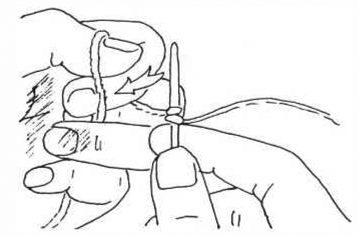
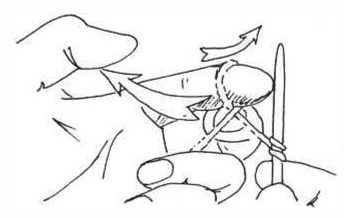
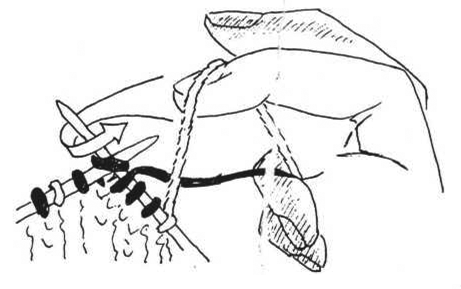
Casting On the Maine Way
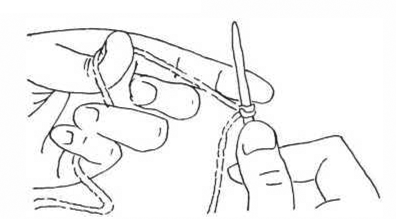
1. This is the third stitch. To make the first and all succeeding stitches, start with the yarn looped over the thumb, holding the short end in the left hand, tensioning the long end with the right lesser fingers, as if you were going to knit.
2. Insert index finger into loop.
3. Slip thumb out of loop and turn index finger away as if pointing at someone.
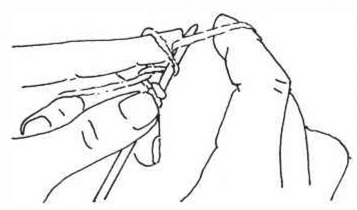
4. Knit stitch as if the left index were a knitting needle. Notice the twist.
5. Pull up tight from left then right, rocking back and forth until the stitch is snug on the needle. The twist provides the room to knit this off easily in the next round. Each cast-on makes one stitch.
In northeastern North America, cuffs come in several forms.
Cuffs at one time were a separate unit not even attached to the mittens. In Maine, these were called wristers and were made either in a color that harmonized with the mittens or in gray, with knit 2, purl 1 or knit 2, purl 2 ribbing. They were slipped on before the mitten. One woman told me she remembered as a child wearing wristers to her elbows over her winter jacket but under her mittens.
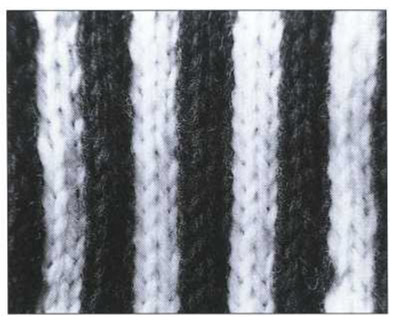
Cuffs nowadays are knit two ways, and they are usually part of the mitten. There is the ribbed cuff, sometimes striped to even out yarn consumption, almost invariably worked with knit 2, purl 1 ribbing or knit 3, purl 1 ribbing. I have met only one traditional knitter in the area who makes knit 2, purl 2 ribbed cuffs. The consensus is that the first two ribbings make a more elastic cuff. Some knitters say they don’t have to change needle sizes when they reach the main body of the mitten if they use one of these two combinations.
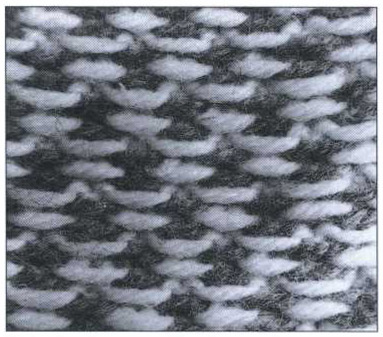
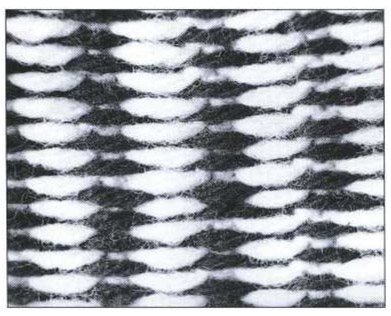
The other kind of cuff is in stockinette stitch! Yarn is cast on in one color, using the Maine method shown at left. A two-color pattern is begun in the next round. One technique is to work the cuffs with stripes of knit 2 dark, knit 2 light or knit 1 dark, knit 1 light. By pulling the fabric up in widthwise ridges in a closer tension than the patterned stockinette that follows, the vertical stripe patterns snug the cuff close to the wrist like ribbing. The stripes even look a little like ribbing. Mittens with these striped cuffs look marvelously handmade and old-timey.
Sometimes, instead of stripes, the pattern used on the rest of the mitten is also knit on the cuff. Although such cuffs look loose, they generally fit quite snugly and don’t let in any weather at all. Extra stitches are often added either in the thumb gore or on the little finger side to loosen up the fit around the hand.
The patterned cuffs are of course double-knit and hence warmer than a ribbed cuff. I don’t think I would knit a cuff like these on any of the Newfoundland/Labrador mittens, but on the small geometric patterns from farther south, they look great.
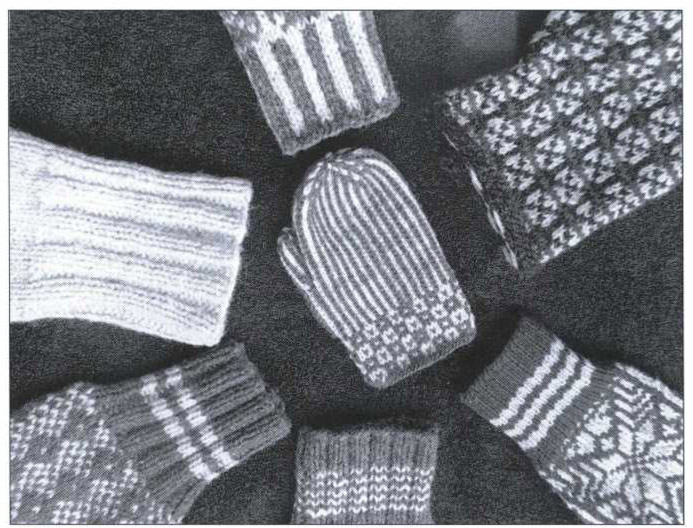
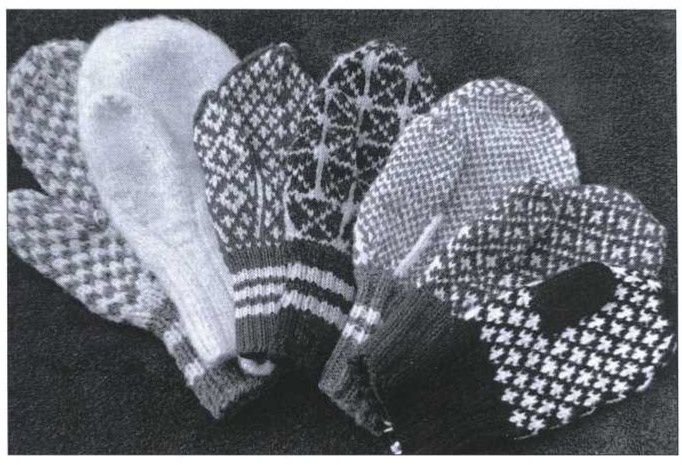
A variety of cuffs. Center: Patterned cuff in Peek-a-Boo. Clockwise from one o’clock: Patterned stockinette cuff in three-color Fox & Geese; knit 2, purl 1 ribbing with Norwegian-style 3 stripes; Newfoundland-style stripes on a knit 2 purl 1 ribbing; knit 2, purl 2 ribbing with stripes on a Labrador Diamonds mitten; plain knit 2, purl 2 ribbing on a Maine Fisherman’s mitten; Maine snug cuff with 2-stitch-wide vertical stripes.
The important thing about needle and yarn sizes is that they determine how many stitches you knit per inch vertically and horizontally. This is called “tension” or “gauge” and determines the size of what you are knitting. It is expressed thus: Tension: 6.5 sts = 1 ”, or sometimes 6.5 sts and 7 rnds = 1 ”. (In metric measurements, 1 ” = 2.5cm.)
Most knitting directions tell you never to knit anything without first making a test swatch—a little square or tube more than two inches wide made with the same needles, the same yarn, and the same pattern as your project—so you can check your tension before you have knitted six inches of a sweater.
However, mittens are small projects, sometimes barely two inches wide, and for them only, I suggest that you use them as your swatch. If you have a ribbed cuff, make it on the suggested needles—a little tight or loose is not a catastrophe on a stretchy cuff. When you reach the stockinette portion of the knitting, use the suggested needle size and work the first inch (2.5cm) according to the pattern, then knit half the round and stop. Leaving the needles in place, fold the knitting in half, so that half the round is visible. Move the stitches around on the needles so they are relaxed—neither crowded together nor pulled hard apart. Gently flatten the piece on a flat surface.
Measure along the bottom points of a row of stitches, lining up a marker line on the ruler with the exact edge of one stitch. Count until you get to the next inch (or 2.5cm) line on the ruler. If that line falls in the middle of a stitch or at a quarter, count that as well, or keep going until you get to two inches (5cm). Write down how many stitches there are in that space, and check a couple of other places on the work, avoiding thumb gore increases. If you don’t have the correct gauge anywhere, rip back to the round above the cuff and reknit on different size needles. DON’T change needle sizes in midstream.
If you have one-half stitch too many per inch (2.5cm), try the next larger needle size. If you have a half-stitch too few, try the next smaller needle size.
To determine your vertical gauge, count up from the point of one stitch. The trick is to count from point to point, not to the top of a stitch.
The coauthor of Flying Geese, Janetta Dexter, and I found that even when we knit the same number of stitches per inch widthwise, we knit a different number of rounds per vertical inch. Because of such differences among knitters, all vertical measurements here are given in inches or centimeters, although traditionally the measurements are given in bands of pattern, as in the directions given Nora Johnson by her mother for Fox & Geese mittens: “Knit three bands for the wrist, 3 for the thumb gore and 5 for the hand and don’t worry about that little bit beyond the fifth band.”
For those who knit in only one color, creating beautiful patterns by knitting with two or even three colors must seem an esoteric skill living only in hands born to it. Perhaps Norwegian knitters have a double-knitting gene and need only to have it awakened at age six or seven to become wonderful knitters.
To the single-color knitters of the world, I say that nobody in my family double-knit anything, although all the women and little girls could knit, fast and smoothly, without mistakes. We loved Scandinavian sweaters, Norwegian mittens, Fair Isle sweaters, but it never occurred to us that we could knit them ourselves. And if it had, reasonable instruction in the art simply didn’t exist in our neighborhoods until recently.
We were told everywhere to pick up the “new color” from underneath (Did “new color” mean the contrast color, or just the color we were about to use?), with the result that the two yarns steadily and inevitably became twisted around each other and had to be untwisted every few rounds—a bore at best. The result of this questionable method is a lumpy piece of knitting with an indistinct pattern.
I would like everyone to know that jacquard, stranding, or double-knitting is not something present in the genes of the elect, that it can be learned and done with skill by anyone who wants to do it. I am living proof of this. The fabric needn’t be lumpy or strangely pulled up, and it can come off the needles perfectly flat, with even tension and a back side as neat as the front.
The first axiom is NEVER TWIST THE YARN. Its corollary, like unto it, is DON’T PICK UP BOTH COLORS THE SAME WAY.
“Carrying one color ahead” is a technique for organizing two strands of yarn so they neither tangle nor twist nor pull unevenly at each other. That curious expression is how traditional knitters say, “When changing colors, pick up Color A from beneath and in front of Color B, and bring Color B from above and behind Color A.”
Color A, the one arriving on your needle from beneath and in front, is the one “carried ahead.” It will actually lie beneath (south of) Color B in the row or round, and it will be emphasized on the front side of the fabric. It is usually the darkest color in your hand, unless you are knitting a pattern of fine light lines that need special emphasis.
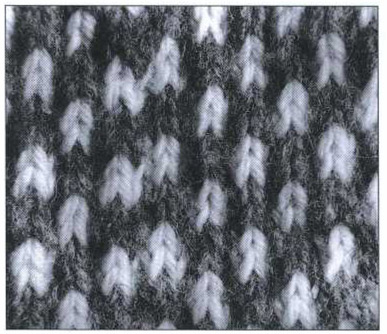
Knit side of Checkerboard pattern with the dark strand carried ahead. Note the dominance of the darker color and the pulled-up effect caused by the vertical lines of color changes.
Color B, the one arriving on your needle from above and behind like a small airplane, is the one “carried behind.” It will lie above (north of) Color A in the row or round, and will be emphasized on the back side of the fabric. Because light, bright colors (particularly white) stand out by virtue of their lightness, Color B is almost always the lighter color.
Purl side of the same Checkerboard pattern. Note how the lighter color dominates on the purl side, and there is no evidence of the pulled-up effect.
(Try carrying white ahead sometime in a mitten where both colors are in equal abundance. You’ll find you have a white mitten with a little added color. This too has its place.)
Now that you know this, how can it be applied to the knitting in your hands?
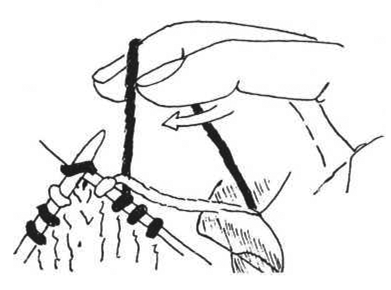
Knitters in the Continental tradition, who pick the yarn off the left index finger with the knitting needle, should place Color A (to be carried ahead) in the crease of the left index finger, Color B nearer the fingertip (top illustration at right). The strand nearest the joint is being carried ahead and will be emphasized on the front of the work.
Knit side of wide stripes with the dark strand carried ahead. Because white is the lighter color, the dominance of the black strand is not so obvious, but if white were carried ahead, the dark color would recede greatly.
Pick both colors the same way, and don’t go under either to get to the other—unless you have a long run of one color and have to weave in (see p. 18).
Knitters familiar with both right-handed Anglo-American knitting and left-handed Continental knitting can use both when working with two colors: Hold Color A (carried ahead) on your left forefinger and pick it à la Continental knitting; hold Color B with your right index finger and bring it to the needle à la American knitting. (See lower drawing at right.) The yarns never cross, never tangle, and Color A will be carried ahead and emphasized. This combination is called “stranding” and is most often seen in Norwegian knitting. When I use this method, color patterns that are meant to be ridgy flatten out. Because I like to have the pattern stand out a little, I almost never use this method. But I’ve never been very good at Continental knitting, either.
Purl side of the same wide stripes. On this side, the strand not carried ahead dominates, while the color carried ahead recedes.

Position of the working yarns in Continental knitting, with Color 13 nearer the fingertip. Both colors are picked up the same way.
Position of the hands in two-handed double-knitting or stranding. Knit the left-hand yarn the Continental way, the right-hand yarn the American way.
For those of us who knit in the Anglo-American tradition, with the yarn on the right index finger, carrying one color ahead is not as clear cut. If neat double-knitting is a problem for you, read carefully and study the drawings on p. 18, try it out, and I think you’ll get it.
Here are some useful terms: Above and over mean “closer to the sky;” Below and under mean “closer to the earth.”
For this lesson only, in front does not mean toward you, versus behind meaning away from you on the back side of your knitting. Instead, think of the knitting on your needles as a road, with the stitches not yet knitted as ahead or in front of you, and the stitches you’ve already knitted as behind you. You stand at the point where you are actually knitting, looking ahead to the left needle.
I tension both yarns together in the crooks of my right ring and little fingers, controlling them from that point. Only the yarn I am using at the time is on my right index finger.
To knit Color A (the yarn being carried ahead), I lift it with the back of my index finger FROM UNDER AND IN FRONT OF Color B, then knit with it as usual. Once Color A is in hand, you can continue knitting with it for 1 to 4 stitches without further gyrations.
Anglo-American knitting: To change from Color A to Color B, lift color B over Color A from behind and knit.
To change from Color B to Color A, catch Color A on the back of your middle or index finger and bring it out from under Color B and knit.
To change to Color B, drop Color A or push it down with your index finger or middle finger and, moving above Color A, catch Color B on your index finger, bring it over Color A, and knit. Once Color B is at work, you can knit 1 to 4 stitches without worrying about Color A.
To change back to Color A, push Color B back (down the road) over Color A, catch Color A on the back of your middle or index finger and bring it out from UNDER Color B, and knit.
The second axiom of double-knitting is: BE SURE TO CHECK THE TENSION IN THE PATTERN YOU’RE USING. Don’t assume that because you got seven stitches to the inch on Size 3 needles in Salt and Pepper pattern that you will get the same tension on the same needles when knitting Stripes or Checkerboard. Some of these patterns are meant to pull up slightly, or even a lot, into ridges. These may have to be knitted on larger needles to get the same tension as other patterns.
“Joining a New Color” and “Weaving In” are together because they are essentially the same technique. In both cases, you are knitting with one color and hitching another color on behind your work, so that it is attached but invisible on the front of the work. The difference is that when joining a new color, you have to anchor a loose end.
When you start a new color, either as a horizontal stripe or as a second color in a double-knit pattern, it’s nice to be able to start that color as an ordinary stitch without having to worry about its becoming gigantic in the next round or pulling loose, and without having to bother with working the end into the back of the knit later. By working it in before you start knitting with it, you make your knitting easier and more even, and you’ll save yourself a lot of sewing-in later. The worked-in end of the new color will knit like any other knitting stitch, without stress, from the get-go.
To join Color B, stop knitting 7 stitches before you need Color B. Pinch the short end of Color B against the back of your knitting below your most recent stitch, tail pointing down and long end up, and knit 1 stitch with Color A so that the working yarn goes around Color B, catching its end against the knit. Knit the next 6 stitches alternately over and under Color B, but never knitting it.
This action is called weaving in. It is also used for securing “floats,” where the color not in use is carried behind the worked stitches for more than 4 stitches.
Most double-knitting patterns, if they are nice, have color changes every one to three stitches. Some go on much longer. In this book, Partridge Feet, Double Irish Chain, Big Waves, and the Newfoundland Diamond patterns have five or more stitches of one color in a row. This means that on the back of your work, there is a 5-stitch-long stretch of the opposite color floating along, blissfully unaware that you’re about to catch it on the back of your diamond ring or your fingernail, rip stitches out of place, and pucker your beautiful work. Multiply this by the number of repeats horizontally and vertically, and your chances of messing things up just by wearing your mittens are very good. Called floats, these loops should never be more than three or four stitches long. Help these little guys not ruin your work by weaving in floats as you knit.
Each knitting method has its own way to knit over and under a strand being woven in.
To weave in the left strand, insert the needle into the next stitch, then lift the left strand so it rests above the right needle. Knit the right strand as usual. Knit the next right-hand stitch with the left strand in its usual position. The float yarn will be tacked to the back of the knit in two places, and the working yarn (from your right hand) will form a little V around the float yarn on the back of your work.
Weaving in or joining a new strand, two-handed technique:
1) Knit under new (or woven-in) strand.
2) Knit over new (or woven-in) strand.
To weave in the right strand while knitting with the left, insert the needle in the next stitch, bring the right strand under both needles above the left yarn. Hold it (loosely) to the left of the left yarn while you knit the left yarn. Bring the right yarn back to its usual position and knit the next stitch as usual. You will have anchored the float yarn at two points and the working yarn will form a little inverted V around the float on the back of your work.
Weaving in the left (or carried ahead) strand forms inverted Vs on the purl side.
To weave in the strand nearest your finger tip (Color B) while knitting the color nearer the joint of your finger tip (Color A), go over, then under, Color B to pick up and knit Color A. If the positions of the yarns switch when you do this, so that Color B now lies closer to the joint of your finger, go under it to get to Color A again. If not, just pick up Color A as usual. This tacks the float yarn to the fabric twice. The working yarn will cover it with a little inverted V on the back side.
To weave in Color A (closest to your index finger joint) while knitting Color B (closest to your finger tip), reverse the procedure. Dig under Color A to get to Color B. Knit Color B. In the next stitch, work Color B as usual. The working yarn (B) will hold the float yarn (A) to the fabric at 2 points and will look like a little V on the back of the fabric.
Pick up the color you want to weave in from the wrong position—that is, to weave in Color B, go through the motions of changing colors but twist Color A (carried ahead) under and to the right of Color B, then over Color B. Knit color A. In the next stitch reverse this: bring Color A back over then under Color B and knit it. Reverse this to weave in Color A.
If this sounds impossibly complicated, just remember that you are giving the yarns a half-twist one way between two stitches and a half-twist back to where they were between the next two stitches. Like everything else in knitting, it gets easier after the first few times.
You will be tacking the float yarn to the back of the fabric with a little V or an inverted V of the working yarn.
When joining two colors at the same time with no attached working yarn in sight, don’t weave in. Instead, grab your blunt-pointed yarn needle and thread the short end of one yarn you want to join. If it’s convenient to turn the work inside out at this point, do. If not (as when you’re joining two colors at the thumb hole of a double-knit mitten), work through the hole.
Starting quite near where you want to begin knitting, make a line of running stitches on the back side of the fabric to anchor the end of the yarn, using available floats or the tops of purl stitches (on the backs of your knit stitches). End by drawing the yarn needle (and yarn end) out through the fabric. Remove the yarn needle, and pull gently on the long end (the one you’ll knit with) until only an inch or two is still sticking out.
Do the same with the second color. Now you have two yarns well anchored and can turn your attention to more important things than loose ends—how many stitches to pick up at the corners, things like that. When you finish the mitten and turn it inside out to work in and trim loose ends, check these ends to see if you like the way they’re worked in. You can always re-do them at this point. Pull the short end through from the outside and re-do or, if you like the way it is already, trim close to the fabric.
Mittens would be simple if it weren’t for the human thumb. The thumb makes the hand wider where it begins at the wrist, wider and wider until it separates from the hand, leaving a gathered group of four fingers. This makes mittens not so simple.
Some mittens have no thumb gore at all and rely on a heavy increase at the top of the cuff to provide room for the thumb, but most of the mittens in this book have what is called a wedge-shaped thumb gore, although it is usually more like a top-heavy trapezoid.
Ways of coping with the thumb, left to right: A New Sweden, Maine, mitten with all the increases in the first two rounds above the cuff. A Maine Fishermen’s mitten with the thumb gore marked on each side with a line of purl stitches. A Norwegian-style mitten from Newfoundland with a triangular thumb gore set apart by two contrasting lines and a separate pattern. A Maine Compass mitten with an entire 8-stitch pattern element added in one (light) round. A Newfoundland mitten with typical palm and wedge-shaped thumb gore bounded by white lines. A Nova Scotia mitten with an unmarked wedge-shaped thumb gore. An Acadian mitten with no thumb gore but a sizable increase above the cuff to accommodate the base of the thumb.
Janetta and I have used several methods of increasing for the thumb, all of them taken from traditional knitters. Where and how they are used differs from region to region, mitten to mitten, knitter to knitter. These increases are fairly invisible, unlike those where one knits into the front and back of one stitch.
There are three options for a single increase, all of them in use throughout New England and Atlantic Canada.
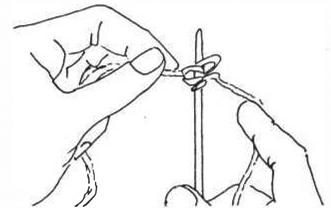
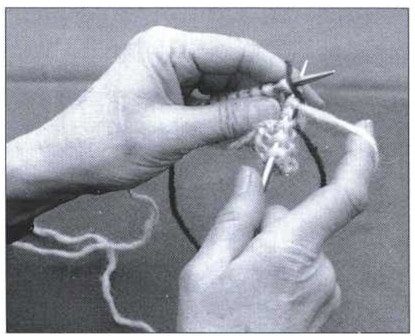
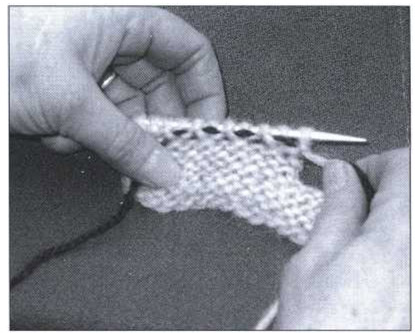
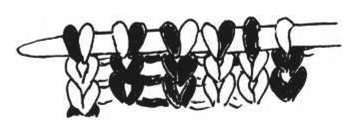
Make One Left (M1L). This increase is the most common in this book. It is simple to make and nearly invisible. M1 means you make a stitch out of nothing, hanging it on nothing. At the point where you want to increase, wrap your right thumb away from you over the working yarn close to the knit, down, then up toward you under the yarn, as if digging into a pint of ice cream with your thumbnail. (This is also called a thumb cast-on.) Slip the loop off your thumb onto the right needle and continue to knit. In the next round, knit into the front loop as an ordinary stitch.
Make One Left
Make One Right
This version, twisted clockwise, leans left. When it is important that it do so, it is called M1L. Otherwise, it is called Make One (M1).
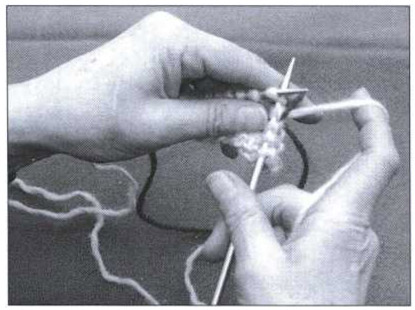
Make One Right is the same as Make One Left, but it leans the other way. You can exactly mirror the Make One Left by repeating the directions above on your left thumb. Or, you can pick up a little loop between thumb and forefinger, give it a half twist counterclockwise, and slip it onto the right needle, as shown in the photo. In the next round, knit into the back of this stitch.
This increase, twisted counterclockwise, leans right and is often paired with M1L for thumb gore increases.
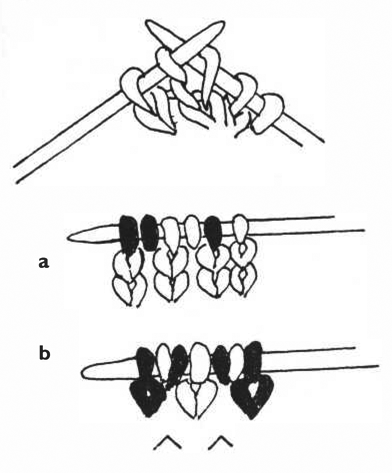
This increase can be only used in two-color knitting and at a point in the charted pattern where two colors change. Because the stitches are attached to the previous round, up to eight of these increases can be lined up next to each other without weakening the fabric. This decrease distorts vertical lines somewhat, so avoid involving vertical lines in the actual increase, although you can work it next to lines successfully. Remember that the increase must fit into the color sequence of the pattern.
Two regular stitches followed by four increases
To knit both colors into one stitch, place the increase at a point where the color will change in the second stitch. (This is worked out for you in the directions.) Insert the right needle in the front loop of the next stitch (as usual), place the color for the next stitch around the needle. Without moving the needles, wrap the opposite color around the needle as well, carrying the correct color ahead (p. 16). Knit both colors as one stitch. In the next round, knit each separately.
If you start with the color you are carrying ahead, be careful that the two colors don’t change places as you knit. If you happen to start with the other color, bringing the carried-ahead color from underneath (as usual), locks the two colors in place in the correct order.
On mittens with strong vertical lines, such as Double-Rolled Mittens and Striped Mittens, emphasize these lines on the sides of the thumb gore with a Step-Down Increase in the darker yarn or the yarn carried ahead.
To work this increase, you must step down to the round below that on your left needle. Insert the right needle into the stitch below the next stitch on your left needle. To increase one stitch here, simply knit that lower stitch, then move back up to the next stitch on the left needle and knit it. To increase two stitches here, as you must to maintain the pattern in Striped Mittens, knit both colors (p. 21) into the lower stitch, then knit the next stitch on the left needle, keeping the color sequence in order.
Top: Making an increase by stepping down one round and knitting into the back of the stitch, then knitting the next stitch on the left needle as usual.
(a) Two 1-stitch increases completed
(b) Two 2-stitches increases completed
You can make a left leaning step-down increase by reversing this procedure: Knit a carried-ahead stitch onto the right needle, then step down two rounds, pick up the top of the stitch from the right needle with the left, knit with one, or two, strands, settle these stitches comfortably on the needle, and work the next stitch as usual.
The usual thumb gore, widely accepted for published knitting patterns, is a simple wedge shape, bounded by lines of color or purl stitches. If there is a color pattern on the rest of the mitten, the color pattern on the thumb gore is often different from or related to the pattern on the palm of the mitten. Increases are generally just inside the marking lines (see p. 20 photo), made either by Make One or by knitting both colors into one stitch.
An older style of thumb gore for double-knit mittens is much less adaptable but almost invisible. A whole pattern element is added at once, within the space of a few stitches, usually in the first round of a color pattern repeat, so that two units of pattern seem magically to erupt from one. Because up to eight increases may be crowded together, knitters use combinations of several increases, usually Make-Ones and Knitting Both Colors into One Stitch on both sides of a center stitch.
This old-time thumb gore must have as many increase stitches crowded together as there are stitches in the repeat. In 2- to 4-stitch repeats, this can be almost invisible, even when 2-stitch increases are paired on opposite sides of a thumb gore. Five- to eight-stitch increases worked this way create a slight bulge in the knitted work, which, however, soon disappears when the mitten is worn.
It’s almost impossible to transfer increase directions from one of these old-time mitten patterns to another because of the peculiarities necessary to make each whole-unit increase fit perfectly into the allover pattern. Knitters may simply use a different, smaller pattern for the thumb and thumb gore to avoid having to increase so many stitches in so little space.
In Chipman’s Check, which is a bundle of clever tricks as well as a 6-stitch repeat, the bulge is avoided by increasing in 2 rounds. This is possible because within the 8-line repeat are pairs of Salt & Pepper rounds, which have only a 2-stitch repeat.
You may encounter these organic thumb gore increases in mittens from New England, Nova Scotia, and New Brunswick, often surrounded by amazed onlookers.
The New Brunswick and Nova Scotia patterns provided by Janetta Dexter call for an increase of one stitch on each side of the thumb gore with no line of marking stitches. This can be confusing and difficult if you’re not accustomed to it. Mark the edge of the thumb gore for your own benefit by laying a piece of contrasting waste yarn between the last stitch of the palm and the first stitch of the thumb gore in the very first round of the thumb gore. Keep your place here by flipping it from front to back (or vice versa) every few rounds. You will be in no danger of knitting this yarn and can remove it easily when you later need it to hold the thumb gore stitches.
You have placed the thumb gore stitches on a piece of waste yarn and want to cast on stitches above the thumb hole so you can continue knitting the hand. It would be nice to be able to have the advantages of the Maine cast-on—elasticity, firmness, and so forth—but no: There’s no second end, and the two strands you’re using have to continue the two-colored pattern.
The answer is the Twisted Make One, a one-strand version of the Maine method of casting on. Follow steps 1 through 4 of the Maine cast-on drawings (p. 14), but instead of knitting the loop off, simply tighten it onto the right needle. Repeat for each stitch you need. If you are working a color pattern, use the strands in the pattern order, so that when you reach the other side of the thumb hole, both colors will be there to work with.
The resultant stitch, like a Make One or a thumb cast-on, is not anchored to anything at the bottom; it doesn’t need to be. Like the Maine cast-on, it has a half-twist that gives it elasticity and makes it easy to knit into in the next round. When it’s time to pick up stitches for the thumb, you will find the twist still shows as a little diagonal at the knit-side edge of the thumb hole, ready for you to pick up and knit. Neat.
This is not traditional from anywhere. I made it up. But how nicely it works!
As with increases, so with decreases: Every knitter has a preferred layout for decreases. Decreasing along two edges will create a flat mitten that must be planned as either a left or a right. Decreasing with the pattern or decreasing at three points will produce an ambidextrous mitten that can be worn on either hand or trained to one.
The women in Labrador and Newfoundland usually decrease at both sides of a mitten: two stitches to a side every round, almost to the tip. At this point, the Norwegian-tradition Newfoundlanders part company with the Anglo-Celtic Newfoundlanders and keep ploddingly decreasing until they reach a point with one or two stitches on each needle. The tip of the finished mitten is like a housetop, what Maine knitters with a sniff call a “pickèd” tip (as in picket fence). The other knitters either begin decreasing in the center front and back when pickèdness threatens, pull the last 14 to 16 stitches in on the end for a rounded tip, or graft the last 16 to 20 stitches front to back to make a squared-off tip.
Decreasing on both edges is commonly used in modern printed patterns—with or without the pickèd tip.
In Maine, knitters are also divided. An old tradition exists of decreasing by whole pattern elements, knitting two stitches together as many times as are needed to eat up a single repeat (six times for a 6-stitch repeat), sort of the reverse of adding a whole pattern repeat on the thumb. Another old tradition is to decrease the repeat itself, by knitting stitches together within each element of the pattern.
These two modes of decreasing are associated with increasing by whole pattern elements. They both give a rounded mitten tip that maintains the integrity of the pattern all the way around. They’re very organic endings for a mitten.
A third old method, used both on single- and double-knit mittens, is to decrease by knitting two stitches together at both ends of all three needles either every round or every second round. You thus decrease six stitches in every decrease round. This too makes a nicely rounded tip and was once the nearly universal method of ending both mittens and socks throughout northern Europe and New England.
There are two decreases used in this book, SSK2tog and K2tog, which lean in opposite directions. Both are used on almost all the patterns and sometimes both are used in tandem to complement a 2-color pattern. Using only one or the other, repeated on the same stitch in succeeding rounds, as in Maine Fisherman’s Mittens, creates a subtle spiral of decreases that shows you really know what you’re doing and are in control of your craft.
This is the most obvious decrease in knitting—simply knitting two stitches as if they were one. This decrease slants to the right.
On the entering side of a pair of decreases, K2tog makes a one-stitch-wide decrease band. On Norwegian mittens, this stitch is often followed by two or more additional stitches and given its own pattern, forming a decorative decrease band. You will find such a decrease band on Spruce mittens in this book.
Used on the leaving side of a pair of decreases, K2tog brings the pattern all the way to the “crack” between decreases, so that, matched with SSK2tog, the patterns from both sides meet, often with great visual effect. Striped mittens have this decrease layout.
In the most basic K2tog, the right needle is inserted as usual but through two stitches, starting with the second stitch on the left needle. These are knitted off as if they were a single stitch.
The K2tog called for in this book has a prep step: Slip the first stitch on the left needle purlwise (as if you were going to purl it) onto the right needle, then insert the left needle into the stitch back to front and replace it on the left needle. You have turned the stitch counter-clockwise. Insert right needle into the second stitch and the twisted first stitch on the left needle and knit them as one stitch. This K2tog, which has no distinctive name, lies flatter and is less visible than the ordinary one above. Not necessarily a traditional decrease (although it may be), it came from Elizabeth Zimmermann’s repertoire.
This decrease was invented, or found, by famous knitter Barbara Walker, whose several collections of knitting stitches and patterns have become classics. It leans to the left and lies flatter and is less visible than the old Slip One, Knit One, Pass the Slipped Stitch Over (S1, K1, PSSO), which it has generally superseded.
SSK2tog involves a little fancy footwork on your needles and basically means that you turn two stitches around, one at a time, replace them on the left needle, and knit them through the back loop (right needle inserted from right to left) as if they were a single stitch.
On the entering side of a pair of decreases, it brings the pattern all the way to the “crack” between decreases, so that, matched with K2tog, the patterns from both sides meet neatly. In this book, Striped mittens have this decrease layout.
Used on the leaving side of a pair of decreases, it makes a one-stitch-wide decrease band. On Norwegian mittens, this is often emphasized with two or more preceding stitches with a separate pattern, forming a decorative decrease band. You will find such a decrease band on Spruce mittens in this book.
To work SSK2tog, slip the first stitch on the left needle knitwise (as if you were going to knit) onto the right needle, slip the next stitch purlwise, then start to replace both stitches on the left needle. As you do so, your right needle will be inserted through the two stitches from right to left. Knit the two stitches together from this position.
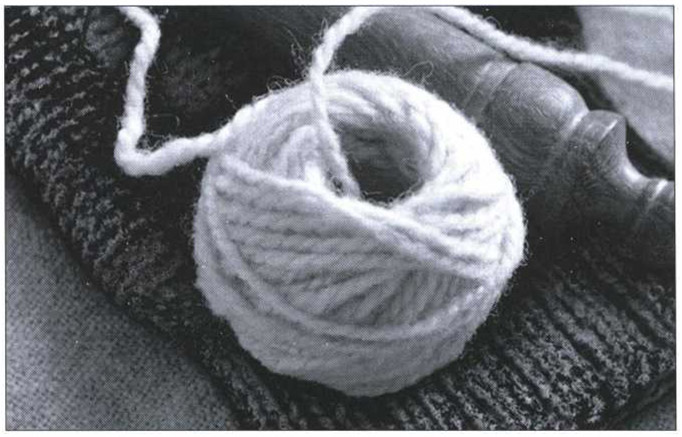
This is not strictly a knitting thing, but think how convenient it would be not to have to chase that ball of yarn around the room and not to have it tangling with other yarns and needles as it turns around in your knitting bag, seeking escape. A center-pull ball, where the working end comes from inside the ball, just sits there and hands you yarn as you need it. Only at the very end does it start to collapse and cause problems—and then you can wind a new little ball that will be just as handy as the first.
You can wind these on mechanical or electric yarn winders, but less expensively, you can wind them yourself by hand. What you need is a nøstepinde (pronounced “nusta pinna”; can you tell that this idea comes from a foreign country?), which has been called in English a “winding stick” or a “yarn dibble” (because it looks like a gardening dibble, which you stick into the ground to make holes for seedlings).
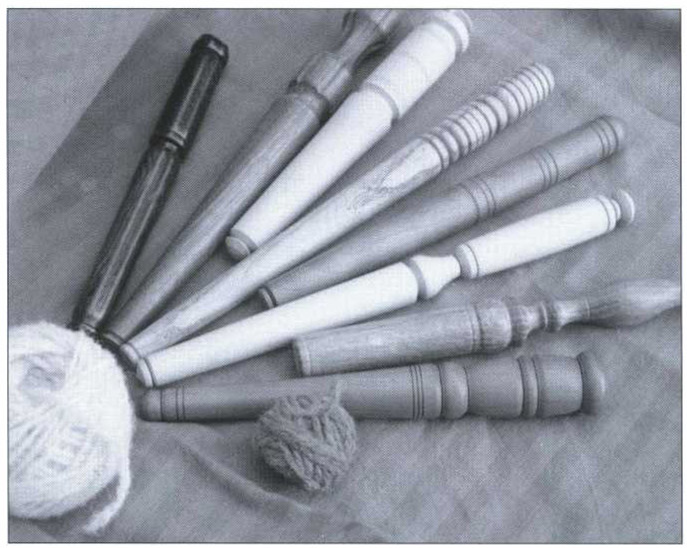
Nøstepinder, yarn winding sticks. This collection is from all over the United States and Scandinavia.
A nøstepinde can be any smooth 8- to 12-inch stick, from a sanded and waxed ⅝” dowel or the end of a broomstick to a handsomely turned piece of mesquite or rosewood with an elaborate handle and a tapered end that will slip the finished ball of yarn off slick as a whistle.
Nøstepinder have been used for generations in Scandinavia for winding balls of yarn from skeins, and young men may still carve or turn them for their sweethearts. They traveled to this country in the 1980s with a knitting technique called twined knitting (or tvåändssticking), which necessitates a ball with both the center and the outside yarn ends accessible. They were taken up by American woodworking men who needed something creative to do while their wives and girlfriends were off knitting. You can find nøstepinder in yarn stores today, you can make one yourself, or you can bundle together some markers or knitting needles in your hand and use them as a nøstepinde. What works, works.
Mount your skein of yarn on a swift or someone else’s hands, or lay it across your knees, carefully untwisted so that the end you have in hand is on top all the way around.
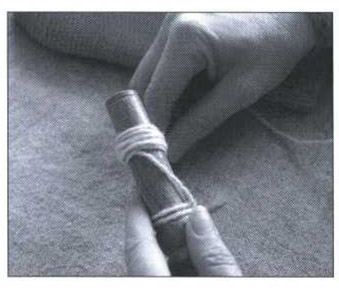
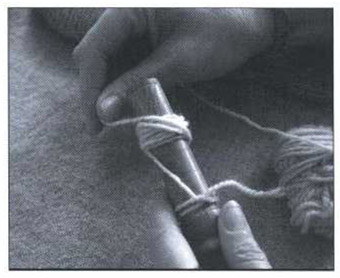
1) Tie the yarn end about halfway down the nøstepinde, using a knot you can get undone. I use two thumb cast-ons, also called a clove hitch.
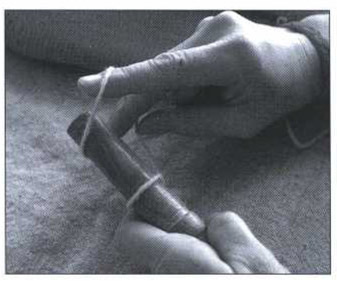
2) Take your yarn dibble, nøstepinde, in your left hand. Start winding around the undecorated end about an inch from the end, and wind straight across the stick until you have a pad of wound yarn 1 to 1½ inches wide and ¼ inch deep.
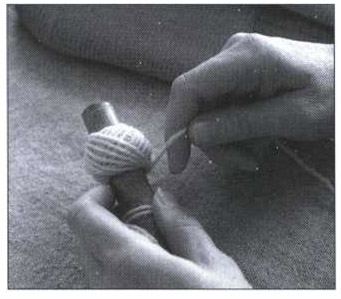
3) Now, wind diagonally, twisting the stick away from you a little all the time, to lay each turn of yarn parallel and close to the one before it. As the ball gets larger, place your left index finger toward the shoulder of the ball to guide the yarn there, so that the ball grows outward, not longer. It should look like a ball of string from the hardware store, not like an egg.
4) When all the yarn is wound, wind the last ten feet or so around the fat waist of the ball and tuck in the end. Remove the ball from the stick, untie the knot, and give the ball a little squeeze from the sides. The hole will collapse slightly, giving the center end a little tension and relaxing all the turns within to keep the yarn soft and manageable.
Place the ball in your bag or on the table, center-pull end up, and knit using the center end. The outside end will not be used until last, unless—as often happens—you need a short length for some other purpose. Then you can take off a piece without having to break the working end.