Chapter 4: Starter Projects
In order to increase your comfort level with the techniques presented in Chapter 2, it is a good idea to complete some simple projects before moving on to more complicated ones. This assemblage of three designs is just right for beginning circular knitters. Each is quick, easy, and useful, from a simple ear warmer and handy kitchen potholders to fingerless mitts.


Before Your Begin
Assemble Your Materials
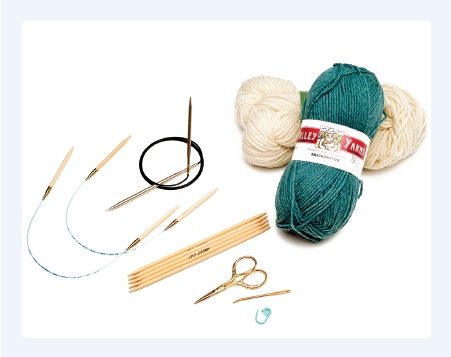
The projects in this chapter require only a few simple materials. First, you will need about 240 yards of worsted-weight yarn. You should also have on hand a variety of knitting needles so that you can practice each of the techniques in Chapter 2. Gather together the following needles, all in size US 8 (5mm):
• One set of 4 or 5 double-pointed needles
• Two 16-inch circular needles
• One 40-inch circular needle
You will also want to have a closed- or locking-ring stitch marker, a pair of scissors, and a seaming needle. Once you have your materials at hand, it’s time to begin your starter projects!
Determine Your Gauge
Knit a swatch in stockinette using your chosen yarn and the recommended needle size (see the “Gauge and Swatching” section in Chapter 5). Next, measure your gauge in stitches per inch and compare this with the gauge specified for the project. The three projects featured in this chapter specify a gauge of 4 stitches per inch in stockinette. If you are getting more than 4 stitches per inch, make another swatch with a needle one size bigger. If you are getting fewer than 4 stitches per inch, make another swatch using a needle one size smaller. Once you achieve the specified gauge, proceed to the instructions for making your project.

Simple Ear Warmer
Simple, useful, and attractive, this headband is a great accessory for cold or cool weather. This project knits up quickly and easily. Make one for yourself; make a few for gifts. Match them with the fingerless mitts later in this chapter and keep your head and hands toasty all season long. In order to complete both projects in the same yarn, you will need about 125 yards of worsted-weight yarn.

Specifications
Size
Finished dimensions: 151⁄2 inches in circumference (unstretched) × 3 inches tall, to fit heads ranging from 20 to 23 inches around
Materials
45 yards of worsted-weight yarn: Peace Fleece Worsted (70% wool/30% mohair, 200 yd./4 oz. skein), 1 skein in color Glasnost Gold, CYCA #4 (medium)
Needles
You can use any of the following needles in size US 8 (5mm), or size to obtain gauge:
One 16-inch circular needle
One set of 4 or 5 double-pointed needles
One 32- to 40-inch circular needle
Two 16-inch circular needles
Notions
Stitch markers
Seaming needle
Gauge
4 stitches per inch in stockinette, worked in the round
Plan the Ear Warmer
Choose a Circular Knitting Technique
You can work this project with any of the four circular knitting techniques covered in Chapter 2. It is so quick and easy that you may want to make four different ear warmers, each using a different technique.
Choose Your Yarn
Use any worsted-weight yarn that is soft and comfortable next to your skin. When selecting a yarn, you may find it useful to hold the skein against your cheek or neck and check for any irritation; these areas are more sensitive than your hands. If you want this ear warmer to be extra warm, be sure to select a yarn with a high percentage of wool or alpaca. Cotton yarns can be very soft, but they are not as warm.
Make the Ear Warmer
1 Cast on 72 stitches and arrange your work on the needles according to the directions for your chosen knitting method (see Chapter 2). Join your work to knit in the round, being careful not to twist your cast on around the needles. Place a stitch marker to indicate the end of the round.
2 *Knit 3, purl 1. Repeat from * to the end of the round.
3 Repeat Step 2 until your work measures about 3 inches from the cast-on edge, approximately 18 rounds.
4 Bind off loosely in pattern (see the “Binding Off in the Round” section in Chapter 2). Weave in yarn ends.
5 Wash and block, if desired.

Suggested Modifications
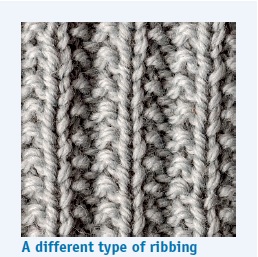
Once your project is complete, you may wish to embellish the surface with embroidery in contrasting colors of yarn. You can knit this pattern in various types of ribbing, or you might want to experiment with stitch patterns such as cables or knit-and-purl combinations (see Chapter 10 for some options).

Double-Thick Potholder
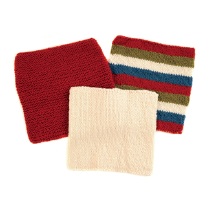
Who doesn’t need a good potholder? Mine take a fair amount of abuse on a daily basis, dividing their time between protecting my hands and shielding my counter from hot pans. These handy kitchen accessories knit up fast. Make a whole pile of them to match your kitchen décor. With a little embellishment, they make excellent gifts. Using one skein each of the colors featured here, you can make all of the potholders pictured and still have yarn left over.

Specifications
Size
Finished dimensions: 9 inches × 9 inches
Materials
115 yards of worsted-weight yarn: Lion Brand LB Collection Organic Wool (100% wool, 185 yd./ 31⁄2 oz. skein)
Potholder A (worked in stockinette stitch): 1 skein in color Natural
Potholder B (worked in garter stitch): 1 skein in color Redwood
Potholder C (worked in stockinette stitch stripes): 1 skein each in colors Redwood, Avocado, Natural, and Dark Teal
Needles
You can use any of the following needles in size US 8 (5mm), or size to obtain gauge:
One 16-inch circular needle
One set of 4 or 5 double-pointed needles
One 32- to 40-inch circular needle
Two 16-inch circular needles
Notions
Stitch markers
Seaming needle
Gauge
4 stitches per inch in stockinette, worked in the round
Plan the Potholder
Choose a Circular Knitting Technique
You can work any of the potholders in this section with any of the four circular knitting techniques covered in Chapter 2. This project is so quick and easy that you may want to make four different potholders, each using a different technique.
Choose Your Yarn
It is very important with this project to use yarns that are 100-percent wool or cotton. Only these two fibers can be relied upon to protect you from the heat. An acrylic or acrylic-blend yarn will melt when exposed to high temperatures. Superwash wools are also not recommended for this project because the treatment the fiber undergoes to make it machine washable changes its characteristics significantly.
A good yarn choice for this project would be one that is rugged and durable; for these potholders, durability is more important than softness or comfort. Consider using a medium to dark color to help hide stains and spills because these potholders will see a great deal of use. Should your potholder find its way into the washing machine, do not fear! If you have made it out of 100-percent wool, it may return smaller and thicker, but the fulling that will have occurred (see the felted tote pattern in Chapter 7 for more information on fulling) will actually make it better at protecting you or your tabletop from the heat.
Make the Potholders
Potholder A: Stockinette Stitch
Follow the instructions here to create a stockinette-stitch potholder (Potholder A).
1 Leaving an extra-long 24-inch tail, cast on 72 stitches with Natural and arrange your work on the needles according to the directions for your chosen knitting method (see Chapter 2). Join your work to knit in the round, being careful not to twist your cast on around the needles. Place a stitch marker to indicate the end of the round.

2 Knit 1 round.
3 Repeat Step 2 until your work measures about 9 inches from the cast-on edge.
4 Bind off loosely (see the “Bind Off in the Round” section in Chapter 2) and cut the yarn, leaving an extra-long 24-inch tail.
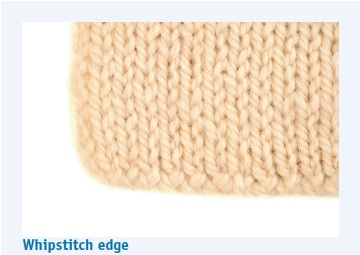
5 Using the extra-long yarn tails that you created during the cast on and bind off, seam each end of the potholder using a whipstitch (see Appendix).
6 Weave in the yarn ends.
Potholder B: Garter Stitch
The potholder shown here was worked completely in garter stitch to increase its thickness. To make it, do the following:
1 Cast on with Redwood according to the directions above.
2 Knit 1 round, then purl 1 round.
3 Repeat Step 2 until your work measures 9 inches from the cast-on edge.
4 Bind off and finish as directed above.
NOTE: The extra thickness of this potholder will require more yarn to complete.

Potholder C: Striped
Potholders are an excellent way to use up yarn scraps from other projects and experiment with changing colors. However, be sure that all of the yarn you use meets the criteria outlined in “Choose Your Yarn” on the previous page.
To make the striped potholder shown here, do the following:
1 Cast on with Redwood according to the directions for Potholder A and knit for 6 rounds.
2 Change to Avocado and knit for 6 rounds.
3 Change to Natural and knit for 6 rounds.
4 Change to Dark Teal and knit for 6 rounds.
5 Change back to Redwood and knit for 6 rounds.
6 Repeat steps 2–5 once.
7 Bind off and finish as directed for Potholder A above.

Suggested Modifications
A potholder would be a great project to experiment with stranded colorwork patterns (see Chapter 10 for some stitch pattern suggestions). You can also add a creative touch by crocheting a single crochet edging as shown here, or whipstitching around the entire outside edge of the potholder with a contrasting color.

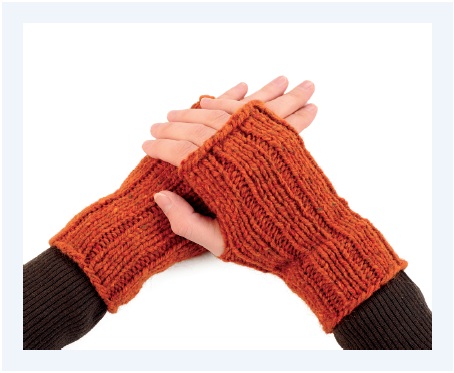
Fingerless Mitts
Another great way to practice working with the techniques outlined in Chapter 2 is to make a pair of fingerless mitts. Knit in a comfortable gauge of 4 stitches per inch, these will work up in no time at all. Make a pair to match the simple ear warmer presented earlier in this chapter, and you’re fashionably set for cool-weather outings. If you would like to make both projects in the same yarn, you will need about 125 yards of worsted-weight yarn.
Specifications
Size
Finished dimensions: 6 inches in circumference (unstretched) × 71⁄4 inches long, to fit most adult hands
Materials
80 yards of worsted-weight yarn: Peace Fleece Worsted (70% wool/30% mohair, 200 yd./4 oz. skein), 1 skein in color Glasnost Gold
Needles
You can use any of the following needles in size US 8 (5mm), or size to obtain gauge:
One set of 4 or 5 double-pointed needles
One 32- to 40-inch circular needle
Two 16-inch circular needles
Notions
Stitch markers
Seaming needle
Gauge
4 stitches per inch in stockinette, worked in the round
Plan Your Mitts
Choose a Circular Knitting Technique
You can work these mitts on double-pointed needles, with the magic loop method, or with two circulars. Because of their small circumference, they are not suitable for the traditional method of knitting with one circular. See Chapter 2 for more details on the various methods of knitting in the round.
Choose Your Yarn
A worsted-weight yarn that is both warm and soft would be a good choice for this project. Choose a fiber that has good elasticity because you want your mitts to stay on your hands comfortably and not stretch out and sag. See Chapter 5 for more information about choosing yarn.
Make the Mitts
1 Cast on 28 stitches and arrange your work on the needles according to the directions for your chosen knitting method (see Chapter 2). Join your work to knit in the round, being careful not to twist your cast on around the needles. Place a stitch marker to indicate the end of the round.
2 *Knit 3, purl 1. Repeat from * to the end of the round.
3 Repeat Step 2 until your work measures about 5 inches from the cast-on edge.
4 At the beginning of the next round, create a hole for your thumb (shown at right) as follows:
Bind off the next 4 stitches, then work in knit 3, purl 1 rib to the end of the round.

5 Using the backward-loop cast-on (see Appendix), create 4 new stitches at the beginning of the round. Then work in knit 3, purl 1 rib to the end of the round.

6 On the next round, work all stitches in the knit 3, purl 1 rib pattern. Work the first 4 stitches fairly tightly to prevent a gap from forming on either side of the new thumb hole.
7 Continue working in pattern as established until your work measures 21⁄4 inches from the edge of the thumb hole.
8 Bind off loosely in pattern (see the “Bind Off in the Round” section in Chapter 2). Weave in yarn ends.
9 Repeat steps 1–8 to make a second mitt to match.
10 Wash and block the mitts, if desired.
Suggested Modifications
Once your project is complete, you may wish to embellish the surface with embroidery in contrasting colors of yarn. You can knit this pattern in various types of ribbing, or you might want to experiment with stitch patterns such as cables or knit-and-purl combinations (see Chapter 10 for some options).